Page 3237 of 3787
![NISSAN LATIO 2011 Service Repair Manual MT-16
< SERVICE INFORMATION >[RS5F91R]
AIR BREATHER HOSE
AIR BREATHER HOSE
Exploded ViewINFOID:0000000005929670
Removal and InstallationINFOID:0000000005929671
REMOVAL
1. Remove the battery. Refer to NISSAN LATIO 2011 Service Repair Manual MT-16
< SERVICE INFORMATION >[RS5F91R]
AIR BREATHER HOSE
AIR BREATHER HOSE
Exploded ViewINFOID:0000000005929670
Removal and InstallationINFOID:0000000005929671
REMOVAL
1. Remove the battery. Refer to](/manual-img/5/57357/w960_57357-3236.png)
MT-16
< SERVICE INFORMATION >[RS5F91R]
AIR BREATHER HOSE
AIR BREATHER HOSE
Exploded ViewINFOID:0000000005929670
Removal and InstallationINFOID:0000000005929671
REMOVAL
1. Remove the battery. Refer to
SC-7, "Removal and Installation".
2. Remove the air duct and air cleaner case. Refer to EM-16, "
Removal and Installation".
3. Remove air breather hose. CAUTION:
When air breather hose is removed, be sure to hold two way connector securely.
INSTALLATION
Installation is in the reverse order of removal.
CAUTION:
Make sure air breather hose is not collapsed or bl ocked due to folding or bending when installed.
• When installing air breather hose on two way connector, aim paint mark toward the vehicle rear.
• When installing air breather hose on two way connector, push it until it hits the transaxle case.
• When installing air breather hose to air duct and air cleaner case, make sure that clips are fully inserted.
1. Air cleaner case2. Air breather hose 3. Air duct
4. Clip 5. Transaxle assembly 6. Two way connector
PCIB1511E
Revision: May 2010 2011 Versa
Page 3281 of 3787
![NISSAN LATIO 2011 Service Repair Manual MT-60
< SERVICE INFORMATION >[RS6F94R]
AIR BREATHER HOSE
AIR BREATHER HOSE
Removal and InstallationINFOID:0000000005929695
COMPONENTS
REMOVAL
1. Remove battery. Refer to SC-7, "Removal and Installatio NISSAN LATIO 2011 Service Repair Manual MT-60
< SERVICE INFORMATION >[RS6F94R]
AIR BREATHER HOSE
AIR BREATHER HOSE
Removal and InstallationINFOID:0000000005929695
COMPONENTS
REMOVAL
1. Remove battery. Refer to SC-7, "Removal and Installatio](/manual-img/5/57357/w960_57357-3280.png)
MT-60
< SERVICE INFORMATION >[RS6F94R]
AIR BREATHER HOSE
AIR BREATHER HOSE
Removal and InstallationINFOID:0000000005929695
COMPONENTS
REMOVAL
1. Remove battery. Refer to SC-7, "Removal and Installation".
2. Remove air duct (front), air duct (inlet) and air cleaner case. Refer to EM-135, "
Removal and Installation".
3. Remove air breather hose. CAUTION:
When air breather hose is removed, be sure to hold two way connector securely.
INSTALLATION
Installation is in the reverse order of removal.
• When installing air breather hose on two way connector, aim paint mark face toward the vehicle front.
• When installing air breather hose on two way connector, push it until it hits transaxle case.
• When installing air breather hose to air duct and air cleaner case, make sure that clips are fully inserted.
CAUTION:
Make sure air breather hose is not collapsed or blocked due to folding or bending when installed.
1. Air cleaner case 2. Air breather hose 3. Air duct (inlet)
4. Clip 5. Transaxle assembly 6. Two way connector
SCIA7629E
Revision: May 2010 2011 Versa
Page 3379 of 3787
BLOWER MOTORMTC-63
< SERVICE INFORMATION >
C
DE
F
G H
I
K L
M A
B
MTC
N
O P
BLOWER MOTOR
Removal and InstallationINFOID:0000000005930862
REMOVAL
1. Remove instrument panel and pad. Refer to IP-11, "Component Parts".
2. Remove side ventilator duct (right). Refer to MTC-69, "
Removal and Installation".
3. Disconnect blower motor connector (1).
4. Push the flange holding hook (A) toward the blower motor (2), then rotate the blower motor (2) clockwise and remove it from
the A/C unit assembly.
CAUTION:
When blower fan and blower motor are assembled, the bal-
ance is adjusted, do not di sassemble to replace the individ-
ual parts.
INSTALLATION
Installation is in the reverse order of removal.
CAUTION:
Rotate the blower motor until th e blower motor flange holding ho ok locks securely into the A/C unit
assembly.
LJIA0199E
Revision: May 2010 2011 Versa
Page 3381 of 3787
AIR MIX DOORMTC-65
< SERVICE INFORMATION >
C
DE
F
G H
I
K L
M A
B
MTC
N
O P
AIR MIX DOOR
Air Mix Door Cable AdjustmentINFOID:0000000005930864
1. Remove steering member. Refer to MTC-59.
2. Remove outer cable of air mix door cable (1) from clamp (A).
3. Set temperature control dial to full cold position.
4. Push air mix door lever (2) in the direction shown by arrow, and then carefully pull outer cable toward controller side, and install
clamp (A).
5. Operate temperature control dial to insure that inner cable moves smoothly.
CAUTION:
When clamping the outer cab le, do not move the inner
cable.
SJIA1150E
Revision: May 2010 2011 Versa
Page 3406 of 3787

MTC-90
< SERVICE INFORMATION >
REFRIGERANT LINES
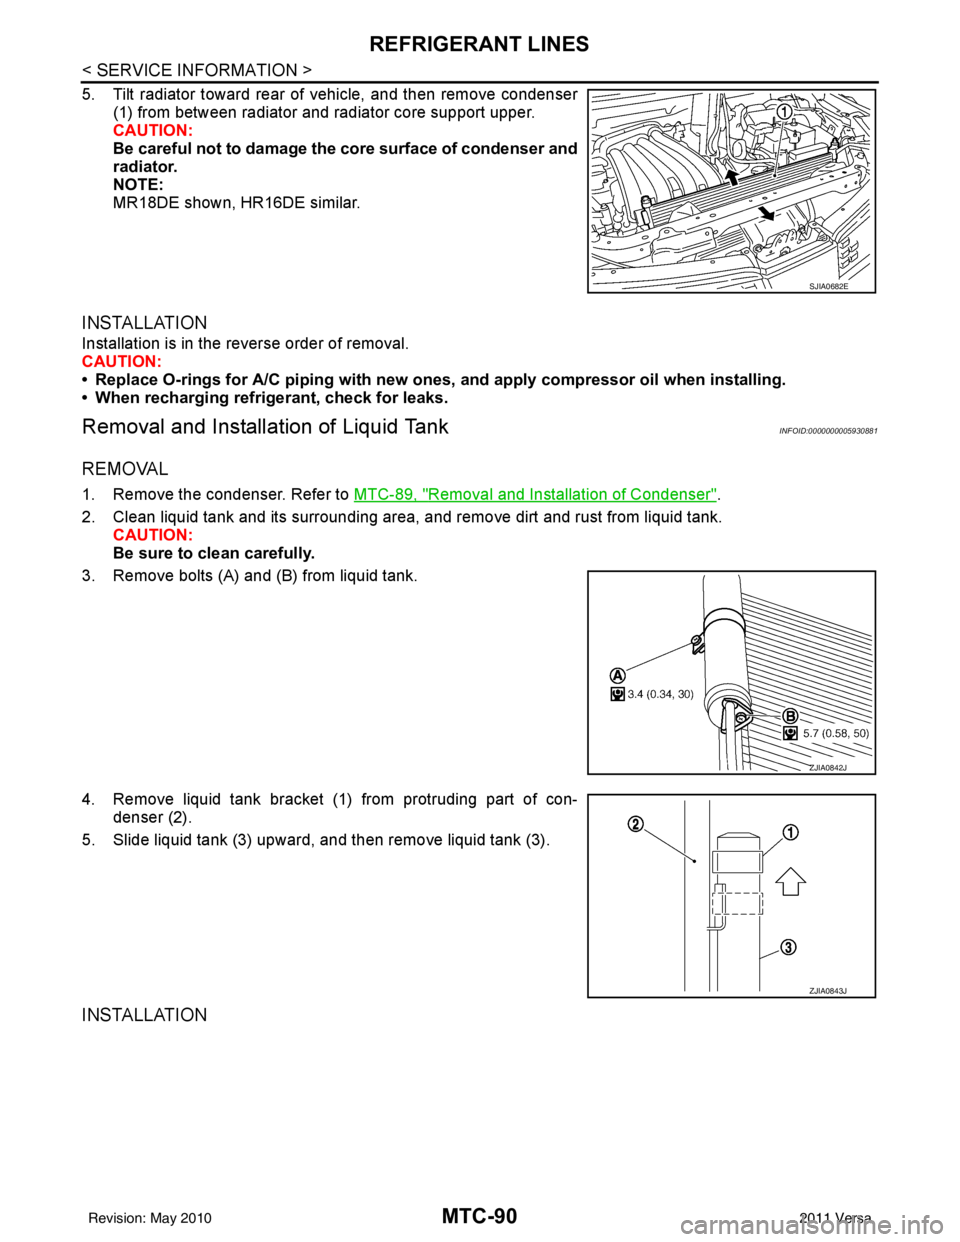
5. Tilt radiator toward rear of vehicle, and then remove condenser(1) from between radiator and radiator core support upper.
CAUTION:
Be careful not to damage the core surface of condenser and
radiator.
NOTE:
MR18DE shown, HR16DE similar.
INSTALLATION
Installation is in the reverse order of removal.
CAUTION:
• Replace O-rings for A/C piping with new ones, and apply compressor oil when installing.
• When recharging refrigerant, check for leaks.
Removal and Installation of Liquid TankINFOID:0000000005930881
REMOVAL
1. Remove the condenser. Refer to MTC-89, "Removal and Installation of Condenser".
2. Clean liquid tank and its surrounding area, and remove dirt and rust from liquid tank. CAUTION:
Be sure to clean carefully.
3. Remove bolts (A) and (B) from liquid tank.
4. Remove liquid tank bracket (1) from protruding part of con- denser (2).
5. Slide liquid tank (3) upward, and then remove liquid tank (3).
INSTALLATION
SJIA0682E
ZJIA0842J
ZJIA0843J
Revision: May 2010 2011 Versa
Page 3497 of 3787

PRECAUTIONSPS-3
< SERVICE INFORMATION >
C
DE
F
H I
J
K L
M A
B
PS
N
O P
5. When the repair work is completed, return the ignition switch to the ″LOCK ″ position before connecting
the battery cables. (At this time, the steering lock mechanism will engage).
6. Perform a self-diagnosis check of al l control units using CONSULT-III.
Precaution for Steering SystemINFOID:0000000005929629
• In case of removing steering gear assembly, make the final tightening with grounded and unloaded vehicle
condition, and then check wheel alignment.
• Observe the following precautions when disassembling.
- Before disassembly, thoroughly clean the outside of the unit.
- Disassembly should be done in a clean work area. It is im portant to prevent the internal parts from becoming
contaminated by dirt or other foreign matter.
- For easier and proper assembly, place disassembled parts in order on a parts rack.
- Use nylon cloth or paper towels to clean the parts; common shop rags can leave lint that might interfere with
their operation.
- Do not reuse non-reusable parts.
- Before assembling, apply the specif ied grease to the directed parts.
Revision: May 2010 2011 Versa
Page 3535 of 3787

RF-12
< FUNCTION DIAGNOSIS >
TROUBLE DIAGNOSIS
• to sunroof motor assembly terminal 1
• through sunroof switch terminal 3
• through sunroof switch terminal 2
• through grounds M57 and M61.
Then the sunroof will tilt up/slide closed.
TILT DOWN/SLIDE OPEN OPERATION
When down/open switch is pressed, ground is supplied
• to sunroof motor assembly terminal 5
• through sunroof switch terminal 1
• through sunroof switch terminal 2
• through grounds M57 and M61.
Then the sunroof will tilt down/slide open.
AUTO OPERATION
The power sunroof AUTO feature makes it possible to slide open and slide closed or tilt up and tilt down the
sunroof without holding the sunroof switch in the UP/CLOSE or DOWN/OPEN position.
RETAINED POWER OPERATION
When the ignition switch is turned to OFF position from ON position, power is supplied for 45 seconds
• through BCM terminal 68
• to sunroof motor assembly terminal 9.
When power is supplied, the sunroof can be operated.
The retained power operation is canceled when the front door LH or RH is opened.
RAP signal period can be changed by CONSULT-III. Refer to RF-17, "
Work Support" .
ANTI-PINCH FUNCTION
The CPU (central processing unit) of sunroof motor as sembly monitors the sunroof motor operation and the
sunroof position (fully-closed or other ) by the signals from sunroof motor.
When sunroof motor detects an interruption during the following slide close and tilt down operation, sunroof
switch controls the motor for open and the sunroof will oper ate until it reaches full up position (during tilt down
operation) or 125 mm (4.92 in) or more in an open direction (during slide close operation).
• close operation and tilt down when igniti on switch is in the ON position.
• close operation and tilt down during retained power operation.
INITIALIZATION FAILURE CONDITIONS
Initialization and teaching of system should be conducted if the following conditions exist:
• sunroof will only move in the UP/CLOSE direction, having a step by step motion
• sunroof does not have any auto operation.
INITIALIZATION PROCEDURE
If the sunroof does not open or close automatically, use the following procedure to return sunroof operation to
normal.
NOTE:
If the sunroof switch is released at any time during step 3, the procedure must be started over again. Leave
the ignition switch ON for at least 2 seconds after this procedure.
1. Push the ignition switch to the ON position.
2. Hold the sunroof switch in the tilt up position. Release the switch when the s unroof has reached the full tilt
up position.
3. Within 5 seconds of releasing the switch in step 2, hold the sunroof switch in the tilt up position again. The sunroof will move from the open position and back to t he close position. Release the switch only when
the sunroof has reached the full closed position.
RE-TEACHING CONDITIONS
Re-teaching of system should be conducted if any of the following conditions exist:
• the sunroof is manually operated using the sunroof wrench with the battery discharged or disconnected.
• the sunroof is manually operated using the sunroof wrench with the key switch in the OFF position and
retained power timed out (after approximat ely 45 seconds or with a front door open).
• the sunroof motor assembly is replaced with a new one.
• the sunroof motor is removed from the sunroof assembly and operated before it is reinstalled.
• the sunroof motor is removed from the sunroof assembly and the glass panel position is changed.
RE-TEACHING PROCEDURE
1. Using the UP/CLOSE switch, move the sunroof toward the tilt position until it stops.
Revision: May 2010 2011 Versa
Page 3624 of 3787
REAR SEATSE-19
< SERVICE INFORMATION >
C
DE
F
G H
J
K L
M A
B
SE
N
O P
2. Push the armrest toward left side while pulling backward to remove.
3. Remove the rear seat bushing, and then remove the armrest hinge cover by pulling it backward.
Assembly of Armrest
Assembly is in the reverse order of disassembly.
Disassembly of Seatback Trim and Pad
1. Remove the headrest.
2. Remove the retainer under the back of seatback.
3. Remove the clips, and then remove the striker cover.
PIIB2915J
PIIB6507E
PIIB2486J
PIIB2485J
Revision: May 2010 2011 Versa