Page 97 of 377

2 Instruments and controls
Instrument panel...................................2-2
Meters and gauges ................................2-3
Speedometer and odometer .....................2-4
Tachometer ....................................2-6
Engine coolant temperature gauge ...............2-6
Fuel gauge ....................................2-7
Engine oil pressure gauge (if so equipped) ........2-8
Voltmeter (if so equipped) .......................2-8
Trip computer (if so equipped) ...................2-9
Compass and outside temperature display
(if so equipped) .................................. 2-10
Outside temperature display ....................2-10
Compass display .............................. 2-11
Warning/indicator lights and audible reminders ......2-14
Checking bulbs ............................... 2-15
Warning lights ................................ 2-15
Indicator lights ................................ 2-20
Audible reminders ............................. 2-23
Security systems (if so equipped) ..................2-24
Vehicle security system (if so equipped) ..........2-24
NISSAN vehicle immobilizer system
(if so equipped) ............................... 2-25
Windshield wiper and washer switch ...............2-26Switch operation
.............................. 2-26
Rear window and outside mirror defroster switch
(if so equipped) .................................. 2-27
Headlight and turn signal switch ....................2-28
Headlight control switch ........................ 2-28
Daytime running light system (Canada only) ......2-30
Instrument brightness control ...................2-31
Turn signal switch ............................. 2-31
Fog light switch (if so equipped) ................2-31
Hazard warning flasher switch .....................2-32
Horn ............................................ 2-32
Cargo lamp switch ............................... 2-33
Heated seat (if so equipped) .......................2-33
Vehicle Dynamic Control (VDC) off switch
(if so equipped) .................................. 2-34
Hill descent control switch (if so equipped) ..........2-34
Electronic locking rear differential (E-Lock) system
switch (if so equipped) ............................ 2-35
Clutch
interlock (clutch start) switch
(if so equipped) .................................. 2-36
Power outlet ..................................... 2-37
Storage ......................................... 2-38
Storage trays ................................. 2-38
Under-seat storage bins ........................ 2-39
Page 99 of 377
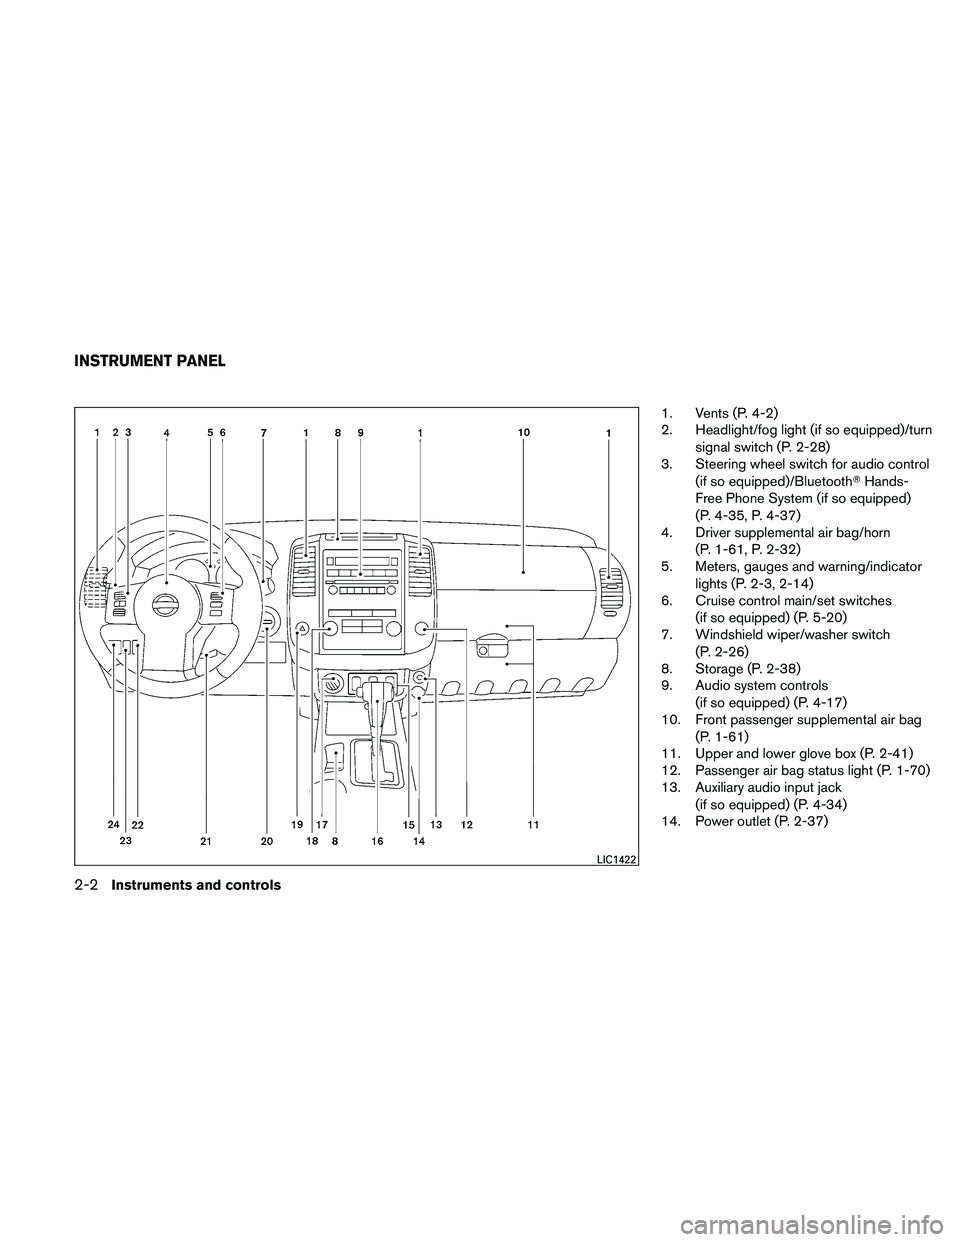
1. Vents (P. 4-2)
2. Headlight/fog light (if so equipped)/turnsignal switch (P. 2-28)
3. Steering wheel switch for audio control
(if so equipped)/Bluetooth� Hands-
Free Phone System (if so equipped)
(P. 4-35, P. 4-37)
4. Driver supplemental air bag/horn
(P. 1-61, P. 2-32)
5. Meters, gauges and warning/indicator
lights (P. 2-3, 2-14)
6. Cruise control main/set switches
(if so equipped) (P. 5-20)
7. Windshield wiper/washer switch
(P. 2-26)
8. Storage (P. 2-38)
9. Audio system controls
(if so equipped) (P. 4-17)
10. Front passenger supplemental air bag
(P. 1-61)
11. Upper and lower glove box (P. 2-41)
12. Passenger air bag status light (P. 1-70)
13. Auxiliary audio input jack
(if so equipped) (P. 4-34)
14. Power outlet (P. 2-37)
LIC1422
INSTRUMENT PANEL
2-2Instruments and controls
Page 125 of 377
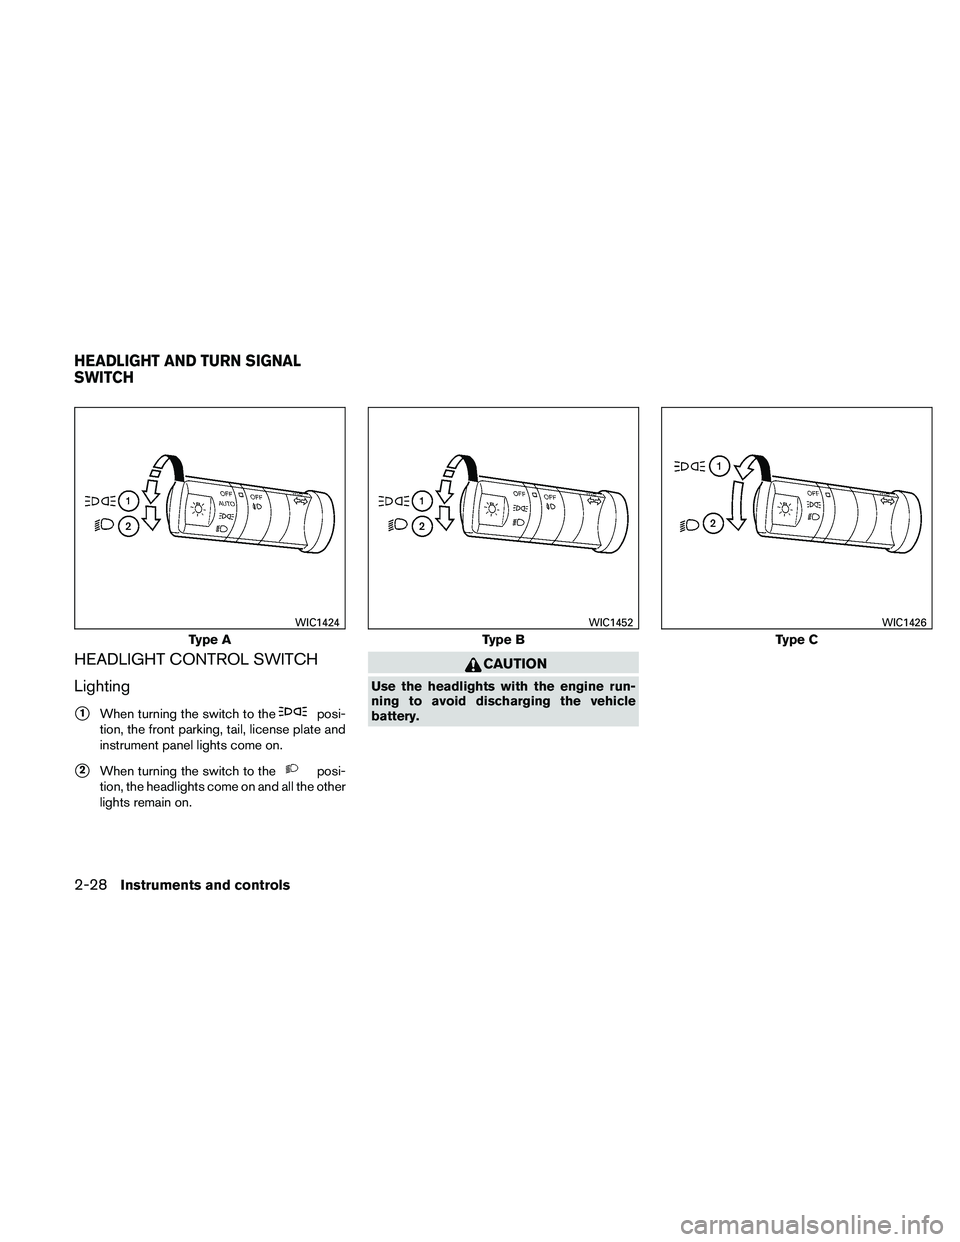
HEADLIGHT CONTROL SWITCH
Lighting
�1When turning the switch to theposi-
tion, the front parking, tail, license plate and
instrument panel lights come on.
�2When turning the switch to theposi-
tion, the headlights come on and all the other
lights remain on.
CAUTION
Use the headlights with the engine run-
ning to avoid discharging the vehicle
battery.
Type A
WIC1424
Type B
WIC1452
Type C
WIC1426
HEADLIGHT AND TURN SIGNAL
SWITCH
2-28Instruments and controls
Page 126 of 377

The autolight system allows the headlights to be
set so they turn on and off automatically. The
autolight system can:● Turn on the headlights, front parking, tail,")
Autolight system (if so equipped)
The autolight system allows the headlights to be
set so they turn on and off automatically. The
autolight system can:● Turn on the headlights, front parking, tail,
license plate and instrument panel lights au-
tomatically when it is dark.
● Turn off all the lights when it is light.
● Keep all the lights on for 45 seconds after
you turn the key to OFF and all doors are
closed. To turn on the autolight system:
1. Turn the headlight switch to the AUTO posi- tion
�1.
2. Turn the ignition switch to ON.
3. The autolight system automatically turns the headlights on and off.
Initially, if the ignition switch is turned OFF and a
door is opened and left open, the headlights
remain ON for 5 minutes. If another door is
opened during the 5 minutes, then the 5 minute
timer is reset.
To turn the autolight system off, turn the switch to
the OFF,
,orposition. Be sure you do not put anything on top of
the autolight sensor
�1located in the top
side of the instrument panel. The autolight
sensor controls the autolight; if it is cov-
ered, the autolight sensor reacts as if it is
dark out and the headlights will illuminate.
If this occurs while parked with the engine
off and the switch in the ON position, your
vehicle’s battery could become discharged.
WIC1453LIC0835
Instruments and controls2-29
Page 128 of 377
 ,
orposition.
Turn the control
�Ato adjust the brightness of")
INSTRUMENT BRIGHTNESS
CONTROL
The instrument brightness control operates when
the headlight control switch is in the AUTO (if so
equipped) ,
orposition.
Turn the control
�Ato adjust the brightness of the
instrument panel lights when driving at night.
TURN SIGNAL SWITCH
Turn signal
�1Move the lever up or down to signal the
turning direction. When the turn is com-
pleted, the turn signals cancel automatically.
Lane change signal
�2To signal a lane change, move the lever up or
down to the point where the indicator light
begins to flash, but the lever does not latch.
FOG LIGHT SWITCH (if so equipped)
To turn the fog lights on, turn the headlight switch
to the
position, then turn the fog light
switch to the
position.
To turn the fog lights on with the headlight switch
in the AUTO position (if so equipped) , the head-
lights must be on, then turn the fog light switch to
the
position.
To turn the fog lights off, turn the fog light switch
to the OFF position.
The headlights must be on and the low beams
selected for the fog lights to operate. The fog
lights automatically turn off when the high beam
headlights are selected.
WIC0917WIC1428LIC0393
Instruments and controls2-31
Page 134 of 377

The power outlets are for powering electrical
accessories such as cellular telephones.
The bottom power outlet located on instrument
panel is powered directly by the vehicle’s battery.
The power outlet located inside the center con-
sole is powered only when the ignition switch is in
the ACC or ON position.
Open the cap to use a power outlet.CAUTION
●The outlet and plug may be hot during
or immediately after use.
● Only certain power outlets are designed
for use with a cigarette lighter unit. Do
not use any other power outlet for an
accessory lighter. See your NISSAN
dealer for additional information.
● Do not use with accessories that ex-
ceed a 12 volt, 120W (10A) power draw.
Do not use double adapters or more
than one electrical accessory. ●
Use power outlets with the engine run-
ning to avoid discharging the vehicle
battery.
● Avoid using power outlets when the air
conditioner, headlights or rear window
defroster is on.
● Before inserting or disconnecting a
plug, be sure the electrical accessory
being used is turned OFF.
● Push the plug in as far as it will go. If
good contact is not made, the plug may
overheat or the internal temperature
fuse may open.
● When not in use, be sure to close the
cap. Do not allow water or any other
liquids to contact the outlet.
Front row
LIC1430
Center console
LIC0761
POWER OUTLET
Instruments and controls2-37
Page 144 of 377

WARNING
●Make sure that all passengers have
their hands, etc. inside the vehicle while
it is in motion and before closing the
windows. Use the window lock switch
to pr")
POWER WINDOWS (if so equipped)
WARNING
●Make sure that all passengers have
their hands, etc. inside the vehicle while
it is in motion and before closing the
windows. Use the window lock switch
to prevent unexpected use of the power
windows.
● Do not leave children unattended inside
the vehicle. They could unknowingly ac-
tivate switches or controls and become
trapped in a window. Unattended chil-
dren could become involved in serious
accidents.
The power windows operate when the ignition
switch is placed in the ON position, or for about
45 seconds after the ignition switch is placed in
the OFF position. If the driver’s or passenger’s
door is opened during this period of about 45
seconds, power to the windows is canceled.
1. Window lock button
2. Power door lock switch
3. Front passenger side window switch
4. Right rear passenger window switch (Crew Cab models only)
5. Left rear passenger window switch
(Crew Cab models only)
6. Driver’s side automatic switch
Driver’s side power window switch
The driver’s side control panel is equipped with
switches to open or close the front and rear
passenger windows.
To open a window, push the switch and hold it
down. To close a window, pull the switch and
hold it up. To stop the opening or closing function
at any time, simply release the switch.
LIC1329
WINDOWS
Instruments and controls2-47
Page 163 of 377

The hazard warning lights will flash once and the
horn will sound once to confirm that the horn
beep feature has been reactivated.
Deactivating the horn beep feature does not si-
lence the horn if the alarm is triggered.
�1Pull the hood lock release handle located
below the driver’s side instrument panel. The
hood will spring up slightly.
�2Push the lever at the front of the hood to the
side as illustrated with your fingertips and
raise the hood.
�3Insert the support rod into the slot on the
underside of the hood.
When closing the hood, return the hood rod to its
original position. Lower the hood approximately
12 inch (30 cm) above the latch and release it.
This allows proper engagement of the hood latch.
WARNING
● Make sure the hood is completely
closed and latched before driving. Fail-
ure to do so could cause the hood to fly
open and result in an accident.
● If you see steam or smoke coming from
the engine compartment, to avoid injury
do not open the hood.
LPD0302
HOOD
3-10Pre-driving checks and adjustments