2011 NISSAN CUBE brake
[x] Cancel search: brakePage 251 of 345
Black plate (249,1)
Model "Z12-D" EDITED: 2010/ 9/ 27
CHANGING A FLAT TIREIf you have a flat tire, follow the instructions
below.Stopping the vehicle1. Safely move the vehicle off the road andaway from traffic.
2. Turn on the hazard warning flashers.
3. Park on a level surface and apply the parking brake.
4. Continuously Variable Transmission
(CVT) models:
Move the selector lever to the P (Park)
position.
Manual Transmission (MT) models:
Move the shift lever to the R (Reverse)
position.
5. Turn off the engine.
6. Raise the hood to warn other traffic, and to signal professional road assistance person-
nel that you need assistance.
7. Have all passengers get out of the vehicle and stand in a safe place, away from traffic
and clear of the vehicle.
WARNING
.Make sure the parking brake is
securely applied and the Manual
Transmission is shifted into R (Re-
verse) , or the Continuously Variable
Transmission into P (Park) .
. Never change tires when the vehicle
is on a slope, ice or slippery areas.
This is hazardous.
. Never change tires if oncoming
traffic is close to your vehicle. Wait
for professional road assistance.
MCE0001A
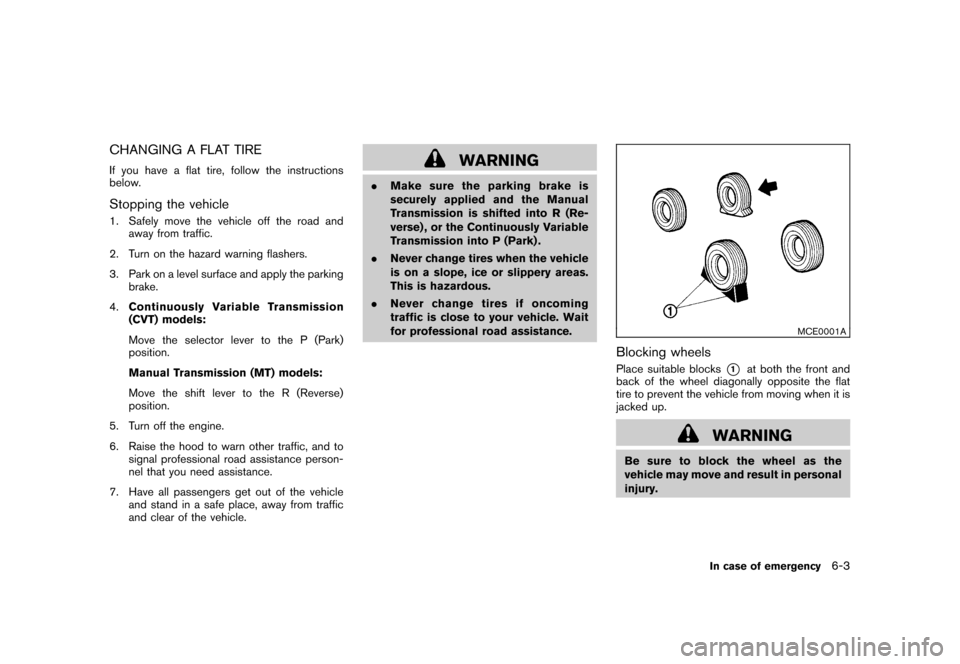
Blocking wheelsPlace suitable blocks
*1
at both the front and
back of the wheel diagonally opposite the flat
tire to prevent the vehicle from moving when it is
jacked up.
WARNING
Be sure to block the wheel as the
vehicle may move and result in personal
injury.
In case of emergency
6-3
Page 258 of 345
Black plate (256,1)
Model "Z12-D" EDITED: 2010/ 9/ 27
SCE0862
WARNING
Always follow the instructions below.
Failure to do so could result in damage
to the charging system and cause
personal injury.
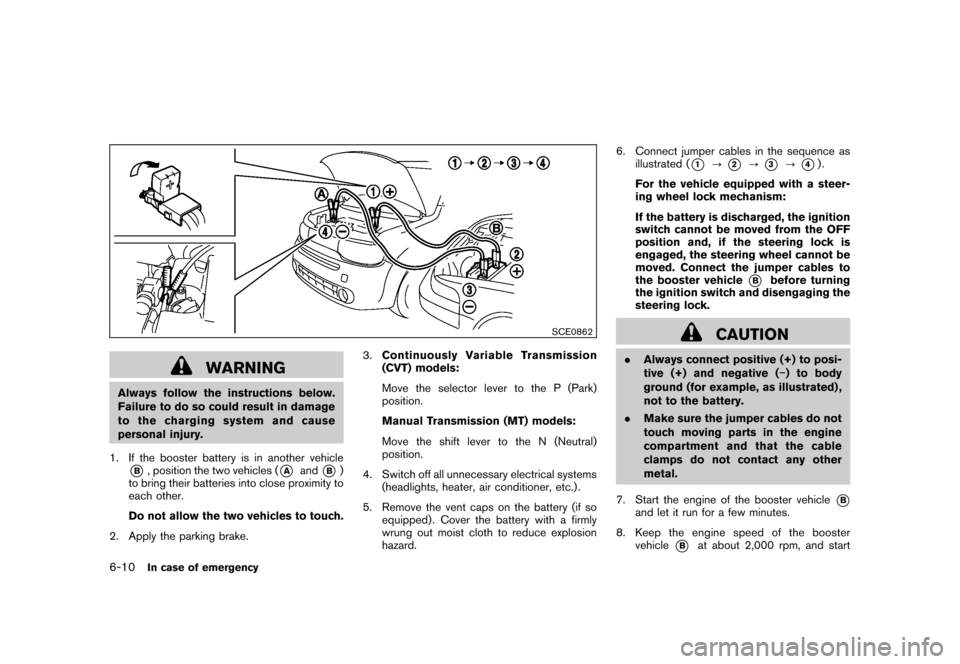
1. If the booster battery is in another vehicle*B, position the two vehicles (
*A
and
*B)
to bring their batteries into close proximity to
each other.
Do not allow the two vehicles to touch.
2. Apply the parking brake. 3.
Continuously Variable Transmission
(CVT) models:
Move the selector lever to the P (Park)
position.
Manual Transmission (MT) models:
Move the shift lever to the N (Neutral)
position.
4. Switch off all unnecessary electrical systems (headlights, heater, air conditioner, etc.) .
5. Remove the vent caps on the battery (if so equipped) . Cover the battery with a firmly
wrung out moist cloth to reduce explosion
hazard. 6. Connect jumper cables in the sequence as
illustrated (
*1
?
*2
?
*3
?
*4).
For the vehicle equipped with a steer-
ing wheel lock mechanism:
If the battery is discharged, the ignition
switch cannot be moved from the OFF
position and, if the steering lock is
engaged, the steering wheel cannot be
moved. Connect the jumper cables to
the booster vehicle
*B
before turning
the ignition switch and disengaging the
steering lock.
CAUTION
. Always connect positive (+) to posi-
tive (+) and negative ( �) to body
ground (for example, as illustrated) ,
not to the battery.
. Make sure the jumper cables do not
touch moving parts in the engine
compartment and that the cable
clamps do not contact any other
metal.
7. Start the engine of the booster vehicle
*B
and let it run for a few minutes.
8. Keep the engine speed of the booster vehicle
*B
at about 2,000 rpm, and start
6-10
In case of emergency
Page 259 of 345
Black plate (257,1)
Model "Z12-D" EDITED: 2010/ 9/ 27
the engine of the vehicle
*A
being jump
started.
CAUTION
Do not keep the starter motor engaged
for more than 10 seconds. If the engine
does not start right away, place the
ignition switch in the OFF position and
wait 10 seconds before trying again.
9. After starting your engine, carefully discon- nect the negative cable and then the positive
cable (
*4
?
*3
?
*2
?
*1).
10. Replace the vent caps (if so equipped) . Be sure to dispose of the cloth used to cover
the vent holes as it may be contaminated
with corrosive acid. Do not attempt to start the engine by pushing.
CAUTION
.
Continuously Variable Transmission
(CVT) models cannot be push-
started or tow-started. Attempting
to do so may cause transmission
damage.
. Three-way catalyst equipped mod-
els should not be started by pushing
since the three way catalyst may be
damaged.
. Never try to start the vehicle by
towing it; when the engine starts,
the forward surge could cause the
vehicle to collide with the tow
vehicle.
CAUTION
.Do not continue to drive if your
vehicle overheats. Doing so could
cause engine damage or a vehicle
fire.
. To avoid the danger of being
scalded, never remove the radiator
cap while the engine is still hot.
When the radiator cap is removed,
pressurized hot water will spurt out,
possibly causing serious injury.
. Do not open the hood if steam is
coming out.
If your vehicle is overheating (indicated by an
extremely high temperature gauge reading) , or if
you feel a lack of engine power, detect abnormal
noise, etc., take the following steps:
1. Move the vehicle safely off the road and apply the parking brake.
2. Continuously Variable Transmission
(CVT) models:
Move the selector lever to the P (Park)
position.
Manual Transmission (MT) models:
Move the shift lever to the N (Neutral)
PUSH STARTING IF YOUR VEHICLE OVERHEATS
In case of emergency
6-11
Page 262 of 345
Black plate (260,1)
Model "Z12-D" EDITED: 2010/ 9/ 27
ahead position with a rope or
similar device. For models with
a steering wheel lock mechan-
ism, never secure the steering
wheel by pushing the ignition
switch to the LOCK position.
This may damage the steering
lock mechanism.
— Move the selector lever or shift lever to the N (Neutral) position.
. When towing a CVT model with the
rear wheels on the ground (if you do
not use towing dollies): Always
release the parking brake.
. If you have to tow an MT model with
the rear wheels on the ground (if
you do not use towing dollies) or
four wheels on the ground:
— Place the ignition switch in the
ON position and turn off all
accessories.
— Always release the parking brake.
— Move the transmission shift le- ver to the N (Neutral) position.
— Observe the following restricted towing speeds and distances for
manual transmission models only:
.
Rear wheels on the ground:
Speed: Below 50 MPH (80
km/h)
Distance: Less than 50 miles
(80 km)
.
Four wheels on the ground:Speed: Below 60 MPH (96
km/h)
Distance: Less than 500 miles
(800 km)
6-14
In case of emergency
Page 265 of 345
Black plate (263,1)
Model "Z12-D" EDITED: 2010/ 9/ 27
SCE0678
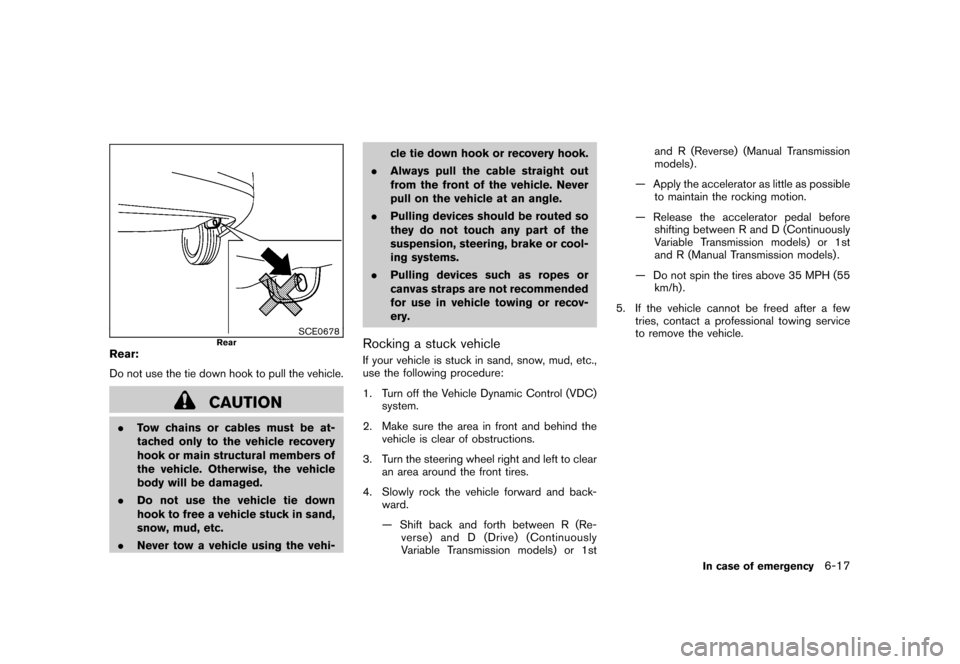
Rear
Rear:
Do not use the tie down hook to pull the vehicle.
CAUTION
.Tow chains or cables must be at-
tached only to the vehicle recovery
hook or main structural members of
the vehicle. Otherwise, the vehicle
body will be damaged.
. Do not use the vehicle tie down
hook to free a vehicle stuck in sand,
snow, mud, etc.
. Never tow a vehicle using the vehi- cle tie down hook or recovery hook.
. Always pull the cable straight out
from the front of the vehicle. Never
pull on the vehicle at an angle.
. Pulling devices should be routed so
they do not touch any part of the
suspension, steering, brake or cool-
ing systems.
. Pulling devices such as ropes or
canvas straps are not recommended
for use in vehicle towing or recov-
ery.
Rocking a stuck vehicleIf your vehicle is stuck in sand, snow, mud, etc.,
use the following procedure:
1. Turn off the Vehicle Dynamic Control (VDC)
system.
2. Make sure the area in front and behind the vehicle is clear of obstructions.
3. Turn the steering wheel right and left to clear an area around the front tires.
4. Slowly rock the vehicle forward and back- ward.
— Shift back and forth between R (Re-verse) and D (Drive) (Continuously
Variable Transmission models) or 1st and R (Reverse) (Manual Transmission
models) .
— Apply the accelerator as little as possible to maintain the rocking motion.
— Release the accelerator pedal before shifting between R and D (Continuously
Variable Transmission models) or 1st
and R (Manual Transmission models) .
— Do not spin the tires above 35 MPH (55 km/h) .
5. If the vehicle cannot be freed after a few tries, contact a professional towing service
to remove the vehicle.
In case of emergency
6-17
Page 273 of 345
Black plate (271,1)
Model "Z12-D" EDITED: 2010/ 9/ 27
MOST COMMON FACTORS CONTRI-
BUTING TO VEHICLE CORROSION.The accumulation of moisture-retaining dirt
and debris in body panel sections, cavities,
and other areas.
. Damage to paint and other protective coat-
ings caused by gravel and stone chips or
minor traffic accidents.ENVIRONMENTAL FACTORS INFLU-
ENCE THE RATE OF CORROSION
MoistureAccumulation of sand, dirt and water on the
vehicle body underside can accelerate corro-
sion. Wet floor coverings will not dry completely
inside the vehicle, and should be removed for
drying to avoid floor panel corrosion.Relative humidityCorrosion will be accelerated in areas of high
relative humidity, especially those areas where
the temperatures stay above freezing where
atmospheric pollution exists, or where road salt
is used.TemperatureA temperature increase will accelerate the rate
of corrosion to those parts which are not well
ventilated.
Air pollutionIndustrial pollution, the presence of salt in the air
in coastal areas, or heavy road salt use will
accelerate the corrosion process. Road salt will
also accelerate the disintegration of paint
surfaces.TO PROTECT YOUR VEHICLE FROM
CORROSION.Wash and wax your vehicle often to keep the
vehicle clean.
. Always check for minor damage to the paint
and repair it as soon as possible.
. Keep drain holes at the bottom of the doors
open to avoid water accumulation.
. Check the underbody for accumulation of
sand, dirt or salt. If present, wash with water
as soon as possible.
CAUTION
.NEVER remove dirt, sand or other
debris from the passenger compart-
ment by washing it out with a hose.
Remove dirt with a vacuum cleaner.
. Never allow water or other liquids to
come in contact with electronic
components inside the vehicle as this may damage them.
Chemicals used for road surface deicing are
extremely corrosive. They accelerate corrosion
and deterioration of underbody components
such as the exhaust system, fuel and brake
lines, brake cables, floor pan and fenders.
In winter, the underbody must be cleaned
periodically.
For additional protection against rust and
corrosion, which may be required in some areas,
consult a NISSAN dealer.
CORROSION PROTECTION
Appearance and care
7-7
Page 275 of 345
Black plate (25,1)
8 Maintenance and do-it-yourself
Model "Z12-D" EDITED: 2010/ 9/ 27
Maintenance requirement..................................... 8-2
Scheduled maintenance ................................... 8-2
General maintenance ...................................... 8-2
Where to go for service ................................... 8-2
General maintenance .......................................... 8-2
Explanation of maintenance items ....................... 8-2
Maintenance precautions ..................................... 8-5
Engine compartment check locations ...................... 8-6
MR18DE engine ............................................ 8-6
Engine cooling system ......................................... 8-7
Checking engine coolant level ........................... 8-8
Changing engine coolant ................................. 8-8
Engine oil ......................................................... 8-9
Checking engine oil level ................................. 8-9
Changing engine oil and filter ............................ 8-9
Continuously Variable Transmission (CVT) fluid ........ 8-11
Brake and clutch fluid ....................................... 8-11
Window washer fluid ........................................ 8-12
Battery .......................................................... 8-13
Jump starting .............................................. 8-14
Variable voltage control system (if so equipped) ...... 8-15
Drive belt ....................................................... 8-15
Spark plugs .................................................... 8-16
Replacing spark plugs ................................... 8-16 Air cleaner
...................................................... 8-16
Windshield wiper blades .................................... 8-17
Cleaning .................................................... 8-17
Replacing ................................................... 8-18
Rear window wiper blade ................................... 8-19
Brakes ........................................................... 8-19
Self-adjusting brakes .................................... 8-19
Brake pad wear warning ................................ 8-19
Fuses ............................................................ 8-20
Engine compartment ..................................... 8-20
Passenger compartment ................................ 8-21
Key battery replacement .................................... 8-23
Keyfob ....................................................... 8-23
Intelligent Key .............................................. 8-24
Lights ............................................................ 8-26
Headlights .................................................. 8-27
Exterior and interior lights ............................... 8-28
Wheels and tires .............................................. 8-30
Tire pressure ............................................... 8-30
Tire labeling ................................................ 8-32
Types of tires .............................................. 8-34
Tire chains .................................................. 8-35
Changing wheels and tires ............................. 8-36
Page 277 of 345
Black plate (275,1)
Model "Z12-D" EDITED: 2010/ 9/ 27
Lights*:Clean the headlights on a regular basis.
Make sure that the headlights, stop lights, tail
lights, turn signal lights, and other lights are all
operating properly and installed securely. Also
check headlight aim.
Road wheel nuts (lug nuts)*: When checking
the tires, make sure no wheel nuts are missing,
and check for any loose wheel nuts. Tighten if
necessary.
Tire rotation*: Tires should be rotated every
7,500 miles (12,000 km).
Tires*: Check the pressure with a gauge often
and always prior to long distance trips. If
necessary, adjust the pressure in all tires,
including the spare, to the pressure specified.
Check carefully for damage, cuts or excessive
wear.
Tire Pressure Monitoring System (TPMS)
transmitter components: Replace the TPMS
transmitter grommet seal, valve core and cap
when the tires are replaced due to wear or age.
Wheel alignment and balance: If the vehicle
should pull to either side while driving on a
straight and level road, or if you detect uneven or
abnormal tire wear, there may be a need for
wheel alignment.
If the steering wheel or seat vibrates at normal
highway speeds, wheel balancing may be
needed. For additional information regarding tires, refer
to “Important Tire Safety Information” (US) or
“Tire Safety Information” (Canada) in the War-
ranty Information Booklet.
Windshield:
Clean the windshield on a regular
basis. Check the windshield at least every six
months for cracks or other damage. Have a
damaged windshield repaired by a qualified
repair facility.
Windshield wiper blades*: Check for cracks
or wear if they do not wipe properly.
Inside the vehicleThe maintenance items listed here should be
checked on a regular basis, such as when
performing scheduled maintenance, cleaning
the vehicle, etc.
Accelerator pedal: Check the pedal for
smooth operation and make sure the pedal
does not catch or require uneven effort. Keep
the floor mat away from the pedal.
Brake pedal: Check the pedal for smooth
operation. If the brake pedal suddenly goes
down further than normal, the pedal feels
spongy or the vehicle seems to take longer to
stop, see a NISSAN dealer immediately. Keep
the floor mat away from the pedal.
Brakes: Check that the brakes do not pull the
vehicle to one side when applied. Continuously Variable Transmission (CVT)
P (Park) position mechanism:
On a fairly
steep hill, check that the vehicle is held securely
with the selector lever in the P (Park) position
without applying any brakes.
Parking brake: Check the parking brake
operation regularly. The vehicle should be
securely held on a fairly steep hill with only the
parking brake applied. If the parking brake needs
adjusted, see a NISSAN dealer.
Seat belts: Check that all parts of the seat belt
system (for example, buckles, anchors, adjusters
and retractors) operate properly and smoothly,
and are installed securely. Check the belt
webbing for cuts, fraying, wear or damage.
Seats: Check seat position controls such as
seat adjusters, seatback recliners, etc. to ensure
they operate smoothly and that all latches lock
securely in every position. Check that the head
restraints/headrests move up and down
smoothly and that the locks (if so equipped)
hold securely in all latched positions.
Steering wheel: Check for changes in the
steering conditions, such as excessive free play,
hard steering or strange noises.
Warning lights and chimes: Make sure that
all warning lights and chimes are operating
properly.
Maintenance and do-it-yourself
8-3