2011 NISSAN CUBE door lock
[x] Cancel search: door lockPage 132 of 345
Black plate (130,1)
Model "Z12-D" EDITED: 2010/ 9/ 27
Locking doors1. Place the ignition switch in the OFF positionand carry the Intelligent Key with you.*1
2. Close all the doors.*2
3. Push the door handle request switch (dri- ver’s or front passenger’s)
*A
or the back
door request switch
*B
while carrying the
Intelligent Key with you.*3
4. All the doors and the back door will lock.
5. The hazard indicator flashes twice and the outside chime sounds twice.
*1: Doors will lock with the request switch while the ignition switch is in the ACC or ON
position.
*2: Doors will not lock with the request switch while any door is open.
*3: Doors will not lock with the request switch when the Intelligent Key is left inside the
vehicle. However, when an Intelligent Key is
inside the vehicle, doors can be locked with
another registered Intelligent Key.
Unlocking doors1. Push the door handle request switch
*A
or
the back door request switch
*B
while
carrying the Intelligent Key with you. 2. The hazard indicator flashes once and out-
side chime sounds once. The corresponding
door or the back door will unlock.
3. Push the request switch again within 1 minute.
4. The hazard indicator flashes once and out- side chime sounds once again. All the doors
and the back door will unlock.
All doors will be locked automatically unless one
of the following operations is performed within 1
minute after pushing the request switch while
the doors are locked.
. Opening any door.
. Pushing the ignition switch.
During this 1-minute time period, if the UNLOCK
button on the Intelligent Key is pushed, all
doors will be locked automatically after another
1 minute.
BATTERY SAVER SYSTEMWhen all the following conditions are met for 60
minutes, the battery saver system will cut off the
power supply to prevent battery discharge.
. The ignition switch is in the ACC position,
and
. All doors are closed, and
. The selector lever is in the P (Park) position.
WARNING LIGHTS AND AUDIBLE
REMINDERSTo help prevent the vehicle from moving
unexpectedly by erroneous operation of the
Intelligent Key listed on the following chart or
to help prevent the vehicle from being stolen,
chime or beep sounds inside and outside the
vehicle and a warning light illuminates or blinks.
When a chime or beep sounds or the warning
light illuminates or blinks, be sure to check the
vehicle and Intelligent Key.
See “TROUBLESHOOTING GUIDE” later in
this section and “WARNING/INDICATOR
LIGHTS AND AUDIBLE REMINDERS” in the
“2. Instruments and controls” section.
Intelligent Key system warning light:P position selecting warning light:
3-14
Pre-driving checks and adjustments
Page 133 of 345
Black plate (131,1)
Model "Z12-D" EDITED: 2010/ 9/ 27
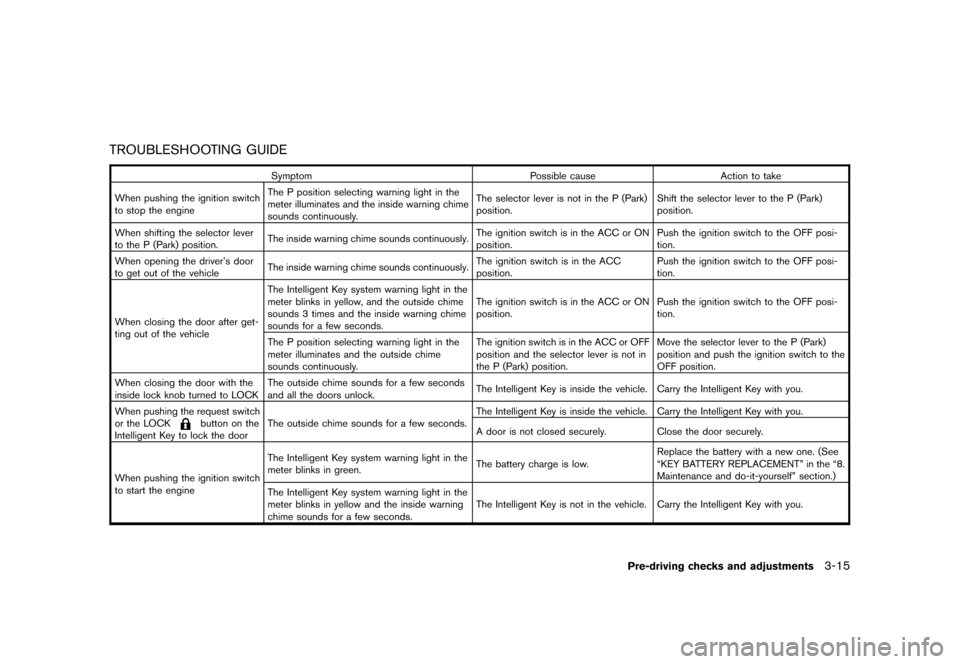
TROUBLESHOOTING GUIDE
SymptomPossible causeAction to take
When pushing the ignition switch
to stop the engine The P position selecting warning light in the
meter illuminates and the inside warning chime
sounds continuously. The selector lever is not in the P (Park)
position.
Shift the selector lever to the P (Park)
position.
When shifting the selector lever
to the P (Park) position. The inside warning chime sounds continuously. The ignition switch is in the ACC or ON
position.Push the ignition switch to the OFF posi-
tion.
When opening the driver’s door
to get out of the vehicle The inside warning chime sounds continuously. The ignition switch is in the ACC
position.Push the ignition switch to the OFF posi-
tion.
When closing the door after get-
ting out of the vehicle The Intelligent Key system warning light in the
meter blinks in yellow, and the outside chime
sounds 3 times and the inside warning chime
sounds for a few seconds.
The ignition switch is in the ACC or ON
position.
Push the ignition switch to the OFF posi-
tion.
The P position selecting warning light in the
meter illuminates and the outside chime
sounds continuously. The ignition switch is in the ACC or OFF
position and the selector lever is not in
the P (Park) position.Move the selector lever to the P (Park)
position and push the ignition switch to the
OFF position.
When closing the door with the
inside lock knob turned to LOCK The outside chime sounds for a few seconds
and all the doors unlock.
The Intelligent Key is inside the vehicle. Carry the Intelligent Key with you.
When pushing the request switch
or the LOCK
button on the
Intelligent Key to lock the door The outside chime sounds for a few seconds. The Intelligent Key is inside the vehicle. Carry the Intelligent Key with you.
A door is not closed securely. Close the door securely.
When pushing the ignition switch
to start the engine The Intelligent Key system warning light in the
meter blinks in green.
The battery charge is low.Replace the battery with a new one. (See
“KEY BATTERY REPLACEMENT” in the “8.
Maintenance and do-it-yourself” section.)
The Intelligent Key system warning light in the
meter blinks in yellow and the inside warning
chime sounds for a few seconds. The Intelligent Key is not in the vehicle. Carry the Intelligent Key with you.
Pre-driving checks and adjustments
3-15
Page 135 of 345
Black plate (133,1)
Model "Z12-D" EDITED: 2010/ 9/ 27
HOW TO USE REMOTE KEYLESS
ENTRY FUNCTION
WARNING
.Radio waves could adversely affect
electric medical equipment. Those
who use a pacemaker should con-
tact the electric medical equipment
manufacturer for the possible influ-
ences before use.
. The Intelligent Key transmits radio
waves when the buttons are
pushed. The FAA advises that the
radio waves may affect aircraft na-
vigation and communication sys-
tems. Do not operate the
Intelligent Key while on an airplane.
Makesurethebuttonsarenot
operated unintentionally when the
unit is stored during a flight.
CAUTION
.Do not allow the Intelligent Key,
which contains electrical compo-
nents, to come into contact with
water or salt water. This could affect
the system function. .
Do not drop the Intelligent Key.
. Do not strike the Intelligent Key
sharply against another object.
. Do not change or modify the Intel-
ligent Key.
. Wetting may damage the Intelligent
Key. If the Intelligent Key gets wet,
immediately wipe until it is comple-
tely dry.
. If the outside temperature is below
148F( �10 8C) degrees, the battery of
the Intelligent key may not function
properly.
. Do not place the Intelligent Key for
an extended period in an area where
temperatures exceed 140 8F (60 8C) .
. Do not attach the Intelligent Key
with a key holder that contains a
magnet.
. Do not place the Intelligent Key near
equipment that produces a mag-
netic field, such as a TV, audio
equipment, personal computers or
cellular phone.
The remote keyless entry function can operate
all door locks using the remote keyless entry
function of the Intelligent Key. The remote keyless entry function can operate at a distance
of approximately 33 ft (10 m) from the vehicle.
(The operating distance depends upon the
conditions around the vehicle.)
The remote keyless entry function will not
operate:
.
When the Intelligent Key is not within the
operational range.
. When the doors are open or not closed
securely.
. When the Intelligent Key battery is dis-
charged.
The remote keyless entry function can also
operate the vehicle alarm.
Pre-driving checks and adjustments
3-17
Page 136 of 345
Black plate (134,1)
Model "Z12-D" EDITED: 2010/ 9/ 27
SPA2252
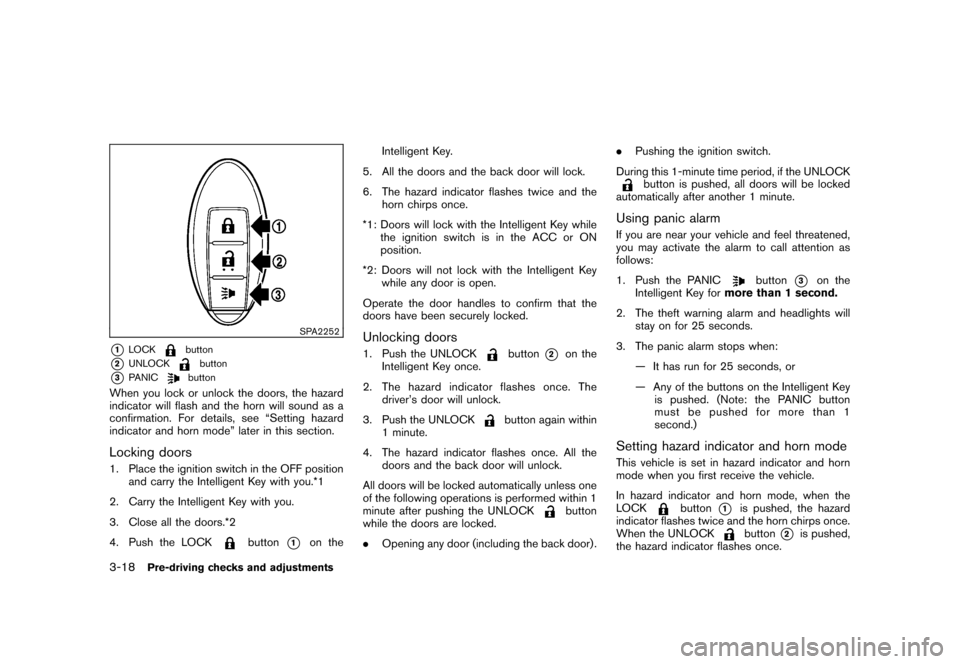
*1
LOCK
button
*2
UNLOCK
button
*3
PANIC
button
When you lock or unlock the doors, the hazard
indicator will flash and the horn will sound as a
confirmation. For details, see “Setting hazard
indicator and horn mode” later in this section.Locking doors1. Place the ignition switch in the OFF positionand carry the Intelligent Key with you.*1
2. Carry the Intelligent Key with you.
3. Close all the doors.*2
4. Push the LOCK
button
*1
on the Intelligent Key.
5. All the doors and the back door will lock.
6. The hazard indicator flashes twice and the horn chirps once.
*1: Doors will lock with the Intelligent Key while the ignition switch is in the ACC or ON
position.
*2: Doors will not lock with the Intelligent Key while any door is open.
Operate the door handles to confirm that the
doors have been securely locked.
Unlocking doors1. Push the UNLOCK
button
*2
on the
Intelligent Key once.
2. The hazard indicator flashes once. The driver’s door will unlock.
3. Push the UNLOCK
button again within
1 minute.
4. The hazard indicator flashes once. All the doors and the back door will unlock.
All doors will be locked automatically unless one
of the following operations is performed within 1
minute after pushing the UNLOCK
button
while the doors are locked.
. Opening any door (including the back door) . .
Pushing the ignition switch.
During this 1-minute time period, if the UNLOCK
button is pushed, all doors will be locked
automatically after another 1 minute.
Using panic alarmIf you are near your vehicle and feel threatened,
you may activate the alarm to call attention as
follows:
1. Push the PANIC
button
*3
on the
Intelligent Key for more than 1 second.
2. The theft warning alarm and headlights will stay on for 25 seconds.
3. The panic alarm stops when: — It has run for 25 seconds, or
— Any of the buttons on the Intelligent Keyis pushed. (Note: the PANIC button
must be pushed for more than 1
second.)
Setting hazard indicator and horn modeThis vehicle is set in hazard indicator and horn
mode when you first receive the vehicle.
In hazard indicator and horn mode, when the
LOCK
button
*1
is pushed, the hazard
indicator flashes twice and the horn chirps once.
When the UNLOCKbutton
*2
is pushed,
the hazard indicator flashes once.
3-18
Pre-driving checks and adjustments
Page 137 of 345
Black plate (135,1)
Model "Z12-D" EDITED: 2010/ 9/ 27
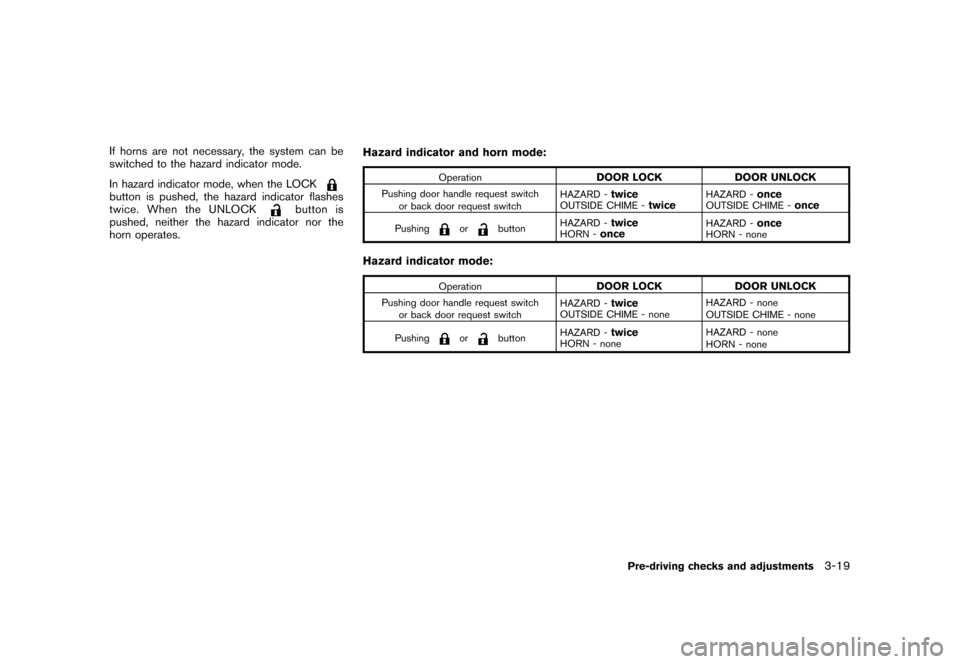
If horns are not necessary, the system can be
switched to the hazard indicator mode.
In hazard indicator mode, when the LOCKbutton is pushed, the hazard indicator flashes
twice. When the UNLOCK
button is
pushed, neither the hazard indicator nor the
horn operates. Hazard indicator and horn mode:
Operation
DOOR LOCK
DOOR UNLOCK
Pushing door handle request switch
or back door request switch HAZARD -
twice
OUTSIDE CHIME -
twice
HAZARD -
once
OUTSIDE CHIME -
once
Pushing
or
button
HAZARD -
twice
HORN -
once
HAZARD -
once
HORN - none
Hazard indicator mode:
Operation
DOOR LOCK
DOOR UNLOCK
Pushing door handle request switch
or back door request switch HAZARD -
twice
OUTSIDE CHIME - noneHAZARD - none
OUTSIDE CHIME - none
Pushing
or
button HAZARD -
twice
HORN - none HAZARD - none
HORN - none
Pre-driving checks and adjustments
3-19
Page 140 of 345
Black plate (138,1)
Model "Z12-D" EDITED: 2010/ 9/ 27
WARNING
.Always be sure the back door has
been closed securely to prevent it
from opening while driving.
. Do not drive with the back door
open. This could allow dangerous
exhaust gases to be drawn into the
vehicle. See “EXHAUST GAS (car-
bon monoxide)” in the “5. Starting
and driving” section of this manual.
. Make sure that all passengers have
their hands, etc. inside the vehicle
before closing the back door.
SPA2608
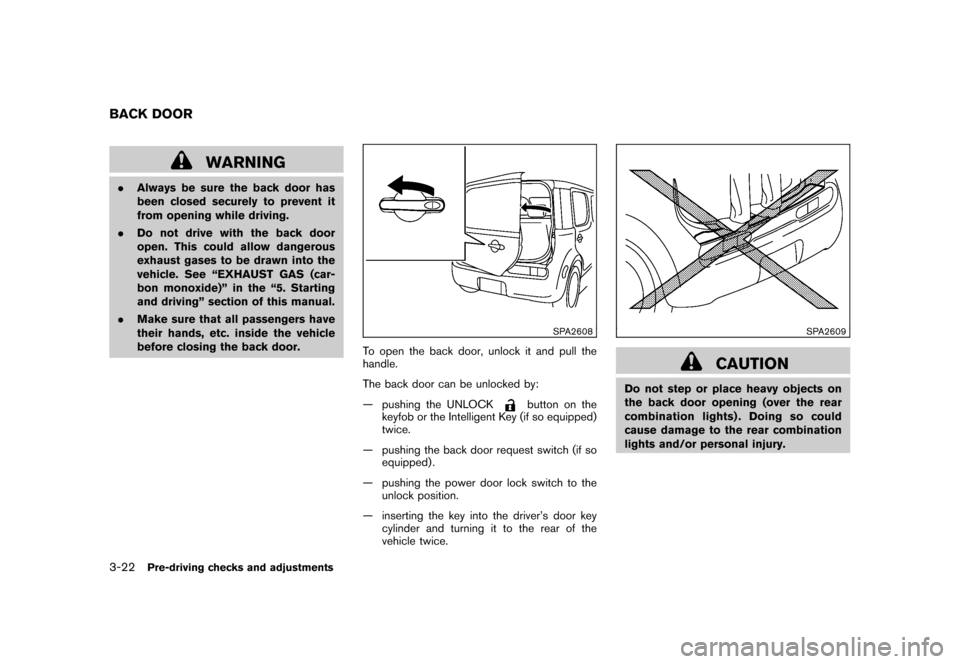
To open the back door, unlock it and pull the
handle.
The back door can be unlocked by:
— pushing the UNLOCK
button on the
keyfob or the Intelligent Key (if so equipped)
twice.
— pushing the back door request switch (if so equipped) .
— pushing the power door lock switch to the unlock position.
— inserting the key into the driver’s door key cylinder and turning it to the rear of the
vehicle twice.
SPA2609
CAUTION
Do not step or place heavy objects on
the back door opening (over the rear
combination lights) . Doing so could
cause damage to the rear combination
lights and/or personal injury.
BACK DOOR3-22
Pre-driving checks and adjustments
Page 142 of 345
Black plate (140,1)
Model "Z12-D" EDITED: 2010/ 9/ 27
SPA2336
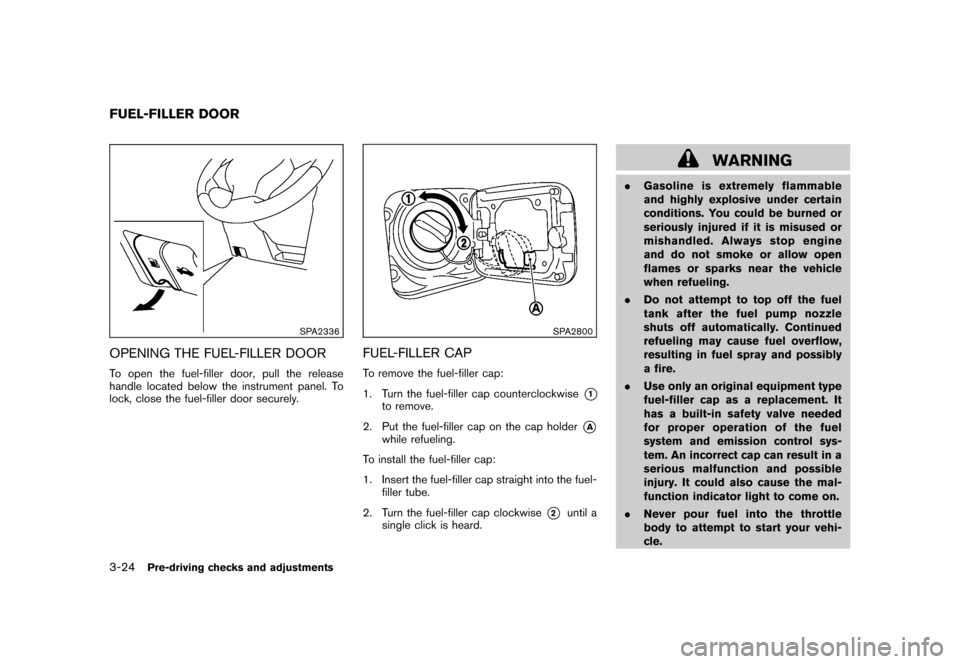
OPENING THE FUEL-FILLER DOORTo open the fuel-filler door, pull the release
handle located below the instrument panel. To
lock, close the fuel-filler door securely.
SPA2800
FUEL-FILLER CAPTo remove the fuel-filler cap:
1. Turn the fuel-filler cap counterclockwise
*1
to remove.
2. Put the fuel-filler cap on the cap holder
*A
while refueling.
To install the fuel-filler cap:
1. Insert the fuel-filler cap straight into the fuel- filler tube.
2. Turn the fuel-filler cap clockwise
*2
until a
single click is heard.
WARNING
. Gasoline is extremely flammable
and highly explosive under certain
conditions. You could be burned or
seriously injured if it is misused or
mishandled. Always stop engine
and do not smoke or allow open
flames or sparks near the vehicle
when refueling.
. Do not attempt to top off the fuel
tank after the fuel pump nozzle
shuts off automatically. Continued
refueling may cause fuel overflow,
resulting in fuel spray and possibly
a fire.
. Use only an original equipment type
fuel-filler cap as a replacement. It
has a built-in safety valve needed
for proper operation of the fuel
system and emission control sys-
tem. An incorrect cap can result in a
serious malfunction and possible
injury. It could also cause the mal-
function indicator light to come on.
. Never pour fuel into the throttle
body to attempt to start your vehi-
cle.
FUEL-FILLER DOOR3-24
Pre-driving checks and adjustments
Page 213 of 345
Black plate (211,1)
Model "Z12-D" EDITED: 2010/ 9/ 27
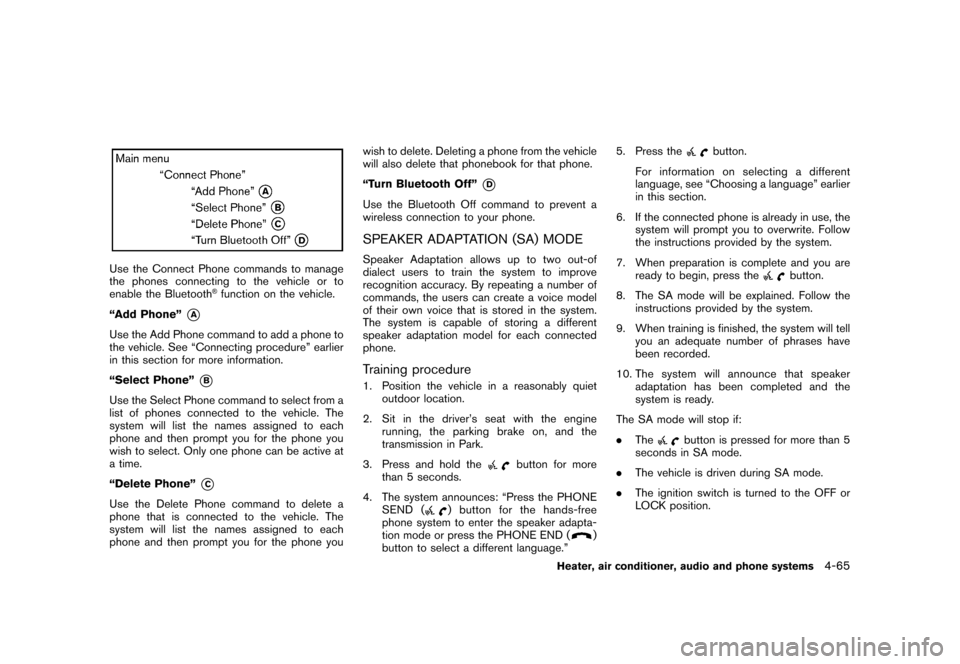
Use the Connect Phone commands to manage
the phones connecting to the vehicle or to
enable the Bluetooth
®function on the vehicle.
“Add Phone”
*A
Use the Add Phone command to add a phone to
the vehicle. See “Connecting procedure” earlier
in this section for more information.
“Select Phone”
*B
Use the Select Phone command to select from a
list of phones connected to the vehicle. The
system will list the names assigned to each
phone and then prompt you for the phone you
wish to select. Only one phone can be active at
a time.
“Delete Phone”
*C
Use the Delete Phone command to delete a
phone that is connected to the vehicle. The
system will list the names assigned to each
phone and then prompt you for the phone you wish to delete. Deleting a phone from the vehicle
will also delete that phonebook for that phone.
“Turn Bluetooth Off”
*D
Use the Bluetooth Off command to prevent a
wireless connection to your phone.SPEAKER ADAPTATION (SA) MODESpeaker Adaptation allows up to two out-of
dialect users to train the system to improve
recognition accuracy. By repeating a number of
commands, the users can create a voice model
of their own voice that is stored in the system.
The system is capable of storing a different
speaker adaptation model for each connected
phone.Training procedure1. Position the vehicle in a reasonably quiet
outdoor location.
2. Sit in the driver’s seat with the engine running, the parking brake on, and the
transmission in Park.
3. Press and hold the
button for more
than 5 seconds.
4. The system announces: “Press the PHONE SEND (
) button for the hands-free
phone system to enter the speaker adapta-
tion mode or press the PHONE END (
)
button to select a different language.” 5. Press the
button.
For information on selecting a different
language, see “Choosing a language” earlier
in this section.
6. If the connected phone is already in use, the system will prompt you to overwrite. Follow
the instructions provided by the system.
7. When preparation is complete and you are ready to begin, press the
button.
8. The SA mode will be explained. Follow the instructions provided by the system.
9. When training is finished, the system will tell you an adequate number of phrases have
been recorded.
10. The system will announce that speaker adaptation has been completed and the
system is ready.
The SA mode will stop if:
. The
button is pressed for more than 5
seconds in SA mode.
. The vehicle is driven during SA mode.
. The ignition switch is turned to the OFF or
LOCK position.
Heater, air conditioner, audio and phone systems
4-65