2011 NISSAN CUBE reset
[x] Cancel search: resetPage 192 of 345
Black plate (190,1)
Model "Z12-D" EDITED: 2010/ 9/ 27
device to the audio system. Music may not play
properly when a monaural cable is used.
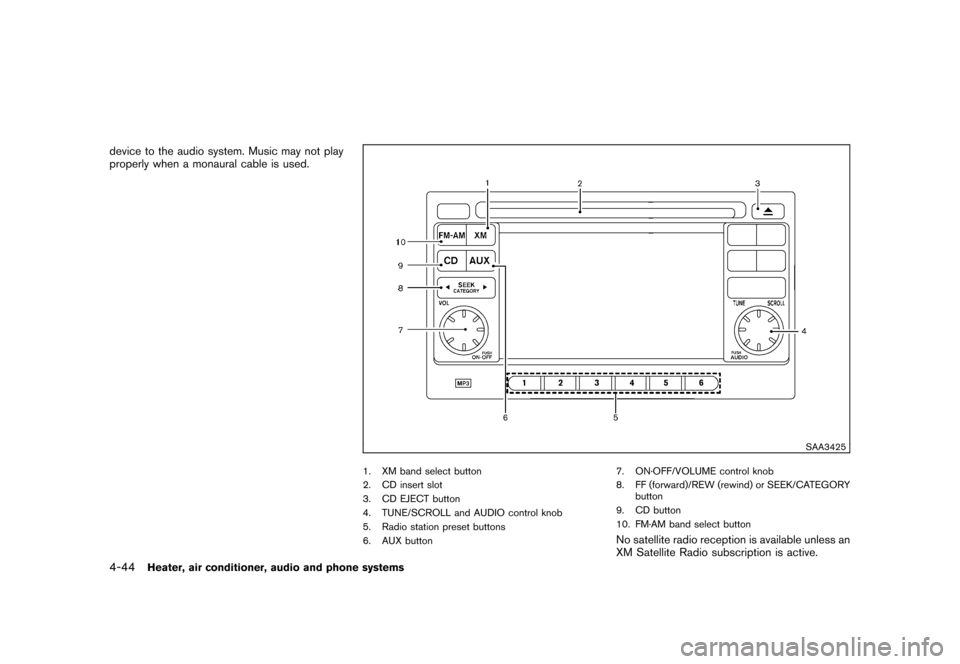
SAA3425
1. XM band select button
2. CD insert slot
3. CD EJECT button
4. TUNE/SCROLL and AUDIO control knob
5. Radio station preset buttons
6. AUX button7. ON·OFF/VOLUME control knob
8. FF (forward)/REW (rewind) or SEEK/CATEGORY
button
9. CD button
10. FM·AM band select button
No satellite radio reception is available unless an
XM Satellite Radio subscription is active.
4-44
Heater, air conditioner, audio and phone systems
Page 194 of 345
Black plate (192,1)
Model "Z12-D" EDITED: 2010/ 9/ 27
TUNE (Tuning):
.For AM and FM radio
Turn the TUNE knob for manual tuning.
. For XM Satellite Radio
Turn the TUNE knob to seek channels from
all of the categories when any category is
not selected.
SEEK tuning:
. For AM and FM radio
Push the SEEK/CATEGORY button
or
to tune from low to high or high to low
frequencies and to stop at the next broad-
casting station.
. For XM Satellite Radio
Push the SEEK/CATEGORY button
or
to tune to the first channel of the next
or previous category.
Tuning with the touchscreen (AM and FM
radio):
When in AM or FM mode, the radio can be
tuned using the touchscreen. To bring up the
visual tuner, touch the “Tune” key on the lower
right corner of the screen. A screen appears
with a bar running from low frequencies on the
left to high frequencies on the right. Touch the screen at the location of the frequency you wish
to tune and the station will change to that
frequency. To return to the regular radio display
screen, touch the “OK” key.
to
Station memory operations:
12 stations/channels can be set for the FM band
(6 each for FM1 and FM2) , 18 for XM radio (6
each for XM1, XM2 and XM3) and 6 stations
can be set for the AM band.
1. Choose the radio band using the radio band select button.
2. Tune to the desired station/channel using the SEEK/CATEGORY button or the TUNE
knob.
3. Push and hold the desired station preset button
to
until the beep sound is
heard.
4. The station indicator will then come on and the sound will resume. Memorizing is now
complete.
5. Other buttons can be set in the same manner.
If the battery cable is disconnected, or if the fuse
opens, the radio memory will be erased. In that
case, reset the desired stations/channels. Touchscreen (XM Satellite Radio):
When the XM Satellite Radio is being played,
the following items are available with the
touchscreen operation.
.
Channels
Displays a list of channels. Touch a preferred
channel displayed on the list to change to
that channel.
. Categories
Displays a list of categories. Touch a
preferred channel displayed on the list to
display options within that category.
Compact Disc (CD) player operationPlace the ignition switch in the ACC or ON
position and insert the Compact Disc (CD) into
the slot with the label side facing up. The CD will
be guided automatically into the slot and start
playing.
If the radio is already operating, it will auto-
matically turn off and the CD will play.
If the system has been turned off while the CD
was playing, pushing the ON·OFF button will
start the CD.
Do not use 3.1 in (8 cm) discs.
4-46
Heater, air conditioner, audio and phone systems
Page 201 of 345
Black plate (199,1)
Model "Z12-D" EDITED: 2010/ 9/ 27
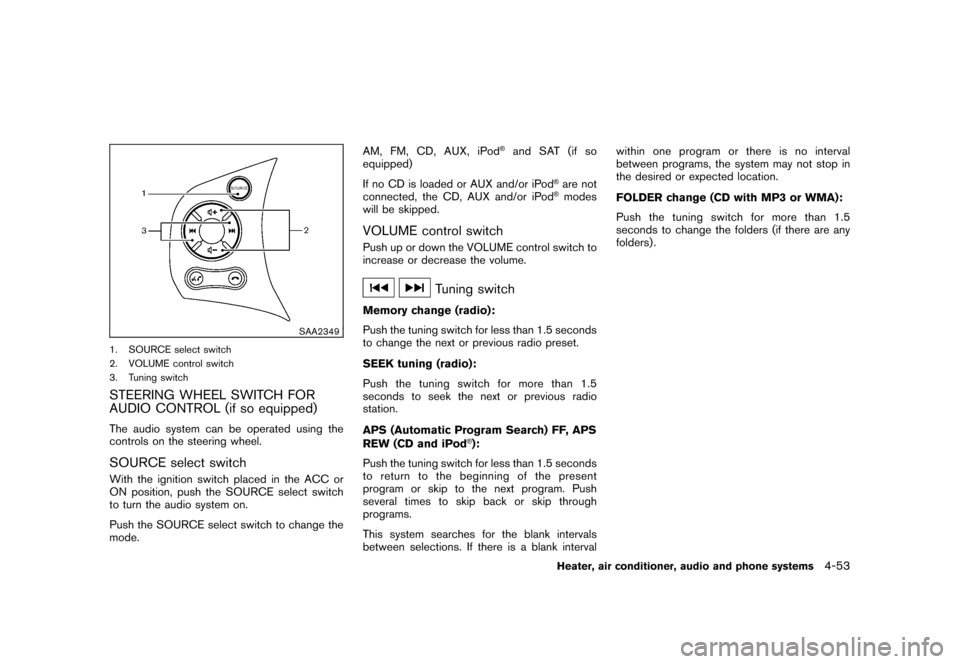
SAA2349
1. SOURCE select switch
2. VOLUME control switch
3. Tuning switchSTEERING WHEEL SWITCH FOR
AUDIO CONTROL (if so equipped)The audio system can be operated using the
controls on the steering wheel.SOURCE select switchWith the ignition switch placed in the ACC or
ON position, push the SOURCE select switch
to turn the audio system on.
Push the SOURCE select switch to change the
mode.AM,FM,CD,AUX,iPod
®and SAT (if so
equipped)
If no CD is loaded or AUX and/or iPod
®are not
connected, the CD, AUX and/or iPod®modes
will be skipped.
VOLUME control switchPush up or down the VOLUME control switch to
increase or decrease the volume.
Tuning switch
Memory change (radio):
Push the tuning switch for less than 1.5 seconds
to change the next or previous radio preset.
SEEK tuning (radio):
Push the tuning switch for more than 1.5
seconds to seek the next or previous radio
station.
APS (Automatic Program Search) FF, APS
REW (CD and iPod
®):
Push the tuning switch for less than 1.5 seconds
to return to the beginning of the present
program or skip to the next program. Push
several times to skip back or skip through
programs.
This system searches for the blank intervals
between selections. If there is a blank interval within one program or there is no interval
between programs, the system may not stop in
the desired or expected location.
FOLDER change (CD with MP3 or WMA):
Push the tuning switch for more than 1.5
seconds to change the folders (if there are any
folders) .
Heater, air conditioner, audio and phone systems
4-53
Page 211 of 345
Black plate (209,1)
Model "Z12-D" EDITED: 2010/ 9/ 27
the cellular phone when privacy is desired.
The system announces, “Transfer call. Call
transferred to privacy mode.” The system
then ends the VR session.
To reconnect a call from the cellular phone
to the Bluetooth
®Hands-Free Phone sys-
tem, push thebutton.
. “Mute” — Use the Mute command to mute
your voice so the other party cannot hear it.
Use the mute command again to unmute
your voice.
NOTE:
If a call is ended or the cellular phone
network connection is lost while the Mute
feature is on, the Mute feature will be reset
to “off” for the next call so the other party
can hear your voice.
Phonebook (phones without automatic
phonebook download function)“Transfer Entry”
*A
Use the Transfer Entry command to store a new
name in the system.
When prompted by the system, say the name
you would like to give the new entry.
For example, say: “Mary.”
If the name is too long or too short, the system
tells you, then prompts you for a name again.
Also, if the name sounds too much like a name
already stored, the system tells you, then
prompts you for a name again.
The system will ask you to transfer a phone
number stored in the cellular phone’s memory.
To enter a phone number by voice command:
For example, say: “five five five one two one
two.” See “How to say numbers” earlier in this
section for more information.
To transfer a phone number stored in the cellular
phone’s memory:
Say: “Transfer entry.” The system acknowledges
the command and asks you to initiate the
transfer from the phone handset. The new
contact phone number will be transferred from
the cellular phone via the Bluetooth
®commu- nication link.
The transfer procedure varies according to each
cellular phone. See the cellular phone Owner’s
Manual for details. You can also visit www.
nissanusa.com/bluetooth for instructions on
transferring phone numbers from NISSAN re-
commended cellular phones.
The system repeats the number and prompts
you for the next command. When you have
finished entering numbers or transferring an
entry, choose “Store.”
The system confirms the name, location and
number.
“Delete Entry”
*B
Use the Delete Entry command to delete one
entry from the phonebook. After the system
acknowledges a command, say the name to
delete or say “List Names” to choose an entry.
“List Names”
*C
Use the List Names command to hear all the
names in the phonebook. The system recites the
phonebook entries but does not include the
actual phone numbers. When playback of the
list is complete, the system returns to the main
menu.
Playback of the list can be stopped at any time
by pushing the
button on the steering
Heater, air conditioner, audio and phone systems
4-63
Page 220 of 345
Black plate (218,1)
Model "Z12-D" EDITED: 2010/ 9/ 27
alternate tires and wheels allow the TPMS to
continue to function properly.Additional information.The TPMS does not monitor the tire
pressure of the spare tire.
. The TPMS will activate only when the
vehicle is driven at speeds above 16 MPH
(25 km/h) . Also, this system may not detect
a sudden drop in tire pressure (for example a
flat tire while driving) .
. The low tire pressure warning light does not
automatically turn off when the tire pressure
is adjusted. After the tire is inflated to the
recommended pressure, the vehicle must be
driven at speeds above 16 MPH (25 km/h)
to activate the TPMS and turn off the low tire
pressure warning light. Use a tire pressure
gauge to check the tire pressure.
. Tire pressure rises and falls depending on
the heat caused by the vehicle’s operation
and the outside temperature. Low outside
temperature can lower the temperature of
the air inside the tire which can cause a
lower tire inflation pressure. This may cause
the low tire pressure warning light to
illuminate. If the warning light illuminates in
low ambient temperature, check the tire
pressure for all four tires.
For additional information, see “Low tire pres- sure warning light” in the “2. Instruments and
controls” section and “TIRE PRESSURE MON-
ITORING SYSTEM (TPMS)” in the “6. In case of
emergency” section.
WARNING
.
If the low tire pressure warning light
illuminates while driving, avoid sud-
den steering maneuvers or abrupt
braking, reduce vehicle speed, pull
off the road to a safe location and
stop the vehicle as soon as possi-
ble. Driving with under-inflated tires
may permanently damage the tires
and increase the likelihood of tire
failure. Serious vehicle damage
could occur and may lead to an
accident and could result in serious
personal injury. Check the tire pres-
sure for all four tires. Adjust the tire
pressure to the recommended COLD
tire pressure shown on the Tire and
Loading Information label to turn
the low tire pressure warning light
OFF. If you have a flat tire, replace it
with a spare tire as soon as possi-
ble. (See “FLAT TIRE” in the “6. In
case of emergency” section for
changing a flat tire.) .
When a spare tire is mounted or a
wheel is replaced, the TPMS will not
function and the low tire pressure
warning light will flash for approxi-
mately 1 minute. The light will
remain on after 1 minute. Contact
your NISSAN dealer as soon as
possible for tire replacement and/
or system resetting.
. Replacing tires with those not ori-
ginally specified by NISSAN could
affect the proper operation of the
TPMS.
. Do not inject any tire liquid or
aerosol tire sealant into the tires,
as this may cause a malfunction of
the tire pressure sensors.
CAUTION
.The TPMS may not function properly
when the wheels are equipped with
tire chains or the wheels are buried
in snow.
. Do not place metalized film or any
metal parts (antenna, etc.) on the
windows. This may cause poor re-
ception of the signals from the tire
5-4
Starting and driving
Page 238 of 345
Black plate (236,1)
Model "Z12-D" EDITED: 2010/ 9/ 27
switch and release it. Take your foot off the
accelerator pedal. Your vehicle will maintain the
set speed.
.To pass another vehicle, depress the
accelerator pedal. When you release the
pedal, the vehicle will return to the previously
set speed.
. The vehicle may not maintain the set speed
on winding or hilly roads. If this happens,
drive without the cruise control.
To cancel the preset speed, use one of the
following methods:
a) Push the CANCEL switch.
b) Tap the brake pedal.
c) Turn the MAIN switch off. The CRUISE indicator light will turn off.
. If you depress the brake pedal while pushing
the RESUME/ACCELERATE or SET/
COAST switch and reset at the cruising
speed, the cruise control will disengage.
Turn the MAIN switch off once and then turn
it on again.
. The cruise control will automatically cancel if
the vehicle slows more than 8 MPH (12
km/h) below the set speed.
. If you move the selector lever to the N
(Neutral) position (Continuously Variable Transmission models) or depressing the
clutch pedal (Manual Transmission models) ,
the cruise control will be canceled.
To reset at a faster cruising speed, use one
of the following methods:
. Depress the accelerator pedal. When the
vehicle attains the desired speed, push and
release the SET/COAST switch.
. Push and hold the RESUME/ACCELERATE
switch. When the vehicle attains the desired
speed, release the switch.
. Push, then quickly release the RESUME/
ACCELERATE switch. Each time you do
this, the set speed will increase by about 1
MPH (1.6 km/h) .
To reset at a slower cruising speed, use one
of the following methods:
. Lightly tap the brake pedal. When the
vehicle attains the desired speed, push the
SET/COAST switch and release it.
. Push and hold the SET/COAST switch.
Release the switch when the vehicle slows
down to the desired speed.
. Push, then quickly release the SET/COAST
switch. Each time you do this, the set speed
will decrease by about 1 MPH (1.6 km/h) . To resume the preset speed,
push and
release the RESUME/ACCELERATE switch.
The vehicle will resume the last set cruising
speed when the vehicle speed is over 25 MPH
(40 km/h) .5-22
Starting and driving
Page 244 of 345
Black plate (242,1)
Model "Z12-D" EDITED: 2010/ 9/ 27
The Vehicle Dynamic Control (VDC) system
uses various sensors to monitor driver inputs
and vehicle motion. Under certain driving con-
ditions, the VDC system helps to perform the
following functions.
.Controls brake pressure to reduce wheel
slip on one slipping drive wheel so power is
transferred to a non slipping drive wheel on
the same axle.
. Controls brake pressure and engine output
to reduce drive wheel slip based on vehicle
speed (traction control function) .
. Controls brake pressure at individual wheels
and engine output to help the driver maintain
control of the vehicle in the following
conditions:
— understeer (vehicle tends to not follow the steered path despite increased steering
input)
— oversteer (vehicle tends to spin due to certain road or driving conditions) .
The VDC system can help the driver to maintain
control of the vehicle, but it cannot prevent loss
of vehicle control in all driving situations.
When the VDC system operates, theindicator in the instrument panel flashes so note
the following:
. The road may be slippery or the system may determine some action is required to help
keep the vehicle on the steered path.
. You may feel a pulsation in the brake pedal
and hear a noise or vibration from under the
hood. This is normal and indicates that the
VDC system is working properly.
. Adjust your speed and driving to the road
conditions.
See “Vehicle Dynamic Control (VDC) warning
light” in the “2. Instruments and controls”
section and “Vehicle Dynamic Control (VDC)
off indicator light” in the “2. Instruments and
controls” section.
If a malfunction occurs in the system, the
and
indicatorlightscomeoninthe
instrument panel. The VDC system automatically
turns off when these indicator lights are on.
The VDC OFF switch is used to turn off the VDC
system. The VDC off indicator illuminates to
indicate the VDC system is off. When the VDC
switch is used to turn off the system, the VDC
system still operates to prevent one drive wheel
from slipping by transferring power to a non
slipping drive wheel. The
indicator flashes
if this occurs. All other VDC functions are off and
the
indicator will not flash. The VDC
System is automatically reset to on when the
ignition switch is placed in the off position then
back to the on position. The computer has a built-in diagnostic feature
that tests the system each time you start the
engine and move the vehicle forward or in
reverse at a slow speed. When the self-test
occurs, you may hear a “clunk” noise and/or feel
a pulsation in the brake pedal. This is normal and
is not an indication of a malfunction.
WARNING
.
The VDC system is designed to help
the driver maintain stability but
does not prevent accidents due to
abrupt steering operation at high
speeds or by careless or dangerous
driving techniques. Reduce vehicle
speed and be especially careful
when driving and cornering on slip-
pery surfaces and always drive care-
fully.
. Do not modify the vehicle’s suspen-
sion. If suspension parts such as
shock absorbers, struts, springs,
stabilizer bars, bushings and
wheels are not NISSAN recom-
mended for your vehicle or are
extremely deteriorated the VDC sys-
tem may not operate properly. This
could adversely affect vehicle hand-
ling performance, and the
in-
VEHICLE DYNAMIC CONTROL (VDC)
SYSTEM5-28
Starting and driving
Page 250 of 345
Black plate (248,1)
Model "Z12-D" EDITED: 2010/ 9/ 27
To shut off the engine in an emergency situation
while driving perform the following procedure:
.Rapidly push the push-button ignition switch
3 consecutive times, or
. Push and hold the push-button ignition
switch for more than 2 seconds.
TIRE PRESSURE MONITORING SYS-
TEM (TPMS)This vehicle is equipped with the Tire Pressure
Monitoring System (TPMS) . It monitors tire
pressure of all tires except the spare. When
the low tire pressure warning light is lit, one or
more of your tires is significantly under-inflated.
If the vehicle is being driven with low tire
pressure, the TPMS will activate and warn you
of it by the low tire pressure warning light. This
system will activate only when the vehicle is
driven at speeds above 16 MPH (25 km/h) . For
more details, see “WARNING/INDICATOR
LIGHTS AND AUDIBLE REMINDERS” in the
“2. Instruments and controls” section and “TIRE
PRESSURE MONITORING SYSTEM (TPMS)”
in the “5. Starting and driving” section.
WARNING
.If the low tire pressure warning light
illuminates while driving, avoid sud-
den steering maneuvers or abrupt
braking, reduce vehicle speed, pull
off the road to a safe location and
stop the vehicle as soon as possi-
ble. Driving with under-inflated tires
may permanently damage the tires
and increase the likelihood of tire
failure. Serious vehicle damage could occur and may lead to an
accident and could result in serious
personal injury. Check the tire pres-
sure for all four tires. Adjust the tire
pressure to the recommended COLD
tire pressure shown on the Tire and
Loading Information label to turn
the low tire pressure warning light
OFF. If you have a flat tire, replace it
with a spare tire as soon as possi-
ble.
. When a spare tire is mounted or a
wheel is replaced, the TPMS will not
function and the low tire pressure
warning light will flash for approxi-
mately 1 minute. The light will
remain on after 1 minute. Contact
your NISSAN dealer as soon as
possible for tire replacement and/
or system resetting.
. Replacing tires with those not ori-
ginally specified by NISSAN could
affect the proper operation of the
TPMS.
. Do not inject any tire liquid or
aerosol tire sealant into the tires,
as this may cause a malfunction of
the tire pressure sensors.
EMERGENCY ENGINE SHUT OFF
(models with Intelligent Key system) FLAT TIRE6-2
In case of emergency