2011 NISSAN CUBE mirror
[x] Cancel search: mirrorPage 119 of 345
Black plate (10,1)
3 Pre-driving checks and adjustments
Model "Z12-D" EDITED: 2010/ 9/ 27
Keys ............................................................... 3-2NISSAN Vehicle Immobilizer System keys ............ 3-2
Intelligent Keys (if so equipped) ......................... 3-3
Doors .............................................................. 3-4
Locking with key ............................................ 3-4
Locking with inside lock knob ........................... 3-5
Locking with power door lock switch .................. 3-5
Automatic door locks ...................................... 3-5
Child safety rear door lock ............................... 3-6
Remote keyless entry system (if so equipped) ........... 3-6
How to use remote keyless entry system ............. 3-7
Intelligent Key system (if so equipped) .................. 3-10
Intelligent Key operating range ........................ 3-12
Door locks/unlocks precaution ........................ 3-12
Intelligent Key operation ................................. 3-13
Battery saver system ..................................... 3-14 Warning lights and audible reminders
............... 3-14
Troubleshooting guide ................................... 3-15
How to use remote keyless entry function .......... 3-17
Hood ............................................................ 3-21
Back door ...................................................... 3-22
Bumpers and side sill extensions (Kro ¯
m models) . .... 3-23
Fuel-filler door ................................................. 3-24
Opening the fuel-filler door ............................. 3-24
Fuel-filler cap .............................................. 3-24
Tilt steering column .......................................... 3-26
Tilt operation ............................................... 3-26
Sun visors ...................................................... 3-26
Mirrors ........................................................... 3-27
Inside mirror ................................................ 3-27
Outside mirrors ............................................ 3-27
Page 145 of 345
Black plate (143,1)
Model "Z12-D" EDITED: 2010/ 9/ 27
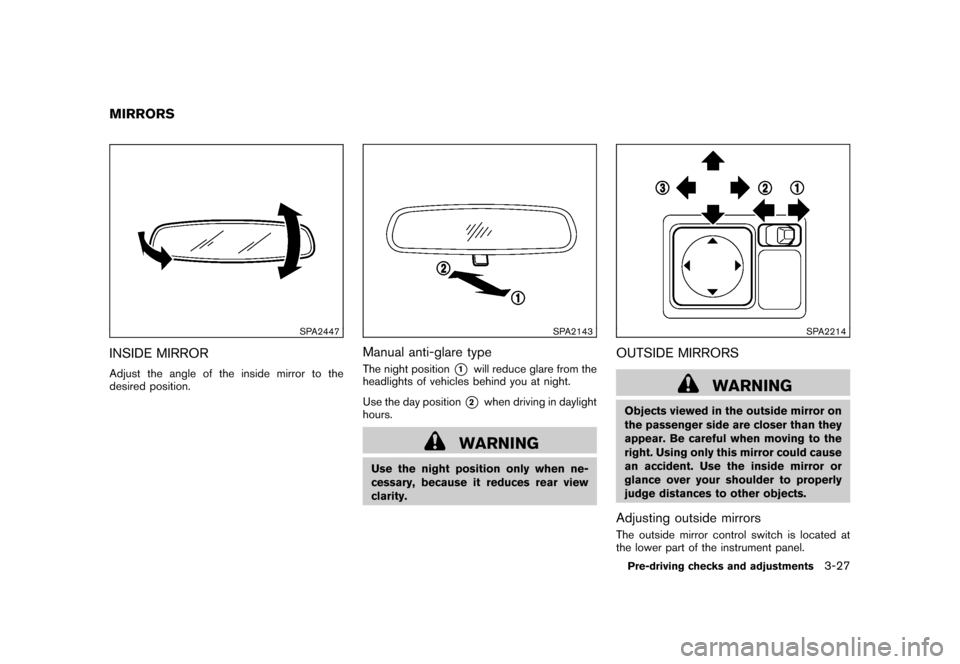
SPA2447
INSIDE MIRRORAdjust the angle of the inside mirror to the
desired position.
SPA2143
Manual anti-glare typeThe night position
*1
will reduce glare from the
headlights of vehicles behind you at night.
Use the day position*2
when driving in daylight
hours.
WARNING
Use the night position only when ne-
cessary, because it reduces rear view
clarity.
SPA2214
OUTSIDE MIRRORS
WARNING
Objects viewed in the outside mirror on
the passenger side are closer than they
appear. Be careful when moving to the
right. Using only this mirror could cause
an accident. Use the inside mirror or
glance over your shoulder to properly
judge distances to other objects.Adjusting outside mirrorsThe outside mirror control switch is located at
the lower part of the instrument panel.
MIRRORS
Pre-driving checks and adjustments
3-27
Page 146 of 345
Black plate (144,1)
Model "Z12-D" EDITED: 2010/ 9/ 27
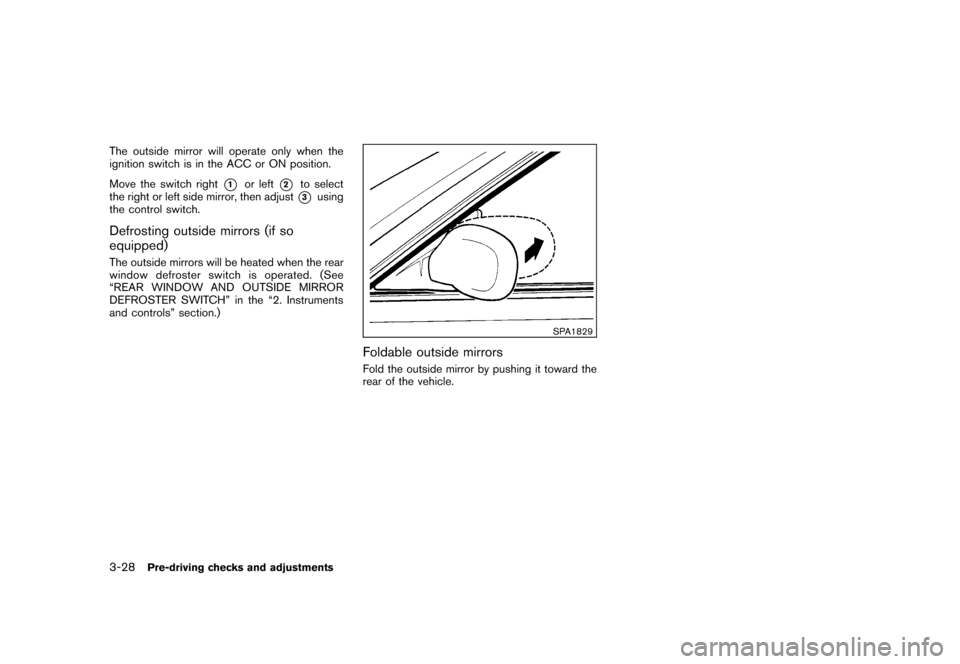
The outside mirror will operate only when the
ignition switch is in the ACC or ON position.
Move the switch right
*1
or left
*2
to select
the right or left side mirror, then adjust*3
using
the control switch.
Defrosting outside mirrors (if so
equipped)The outside mirrors will be heated when the rear
window defroster swi tch is operated. (See
“REAR WINDOW AND OUTSIDE MIRROR
DEFROSTER SWITCH” in the “2. Instruments
and controls” section.)
SPA1829
Foldable outside mirrorsFold the outside mirror by pushing it toward the
rear of the vehicle.
3-28
Pre-driving checks and adjustments
Page 157 of 345
Black plate (155,1)
Model "Z12-D" EDITED: 2010/ 9/ 27
When the selector lever is shifted into the R
(Reverse) position, the monitor display shows
the view to the rear of the vehicle.
The system is designed as an aid to the driver in
detecting large stationary objects to help avoid
damaging the vehicle. The system will not detect
small objects below the bumper and may not
detect objects close to the bumper or on the
ground.
WARNING
.The rear view camera is a conve-
nience but it is not a substitute for
proper backing up. Always turn and
check that it is safe to do so before
backing up. Always back up slowly.
. Objects viewed in the RearView
Monitor differ from actual distance
because a wide-angle lens is used.
Objects in the RearView Monitor
will appear visually opposite than
when viewed in the rear view and
outside mirrors.
. Make sure that the back door is
securely closed when backing up.
. Underneath the bumper and the
corner areas of the bumper cannot
be viewed on the RearView Monitor because of its monitoring range
limitation.
. Do not put anything on the rear view
camera.
. When washing the vehicle with
high-pressure water, be sure not to
spray it around the camera. Other-
wise, water may enter the camera
unit causing water condensation on
the lens, a malfunction, fire or an
electric shock.
. Do not strike the camera. It is a
precision instrument. Otherwise, it
may malfunction or cause damage
resulting in a fire or an electric
shock.
CAUTION
Do not scratch the camera lens when
cleaning dirt or snow from the lens.
SAA2776
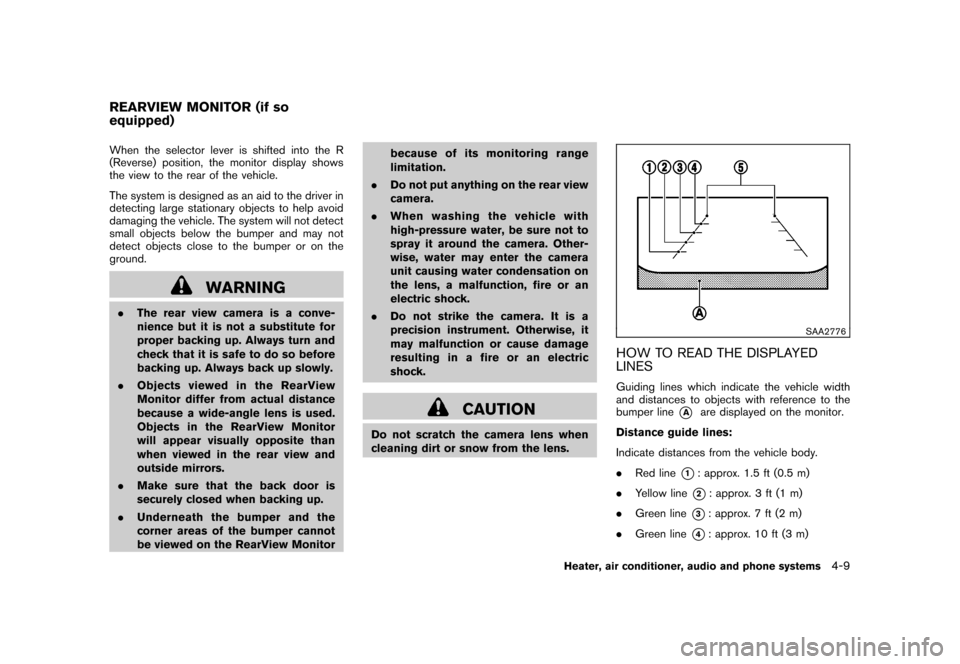
HOW TO READ THE DISPLAYED
LINESGuiding lines which indicate the vehicle width
and distances to objects with reference to the
bumper line
*A
are displayed on the monitor.
Distance guide lines:
Indicate distances from the vehicle body.
. Red line
*1: approx. 1.5 ft (0.5 m)
. Yellow line*2: approx. 3 ft (1 m)
. Green line
*3: approx. 7 ft (2 m)
. Green line
*4: approx. 10 ft (3 m)
REARVIEW MONITOR (if so
equipped)
Heater, air conditioner, audio and phone systems
4-9
Page 162 of 345
Black plate (160,1)
Model "Z12-D" EDITED: 2010/ 9/ 27
SAA2345
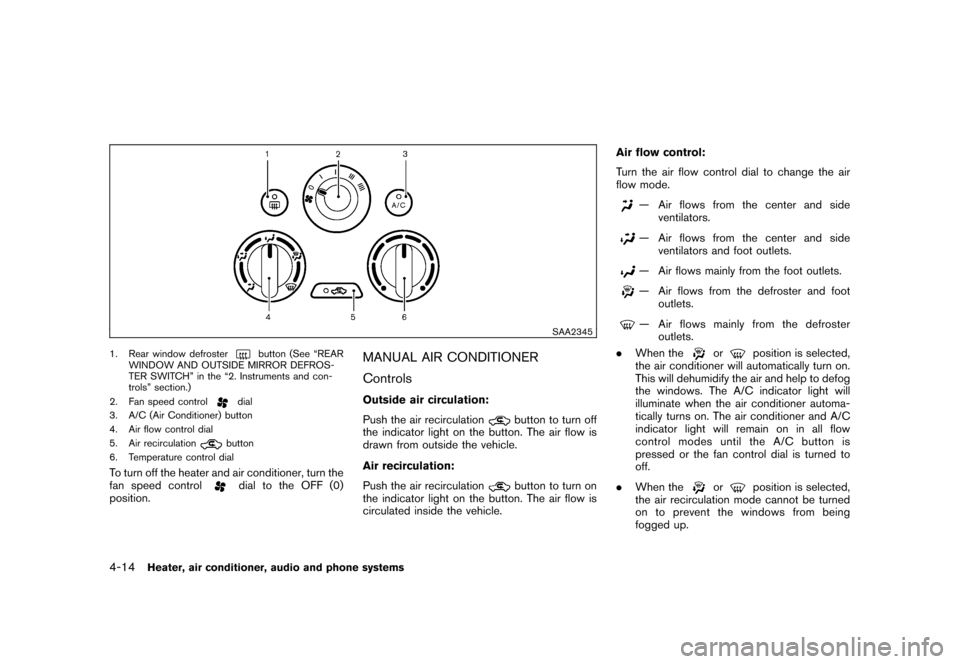
1. Rear window defroster
button (See “REAR
WINDOW AND OUTSIDE MIRROR DEFROS-
TER SWITCH” in the “2. Instruments and con-
trols” section.)
2. Fan speed control
dial
3. A/C (Air Conditioner) button
4. Air flow control dial
5. Air recirculationbutton
6. Temperature control dial
To turn off the heater and air conditioner, turn the
fan speed control
dial to the OFF (0)
position.
MANUAL AIR CONDITIONER
ControlsOutside air circulation:
Push the air recirculation
button to turn off
the indicator light on the button. The air flow is
drawn from outside the vehicle.
Air recirculation:
Push the air recirculationbutton to turn on
the indicator light on the button. The air flow is
circulated inside the vehicle. Air flow control:
Turn the air flow control dial to change the air
flow mode.
— Air flows from the center and side
ventilators.— Air flows from the center and side
ventilators and foot outlets.— Air flows mainly from the foot outlets.— Air flows from the defroster and footoutlets.— Air flows mainly from the defrosteroutlets.
. When the
or
position is selected,
the air conditioner will automatically turn on.
This will dehumidify the air and help to defog
the windows. The A/C indicator light will
illuminate when the air conditioner automa-
tically turns on. The air conditioner and A/C
indicator light will remain on in all flow
control modes until the A/C button is
pressed or the fan control dial is turned to
off.
. When the
or
position is selected,
the air recirculation mode cannot be turned
on to prevent the windows from being
fogged up.
4-14
Heater, air conditioner, audio and phone systems
Page 165 of 345
Black plate (163,1)
Model "Z12-D" EDITED: 2010/ 9/ 27
When the
position is selected, the air
conditioner will automatically turn on. This will
dehumidify the air and help to defog the
windows. The A/C indicator light will illuminate
when the air conditioner automatically turns on.
The air conditioner and A/C indicator light will
remain on in all flow control modes until the A/C
button is pressed or the fan control dial is turned
to off.
SAA2346
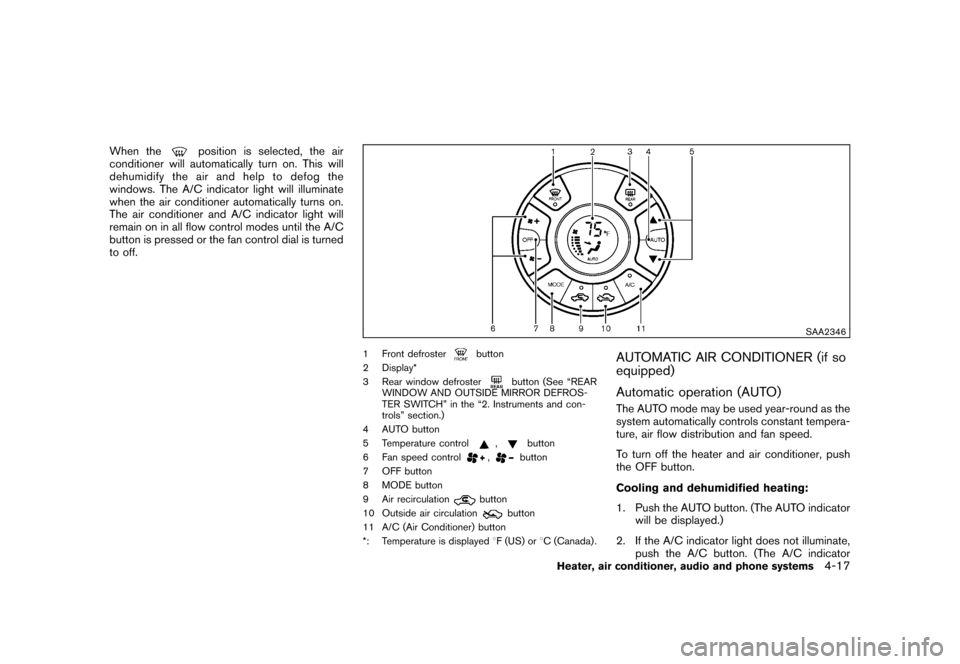
1 Front defroster
button
2 Display*
3 Rear window defroster
button (See “REAR
WINDOW AND OUTSIDE MIRROR DEFROS-
TER SWITCH” in the “2. Instruments and con-
trols” section.)
4 AUTO button
5 Temperature control
,
button
6 Fan speed control
,
button
7 OFF button
8 MODE button
9 Air recirculation
button
10 Outside air circulation
button
11 A/C (Air Conditioner) button
*: Temperature is displayed 8F (US) or 8C (Canada) .
AUTOMATIC AIR CONDITIONER (if so
equipped)
Automatic operation (AUTO)The AUTO mode may be used year-round as the
system automatically controls constant tempera-
ture, air flow distribution and fan speed.
To turn off the heater and air conditioner, push
the OFF button.
Cooling and dehumidified heating:
1. Push the AUTO button. (The AUTO indicator
will be displayed.)
2. If the A/C indicator light does not illuminate, push the A/C button. (The A/C indicator
Heater, air conditioner, audio and phone systems
4-17
Page 228 of 345
Black plate (226,1)
Model "Z12-D" EDITED: 2010/ 9/ 27
chime sounds. The engine will start.
After step 3 is performed, when the ignition
switch is pushed without depressing the brake
pedal, the ignition switch position will change to
ACC.
NOTE:
. When the ignition switch is pushed to
the ACC or ON position or the engine is
started by the above procedures, the
Intelligent Key system warning light
may blink in yellow even if the Intelli-
gent Key is inside the vehicle. This is
not a malfunction. To stop the warning
light from blinking, touch the ignition
switch with the Intelligent Key again.
. If the Intelligent Key system warning
light in the meter is blinking in green,
replace the battery as soon as possible.
(See “KEY BATTERY REPLACEMENT”
in the “8. Maintenance and do-it-your-
self” section.) .
Make sure the area around the vehicle is
clear.
. Check fluid levels such as engine oil, cool-
ant, brake fluid, and window washer fluid as
frequently as possible, or at least whenever
you refuel.
. Check that all windows and lights are clean.
. Visually inspect tires for their appearance
and condition. Also check tires for proper
inflation.
. Lock all doors.
. Position seat and adjust head restraints.
. Adjust inside and outside mirrors.
. Fasten seat belts and ask all passengers to
do likewise.
. Check the operation of warning lights when
the ignition switch is placed in the ON
position. (See “WA RNING/INDICATOR
LIGHTS AND AUDIBLE REMINDERS” in
the “2. Instruments and controls” section.)
MODELS WITHOUT INTELLIGENT KEY
SYSTEM1. Apply the parking brake.
2. Continuously Variable Transmission
(CVT) models:
Move the selector lever to the P (Park) or N
(Neutral) position. (P is recommended.)
The starter is designed so that it does not
operate unless the selector lever is in either
of the above positions.
Manual Transmission (MT) models:
Move the shift lever to the N (Neutral)
position. Depress the clutch pedal fully to
the floor.
The starter is designed not to operate unless
the clutch pedal is fully depressed.
3. Crank the engine with your foot off the
accelerator pedal by turning the ignition
switch to START. Release the switch when
the engine starts. If the engine starts, but
fails to run, repeat the above procedure.
— If the engine is very hard to start in extremely cold weather or when restart-
ing, depress the accelerator pedal a little
(approximately 1/3 to the floor) and hold
it and then crank the engine. Release the
accelerator pedal when the engine
BEFORE STARTING THE ENGINE STARTING THE ENGINE
5-12
Starting and driving
Page 338 of 345
Black plate (2,1)
10-2Control panel buttons — color screen with
navigation system.................................... 4-2
Controls, Steering wheel audio controls ......... 4-53
Coolant Capacities and recommended
fuel/lubricants .................................... 9-2
Changing engine coolant ........................ 8-8
Checking engine coolant level .................. 8-8
Corrosion protection ................................. 7-7
Cruise control ...................................... 5-21
Cup holders ........................................ 2-34
CVT, Driving with CVT
(Continuously Variable Transmission) ........ 5-7, 5-14
D
Daytime running light system ..................... 2-26
Defroster switch, Rear window and outside
mirror defroster switch ............................ 2-24
Dimensions and weights ............................ 9-8
Door open warning light ........................... 2-12
Drive belt ........................................... 8-15
Driving Cold weather driving .......................... 5-29
Driving with CVT
(Continuously Variable Transmission) .... 5-7, 5-14
Driving with manual transmission ........ 5-8, 5-18
Precautions when starting and driving ......... 5-2
E
Economy, Fuel ..................................... 5-23
Electric power steering system ................... 5-25
Electric power steering warning light ............ 2-13
Emission control information label ................ 9-10
Emission control system warranty ................ 9-19Engine
Before starting the engine .................... 5-12
Break-in schedule .............................. 5-23
Capacities and recommended
fuel/lubricants .................................... 9-2
Changing engine coolant ........................ 8-8
Changing engine oil and filter ................... 8-9
Checking engine coolant level .................. 8-8
Checking engine oil level ........................ 8-9
Coolant temperature gauge ..................... 2-6
Emergency engine shut off .................... 5-11
Engine block heater ........................... 5-30
Engine compartment check locations .......... 8-6
Engine cooling system .......................... 8-7
Engine oil ......................................... 8-9
Engine oil and oil filter recommendation ....... 9-5
Engine oil viscosity .............................. 9-5
Engine serial number ............................ 9-9
Engine specifications ............................ 9-7
If your vehicle overheats ....................... 6-11
Starting the engine ............................ 5-12
Event Data Recorders (EDR) ..................... 9-21
Exhaust gas (carbon monoxide) .................... 5-2
F
F.M.V.S.S./C.M.V.S.S. certification label. ........... 9-9
Filter Air cleaner housing filter ...................... 8-16
Changing engine oil and filter ................... 8-9
Flashers (See hazard warning flasher switch) . . . 2-28
Flat tire ................................................ 6-2
Flat towing .......................................... 9-17
Floor mat cleaning ................................... 7-5 Fluid
Brake and clutch fluid ......................... 8-11
Capacities and recommended
fuel/lubricants .................................... 9-2
Continuously Variable Transmission (CVT)
fluid ............................................. 8-11
Engine coolant ................................... 8-7
Engine oil ......................................... 8-9
Window washer fluid .......................... 8-12
FM-AM radio with Compact Disc (CD)
player ........................................ 4-34, 4-38
FM-AM-SAT radio with Compact Disc (CD)
player ............................................... 4-45
Fog light switch .................................... 2-28
Front manual seat adjustment. ...................... 1-3
Front passenger air bag and status light ........ 1-49
Front seat, Front seat adjustment .................. 1-3
Front-seat active head restraints ................... 1-9
Fuel Capacities and recommended
fuel/lubricants .................................... 9-2
Distance to empty ............................... 2-9
Fuel economy .................................. 5-23
Fuel octane rating ................................ 9-3
Fuel recommendation ............................ 9-3
Fuel-filler cap ................................... 3-24
Fuel-filler door .................................. 3-24
Gauge ............................................ 2-7
Fuses ............................................... 8-20
Fusible links ........................................ 8-21
G
Gas cap ............................................ 3-24
Gauge ................................................ 2-4
Model "Z12-D" EDITED: 2010/ 9/ 27