Page 12 of 489
1. Engine hood (P. 3-23)
2. Windshield wiper and washer switch(P. 2-28)
3. Windshield (P. 8-20)
4. Power windows (P. 2-51)
5. Door locks, NISSAN Intelligent Key™,
keys (P. 3-5, 3-12, 3-2)
6. Mirrors (P. 3-32)
7. Tire pressure (P. 9-13)
8. Flat tire (P. 6-2)
9. Tire chains (P. 8-43)
10. Replacing bulbs (P. 8-33)
11. Headlight and turn signal switch
(P. 2-30)
12. Fog light switch (P. 2-34)
13. Tow hooks (if so equipped) (P. 6-13)
See the page number indicated in paren-
theses for operating details.
Page 16 of 489
16. Climate controls (P. 4-36)
17. Power outlet (P. 2-39)
18. Heated seat switch (if so equipped)(P. 2-35)
19. Vehicle Dynamic Control (VDC) off
switch (P. 2-37)
20. Tow mode switch (P. 2-38)
21. Shift selector (P. 5-14)
22. Heated steering wheel (if so equipped)
(P. 2-36)
23. Center stack storage (P. 2-40)
24. Power outlet (P. 2-39)
25. Front passenger air bag status light
(P. 1-66)
26. Auxiliary jack (P. 4-54)
27. 4WD shift switch (if so equipped)
(P. 5-22)
28. Tilt steering wheel control (P. 3-30)
29. Rear or front and rear sonar system off
switch (if so equipped) (P. 2-38)
30. Pedal position adjustment switch
(P. 3-30)
31. Power vent window (if so equipped)
(P. 2-54)
32. Lift gate open/close switch
(if so equipped) (P. 3-23)*: Refer to the separate Navigation System Own-
er’s Manual (if so equipped) .
See the page number indicated in paren-
theses for operating details.
Illustrated table of contents0-7
Page 25 of 489

Tip up for easy entry to the 3rd row
The 2nd row captain’s chairs can be tipped for-
ward for easy entry or exit from the 3rd row bench
seat. To enter the 3rd row
�1, raise the armrest so
it is parallel to the seatback and in the stowed
position, then lift up on the seatback latch located
on the upper corner of the seatback on the 2nd
row captain’s chair and fold the seatback forward
at an angle over the seat base. This will release
the back of the seat so it may be tipped forward. Then
�2lift up on the lower corner of the seat
base and tip the 2nd row captain’s chair forward.
To exit the 3rd row bench seat, lift up on the same
seatback latch and fold the seatback forward
onto the seat base. Then lift up on the seat base
and tip it forward.
2ND ROW BENCH SEAT
ADJUSTMENT (if so equipped)
Reclining
To recline the seatback, pull up on the lever and
lean back.
The recline feature allows adjustment of the seat-
back for occupants of different sizes for added
comfort and to help obtain proper seat belt fit
(see “Precautions on seat belt usage” later in this
section) . Also, the seatback can be reclined to
allow occupants to rest when the vehicle is
stopped and the shift selector is in P (Park) .
Page 27 of 489
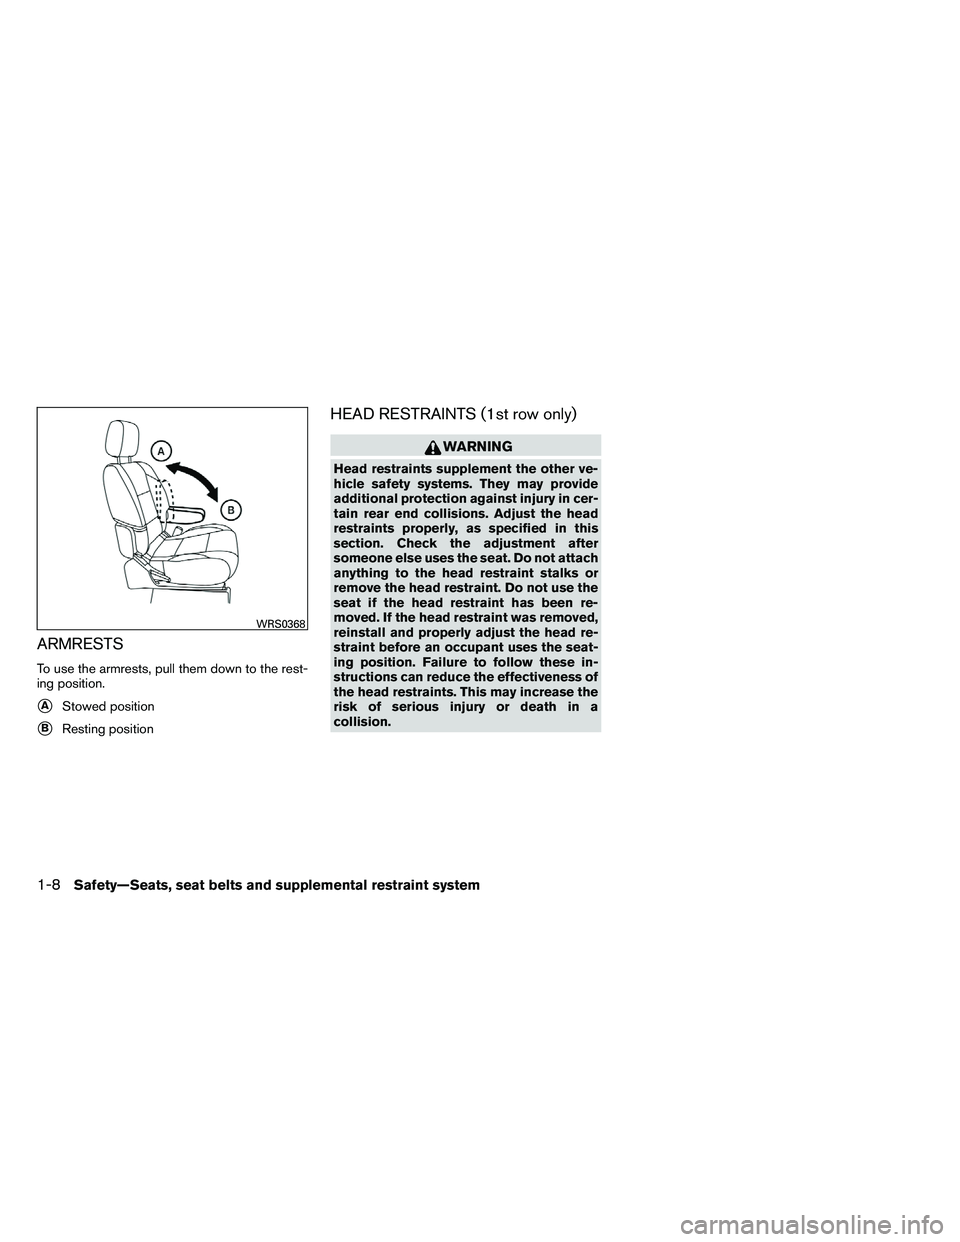
ARMRESTS
To use the armrests, pull them down to the rest-
ing position.
�AStowed position
�BResting position
HEAD RESTRAINTS (1st row only)
Page 38 of 489
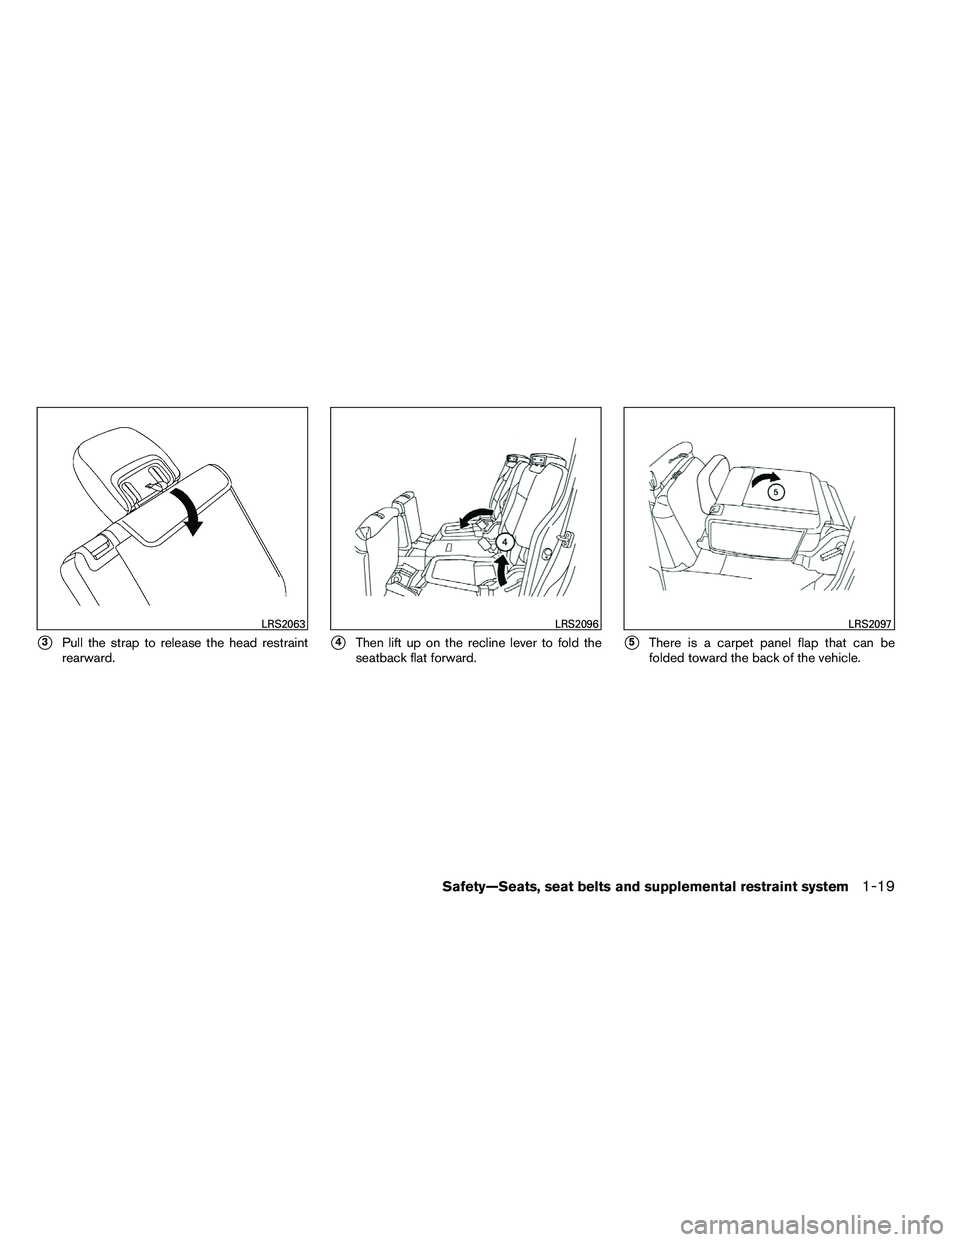
�3Pull the strap to release the head restraint
rearward.�4Then lift up on the recline lever to fold the
seatback flat forward.�5There is a carpet panel flap that can be
folded toward the back of the vehicle.
Page 40 of 489
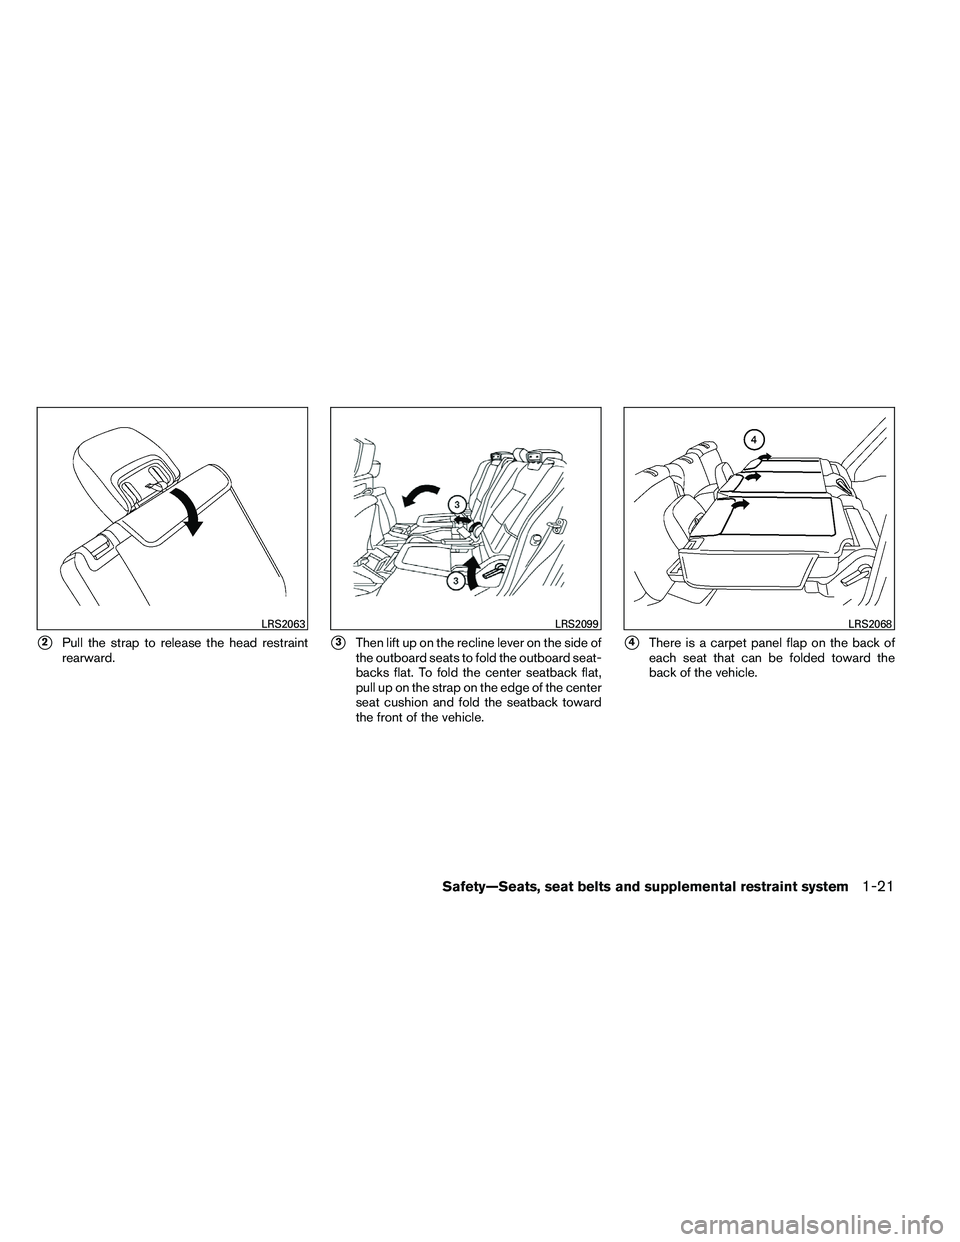
�2Pull the strap to release the head restraint
rearward.�3Then lift up on the recline lever on the side of
the outboard seats to fold the outboard seat-
backs flat. To fold the center seatback flat,
pull up on the strap on the edge of the center
seat cushion and fold the seatback toward
the front of the vehicle.�4There is a carpet panel flap on the back of
each seat that can be folded toward the
back of the vehicle.
Page 48 of 489

�2Slowly pull the seat belt out of the retractor
and insert the tongue into the buckle until
you hear and feel the latch engage.
● The retractor is designed to lock dur-
ing a sudden stop or on impact. A
slow pulling motion permits the seat
belt to move and allows you some
freedom of movement in the seat.
● If the seat belt cannot be pulled from
its fully retracted position, firmly pull
the belt and release it. Then
smoothly pull the belt out of the re-
tractor.�3Position the lap belt portion low and snug
on the hips as shown.
�4Pull the shoulder belt portion toward the
retractor to take up extra slack. Be sure the
shoulder belt is routed over your shoulder
and across your chest.
The front passenger seat and the rear seating
positions three-point seat belts have two modes
of operation: ● Emergency Locking Retractor (ELR)
● Automatic Locking Retractor (ALR) The Emergency Locking Retractor (ELR) mode
allows the seat belt to extend and retract to allow
the driver and passengers some freedom of
movement in the seat. The ELR locks the seat belt
when the vehicle slows down rapidly or during
certain impacts.
The Automatic Locking Retractor (ALR) mode
(child restraint mode) locks the seat belt for child
restraint installation.
When the ALR mode is activated, the seat belt
cannot be extended again until the seat belt
tongue is detached from the buckle and fully
retracted. The seat belt returns to the ELR mode
after the seat belt fully retracts. See “Child re-
straints” later in this section for more information.
The ALR mode should be used only for
child restraint installation. During normal
seat belt use by an occupant, the ALR mode
should not be activated. If it is activated, it
may cause uncomfortable seat belt ten-
sion. It can also change the operation of
the front passenger air bag. See “Front
passenger air bag and status light” later in
this section.
Page 51 of 489
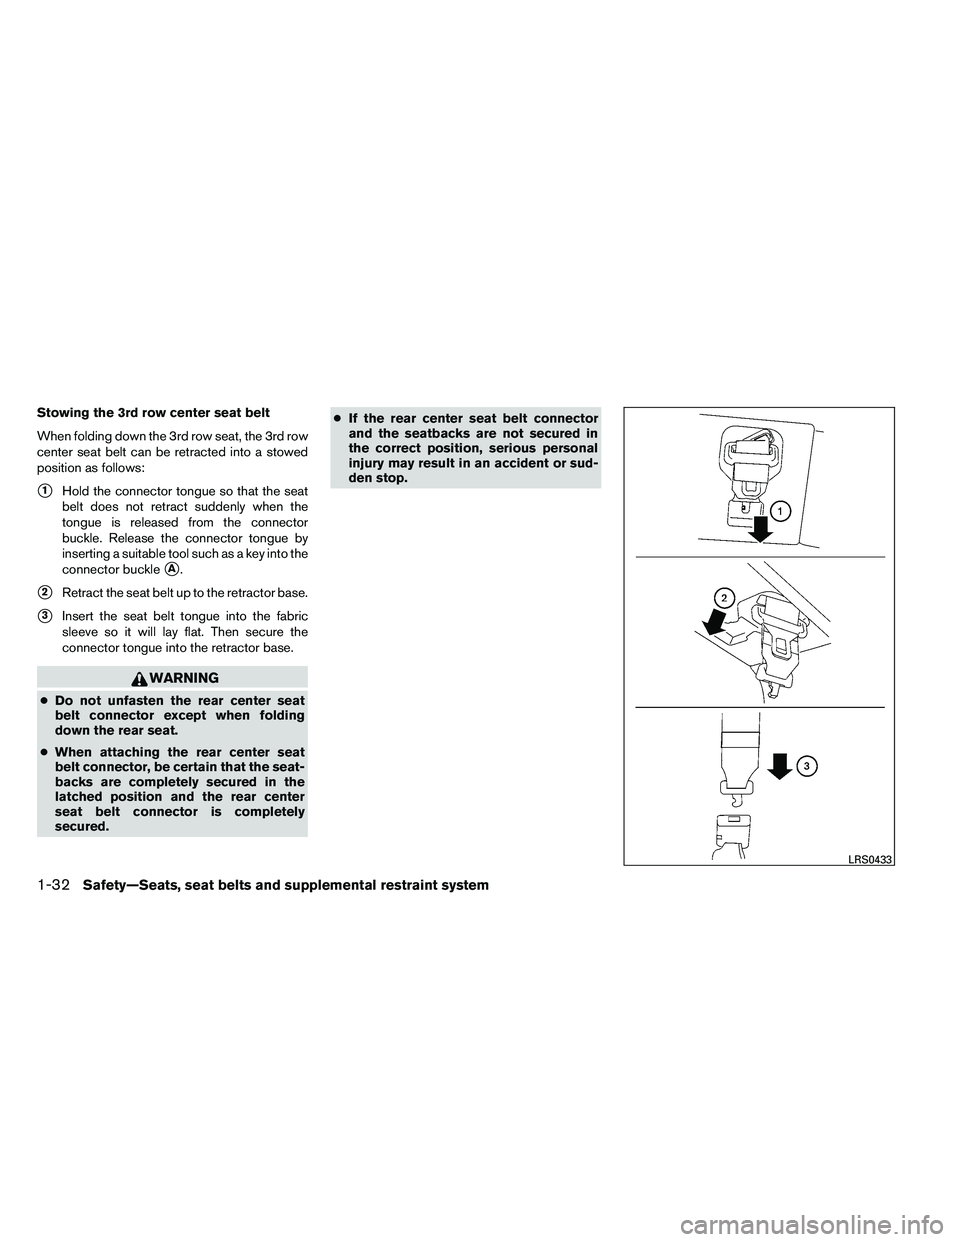
Stowing the 3rd row center seat belt
When folding down the 3rd row seat, the 3rd row
center seat belt can be retracted into a stowed
position as follows:
�1Hold the connector tongue so that the seat
belt does not retract suddenly when the
tongue is released from the connector
buckle. Release the connector tongue by
inserting a suitable tool such as a key into the
connector buckle
�A.
�2Retract the seat belt up to the retractor base.
�3Insert the seat belt tongue into the fabric
sleeve so it will lay flat. Then secure the
connector tongue into the retractor base.

2. Windshield wiper and washer switch(P. 2-28)
3. Windshield (P. 8-20)
4. Power windows (P. 2-51)
5. Door locks, NISSAN Intelligent Key™,
keys (P. 3-5, 3-12, 3-2)
6. Mirrors")

17. Power outlet (P. 2-39)
18. Heated seat switch (if so equipped)(P. 2-35)
19. Vehicle Dynamic Control (VDC) off
switch (P. 2-37)
20. Tow mode switch (P. 2-38)
21. Shif")