Page 69 of 489
3. Route the seat belt tongue through the childrestraint and insert it into the buckle until you
hear and feel the latch engage. Be sure to
follow the child restraint manufacturer’s in-
structions for belt routing. 4. Pull the shoulder belt until the belt is fully
extended. At this time, the seat belt retractor
is in the Automatic Locking Retractor (ALR)
mode (child restraint mode) . It reverts to
Emergency Locking Retractor (ELR) mode
when the seat belt is fully retracted. 5. Allow the seat belt to retract. Pull up on the
shoulder belt to remove any slack in the belt.
Page 70 of 489

6. Remove any additional slack from the seatbelt; press downward and rearward firmly in
the center of the child restraint with your
knee to compress the vehicle seat cushion
and seatback while pulling up on the seat
belt.
7. If the child restraint is equipped with a top tether strap, route the top tether strap and
secure the tether strap to the tether anchor
point (rear seat installation only) . See “In-
stalling top tether strap” in this section. Do
not install child restraints that require the use
of a top tether strap in seating positions that
do not have a top tether anchor. 8. After attaching the child restraint, test it be-
fore you place the child in it. Push it from side
to side while holding the child restraint near
the seat belt path. The child restraint should
not move more than 1 inch (25 mm) , from
side to side. Try to tug it forward and check
to see if the belt holds the restraint in place.
If the restraint is not secure, tighten the seat
belt as necessary, or put the restraint in
another seat and test it again. You may need
to try a different child restraint. Not all child
restraints fit in all types of vehicles. 9. Check to make sure the child restraint is
properly secured prior to each use. If the
seat belt is not locked, repeat steps 3
through 8.
Page 116 of 489
Vehicle information display warnings
and indicators
1. Door and liftgate open warning
2. Lock warning (NISSAN Intelligent Key™model) 3. Low fuel warning
4. Low windshield-washer fluid warning
5. No key warning (NISSAN Intelligent Key™
model)
6. Parking brake warning 7. Shift P warning (NISSAN Intelligent Key™
model)
8. Cruise main switch indicator
9. Cruise set switch indicator
Page 119 of 489

Your vehicle has two types of security systems:● Vehicle security system
● NISSAN Vehicle Immobilizer System
VEHICLE SECURITY SYSTEM
The vehicle security system provides visual and
audible alarm signals if someone opens the doors
when the system is armed. It is not, however, a
motion detection type system that activates when
a vehicle is moved or when a vibration occurs.
The system helps deter vehicle theft but cannot
prevent it, nor can it prevent the theft of interior or
exterior vehicle components in all situations. Al-
ways secure your vehicle even if parking for a brief period. Never leave your keys in the ignition,
and always lock the vehicle when unattended. Be
aware of your surroundings, and park in secure,
well-lit areas whenever possible.
Many devices offering additional protection, such
as component locks, identification markers, and
tracking systems, are available at auto supply
stores and specialty shops. Your NISSAN dealer
may also offer such equipment. Check with your
insurance company to see if you may be eligible
for discounts for various theft protection features.
How to arm the vehicle security
system
1. Close all windows.
(The system can be
armed even if the windows are open.)
2. Place the ignition switch in the LOCK posi- tion and remove the key.
3. Close all doors. Lock all doors. The doors can be locked with:
● the power door lock switch (if the door is
opened, locked and then closed) .
● the key — master or mechanical (NISSAN
Intelligent Key™ models) .
● any request switch (NISSAN Intelligent
Key™ models) .
● the keyfob or NISSAN Intelligent Key™. Keyfob and NISSAN Intelligent Key™ opera-
tion:
●
Push the
Page 120 of 489
●If the key is turned slowly when locking
the driver’s door, the system may not
arm. Furthermore, if the key is turned
beyond the vertical position toward the
unlock position to remove the key, the
system may be disarmed when the key
is removed. If the indicator light fails to
glow for a period of time, unlock the
door once and lock it again.
● Even when the driver and/or passen-
gers are in the vehicle, the system will
arm with all doors closed and locked
with the ignition switch placed in the
OFF position.
Vehicle security system activation
The vehicle security system will give the following
alarm:
● The headlights blink and the horn sounds
intermittently.
● The alarm automatically turns off after a pe-
riod of time. However, the alarm reactivates if
the vehicle is tampered with again. The alarm
can be shut off by unlocking the driver’s door
with the key, a request switch or by pressing
the
Page 121 of 489

Security indicator light
The security indicator light blinks whenever the
ignition switch is placed in the LOCK, OFF or ACC
position. This function indicates the NISSAN Ve-
hicle Immobilizer System is operational.
If the NISSAN Vehicle Immobilizer System is mal-
functioning, the light will remain on while the
ignition switch is placed in the ON position.
If the light still remains on and/or the en-
gine will not start, see a NISSAN dealer for
NISSAN Vehicle Immobilizer System ser-
vice as soon as possible. Please bring all
registered keys that you have when visiting
your NISSAN dealer for service.
SWITCH OPERATION
The windshield wiper and washer operates when
the ignition switch is in the ON position.
Push the lever down to operate the wiper at the
following speed:
�1Intermittent (INT) — intermittent operation
can be adjusted by turning the knob toward
�A(Slower) or�B(Faster) . Also, the inter-
mittent operation speed varies in accor-
dance with the vehicle speed. (For example,
when the vehicle speed is high, the intermit-
tent operation speed will be faster.) NOTE:
You can turn on or turn off the driving
speed dependent intermittent wiper func-
tion. Refer to “Comfort & convenience set-
tings” in the “Monitor, climate, audio,
phone and voice recognition systems” sec-
tion later in this manual.
�2Low (LO) — continuous low speed operation
�3High (HI) — continuous high speed opera-
tion
Push the lever up
�4to have one sweep opera-
tion (MIST) of the wiper.
Pull the lever toward you
�5to operate the
washer. The wiper will also operate several times.
Page 122 of 489

CAUTION
●Do not operate the washer continu-
ously for more than 30 seconds.
● Do not operate the washer if the
windshield-washer reservoir is empty.
● Do not fill the windshield-washer reser-
voir with washer fluid concentrates at
full strength. So methyl alcohol based
windshield-washer fluid concentrates
may permanently stain the grille if
spilled with filling the windshield-
washer fluid reservoir.
● Pre-mix windshield-washer fluid con-
centrates with water to the manufactur-
er’s recommended levels before pour-
ing the fluid into the windshield-washer
reservoir. Do not use the windshield-
washer reservoir to mix the windshield-
washer fluid concentrate and water. The rear window wiper and washer operate when
the ignition switch is placed in the ON position.
Turn the switch clockwise from the OFF position
to operate the wiper.
�1Intermittent (INT) – intermittent operation
(not adjustable)
�2ON – continuous low speed operation
Push the switch forward
�3to operate the
washer. The wiper will also operate several times.
Page 134 of 489
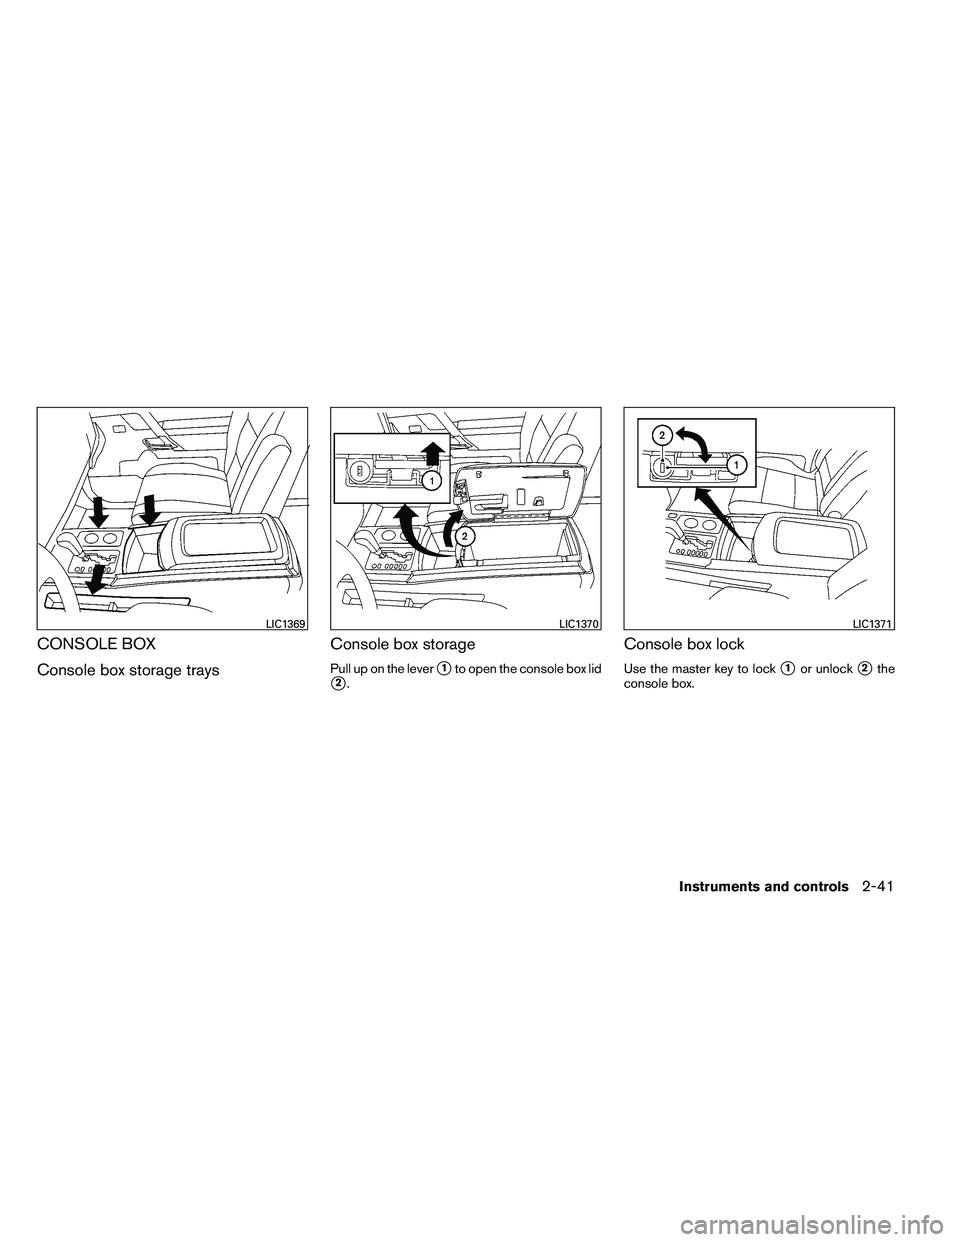
CONSOLE BOX
Console box storage traysConsole box storage
Pull up on the lever�1to open the console box lid
�2.
Console box lock
Use the master key to lock�1or unlock�2the
console box.

 3. Low fuel warning
4. Low windshield-washer fluid warning
5. No")