Page 252 of 489
Precision phased audio (if so equipped):
To turn on or off the precision phased audio,
press the SETTING button. Then touch the “Au-
dio” key; the audio settings screen will be dis-
played. Touch the “Precision Phased Audio ON”
key. If the amber indicator light is displayed, the
precision phased audio is enabled. Touching the
“Precision Phased Audio ON” key again will turn
off the precision phased audio; the indicator light
will disappear.
When this item is turned on, super high pitch
sound and super low pitch sound are empha-
sized and midrange sound is played naturally.While in this screen, you can also adjust the other
audio settings by touching the corresponding
key.
Once you have adjusted the sound quality to the
desired level, touch the “BACK” key.
Clock set:
For setting the clock, see “Clock” under the
“Control panel buttons – color screen without
navigation system” heading earlier in this section.
Page 257 of 489
DISC/AUX button:
When the DISC/AUX button is pressed with the
system off and the CF card inserted, the system
will turn on. If another audio source is playing and
a CF card is inserted, press the DISC/AUX but-
ton repeatedly until the center display changes to
the CompactFlash�mode.
CF display mode
While listening to CF certain text might be able to
be displayed.
Depending on how the files are encoded on the
CF the following text might be able to be dis-
played by touching the “Text” key:
● Folder displays the name of the current
folder being accessed.
● File displays the name of the file currently
playing.
● Song displays the ID3 encoded tag of the
song name. ●
Album displays the ID3 encoded tag of the
album name.
● Artist displays the ID3 encoded tag of the
artist’s name.
Press the BACK button to exit the CF text display
screen.
SEEK/CAT and TRACK buttons:
Press the
Page 259 of 489
NOTE:
If the hard drive needs to be replaced due
to a malfunction, all stored music data will
be erased.
Recording CDs
1. Operate the audio system to play a CD.For information on playing CDs, see “Com-
pact Disc (CD) player operation” earlier in
this section.
2. Touch the “REC” key. REC CD appears on the screen.
NOTE: ● The system starts playing and recording the
1st track on the CD when the “REC” key is
selected. ●
Individual tracks from a CD cannot be se-
lected to be recorded to the Music Box.
● The skip, fast forward and rewind features
are disabled while the CD is recording.
● The recording process can be stopped at
any time. All tracks that were played before
the CD was stopped are stored.
● Individual tracks can be deleted from the
hard drive after the CD is recorded.
● The system records faster than it plays.
Page 261 of 489
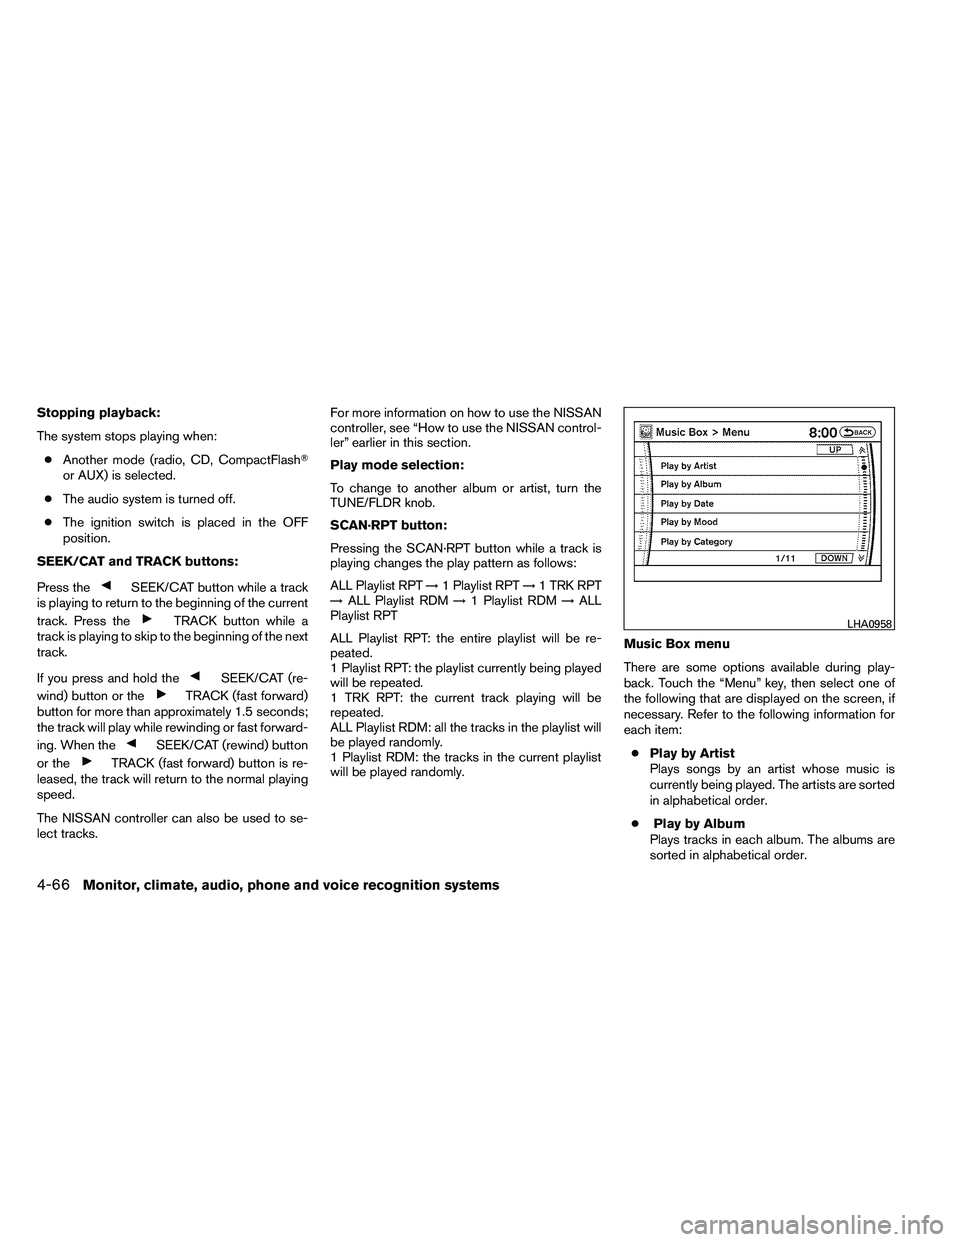
Stopping playback:
The system stops playing when:● Another mode (radio, CD, CompactFlash�
or AUX) is selected.
● The audio system is turned off.
● The ignition switch is placed in the OFF
position.
SEEK/CAT and TRACK buttons:
Press the
Page 263 of 489

●Search Song Details
Set the conditions and touch the “Start
Song Search” key to search for a desired
song that is stored in the system. The con-
ditions are as follows:
– Music Tempo (All, Slow, Normal and Fast)
– Decade (All, ’70s, ’80s, ’90s, ’00s, ’10s and After)
– Group (All, Male Artist, Female Artist, Group and Duo)
– Category (Rock, Pop, Latin, Jazz, R&B, Hip Hop, Club/Dance, Punk, Reggae,
Folk, Blues, Country, Metal, Easy Listen-
ing, New Age, Soundtrack, Gospel & Re-
ligious, World, Classical, Children’s and
Other)
● Search Keywords
Input a search keyword using the keypad
displayed on the screen.
For information, see “How to use the touch
screen” earlier in this section.
● Edit Albums
Select a category (Rec. (Recorded) Date,
Name, Released Year and Artist) and edit
the details using the keypad displayed on
the screen.
For information, see “How to use the touch
screen” earlier in this section. ●
Music Box System Info.
Displays the following information about the
Music Box audio system:
– Music Box Used / Free Space Information about Saved Albums, Saved
Tracks and Remaining Time is displayed.
– Mood Categories Number of saved tracks and their catego-
ries (Relaxing Music, Lively Music, Slow
Music, Upbeat Music and Others) are
displayed.
– Deleted Items Information about the deleted tracks is
displayed.
– Search Missing Titles If titles are not displayed for CDs that
have been recorded, titles can be ac-
quired using one of the following meth-
ods:
● Retrieve from HDD
Searches the title using the database in
the hard drive.
● Retrieve from CF
Searches the title from the information
acquired on the Internet. ●
Transfer Missing Titles to CFTransfers the information of the album re-
corded without titles to a CompactFlash�
card. Visit www.nissanusa.com/gracenote/
for details.
– Music Box Settings
For information, see “Music Box settings”
later in this section.
– CDDB Version The version of the built-in Gracenote�
Database is displayed.
4-68Monitor, climate, audio, phone and voice recognition systems
Page 264 of 489

Music Box text display:
While listening to a track in the Music Box audio
system you can view certain text. Touch the “Text”
key to display the following information for each
item:● Set Mood
Set the mood category of the track to “Re-
laxing Music”, “Lively Music”, “Slow Music”
or “Upbeat Music”.
● Delete Track
Delete the track being played. ●
Edit Info.
Edit the name of the track being played and
its artist using the keypad displayed on the
screen.
For information, see “How to use the touch
screen” earlier in this section.
The category of the track can also be set to
Rock, Pop, Latin, Jazz, R&B, Hip Hop,
Club/Dance, Punk, Reggae, Folk, Blues,
Country, Metal, Easy Listening, New Age,
Soundtrack, Gospel & Religious, World,
Classical, Children’s and Others.
● Remove Track
Reset the mood setting of a track.Restoring deleted data
Deleted music data can be restored by perform-
ing the following:
1. Touch the “Menu” key and then the touch the “Music Box System Info.” key on the screen.
2. Touch the “Deleted Items” key and then the “Album/Track” key.
3. Touch the “Restore Album/Track” key to re- store the deleted music data.
Page 269 of 489

1. Volume control switch
2. MODE select switch
3. POWER on/off switch
4. Tuning switch1. Volume control switch
2. Phone operation switch
3. POWER on and MODE select switch
4. Tuning switch
STEERING WHEEL SWITCH FOR
AUDIO CONTROL
The audio system can be operated using the
controls on the steering wheel.
POWER on/off switch
If you have the Type A switch, with the ignition
switch placed in the ACC or ON position, push
the POWER switch to turn the audio system on
or off.
If you have the Type B switch, with the ignition
switch placed in the ACC or ON position, push
the MODE switch to turn the audio system on.
MODE select switch
Push the mode select switch to change the mode
in the following sequence: PRESET A
→PRE-
SET B →PRESET C →Music Box** (if so
equipped) →CD* →CompactFlash�* (if so
equipped) →DVD* (if so equipped) →AUX***.
*These modes are only available when compat-
ible media storage is inserted into the device.
**This mode is only available when music has
been downloaded into the Music Box hard-disk
drive audio system.
***This mode is only available when a compatible
auxiliary device is plugged into the AUX jack.
Volume control switch
Push the volume control switch up or down to
increase or decrease the volume.
Page 273 of 489
Movies will not be shown on the front display
while the vehicle is in any drive position to reduce
driver distraction. Audio is available when a movie
is played. To view movies in the front display, stop
the vehicle in a safe location, move the shift
selector to the P (Park) position and apply the
parking brake.
1. EJECT button
2. DVD slot
3. Auxiliary input jacks
DIGITAL VIDEO DISC (DVD) PLAYER
CONTROLS
1.
:
To turn on or off the precision phased audio,
press the SETTING button. Then touch the “Au-
dio” key; the audio settings screen will be dis-
played. Touch")