Page 28 of 489
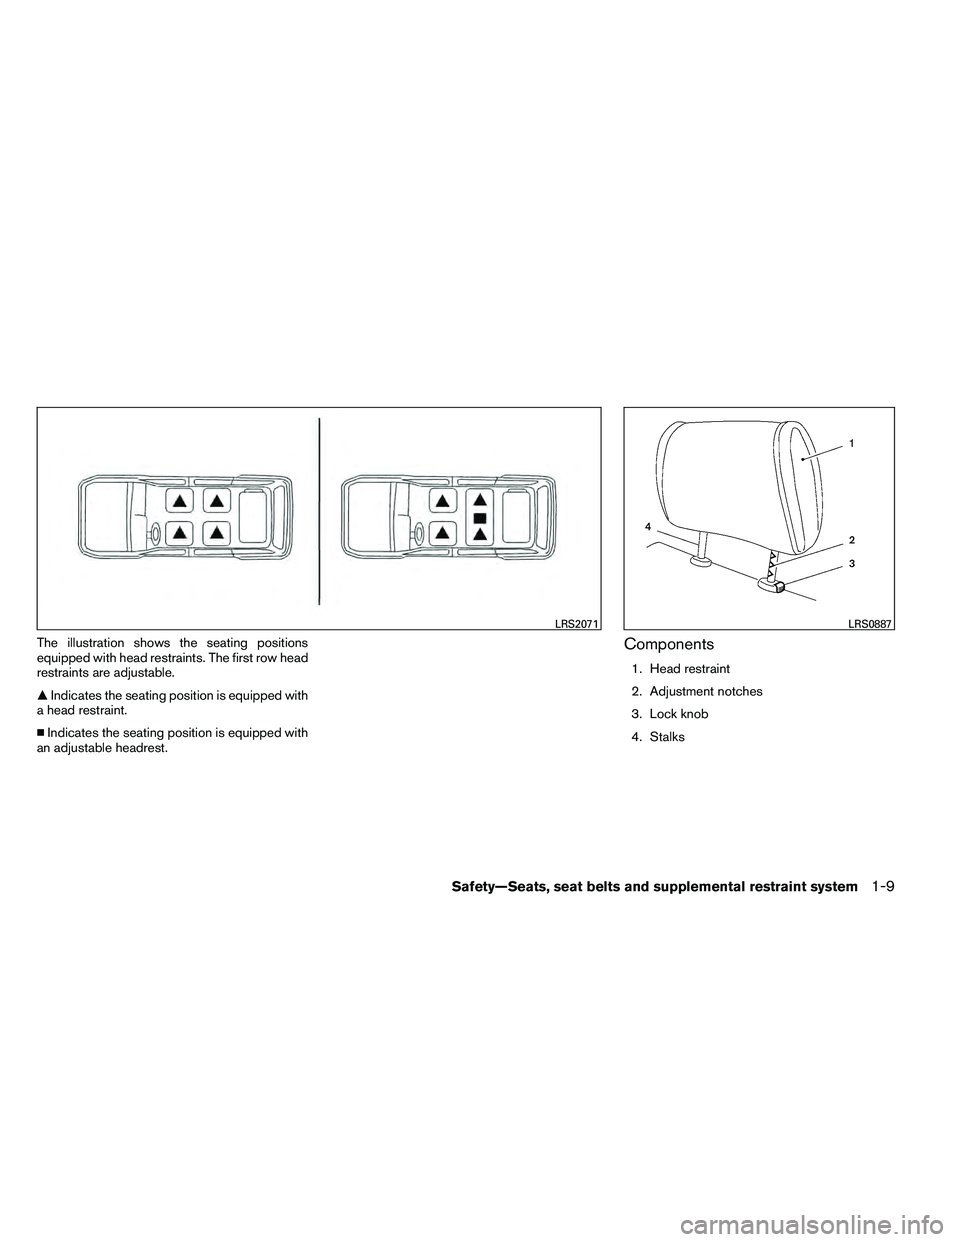
The illustration shows the seating positions
equipped with head restraints. The first row head
restraints are adjustable.
�Indicates the seating position is equipped with
a head restraint.
� Indicates the seating position is equipped with
an adjustable headrest.Components
1. Head restraint
2. Adjustment notches
3. Lock knob
4. Stalks
Page 29 of 489
Adjustment
Adjust the head restraint so the center is level
with the center of the seat occupant’s ears.To raise the head restraint, pull it up.
To lower, push and hold the lock knob and push
the head restraint down.
Page 30 of 489

Removal
Use the following procedure to remove the ad-
justable head restraints.1. Pull the head restraint up to the highest position.
2. Push and hold the lock knob.
3. Remove the head restraint from the seat.
4. Store the head restraint properly so it is not loose in the vehicle.
5. Reinstall and properly adjust the head re- straint before an occupant uses the seating
position.
Install
1. Align the head restraint stalks with the holesin the seat. Make sure the head restraint is
facing the correct direction. The stalk with
the adjustment notches
�1must be installed
in the hole with the lock knob
�2.
2. Push and hold the lock knob and push the head restraint down.
3. Properly adjust the head restraint before an occupant uses the seating position.
Front-seat Active Head Restraints
The Active Head Restraint moves forward utiliz-
ing the force that the seatback receives from the
occupant in a rear-end collision. The movement
of the head restraint helps support the occu-
pant’s head by reducing its backward movement
and helping absorb some of the forces that may
lead to whiplash-type injuries.
Active Head Restraints are effective for collisions
at low to medium speeds in which it is said that
whiplash injury occurs most.
Active Head Restraints operate only in certain
rear-end collisions. After the collision, the head
restraints return to their original position.
Page 34 of 489
Components
1. Adjustable headrest
2. Adjustment notches
3. Lock knob
4. Stalks
Adjustment
Adjust the headrest so the center is level with the
center of the seat occupant’s ears.To raise the headrest, pull it up.
Page 53 of 489
WARNING
●After adjustment, release the adjust-
ment button and try to move the shoul-
der belt anchor up and down to make
sure it is securely fixed in position.
● The shoulder belt anchor height should
be adjusted to the position best for you.
Failure to do so may reduce the effec-
tiveness of the entire restraint system
and increase the chance or severity of
injury in an accident.
SEAT BELT EXTENDERS
If, because of body size or driving position, it is
not possible to properly fit the lap/shoulder belt
and fasten it, an extender that is compatible with
the installed seat belts is available that can be
purchased. The extender adds approximately 8 in
(200 mm) of length and may be used for either
the driver or front passenger seating position.
See a NISSAN dealer for assistance with pur-
chasing an extender if an extender is required.
Page 57 of 489
 sys-
tem. Some child restraints include rigid or
webbing-moun")
This vehicle is equipped with a universal child
restraint anchor system, referred to as the LATCH
(Lower Anchors and Tethers for CHildren) sys-
tem. Some child restraints include rigid or
webbing-mounted attachments that can be con-
nected to these anchors. For details, see “LATCH
(Lower Anchors and Tethers for CHildren) sys-
tem” later in this section.
If you do not have a LATCH compatible child
restraint, the vehicle seat belts can be used.
Several manufacturers offer child restraints for
infants and children of various sizes. When se-
lecting any child restraint, keep the following
points in mind:● Choose only a restraint with a label certifying
that it complies with Federal Motor Vehicle
Safety Standard 213 or Canadian Motor
Vehicle Safety Standard 213.
● Check the child restraint in your vehicle to be
sure it is compatible with the vehicle’s seat
and seat belt system. ●
If the child restraint is compatible with your
vehicle, place your child in the child restraint
and check the various adjustments to be
sure the child restraint is compatible with
your child. Choose a child restraint that is
designed for your child’s height and weight.
Always follow all recommended procedures.
All U.S. states and Canadian provinces or
territories require that infants and small
children be restrained in an approved child
restraint at all times while the vehicle is
being operated. Canadian law requires the
top tether strap on forward-facing child
restraints be secured to the designated an-
chor point on the vehicle.
LATCH (Lower Anchors and Tethers
for CHildren) SYSTEM
Your vehicle is equipped with special anchor
points that are used with LATCH (Lower Anchors
and Tethers for CHildren) system compatible
child restraints. This system may also be referred
to as the ISOFIX or ISOFIX compatible system.
With this system, you do not have to use a vehicle
seat belt to secure the child restraint.
Page 67 of 489

3. The back of the child restraint should besecured against the vehicle seatback.
If necessary, adjust or remove the head re-
straint to obtain the correct child restraint fit. If
the head restraint is removed, store it in a
secure place. Be sure to reinstall the head
restraint when the child restraint is re-
moved.
See “Head restraints” in this section
for head restraint adjustment information.
If the seating position does not have an
adjustable head restraint and it is interfering
with the proper child restraint fit, try another
seating position or a different child restraint. 4. For child restraints that are equipped with
webbing-mounted attachments, remove any
additional slack from the anchor attach-
ments. Press downward and rearward firmly
in the center of the child restraint with your
knee to compress the vehicle seat cushion
and seatback while tightening the webbing
of the anchor attachments.
5. Tighten the tether strap according to the manufacturer’s instructions to remove any
slack. 6. After attaching the child restraint, test it be-
fore you place the child in it. Push it from side
to side while holding the child restraint near
the LATCH attachment path. The child re-
straint should not move more than 1 inch (25
mm) , from side to side. Try to tug it forward
and check to see if the LATCH attachment
holds the restraint in place. If the restraint is
not secure, tighten the LATCH attachment
as necessary, or put the restraint in another
seat and test it again. You may need to try a
different child restraint. Not all child re-
straints fit in all types of vehicles.
Page 72 of 489
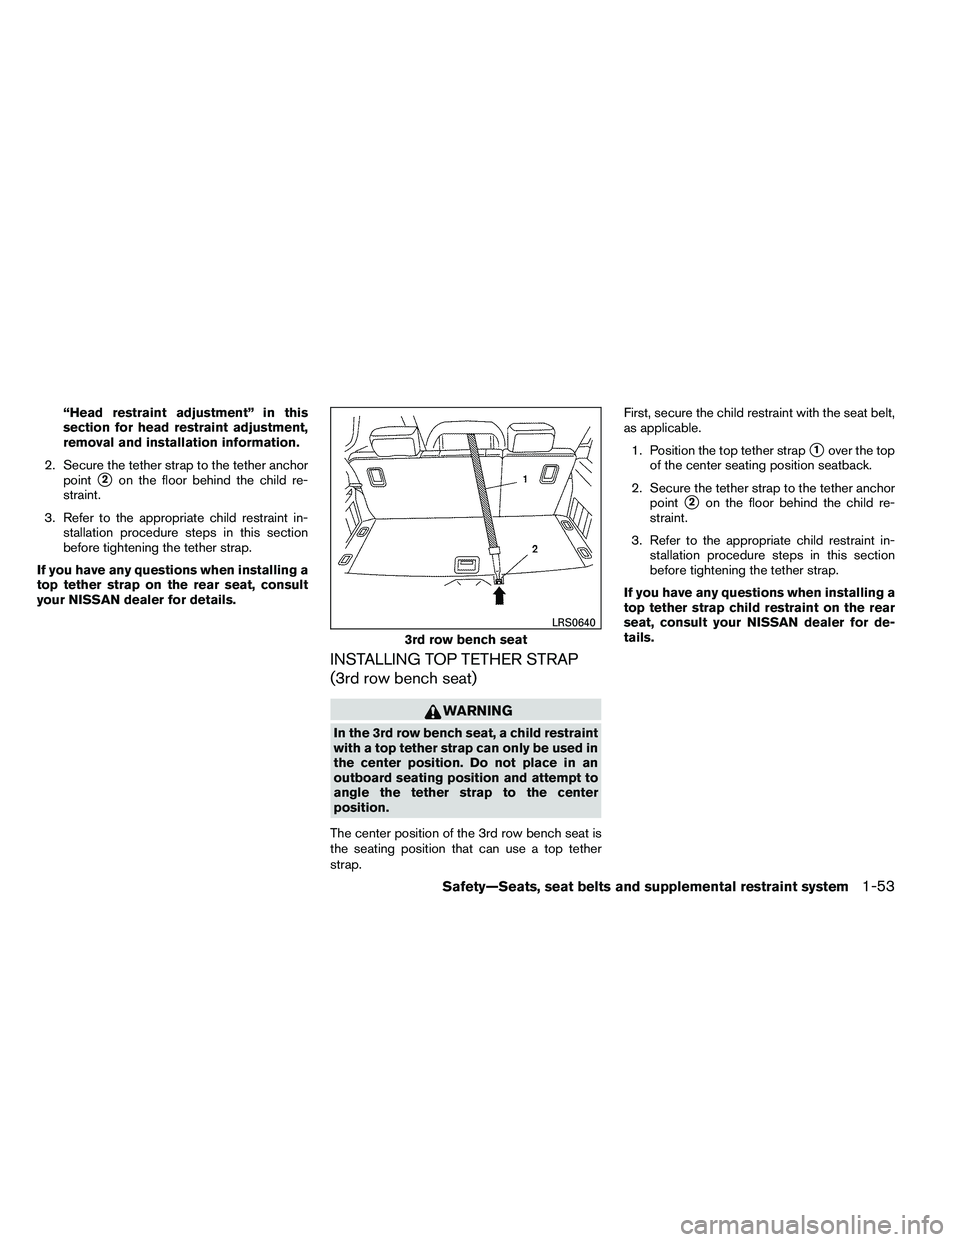
“Head restraint adjustment” in this
section for head restraint adjustment,
removal and installation information.
2. Secure the tether strap to the tether anchor point
�2on the floor behind the child re-
straint.
3. Refer to the appropriate child restraint in- stallation procedure steps in this section
before tightening the tether strap.
If you have any questions when installing a
top tether strap on the rear seat, consult
your NISSAN dealer for details.
INSTALLING TOP TETHER STRAP
(3rd row bench seat)