Page 221 of 489
Display settings
Select the “Display” key and press the ENTER
button. The Display settings screen will appear.Brightness/contrast:
Select the “Brightness” key or the “Contrast” key
to adjust the brightness or contrast of the display
background. Use the NISSAN controller to adjust
the brightness to darker or brighter and the con-
trast to lower or higher.
The new settings are automatically saved when
you exit the setting screen by pressing the BACK
button or any other mode button.Display off:
Select the “Display ON” key. The indicator of the
“Display ON” turns amber and the message
above will be displayed briefly. When the audio,
HVAC (Heater and air conditioner) , or any mode
button on the control panel is operated, the dis-
play turns on for that operation. If one of the
control panel buttons is pressed, the display will
not automatically turn off until that operation is
finished. Otherwise, the screen turns off auto-
matically after five seconds.
Page 234 of 489

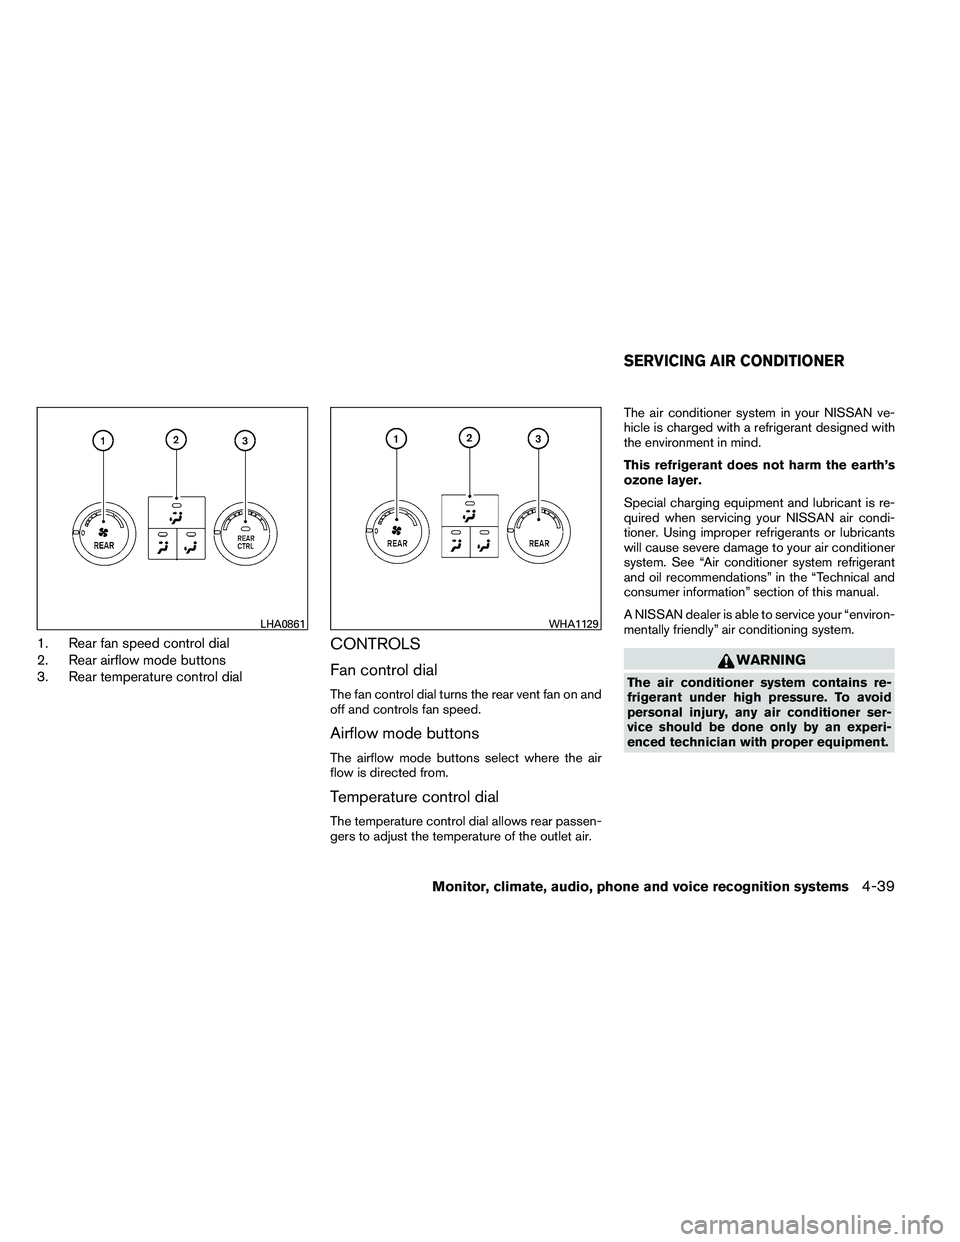
1. Rear fan speed control dial
2. Rear airflow mode buttons
3. Rear temperature control dialCONTROLS
Fan control dial
The fan control dial turns the rear vent fan on and
off and controls fan speed.
Airflow mode buttons
The airflow mode buttons select where the air
flow is directed from.
Temperature control dial
The temperature control dial allows rear passen-
gers to adjust the temperature of the outlet air.The air conditioner system in your NISSAN ve-
hicle is charged with a refrigerant designed with
the environment in mind.
This refrigerant does not harm the earth’s
ozone layer.
Special charging equipment and lubricant is re-
quired when servicing your NISSAN air condi-
tioner. Using improper refrigerants or lubricants
will cause severe damage to your air conditioner
system. See “Air conditioner system refrigerant
and oil recommendations” in the “Technical and
consumer information” section of this manual.
A NISSAN dealer is able to service your “environ-
mentally friendly” air conditioning system.
Page 244 of 489

For information on how to use the NISSAN con-
troller, see “How to use the NISSAN controller”
earlier in this section.Precision phased audio (if so equipped):
To turn on or off the precision phased audio,
press the SETTING button. Select the “Audio”
key using the NISSAN controller, then press the
ENTER button, the audio settings screen will be
displayed. Select the “Precision Phased Audio”
key, then press the ENTER button. If the amber
indicator light is displayed, the precision phased
audio is enabled. Pressing the ENTER button
again will turn off the precision phased audio, the
indicator light will disappear.
When this item is turned on, super high pitch
sound and super low pitch sound are empha-
sized and midrange sound is played naturally.While in this screen, you can also adjust the other
audio settings by selecting the corresponding
key.
Once you have adjusted the sound quality to the
desired level, press the BACK button.
For information on how to use the NISSAN con-
troller, see “How to use the NISSAN controller”
earlier in this section.
Clock set:
For setting the clock, see “Clock” under the
“Control panel buttons – color screen without
navigation system” heading earlier in this section.
Page 252 of 489
Precision phased audio (if so equipped):
To turn on or off the precision phased audio,
press the SETTING button. Then touch the “Au-
dio” key; the audio settings screen will be dis-
played. Touch the “Precision Phased Audio ON”
key. If the amber indicator light is displayed, the
precision phased audio is enabled. Touching the
“Precision Phased Audio ON” key again will turn
off the precision phased audio; the indicator light
will disappear.
When this item is turned on, super high pitch
sound and super low pitch sound are empha-
sized and midrange sound is played naturally.While in this screen, you can also adjust the other
audio settings by touching the corresponding
key.
Once you have adjusted the sound quality to the
desired level, touch the “BACK” key.
Clock set:
For setting the clock, see “Clock” under the
“Control panel buttons – color screen without
navigation system” heading earlier in this section.
Page 255 of 489
SEEK/CAT and TRACKbuttons:
When the SEEK/CAT
Page 257 of 489
DISC/AUX button:
When the DISC/AUX button is pressed with the
system off and the CF card inserted, the system
will turn on. If another audio source is playing and
a CF card is inserted, press the DISC/AUX but-
ton repeatedly until the center display changes to
the CompactFlash�mode.
CF display mode
While listening to CF certain text might be able to
be displayed.
Depending on how the files are encoded on the
CF the following text might be able to be dis-
played by touching the “Text” key:
● Folder displays the name of the current
folder being accessed.
● File displays the name of the file currently
playing.
● Song displays the ID3 encoded tag of the
song name. ●
Album displays the ID3 encoded tag of the
album name.
● Artist displays the ID3 encoded tag of the
artist’s name.
Press the BACK button to exit the CF text display
screen.
SEEK/CAT and TRACK buttons:
Press the
Page 261 of 489
Stopping playback:
The system stops playing when:● Another mode (radio, CD, CompactFlash�
or AUX) is selected.
● The audio system is turned off.
● The ignition switch is placed in the OFF
position.
SEEK/CAT and TRACK buttons:
Press the
Page 283 of 489

MENU:
If the media is in PLAY mode and the MENU
button is pressed, the DVD menu will appear on
the screen. Use the Navigation Keys to navigate
within the menu and use ENTER to select the
item.
Press the MENU button again to return to PLAY
mode.
TITLE:
Press the TITLE button to return the DVD media
to the “title” of the DVD.
Press the TITLE button again to return to the
previous stop point and play.
BACK:
Press the BACK button to exit the current active
menu and return to the previous menu.
SUBTITLE:
Press the SUBTITLE button to call up subtitle
selection menu.
Repeatedly press the SUBTITLE button to cycle
through each available subtitle.
AUDIO:
Press the AUDIO button to call up the audio
menu.Repeatedly press the AUDIO button to cycle
through each available audio track.
ANGLE:
Press the ANGLE button to call up the camera
angle menu.
Repeatedly press the ANGLE button to cycle
through each available angle.
CLEAR:
Press the CLEAR button to clear all numeric
inputs, if actuated prior to expiration of the
3-second timer.
NUMERIC KEYPAD (0–9 &
≥10):
Press the NUMERIC KEYPAD to directly access
disc chapters, titles or tracks by inputting their
numeric value.
Use the “≥10” button to input numbers greater
than or equal to 10. Up to 3 digits can be inputted
when selecting the chapter/title/track number.
The subsequent actuation of numeric buttons will
continuously shift the previously input number to
the “left”.
The chapter/title/track number will be automati-
cally selected (if valid, based on media content) if
3 seconds expire without any keypad inputs. The operator can cancel the input
chapter/title/track number by actuating the
CLEAR control prior to the expiration of the
3-second timer.
These functions can be used only for the DVD
discs which correspond to them.
CARE AND MAINTENANCE
Use a lightly dampened, lint free cloth to clean the
surfaces of your NISSAN Mobile Entertainment
System (DVD player face, screen, remote control,
etc.) .
Do not attempt to use the system in extreme
temperature conditions [below -4°F (-20°C) or
above 158°F (70°C)].
Do not attempt to operate the system in extreme
humidity conditions (less than 10% or more than
75%) .