Page 9 of 446
1. Top tether strap anchor (P. 1-27)
2. Rear seat belts (P. 1-14)
3. Roof-mounted curtain side-impactsupplemental air bag (P. 1-41)
4. Front seat-mounted side-impact
supplemental air bag (P. 1-41)
5. Head Restraints (P. 1-10)
6. Front seat belts (P. 1-14)
7. Side-impact air bag pressure sensor
(driver’s side shown; passenger’s side
similar) (P. 1-57)
8. Supplemental front-impact air bags
(P. 1-41)
9. Seats (P. 1-2)
10. Occupant classification sensor
(pattern sensor) (P. 1-50)
11. Seat belt with pretensioner (P. 1-55)
12. LATCH (Lower Anchors and Tethers for
CHildren) system (P. 1-25)
See the page number indicated in paren-
theses for operating details.
Page 14 of 446
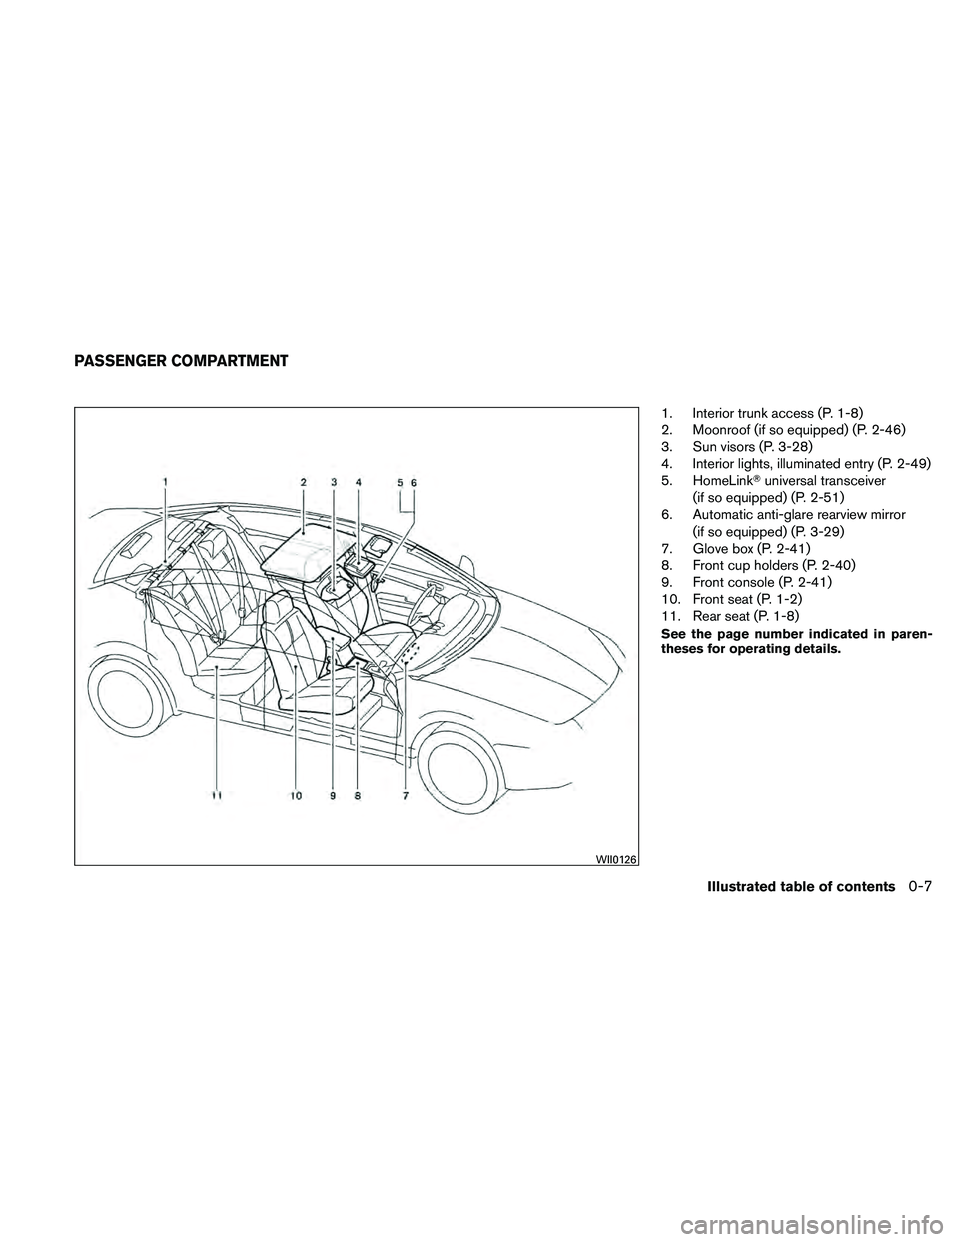
1. Interior trunk access (P. 1-8)
2. Moonroof (if so equipped) (P. 2-46)
3. Sun visors (P. 3-28)
4. Interior lights, illuminated entry (P. 2-49)
5. HomeLink�universal transceiver
(if so equipped) (P. 2-51)
6. Automatic anti-glare rearview mirror
(if so equipped) (P. 3-29)
7. Glove box (P. 2-41)
8. Front cup holders (P. 2-40)
9. Front console (P. 2-41)
10. Front seat (P. 1-2)
11. Rear seat (P. 1-8)
See the page number indicated in paren-
theses for operating details.
Page 61 of 446

Roof-mounted curtain side-impact supple-
mental air bag system:This system can help
cushion the impact force to the head of occu-
pants in front and rear outboard seating positions
in certain side-impact collisions. The curtain air
bags are designed to inflate on the side where
the vehicle is impacted.
These supplemental restraint systems are de-
signed to supplement the crash protection pro-
vided by the driver and front passenger seat belts
and are not a substitute for them. Seat belts
should always be correctly worn and the occu-
pant seated a suitable distance away from the
steering wheel, instrument panel and door finish-
ers. (See “Seat belts” earlier in this section for
instructions and precautions on seat belt usage.)
The supplemental air bags operate only
when the ignition switch is placed in the
ON position.
After placing the ignition switch in the ON
position, the supplemental air bag warning
light illuminates. The supplemental air bag
warning light will turn off after about 7
seconds if the system is operational.
Page 65 of 446
WARNING
Front seat-mounted side-impact supple-
mental air bags and roof-mounted curtain
side-impact supplemental air bags:
●The side air bags and curtain air bags
ordinarily will not inflate in the event of
a frontal impact, rear impact, rollover or
lower severity side collision. Always
wear your seat belts to help reduce the
risk or severity of injury in various kinds
of accidents.
Page 68 of 446
1. Roof-mounted curtain side-impactsupplemental air bag inflators
2. Roof-mounted curtain side-impact
supplemental air bags
3. Front seat-mounted side-impact
supplemental air bag modules
4. Air bag Control Unit (ACU)
5. Side-impact air bag pressure sensor
(driver’s side shown; passenger’s side
similar)
6. Supplemental front-impact air bag
modules
7. Crash zone sensor
8. Seat belt buckle switches on driver’s
and passenger’s side
9. Occupant classification sensor
(pattern sensor)
10. Occupant classification system control
unit
11. Seat belt with pretensioner
12. Side satellite sensor
Page 73 of 446

Front seat-mounted side-impact
supplemental air bag and roof-
mounted curtain side-impact
supplemental air bag systems
The side air bags are located in the outside of the
seatback of the front seats. The curtain air bags
are located in the side roof rails. These systems
are designed to meet voluntary guidelines to help
reduce the risk of injury to out-of-position occu-
pants.However, all of the information, cau-
tions and warnings in this manual still ap-
ply and must be followed. The side air bags
and curtain air bags are designed to inflate in
higher severity side collisions, although they may inflate if the forces in another type of collision are
similar to those of a higher severity side impact.
They are designed to inflate on the side where the
vehicle is impacted. They may not inflate in cer-
tain side collisions.
Vehicle damage (or lack of it) is not always an
indication of proper side air bag and curtain air
bag operation.
When the side air bags and curtain air bags
inflate, a fairly loud noise may be heard, followed
by the release of smoke. This smoke is not harm-
ful and does not indicate a fire. Care should be
taken not to inhale it, as it may cause irritation and
choking. Those with a history of a breathing con-
dition should get fresh air promptly.
Side air bags, along with the use of seat belts,
help to cushion the impact force on the chest and
pelvic area of the front occupants. Curtain air
bags help to cushion the impact force to the head
of occupants in the front and rear outboard seat-
ing positions. They can help save lives and re-
duce serious injuries. However, an inflating side
air bag and curtain air bag may cause abrasions
or other injuries. Side air bags and curtain air
bags do not provide restraint to the lower body.
The seat belts should be correctly worn and the
driver and passenger seated upright as far as
practical away from the side air bag. Rear seat
passengers should be seated as far away as
practical from the door finishers and side roof
rails. The side air bags and curtain air bags inflate
quickly in order to help protect the occupants.
Because of this, the force of the side air bag and
curtain air bag inflating can increase the risk of
injury if the occupant is too close to, or is against,
these air bag modules during inflation. The side
air bags and curtain air bag will deflate quickly
after the collision is over.
The side air bags and curtain air bags op-
erate only when the ignition switch is
placed in the ON position.
After placing the ignition switch in the ON
position, the supplemental air bag warning
light illuminates. The supplemental air bag
warning light will turn off after about 7
seconds if the system is operational.
Page 125 of 446
 does not operate properly, perform the fol-
lowing procedure to initialize the power window
system:1. Pl")
When power window switch does not
operate
If the power window automatic function (closing
only) does not operate properly, perform the fol-
lowing procedure to initialize the power window
system:1. Place the ignition switch in the ON position.
2. Open the window more than halfway by operating the power window switch.
3. Pull the power window switch and hold it to close the window, and then hold the switch
more than 3 seconds after the window is
closed.
4. Release the power window switch. Operate the window by the automatic function to
confirm the initialization is complete. The
power window automatically opens or
closes depending on if the automatic down
or up function is selected.
5. Perform steps 2 through 4 above for other windows.
If the power window function does not operate
properly after performing the above procedure,
see a NISSAN dealer for assistance.
AUTOMATIC MOONROOF
The moonroof will only operate when the ignition
switch is placed in the ON position. The auto-
matic moonroof is operational for about 45 sec-
onds, even if the ignition switch is placed in the
ACC or OFF position. If the driver’s door or the
front passenger’s door is opened during this
period of about 45 seconds, power to the moon-
roof is canceled.
Sliding the moonroof
To fully open the moonroof, push the switch
toward
Page 126 of 446
CAUTION
●Remove water drops, snow, ice or sand
from the moonroof before opening.
● Do not place heavy objects on the
moonroof or surrounding area.
Resetting the moonroof switch
The moonroof switch may not operate properly
and need to be reset if any of the following
conditions have occurred:
● the moonroof has been manually moved,
● the moonroof motor has been removed and
reinstalled after the moonroof has been re-
positioned or adjusted,
● the moonroof glass panel has been adjusted
or changed, or
● the electrical supply interrupted and/or
some malfunction has been detected.
Use the following reset procedure to return the
moonroof operation to normal. 1. Place the ignition switch in the ON position.
2. Push and hold the moonroof switch toward

2. Rear seat belts (P. 1-14)
3. Roof-mounted curtain side-impactsupplemental air bag (P. 1-41)
4. Front seat-mounted side-impact
supplemental air bag (P. 1-41)
5.")