Page 14 of 446
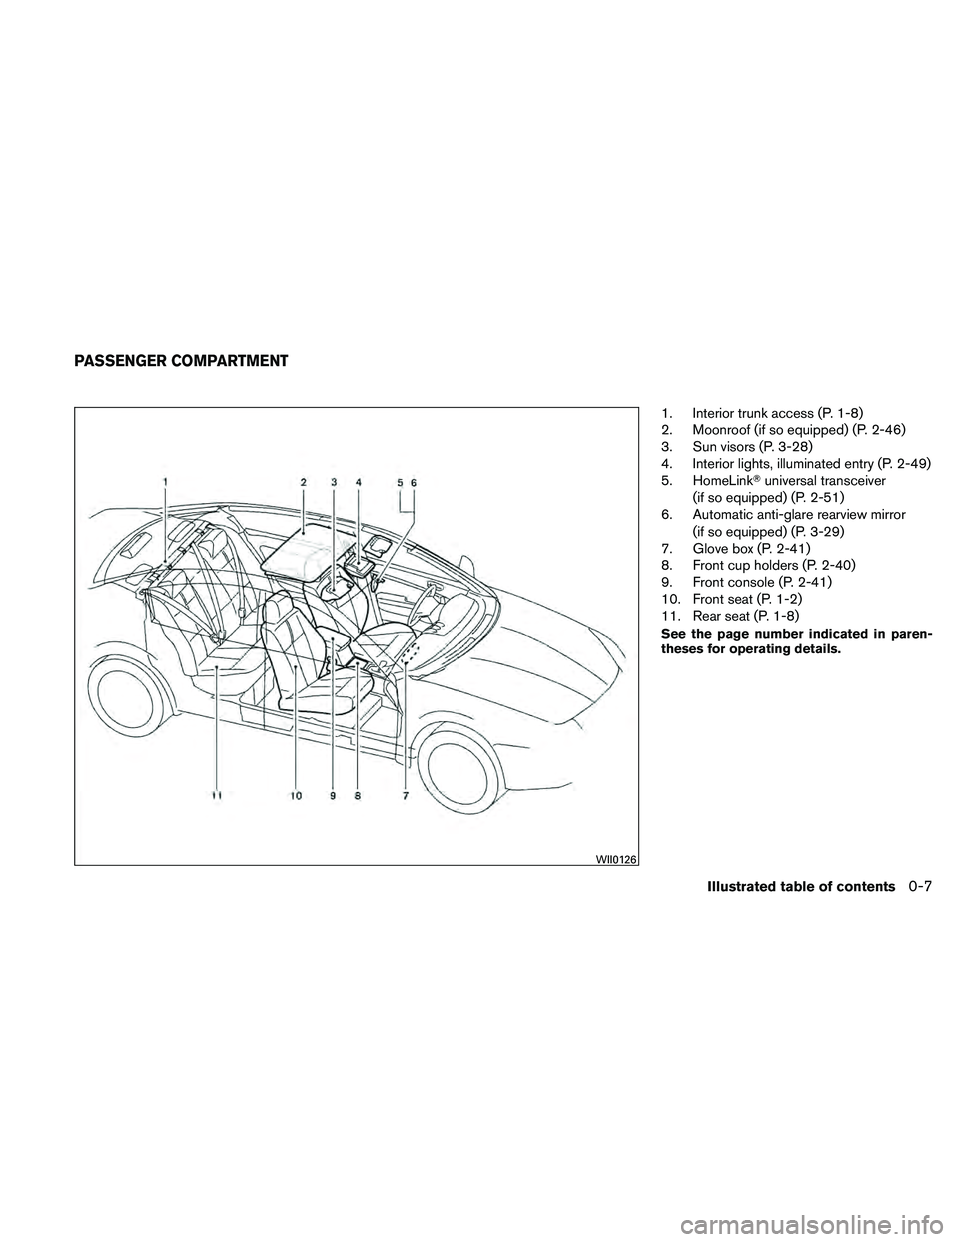
1. Interior trunk access (P. 1-8)
2. Moonroof (if so equipped) (P. 2-46)
3. Sun visors (P. 3-28)
4. Interior lights, illuminated entry (P. 2-49)
5. HomeLink�universal transceiver
(if so equipped) (P. 2-51)
6. Automatic anti-glare rearview mirror
(if so equipped) (P. 3-29)
7. Glove box (P. 2-41)
8. Front cup holders (P. 2-40)
9. Front console (P. 2-41)
10. Front seat (P. 1-2)
11. Rear seat (P. 1-8)
See the page number indicated in paren-
theses for operating details.
Page 79 of 446

2 Instruments and controls
Instrument panel...................................2-2
Meters and gauges ................................2-3
Speedometer and odometer .....................2-4
Tachometer ....................................2-5
Engine coolant temperature gauge ...............2-5
Fuel gauge ....................................2-6
Compass display (if so equipped) ...................2-6
Compass display ...............................2-7
Warning/indicator lights and audible reminders ......2-10
Checking bulbs ............................... 2-10
Warning lights ................................ 2-11
Indicator lights ................................ 2-14
Audible reminders ............................. 2-16
Vehicle information display ......................... 2-17
How to use the Vehicle Information Display .......2-17
Security systems ................................. 2-26
Vehicle security system ......................... 2-26
NISSAN vehicle immobilizer system .............2-27
Windshield wiper and washer switch ...............2-28
Switch operation .............................. 2-28
Rear window and outside mirror (if so equipped)
defroster switch .................................. 2-29
Headlight and turn signal switch ....................2-29Xenon headlights (if so equipped) . . .
............2-29
Headlight control switch ........................ 2-31
Daytime running light system (Canada only) ......2-32
Instrument brightness control ...................2-33
Turn signal switch ............................. 2-33
Fog light switch (if so equipped) ................2-34
Hazard warning flasher switch .....................2-34
Horn ............................................ 2-35
Heated seat (if so equipped) .......................2-35
Vehicle Dynamic Control (VDC) off switch ...........2-36
Power outlet ..................................... 2-36
Storage ......................................... 2-37
Map pockets .................................. 2-37
Seatback pockets (if so equipped) ..............2-37
Storage pouch (if so equipped) .................2-38
Sunglasses
holder............................. 2-38
Cup holders .................................. 2-40
Glove box .................................... 2-41
Console box .................................. 2-41
Storage box (if so equipped) ....................2-42
Covered storage box ........................... 2-42
Grocery hooks ................................ 2-42
Cargo net (if so equipped) ......................2-43
Page 90 of 446
Page 105 of 446

Your vehicle may have two types of security sys-
tems:● Vehicle security system
● NISSAN Vehicle Immobilizer System
VEHICLE SECURITY SYSTEM
The vehicle security system provides visual and
audible alarm signals if someone opens the doors
or trunk lid when the system is armed. It is not,
however, a motion detection type system that
activates when a vehicle is moved or when a
vibration occurs.
The system helps deter vehicle theft but cannot
prevent it, nor can it prevent the theft of interior or exterior vehicle components in all situations. Al-
ways secure your vehicle even if parking for a
brief period. Never leave your Intelligent Key in
the vehicle, and always lock the vehicle when
unattended. Be aware of your surroundings, and
park in secure, well-lit areas whenever possible.
Many devices offering additional protection, such
as component locks, identification markers, and
tracking systems, are available at auto supply
stores and specialty shops. Your NISSAN dealer
may also offer such equipment. Check with your
insurance company to see if you may be eligible
for discounts for various theft protection features.
How to arm the vehicle security
system
1. Close all windows.
(The system can be
armed even if the windows are open.)
2. Remove the Intelligent Key from the vehicle.
3. Close all doors, hood and trunk. Lock all doors. The doors can be locked with the
Intelligent Key, door handle request switch
(if so equipped) , power door lock switch or
mechanical key.
4. Confirm that the security indicator light comes on. The security light stays on for
about 30 seconds. The vehicle security sys-
tem is now pre-armed. After about 30 sec- onds the vehicle security system automati-
cally shifts into the armed phase. The
security light begins to flash once every 3
seconds. If, during the 30-second pre-arm
time period, the driver’s door is unlocked by
the key or the keyfob, or the ignition switch is
placed in the ACC or ON position, the sys-
tem will not arm.
● Even when the driver and/or passen-
gers are in the vehicle, the system will
activate with all the doors, hood and
trunk lid locked with the ignition
switch placed in the LOCK position.
When placing the ignition switch in the
ACC or ON position, the system will be
released.Vehicle security system activation
The vehicle security system will give the following
alarm:
● The headlights blink and the horn sounds
intermittently.
● The alarm automatically turns off after ap-
proximately 50 seconds. However, the alarm
reactivates if the vehicle is tampered with
again. The alarm can be shut off by unlocking
the driver’s door or trunk lid with the key, or
by pressing the
Page 109 of 446
●The life of xenon headlights will be
shortened by frequent on-off opera-
tion. It is generally desirable not to turn
off the headlights for short intervals
(for example, when the vehicle stops at
a traffic signal) . Even when the daytime
running lights are active (Canada only) ,
the xenon headlights do not turn on.
This way the life of the xenon head-
lights is not reduced.
● If the xenon headlight bulb is close to
burning out, the brightness will drasti-
cally decrease, the light will start blink-
ing, or the color of the light will be-
come reddish. If one or more of the
above signs appear, contact a NISSAN
dealer.
Page 111 of 446
Be sure you do not put anything on top of
the autolight sensor located on the top side
of the instrument panel. The autolight sen-
sor controls the autolight; if it is covered,
the autolight sensor reacts as if it is dark
out and the headlights will illuminate. If
this occurs while parked with the engine
off and the ignition switch placed in the ON
position, your vehicle’s battery could be-
come discharged.Headlight beam select
�1To select the high beam function, push the
lever forward. The high beam lights come on
and the
Page 112 of 446
WARNING
When the daytime running light system is
active, tail lights on your vehicle are not
on. It is necessary at dusk to turn on your
headlights. Failure to do so could cause
an accident injuring yourself and others.
INSTRUMENT BRIGHTNESS
CONTROL
The instrument cluster illuminates when the igni-
tion switch is placed in the ON position.
The instrument brightness control operates when
the headlight control switch is in the
AUTO,
Page 113 of 446
FOG LIGHT SWITCH (if so equipped)
To turn the fog lights on, turn the headlight switch
to the


To turn the fog lights on, turn the headlight switch
to the")