Page 123 of 446
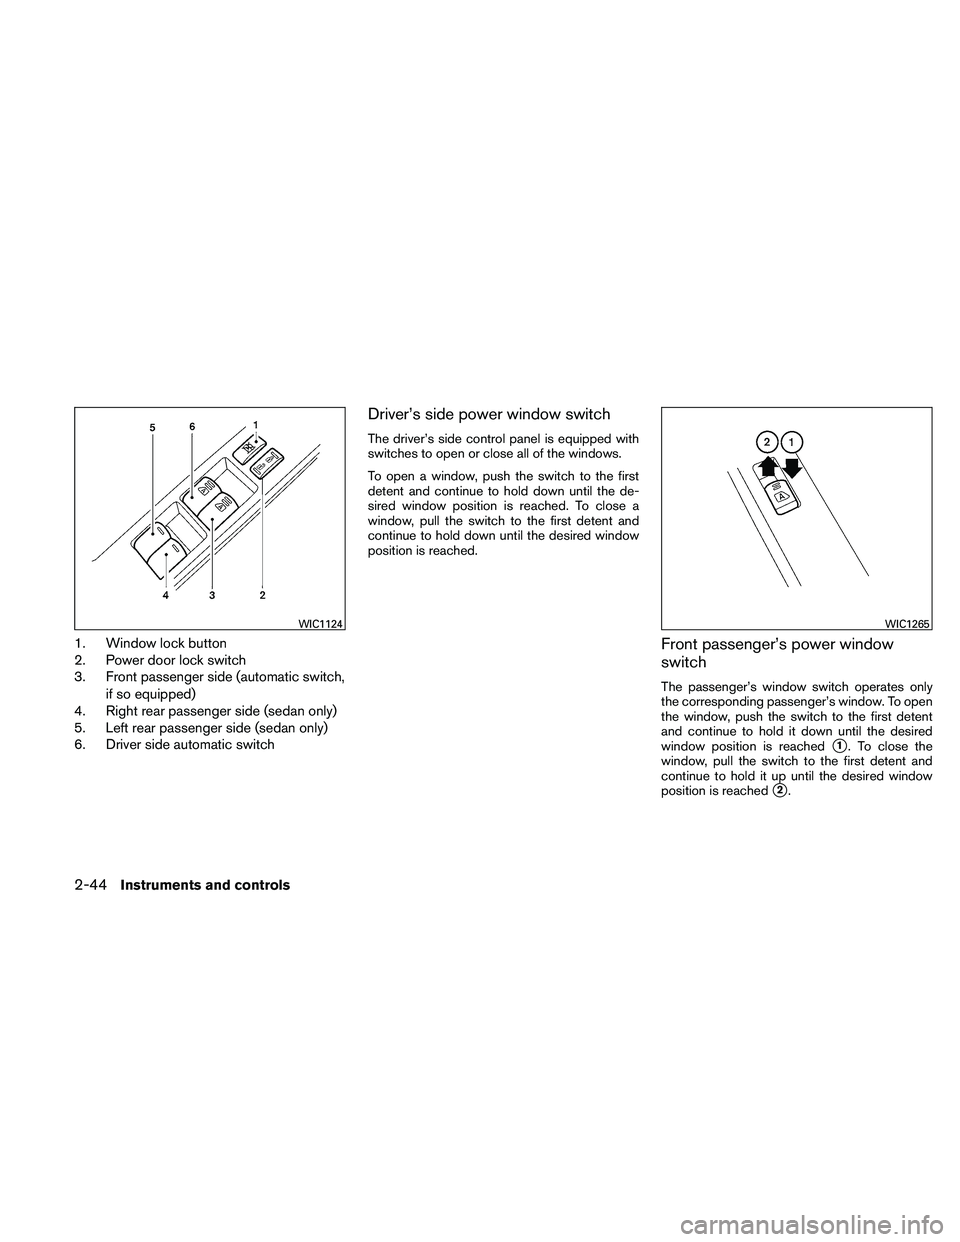
1. Window lock button
2. Power door lock switch
3. Front passenger side (automatic switch,if so equipped)
4. Right rear passenger side (sedan only)
5. Left rear passenger side (sedan only)
6. Driver side automatic switch
Driver’s side power window switch
The driver’s side control panel is equipped with
switches to open or close all of the windows.
To open a window, push the switch to the first
detent and continue to hold down until the de-
sired window position is reached. To close a
window, pull the switch to the first detent and
continue to hold down until the desired window
position is reached.
Front passenger’s power window
switch
The passenger’s window switch operates only
the corresponding passenger’s window. To open
the window, push the switch to the first detent
and continue to hold it down until the desired
window position is reached
�1. To close the
window, pull the switch to the first detent and
continue to hold it up until the desired window
position is reached
�2.
Page 124 of 446
Rear power window switch (sedan
only)
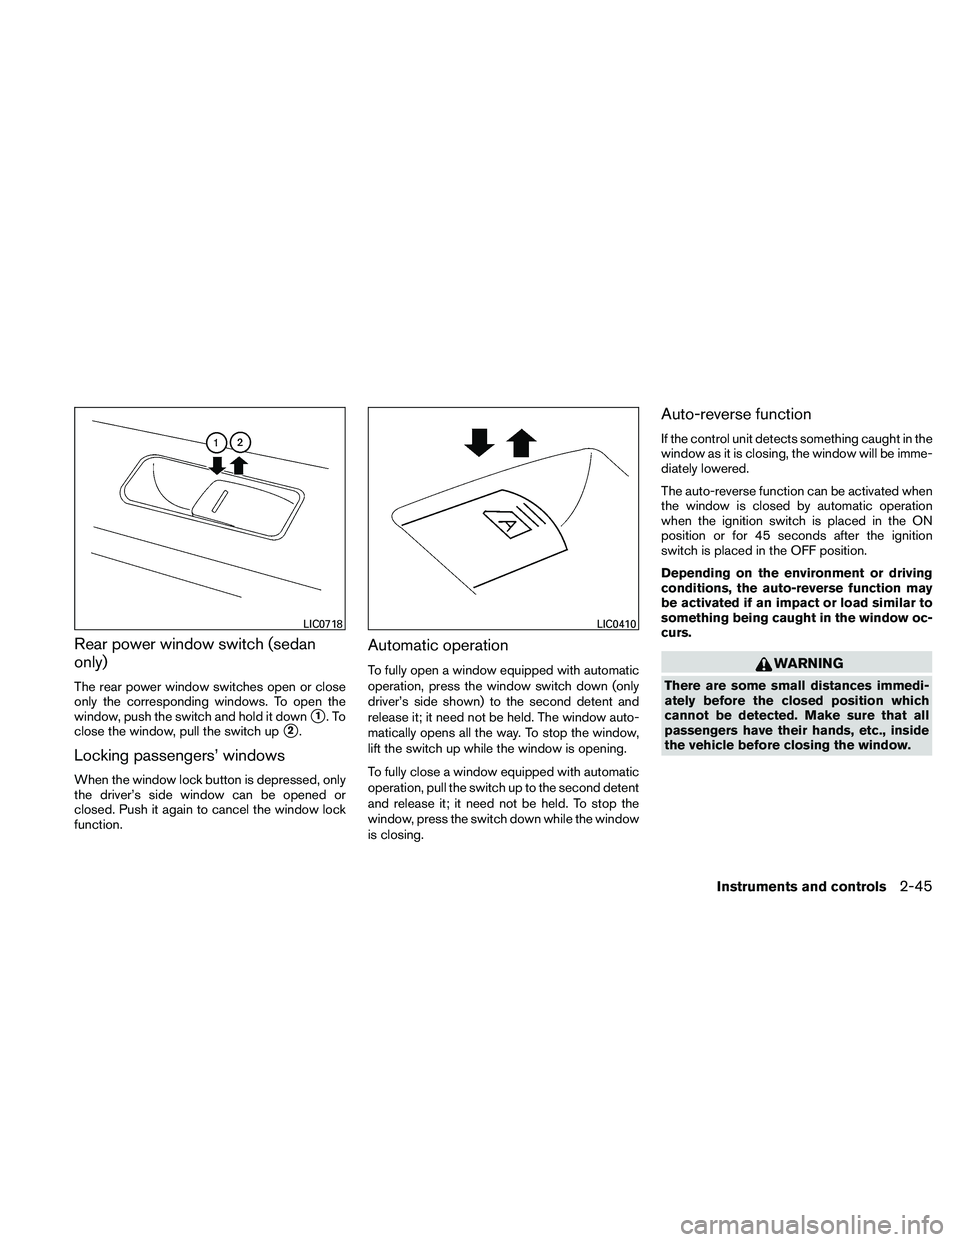
The rear power window switches open or close
only the corresponding windows. To open the
window, push the switch and hold it down
�1.To
close the window, pull the switch up
�2.
Locking passengers’ windows
When the window lock button is depressed, only
the driver’s side window can be opened or
closed. Push it again to cancel the window lock
function.
Automatic operation
To fully open a window equipped with automatic
operation, press the window switch down (only
driver’s side shown) to the second detent and
release it; it need not be held. The window auto-
matically opens all the way. To stop the window,
lift the switch up while the window is opening.
To fully close a window equipped with automatic
operation, pull the switch up to the second detent
and release it; it need not be held. To stop the
window, press the switch down while the window
is closing.
Auto-reverse function
If the control unit detects something caught in the
window as it is closing, the window will be imme-
diately lowered.
The auto-reverse function can be activated when
the window is closed by automatic operation
when the ignition switch is placed in the ON
position or for 45 seconds after the ignition
switch is placed in the OFF position.
Depending on the environment or driving
conditions, the auto-reverse function may
be activated if an impact or load similar to
something being caught in the window oc-
curs.
Page 125 of 446
When power window switch does not
operate
If the power window automatic function (closing
only) does not operate properly, perform the fol-
lowing procedure to initialize the power window
system:1. Place the ignition switch in the ON position.
2. Open the window more than halfway by operating the power window switch.
3. Pull the power window switch and hold it to close the window, and then hold the switch
more than 3 seconds after the window is
closed.
4. Release the power window switch. Operate the window by the automatic function to
confirm the initialization is complete. The
power window automatically opens or
closes depending on if the automatic down
or up function is selected.
5. Perform steps 2 through 4 above for other windows.
If the power window function does not operate
properly after performing the above procedure,
see a NISSAN dealer for assistance.
AUTOMATIC MOONROOF
The moonroof will only operate when the ignition
switch is placed in the ON position. The auto-
matic moonroof is operational for about 45 sec-
onds, even if the ignition switch is placed in the
ACC or OFF position. If the driver’s door or the
front passenger’s door is opened during this
period of about 45 seconds, power to the moon-
roof is canceled.
Sliding the moonroof
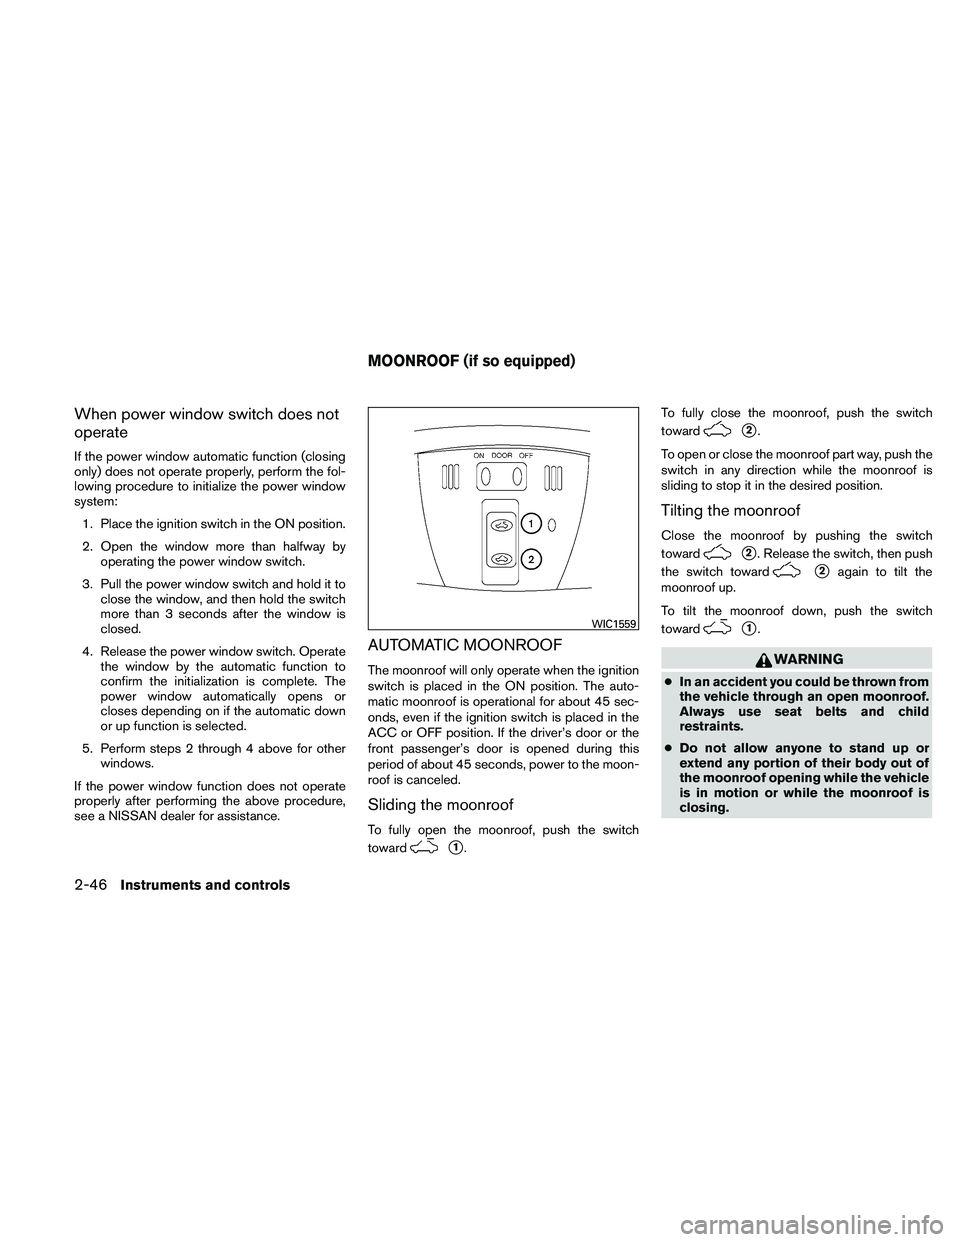
To fully open the moonroof, push the switch
toward
Page 149 of 446
The interior light illuminates for 15 seconds when
a door is unlocked and the room light switch is in
the DOOR position.
The light can be turned off without waiting for 15
seconds by performing one of the following op-
erations:● Placing the ignition switch in the ON posi-
tion.
● Locking the doors with the Intelligent Key.
● Switching the room light switch to the OFF
position.
Opening windows (if so equipped)
The Intelligent Key allows you to open windows
equipped with automatic operation simultane-
ously.
● To open the windows, press the
Page 184 of 446
●Do not adjust the Brightness or Contrast of
the RearView Monitor while the vehicle is
moving.
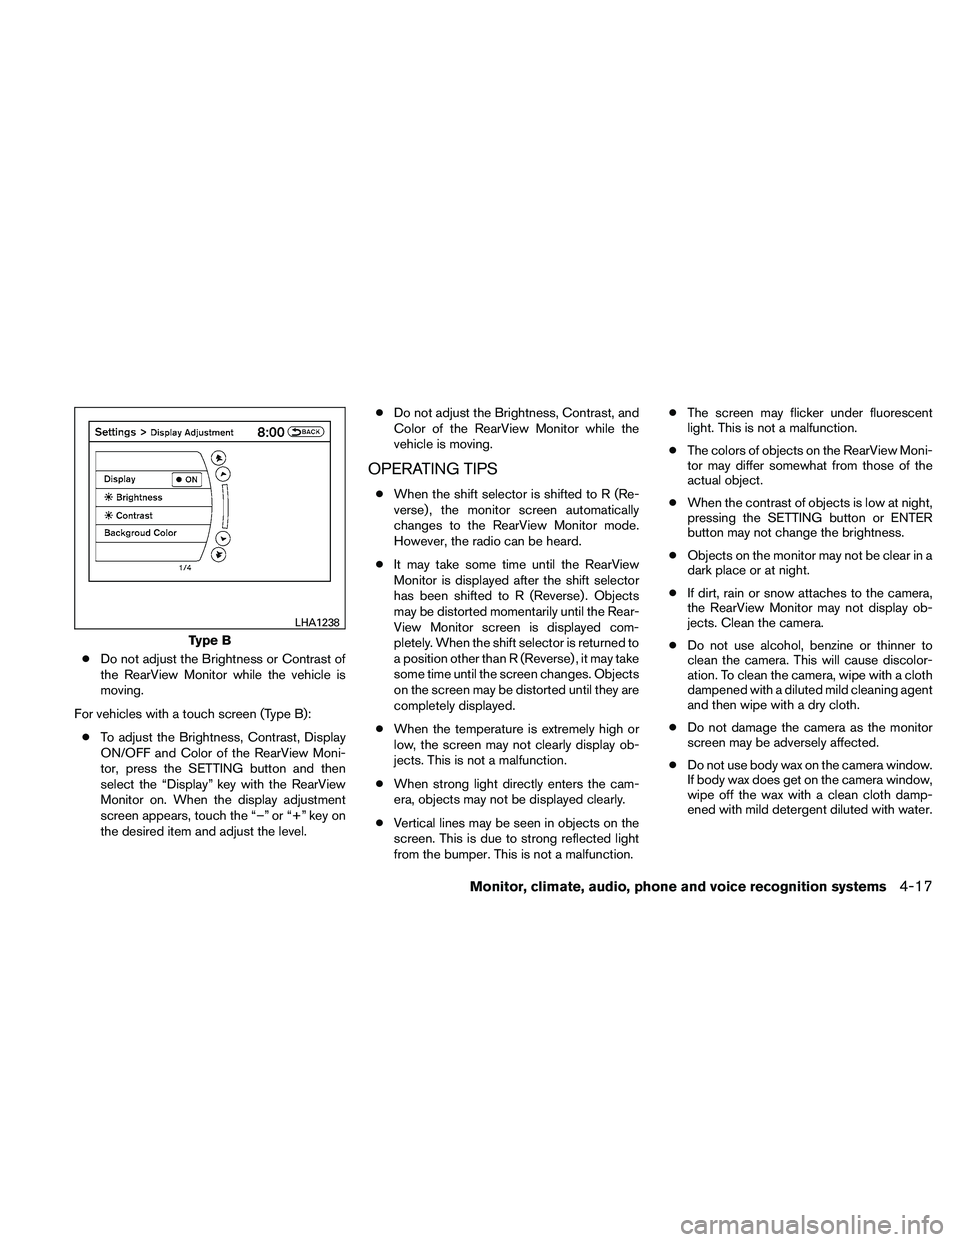
For vehicles with a touch screen (Type B): ● To adjust the Brightness, Contrast, Display
ON/OFF and Color of the RearView Moni-
tor, press the SETTING button and then
select the “Display” key with the RearView
Monitor on. When the display adjustment
screen appears, touch the “–” or “+” key on
the desired item and adjust the level. ●
Do not adjust the Brightness, Contrast, and
Color of the RearView Monitor while the
vehicle is moving.
OPERATING TIPS
● When the shift selector is shifted to R (Re-
verse) , the monitor screen automatically
changes to the RearView Monitor mode.
However, the radio can be heard.
● It may take some time until the RearView
Monitor is displayed after the shift selector
has been shifted to R (Reverse) . Objects
may be distorted momentarily until the Rear-
View Monitor screen is displayed com-
pletely. When the shift selector is returned to
a position other than R (Reverse) , it may take
some time until the screen changes. Objects
on the screen may be distorted until they are
completely displayed.
● When the temperature is extremely high or
low, the screen may not clearly display ob-
jects. This is not a malfunction.
● When strong light directly enters the cam-
era, objects may not be displayed clearly.
● Vertical lines may be seen in objects on the
screen. This is due to strong reflected light
from the bumper. This is not a malfunction. ●
The screen may flicker under fluorescent
light. This is not a malfunction.
● The colors of objects on the RearView Moni-
tor may differ somewhat from those of the
actual object.
● When the contrast of objects is low at night,
pressing the SETTING button or ENTER
button may not change the brightness.
● Objects on the monitor may not be clear in a
dark place or at night.
● If dirt, rain or snow attaches to the camera,
the RearView Monitor may not display ob-
jects. Clean the camera.
● Do not use alcohol, benzine or thinner to
clean the camera. This will cause discolor-
ation. To clean the camera, wipe with a cloth
dampened with a diluted mild cleaning agent
and then wipe with a dry cloth.
● Do not damage the camera as the monitor
screen may be adversely affected.
● Do not use body wax on the camera window.
If body wax does get on the camera window,
wipe off the wax with a clean cloth damp-
ened with mild detergent diluted with water.
Page 186 of 446
WARNING
●The air conditioner cooling function op-
erates only when the engine is running.
● Do not leave children or adults who
would normally require the assistance
of others alone in your vehicle. Pets
should also not be left alone. They
could accidentally injure themselves or
others through inadvertent operation of
the vehicle. Also, on hot, sunny days,
temperatures in a closed vehicle could
quickly become high enough to cause
severe or possibly fatal injuries to
people or animals.
● Do not use the recirculation mode for
long periods as it may cause the interior
air to become stale and the windows to
fog up.
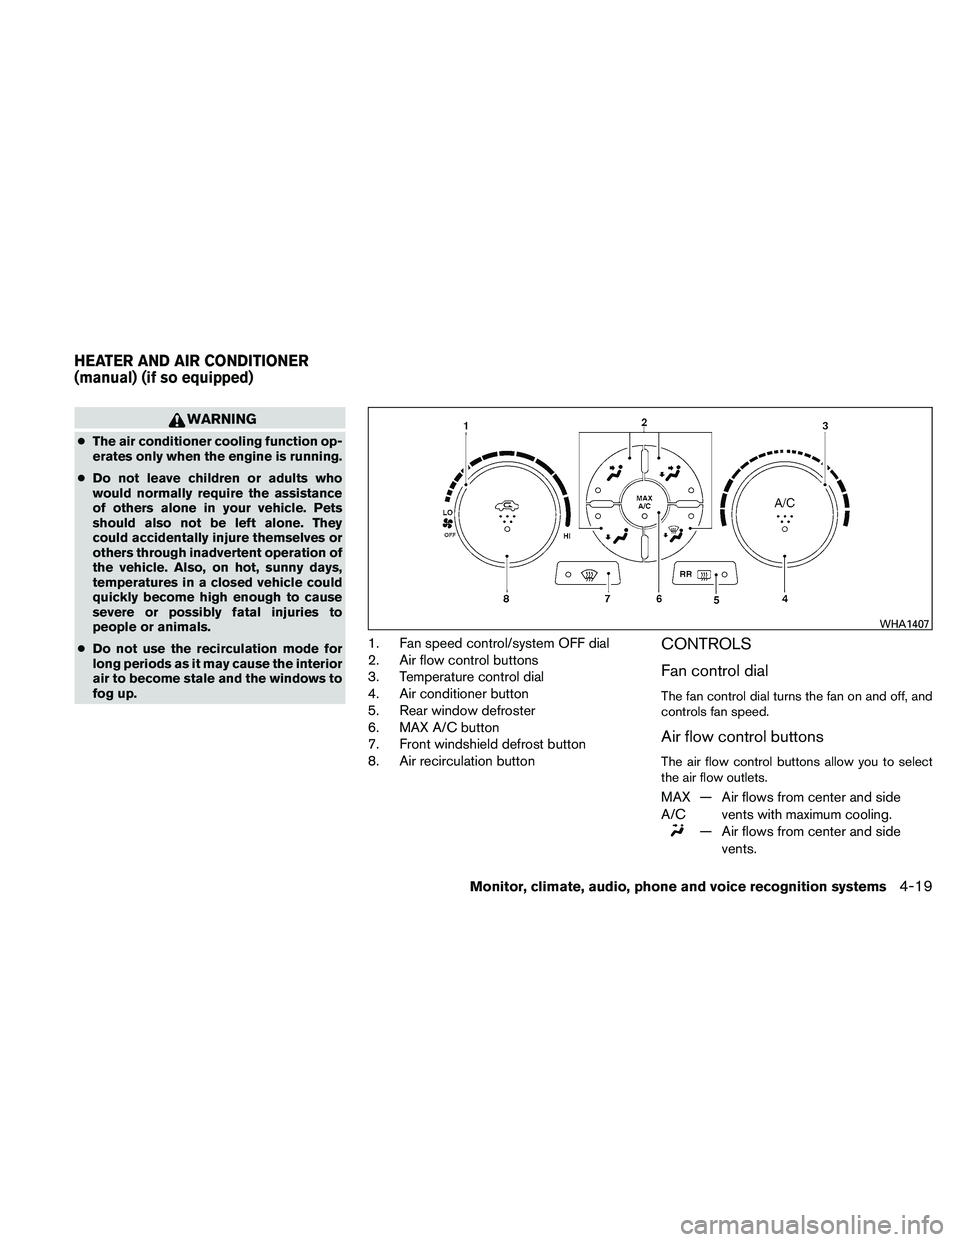
1. Fan speed control/system OFF dial
2. Air flow control buttons
3. Temperature control dial
4. Air conditioner button
5. Rear window defroster
6. MAX A/C button
7. Front windshield defrost button
8. Air recirculation buttonCONTROLS
Fan control dial
The fan control dial turns the fan on and off, and
controls fan speed.
Air flow control buttons
The air flow control buttons allow you to select
the air flow outlets.
MAX
A/C — Air flows from center and side
vents with maximum cooling.
Page 193 of 446
1. Driver temperature control dial
2. Air flow control buttons
3. Passenger temperature control dial
4. DUAL button
5. Rear defrost button
6. Front window defrost button
7. Fan speed dial/system OFF button
8. Air recirculation button
9. A/C ON/OFF button
10. AUTO button
Page 202 of 446
●Bit rate — Bit rate denotes the number of
bits per second used by a digital music file.
The size and quality of a compressed digital
audio file is determined by the bit rate used
when encoding the file.
● Sampling frequency — Sampling frequency
is the rate at which the samples of a signal
are converted from analog to digital (A/D
conversion) per second.
● Multisession — Multisession is one of the
methods for writing data to media. Writing
data once to the media is called a single
session, and writing more than once is called
a multisession.
● ID3/WMA Tag — The ID3/WMA tag is the
part of the encoded MP3 or WMA file that
contains information about the digital music
file such as song title, artist, encoding bit
rate, track time duration, etc. ID3 tag infor-
mation is displayed on the Artist/song title
line on the display.
* Windows� and Windows Media� are regis-
tered trademarks and trademarks in the United
States of America and other countries of Micro-
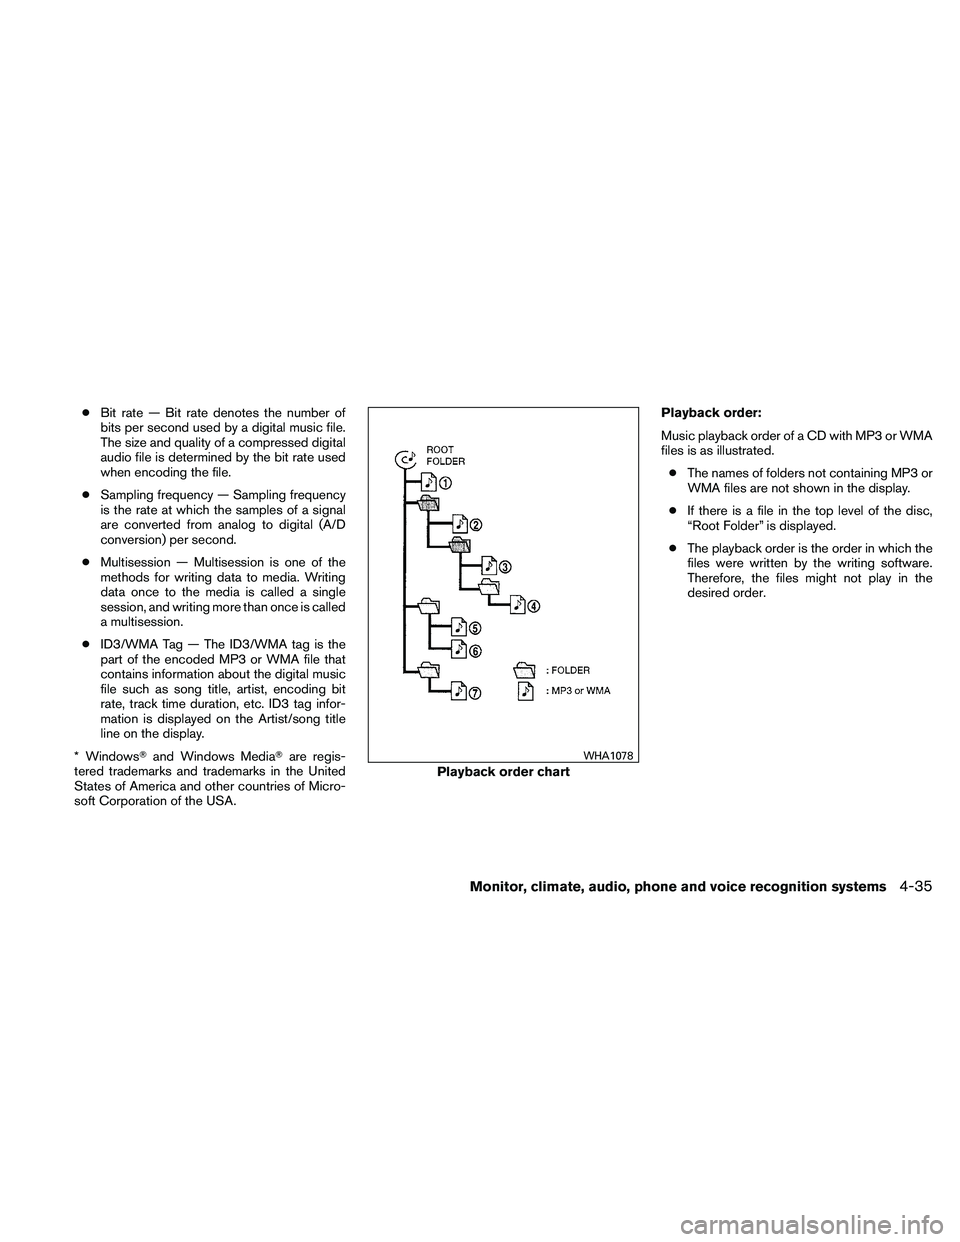
soft Corporation of the USA. Playback order:
Music playback order of a CD with MP3 or WMA
files is as illustrated.
● The names of folders not containing MP3 or
WMA files are not shown in the display.
● If there is a file in the top level of the disc,
“Root Folder” is displayed.
● The playback order is the order in which the
files were written by the writing software.
Therefore, the files might not play in the
desired order.