Page 236 of 446
When there are both audio and movie files in the
USB memory, the mode select screen is dis-
played. Use the touchscreen to select the pre-
ferred type of file. When there is only type of file in
the USB memory, that audio or movie operation
screen is displayed and starts to play.
When you play a file with limited playing time, the
confirmation screen will be displayed before
starting to play the file. Confirm the playing time
and select “yes” to start playing.
Audio file operation
DISC-AUX button:
Place the ignition switch in the ON or ACC
position and press the DISC-AUX button to
switch to the USB input mode. If another audio
source is playing and a USB memory device is
inserted, press the DISC-AUX button repeatedly
until the center display changes to the USB
memory mode.
If the system has been turned off while the USB
memory was playing, push the ON-OFF/VOL
control knob to restart the USB memory.
Page 237 of 446

Menu:
There are some options available during play-
back. Select one of the following that are dis-
played on the screen, if necessary. Refer to the
following information for each item.● Movie Playback
Switch to the movie playback mode. This
item is displayed only when the USB
memory contains movie files.
The shift selector must be in Park (P) with
the parking brake engaged to watch movies
from a USB device. ●
Folder List/Track List
Displays the folder or track list. The “Movie
Playback” key is also displayed in this list
screen and enables you to switch to the
movie playback mode.
● Play Mode
Choose the preferred play mode using the
touchscreen.Movie file operation
Park the vehicle in a safe location for the
front seat occupants to operate the USB
memory while watching the images.
DISC-AUX button:
When the DISC-AUX button is pushed with the
system off and the USB memory inserted, the
system will turn on. If another audio source is
playing and the USB memory is inserted, press
the DISC-AUX button repeatedly until the center
display changes to the USB memory mode.
Page 238 of 446
Operation keys:
To operate the USB memory, select the desired
key displayed on the display screen.●
Page 239 of 446

●10 Key Search
Select the “10 Key Search” key to open the
number entry screen. Input the number you
want to search for and the specified file or
folder will be played.
● Display
Adjust the image quality of the screen.
● DRC
DRC (Dynamic Range Compression) auto-
matically adjusts the soundtrack volume
level to maintain a more even sound to the
speakers.
● Audio
Choose the preferred language of the audio.
● Subtitle
Choose the preferred language of the sub-
titles.
● Display Mode
Choose between the “Normal”, “Wide”,
“Cinema” or “Full” display modes.
iPod�* PLAYER OPERATION
WITHOUT NAVIGATION SYSTEM (if
so equipped)
Connecting iPod�
To connect an iPod� to the vehicle so that the
iPod� can be controlled with the audio system
controls and display screen, use the USB jack
located in the center console. Open the protec-
tive cover
�1on the USB jack in the center
console. Then connect the iPod�-specific end of
the cable to the iPod� and the USB end of the
cable to the USB jack on the vehicle. If your iPod�
supports charging via a USB connection, its bat- tery will be charged while connected to the ve-
hicle with the ignition switch in the ACC or ON
position.
While connected to the vehicle, the iPod�
can
only be operated by the vehicle audio controls.
To disconnect the iPod� from the vehicle, remove
the USB end of the cable from the USB jack on
the vehicle, then remove the cable from the
iPod�.
*iPod �is a trademark of Apple Inc., registered in
the U.S. and other countries.
Compatibility
The following models are compatible:
● iPod� 5th Generation version 1.2.3
● iPod� Classic - version 1.1
● iPod� Touch - version 2.1*
● iPod� Nano - 1st generation version 1.3.1
● iPod� Nano - 2nd generation version 1.1.3
● iPod� Nano - 3rd generation version 1.0.2
● iPod� Nano - 4th generation version 1.0.4
● iPod� Nano - 5th generation version 1.0.1
* Some features of this iPod� may not be fully
functional.
Page 241 of 446

Connecting iPod�
To connect an iPod�to the vehicle so that the
iPod� can be controlled with the audio system
controls and display screen")
iPod�* PLAYER OPERATION WITH
NAVIGATION SYSTEM (if so
equipped)
Connecting iPod�
To connect an iPod�to the vehicle so that the
iPod� can be controlled with the audio system
controls and display screen, use the USB jack
located in the center console. Open the protec-
tive cover
�1on the USB jack in the center
console. Then connect the iPod�-specific end of
the cable to the iPod� and the USB end of the
cable to the USB jack on the vehicle. If your iPod�
supports charging via a USB connection, its bat- tery will be charged while connected to the ve-
hicle with the ignition switch in the ACC or ON
position.
While connected to the vehicle, the iPod�
can
only be operated by the vehicle audio controls.
To disconnect the iPod� from the vehicle, remove
the USB end of the cable from the USB jack on
the vehicle, then remove the cable from the
iPod�.
*iPod �is a trademark of Apple Inc., registered in
the U.S. and other countries.
Compatibility
The following models are compatible:
● iPod� 5th Generation version 1.2.3
● iPod� Classic - version 1.1.1
● iPod� Touch - version 2.0.0*
● iPod� Nano - 1st generation version 1.3.1
● iPod� Nano - 2nd generation version 1.1.3
● iPod� Nano - 3rd generation version 1.1.3
● iPod� Nano - 4th generation version 1.0.4
● iPod� Nano - 5th generation version 1.0.1
* Some features of this iPod� may not be fully
functional. Make sure that your iPod�
firmware is updated to
the version indicated above.
Page 246 of 446
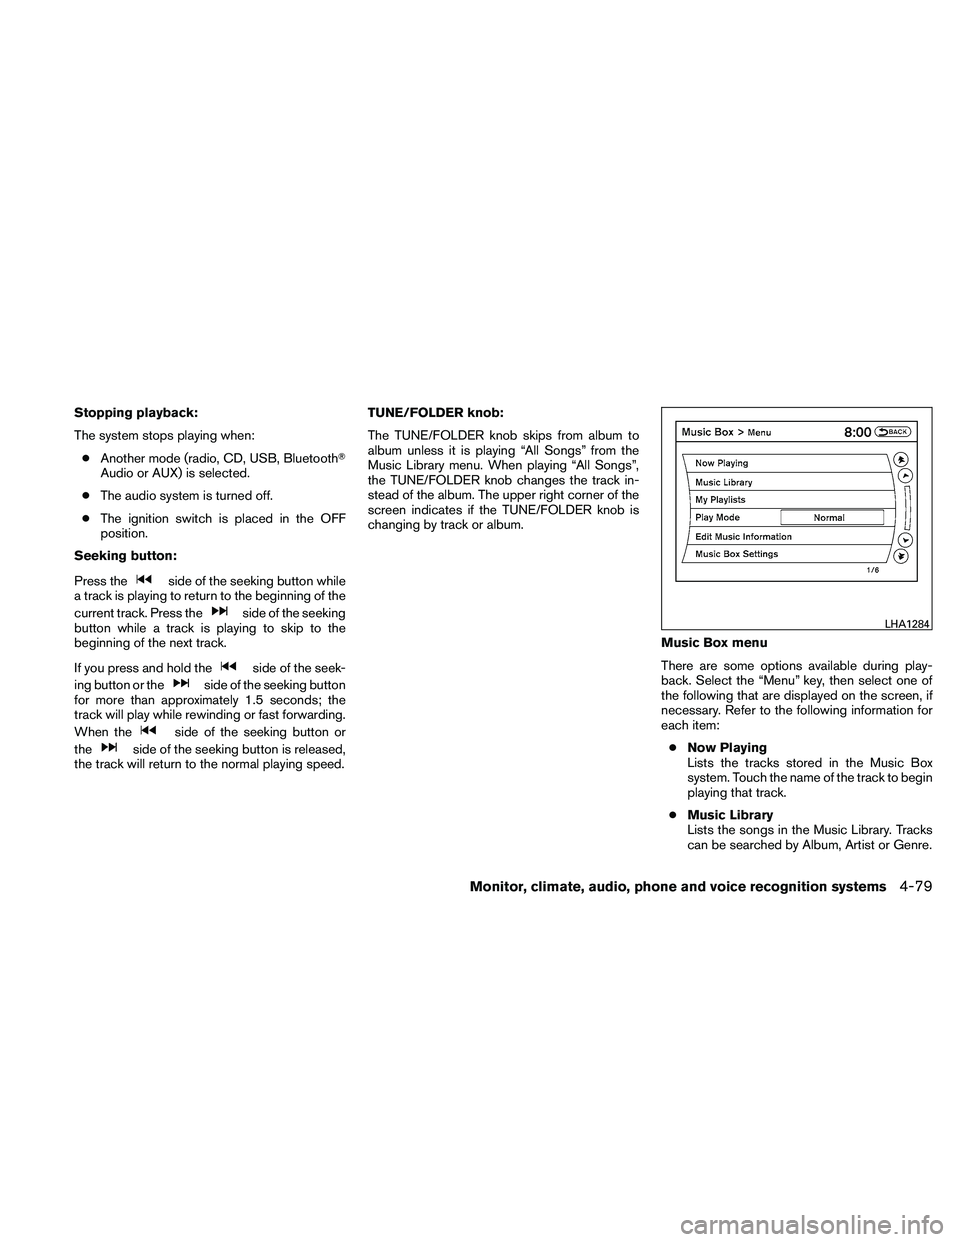
Stopping playback:
The system stops playing when:● Another mode (radio, CD, USB, Bluetooth�
Audio or AUX) is selected.
● The audio system is turned off.
● The ignition switch is placed in the OFF
position.
Seeking button:
Press the
Page 248 of 446
●Play Mode
Alters the play mode of the playlist. Touch
the key of the mode you wish to apply. The
modes change the play pattern as follows:
– Normal - no play pattern is applied.
– 1 Album Repeat - the songs in the current album are repeated.
– 1 Track Repeat - the current track is re- peated.
– 1 Album Random - the songs in the cur- rent album are played randomly.
– All Random - all songs are played ran- domly. ●
Edit Music Information
Edits the information of the songs in the
Music Library.
– Edit Information of Current Song
– Edit Information by Album
– Update Gracenote from USB Device
– Transfer Missing Titles to USB
– Update Gracenote from HDD The “Transfer Missing Titles to USB” and “Up-
date Gracenote from HDD” options can be used
to update the titles of songs in the Music Library.
Visit www.nissanusa.com/gracenote for detailed
instructions on how to update the Gracenote
database.
Page 257 of 446
:● Tilt up/down for less than 1.5 seconds to
increase or decrease the preset station.
● Tilt up/down for more than 1.5 seconds to
go to the next or previous category.
● Press")
XM (if so equipped):● Tilt up/down for less than 1.5 seconds to
increase or decrease the preset station.
● Tilt up/down for more than 1.5 seconds to
go to the next or previous category.
● Press the ENTER button to show the XM
Menu.
iPod�: ● Tilt up/down for less than 1.5 seconds to
increase or decrease the track number.
● Press the ENTER button to show the iPod
Menu.
CD: ● Tilt up/down for less than 1.5 seconds to
increase or decrease the track number.
● Tilt up/down for more than 1.5 seconds to
increase or decrease the folder number (if
playing compressed audio files) .
● Press the ENTER button to show the CD
Menu.
DVD: ● Tilt up/down for less than 1.5 seconds to
increase or decrease the track number. ●
Tilt up/down for more than 1.5 seconds to
increase or decrease the title number.
● Press the ENTER button to select an item
from the DVD display.
● When the transparent operation menu ap-
pears, the switch will control the menu.
USB: ● Tilt up/down for less than 1.5 seconds to
increase or decrease the track number.
● Tilt up/down for more than 1.5 seconds to
increase or decrease the folder number.
● Press the ENTER button to show the USB
Menu.
Music Box: ● Tilt up/down for less than 1.5 seconds to
increase or decrease the track number.
● Tilt up/down for more than 1.5 seconds to
increase or decrease the album (folder)
number (if playing compressed audio files) .
● Press the ENTER button to show the Music
Box Menu.
Bluetooth� Audio:
● Tilt up/down for less than 1.5 seconds to
increase or decrease the track number. AUX:
● Press the ENTER button to show the AUX
Menu.
ANTENNA
Window antenna
The antenna pattern is printed inside the rear
window.