Page 158 of 422

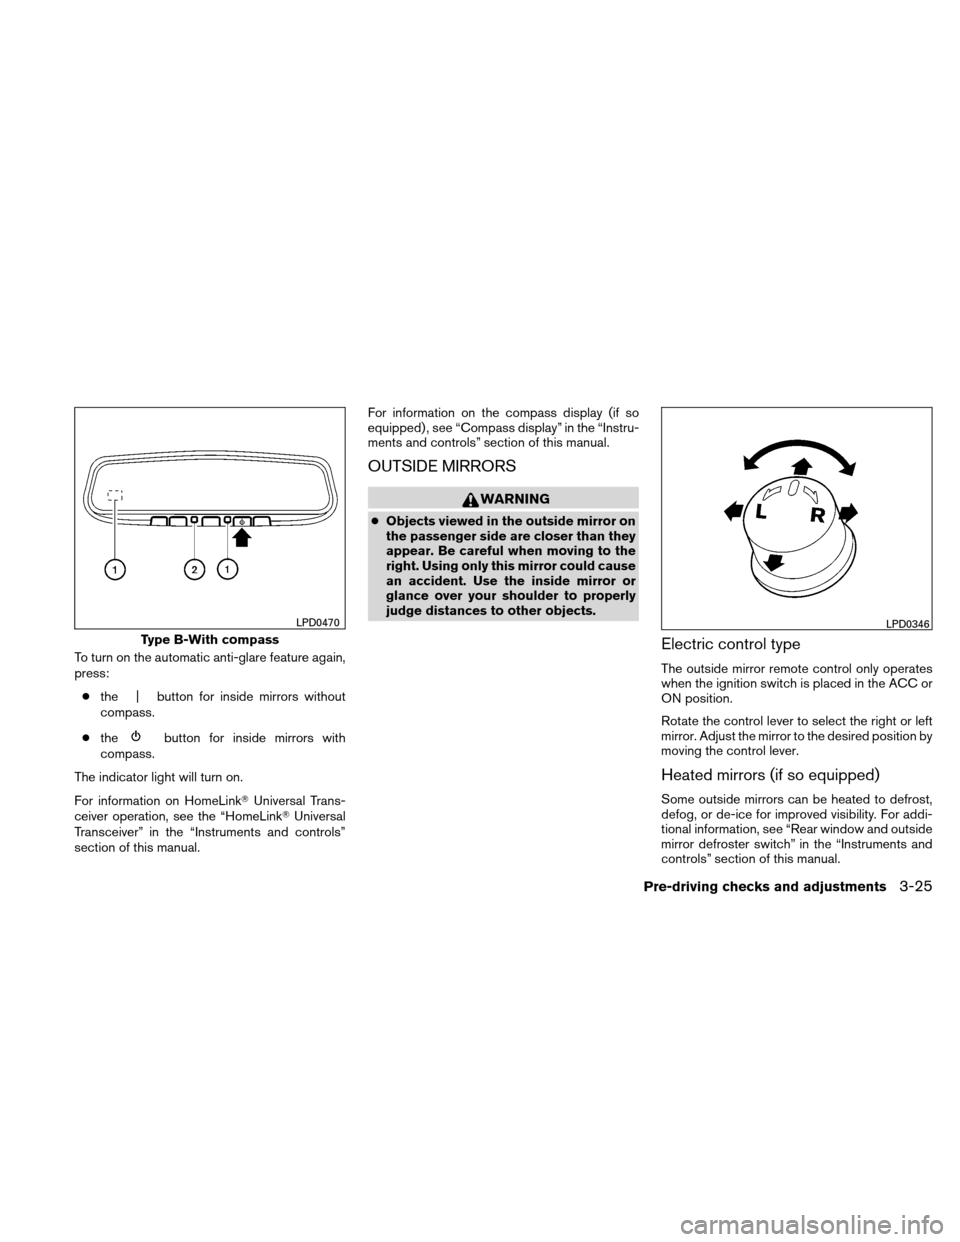
To turn on the automatic anti-glare feature again,
press:● the | button for inside mirrors without
compass.
● the
button for inside mirrors with
compass.
The indicator light will turn on.
For information on HomeLink� Universal Trans-
ceiver operation, see the “HomeLink� Universal
Transceiver” in the “Instruments and controls”
section of this manual. For information on the compass display (if so
equipped) , see “Compass display” in the “Instru-
ments and controls” section of this manual.
OUTSIDE MIRRORS
WARNING
●
Objects viewed in the outside mirror on
the passenger side are closer than they
appear. Be careful when moving to the
right. Using only this mirror could cause
an accident. Use the inside mirror or
glance over your shoulder to properly
judge distances to other objects.
Electric control type
The outside mirror remote control only operates
when the ignition switch is placed in the ACC or
ON position.
Rotate the control lever to select the right or left
mirror. Adjust the mirror to the desired position by
moving the control lever.
Heated mirrors (if so equipped)
Some outside mirrors can be heated to defrost,
defog, or de-ice for improved visibility. For addi-
tional information, see “Rear window and outside
mirror defroster switch” in the “Instruments and
controls” section of this manual.
Type B-With compass
LPD0470LPD0346
Pre-driving checks and adjustments3-25
Page 180 of 422

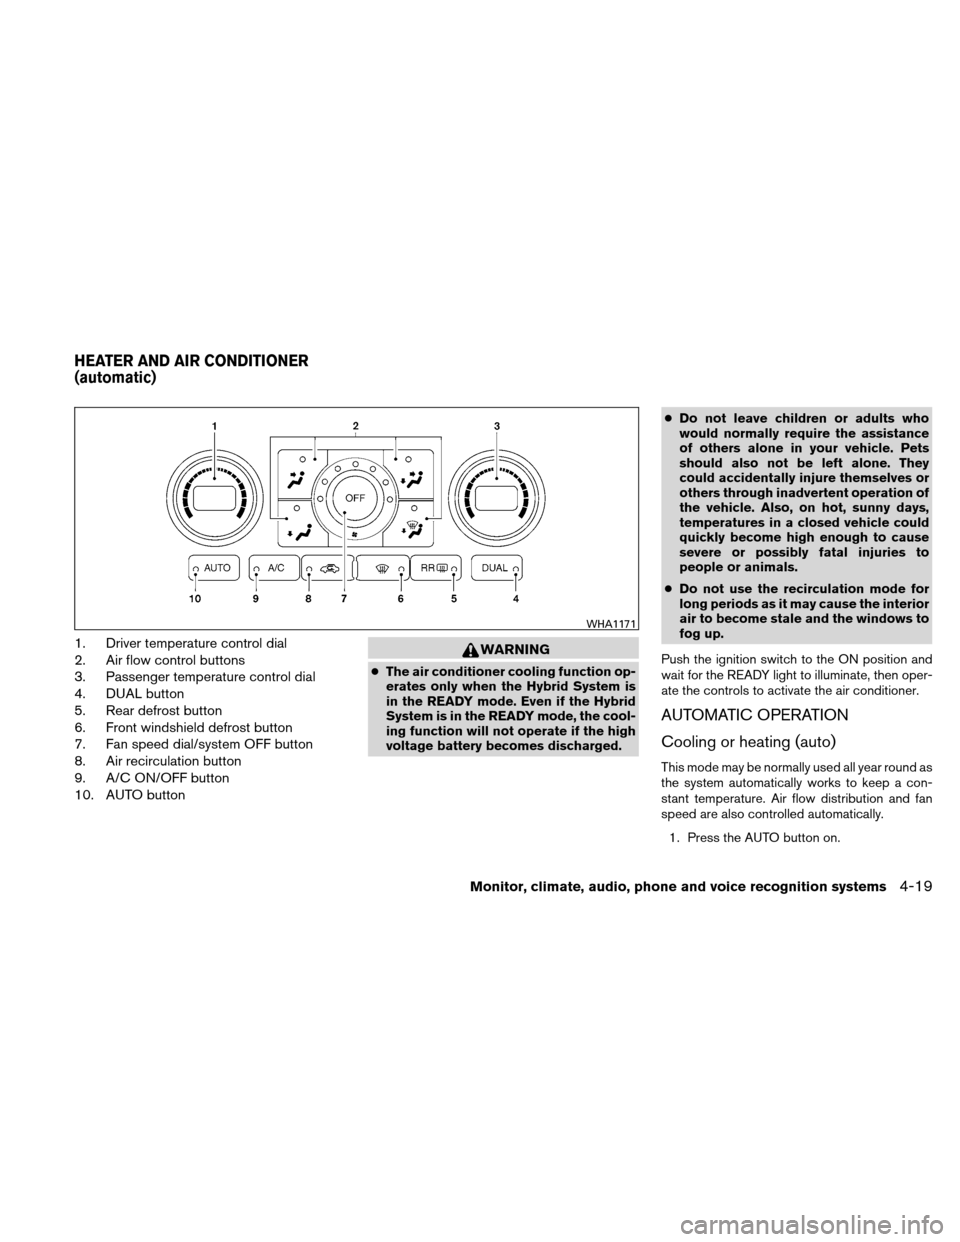
1. Driver temperature control dial
2. Air flow control buttons
3. Passenger temperature control dial
4. DUAL button
5. Rear defrost button
6. Front windshield defrost button
7. Fan speed dial/system OFF button
8. Air recirculation button
9. A/C ON/OFF button
10. AUTO buttonWARNING
●The air conditioner cooling function op-
erates only when the Hybrid System is
in the READY mode. Even if the Hybrid
System is in the READY mode, the cool-
ing function will not operate if the high
voltage battery becomes discharged. ●
Do not leave children or adults who
would normally require the assistance
of others alone in your vehicle. Pets
should also not be left alone. They
could accidentally injure themselves or
others through inadvertent operation of
the vehicle. Also, on hot, sunny days,
temperatures in a closed vehicle could
quickly become high enough to cause
severe or possibly fatal injuries to
people or animals.
● Do not use the recirculation mode for
long periods as it may cause the interior
air to become stale and the windows to
fog up.
Push the ignition switch to the ON position and
wait for the READY light to illuminate, then oper-
ate the controls to activate the air conditioner.
AUTOMATIC OPERATION
Cooling or heating (auto)
This mode may be normally used all year round as
the system automatically works to keep a con-
stant temperature. Air flow distribution and fan
speed are also controlled automatically. 1. Press the AUTO button on.
WHA1171
HEATER AND AIR CONDITIONER
(automatic)
Monitor, climate, audio, phone and voice recognition systems4-19
Page 181 of 422

2. Turn the driver’s side temperature controldial to the left or right to set the desired
temperature. Driver and passenger tem-
peratures can be set independently. Press
DUAL or turn the passenger temperature
control dial to the left or right to activate dual
climate control functions. Turn the passen-
ger’s side temperature control dial to the left
or right to set the desired passenger’s tem-
perature.
● Adjust the temperature dial to about 75°F
(24°C) for normal operation.
● The temperature of the passenger compart-
ment will be maintained automatically. Air
flow distribution, fan speed and A/C on/off
are also controlled automatically.
● A visible mist may be seen coming from the
vents in hot, humid conditions as the air is
cooled rapidly. This does not indicate a mal-
function.
Dehumidified defrosting or defogging
1. Press the defroster control buttonto
turn the system on. The indicator light in the
button will illuminate.
2. Turn the temperature dial to the left or right to set the desired temperature. ●
To quickly remove ice from the outside of the
windows, turn the manual fan control to HI.
● As soon as possible after the windshield is
clean, press the AUTO button to return to
the auto mode.
● When the
control is activated, the air
conditioner will automatically be turned on at
outside temperatures above 36°F (2°C) .
This dehumidifies the air which helps defog
the windshield. The air recirculation mode
automatically turns off, allowing outside air
to be drawn into the passenger compart-
ment to further improve the defogging per-
formance.
Rear window defroster switch
For more information about the rear window de-
froster switch, see “Rear window and outside
mirror defroster switch” in the “Instruments and
controls” section of this manual.
MANUAL OPERATION
Fan speed control
Turn the fan control dialleft or right to
manually control the fan speed.
Press the
/OFF button to turn the system
off. Press the AUTO button to return to automatic
control of the fan speed.
Air recirculation
Push the air recirculation buttonto recir-
culate interior air inside the vehicle. The indicator
light on the switch will come on.
The air recirculation button will not be activated
when the air conditioner is in DEF or
mode.
Air flow control
Press the air flow control buttons to manually
control air flow and select the air outlet:
— Air flows from center and side
vents.
— Air flows from center and side ventsand foot outlets.
— Air flows mainly from foot outlets.
— Air flows from defroster and footoutlets.
— Air flows from defroster outlets.
To turn system off
Press the/OFF button.
4-20Monitor, climate, audio, phone and voice recognition systems
Page 366 of 422

HEADLIGHTS
Replacing the halogen headlight bulb
The headlight is a semi-sealed beam type which
uses a replaceable headlight (halogen) bulb. Be-
cause the headlight assembly must be removed
from the vehicle for bulb replacement, see your
NISSAN dealer.
CAUTION
●Aiming is not necessary after replacing
the bulb. When aiming adjustment is
necessary, contact a NISSAN dealer.
● Do not leave the headlight assembly
open without a bulb installed for a long
period of time. Dust, moisture, smoke,
etc. entering the headlight body may
affect bulb performance. Remove the
bulb from the headlight assembly just
before a replacement bulb is installed.
● Only touch the base when handling the
bulb. Never touch the glass envelope.
Touching the glass could significantly
affect bulb life and/or headlight
performance.
● High pressure halogen gas is sealed
inside the halogen bulb. The bulb may
break if the glass envelope is scratched
or the bulb is dropped. ●
Use the same number and wattage as
shown in the chart.
Fog may temporarily form inside the lens of the
exterior lights in the rain or in a car wash. A
temperature difference between the inside and
the outside of the lens causes the fog. This is not
a malfunction. If large drops of water collect
inside the lens, contact a NISSAN dealer.FRONT PARK/TURN/SIDEMARKER
LIGHT
Bulb replacement requires the removal of the
headlight assembly. If replacement is required,
see your NISSAN dealer.
LIGHTS
Maintenance and do-it-yourself8-25