Page 108 of 446
 , start the engine and
push the rear window defroster switch on. The
rear window defroster indicator light on the
switch comes on.")
To defrost the rear window glass and outside
mirrors (if so equipped) , start the engine and
push the rear window defroster switch on. The
rear window defroster indicator light on the
switch comes on. Push the switch again to turn
the defroster off.
The rear window defroster automatically turns off
after approximately 15 minutes.
CAUTION
When cleaning the inner side of the rear
window, be careful not to scratch or dam-
age the rear window defroster.NOTE:
The top and bottom few rows of wires on
the rear window are not part of the rear
window defroster system. These wires
make up the antenna for the audio system.
XENON HEADLIGHTS (if so
equipped)
WARNING
�HIGH VOLTAGE
●
When xenon headlights are on, they
produce a high voltage. To prevent an
electric shock, never attempt to modify
or disassemble. Always have your xe-
non headlights replaced at a NISSAN
dealer.
● Xenon headlights provide considerably
more light than conventional head-
lights. If they are not correctly aimed,
they might temporarily blind an oncom-
ing driver or the driver ahead of you and
cause a serious accident. If headlights
are not aimed correctly, immediately
take your vehicle to a NISSAN dealer
and have the headlights adjusted
correctly.
When the xenon headlight is initially turned on, its
brightness or color varies slightly. However, the
color and brightness will soon stabilize.
Type A
LIC2030
Type B
WIC1460
REAR WINDOW AND OUTSIDE
MIRROR (if so equipped)
DEFROSTER SWITCH HEADLIGHT AND TURN SIGNAL
SWITCH
Instruments and controls2-29
Page 112 of 446
WARNING
When the daytime running light system is
active, tail lights on your vehicle are not
on. It is necessary at dusk to turn on your
headlights. Failure to do so could cause
an accident injuring yourself and others.
INSTRUMENT BRIGHTNESS
CONTROL
The instrument cluster illuminates when the igni-
tion switch is placed in the ON position.
The instrument brightness control operates when
the headlight control switch is in the
AUTO,
orposition.
Turn the control left or right to adjust the bright-
ness of the instrument panel lights when driving
at night.
TURN SIGNAL SWITCH
Turn signal
�1Move the lever up or down to signal the
turning direction. When the turn is com-
pleted, the turn signals cancel automatically.
Lane change signal
�2To signal a lane change, move the lever up or
down to the point where the indicator light
begins to flash, but the lever does not latch.
LIC1066LIC1088
Instruments and controls2-33
Page 113 of 446

To turn the fog lights on, turn the headlight switch
to the
position, then turn the fog light
switch to the
position.
To turn the fog lights on with the headlight swi")
FOG LIGHT SWITCH (if so equipped)
To turn the fog lights on, turn the headlight switch
to the
position, then turn the fog light
switch to the
position.
To turn the fog lights on with the headlight switch
in the AUTO position (if so equipped) , the head-
lights must be on, then turn the fog light switch to
the
position.
To turn the fog lights off, turn the fog light switch
to the OFF position.
The headlights must be on and the low beams
selected for the fog lights to operate. The fog
lights automatically turn off when the high beam
headlights are selected. Push the switch on to warn other drivers when
you must stop or park under emergency condi-
tions. All turn signal lights flash.
WARNING
●
If stopping for an emergency, be sure to
move the vehicle well off the road.
● Do not use the hazard warning flashers
while moving on the highway unless
unusual circumstances force you to
drive so slowly that your vehicle might
become a hazard to other traffic.
● Turn signals do not work when the haz-
ard warning flasher lights are on. The flashers will operate with the ignition switch
placed in any position.
Some state laws may prohibit the use of
the hazard warning flasher switch while
driving.
LIC1089LIC0394
HAZARD WARNING FLASHER
SWITCH
2-34Instruments and controls
Page 114 of 446

To sound the horn, push the center pad area of
the steering wheel.
WARNING
Do not disassemble the horn. Doing so
could affect proper operation of the
supplemental front air bag system. Tam-
pering with the supplemental front air bag
system may result in serious personal
injury.The front seats are warmed by built-in heaters.
1. Start the engine.
2. Push the low or high position of the switch, as desired, depending on the temperature.
The indicator light in the switch will illumi-
nate.
The heater is controlled by a thermostat,
automatically turning the heater on and off.
The indicator light will remain on as long as
the switch is on.
3. When the seat is warmed or before you leave the vehicle, be sure to turn the switch
off.
CAUTION
●Do not use the seat heater for extended
periods or when no one is using the
seat.
● Do not put anything on the seat which
insulates heat, such as a blanket, cush-
ion, seat cover, etc. Otherwise, the seat
may become overheated.
● Do not place anything hard or heavy on
the seat or pierce it with a pin or similar
object. This may result in damage to the
heater.
● Any liquid spilled on the heated seat
should be removed immediately with a
dry cloth.
● When cleaning the seat, never use
gasoline, benzine, thinner, or any simi-
lar materials.
● If any abnormalities are found or the
heated seat does not operate, turn the
switch off and have the system checked
by your NISSAN dealer.
● The battery could run down if the seat
heater is operated while the engine is
not running.
LIC1069LIC1543
HORN HEATED SEAT (if so equipped)
Instruments and controls2-35
Page 117 of 446
STORAGE POUCH (if so equipped)
A storage pouch is located on the front of the
driver’s and passenger’s seats.
WARNING
Do not store angular, sharp, heavy objects
or objects that cannot fully fit inside the
pouch because they might increase the
likelihood of an injury in a crash.
SUNGLASSES HOLDER
To open the sunglasses holder, push and release.
Only store one pair of sunglasses in the holder.
WARNING
Keep the sunglasses holder closed while
driving to prevent an accident.
CAUTION
●Do not use for anything other than
sunglasses.
● Do not leave sunglasses in the sun-
glasses holder while parking in direct
sunlight. The heat may damage the
sunglasses.
LIC1242WIC1551
2-38Instruments and controls
Page 120 of 446
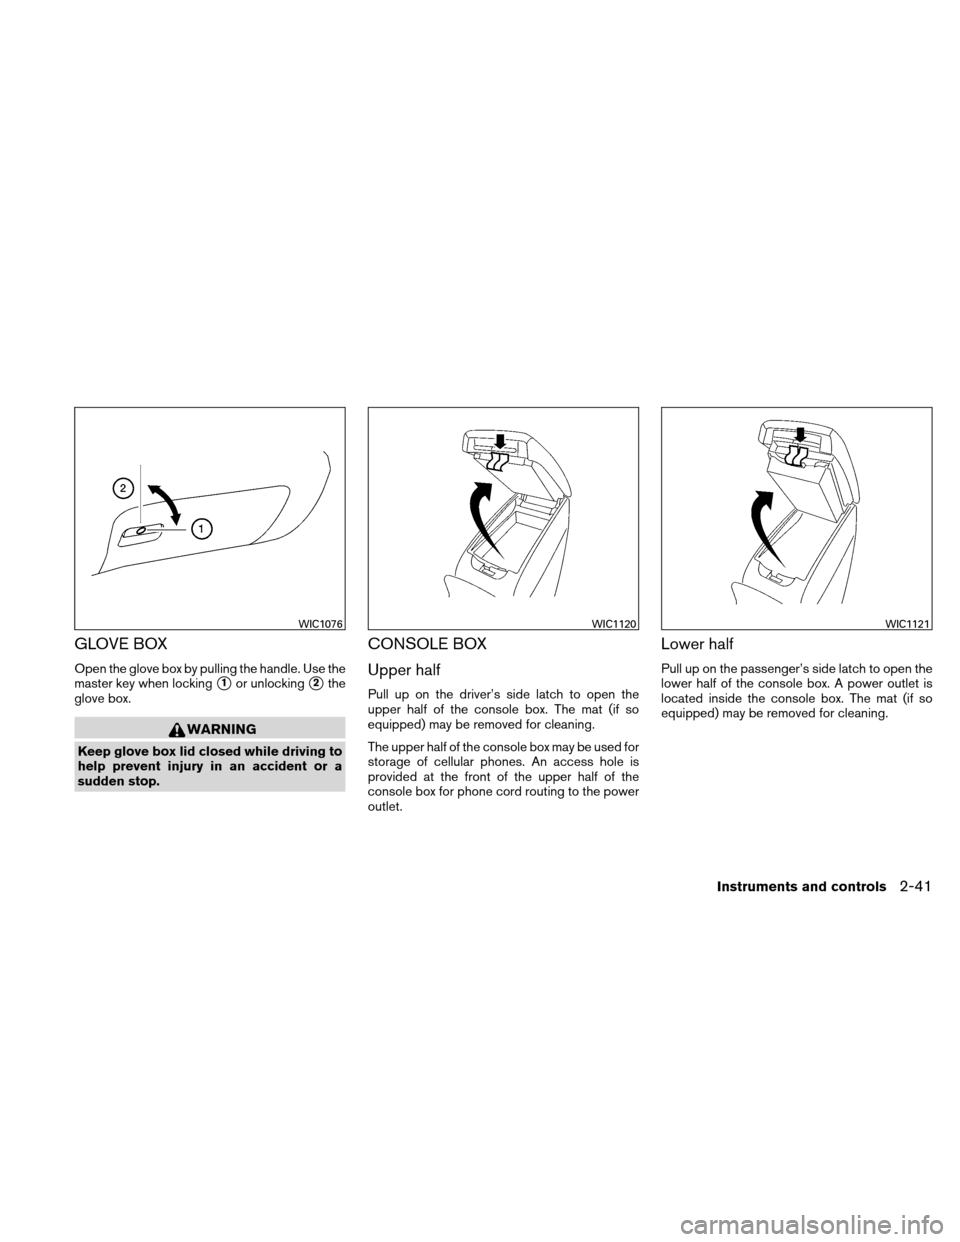
GLOVE BOX
Open the glove box by pulling the handle. Use the
master key when locking
�1or unlocking�2the
glove box.
WARNING
Keep glove box lid closed while driving to
help prevent injury in an accident or a
sudden stop.
CONSOLE BOX
Upper half
Pull up on the driver’s side latch to open the
upper half of the console box. The mat (if so
equipped) may be removed for cleaning.
The upper half of the console box may be used for
storage of cellular phones. An access hole is
provided at the front of the upper half of the
console box for phone cord routing to the power
outlet.
Lower half
Pull up on the passenger’s side latch to open the
lower half of the console box. A power outlet is
located inside the console box. The mat (if so
equipped) may be removed for cleaning.
WIC1076WIC1120WIC1121
Instruments and controls2-41
Page 122 of 446

WARNING
Properly secure all cargo with ropes or
straps to help prevent it from sliding or
shifting. In a sudden stop or collision, un-
secured cargo could cause personal
inj")
CARGO NET (if so equipped)
WARNING
Properly secure all cargo with ropes or
straps to help prevent it from sliding or
shifting. In a sudden stop or collision, un-
secured cargo could cause personal
injury.
The cargo net helps keep packages in the cargo
area from moving around while the vehicle is in
motion. To install the cargo net, attach the net to the
retainers.
To remove the cargo net, detach the net from the
cargo net retainers.
POWER WINDOWS
WARNING
●
Make sure that all passengers have
their hands, etc. inside the vehicle while
it is in motion and before closing the
windows. Use the window lock switch
to prevent unexpected use of the power
windows.
● Do not leave children unattended inside
the vehicle. They could unknowingly ac-
tivate switches or controls and become
trapped in a window. Unattended chil-
dren could become involved in serious
accidents.
The power windows operate when the ignition
switch is placed in the ON position, or for about
45 seconds after the ignition switch is placed in
the OFF position. If the driver’s or passenger’s
door is opened during this period of about 45
seconds, power to the windows is canceled.
WIC1264LIC0802
WINDOWS
Instruments and controls2-43
Page 124 of 446

The rear power window switches open or close
only the corresponding windows. To open the
window, push the switch and hold it down
�1.To
close the window, pull the")
Rear power window switch (sedan
only)
The rear power window switches open or close
only the corresponding windows. To open the
window, push the switch and hold it down
�1.To
close the window, pull the switch up
�2.
Locking passengers’ windows
When the window lock button is depressed, only
the driver’s side window can be opened or
closed. Push it again to cancel the window lock
function.
Automatic operation
To fully open a window equipped with automatic
operation, press the window switch down (only
driver’s side shown) to the second detent and
release it; it need not be held. The window auto-
matically opens all the way. To stop the window,
lift the switch up while the window is opening.
To fully close a window equipped with automatic
operation, pull the switch up to the second detent
and release it; it need not be held. To stop the
window, press the switch down while the window
is closing.
Auto-reverse function
If the control unit detects something caught in the
window as it is closing, the window will be imme-
diately lowered.
The auto-reverse function can be activated when
the window is closed by automatic operation
when the ignition switch is placed in the ON
position or for 45 seconds after the ignition
switch is placed in the OFF position.
Depending on the environment or driving
conditions, the auto-reverse function may
be activated if an impact or load similar to
something being caught in the window oc-
curs.
WARNING
There are some small distances immedi-
ately before the closed position which
cannot be detected. Make sure that all
passengers have their hands, etc., inside
the vehicle before closing the window.
LIC0718LIC0410
Instruments and controls2-45


A storage pouch is located on the front of the
driver’s and passenger’s seats.
WARNING
Do not store angular, sharp, heavy objects
or objects that cannot fully fit in")