2011 NISSAN ALTIMA COUPE steering wheel
[x] Cancel search: steering wheelPage 285 of 446
To improve the recognition success rate when
Alternate Command Mode is active, try using the
Speaker Adaptation Function available in that
mode. See “Speaker Adaptation Function” in this
section. Otherwise, it is recommended that Alter-
nate Command Mode be turned off and Standard
Mode be used for the best recognition perfor-
mance.
While using the NISSAN Voice Recognition sys-
tem for certain Phone and Navigation features,
you can switch to using manual controls (touch-
screen, steering wheel controls) and the informa-
tion you have already entered by voice control will
be retained. To switch to manual controls, select
the “Manual Controls” key on the display when it
appears. The system will respond by speaking
“Changing to manual operation. Please use
manual controls to continue.”
For the voice commands for the navigation sys-
tem, refer to the Navigation System Owner’s
Manual of your vehicle.
For vehicles in the U.S., the factory default setting
is the Standard Mode. See “NISSAN Voice Rec-
ognition Standard Mode” in this section. For ve-
hicles in Canada, the factory default setting is the
Alternate Command Mode. See “NISSAN Voice
Recognition Alternate Command Mode” in this
section.NISSAN VOICE RECOGNITION
STANDARD MODE
The Standard Mode enables control of naviga-
tion, phone and vehicle information. With this
setting active, commands that are available are
always shown on the display and announced by
the system.
Displaying user guide
If you use the NISSAN Voice Recognition system
for the first time or you do not know how to
operate it, you can display the User Guide for
confirmation.
You can confirm how to use voice commands by
accessing a simplified User Guide, which con-
tains basic instructions and tutorials for several
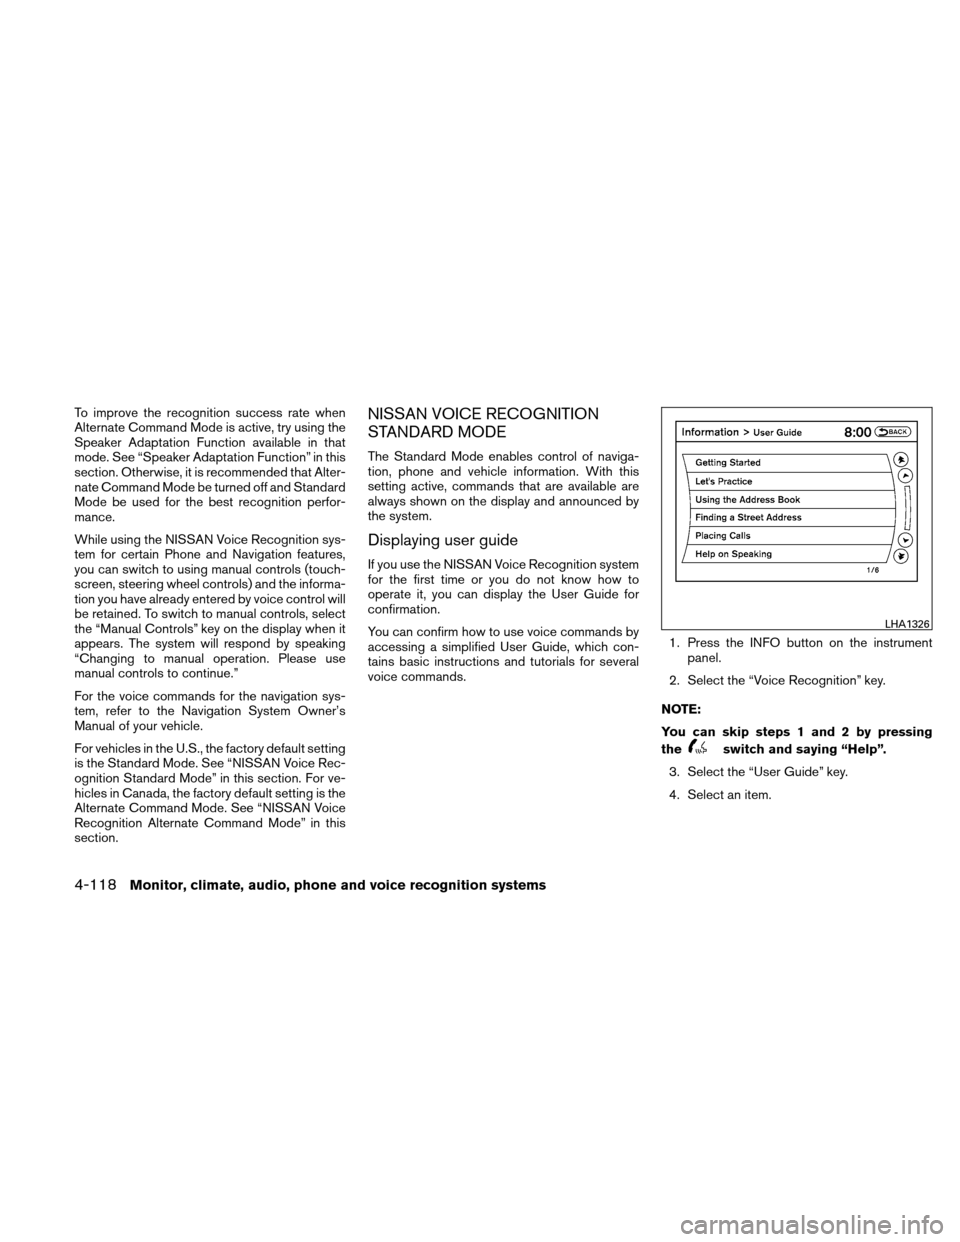
voice commands.1. Press the INFO button on the instrument
panel.
2. Select the “Voice Recognition” key.
NOTE:
You can skip steps 1 and 2 by pressing
the
switch and saying “Help”.
3. Select the “User Guide” key.
4. Select an item.
LHA1326
4-118Monitor, climate, audio, phone and voice recognition systems
Page 289 of 446
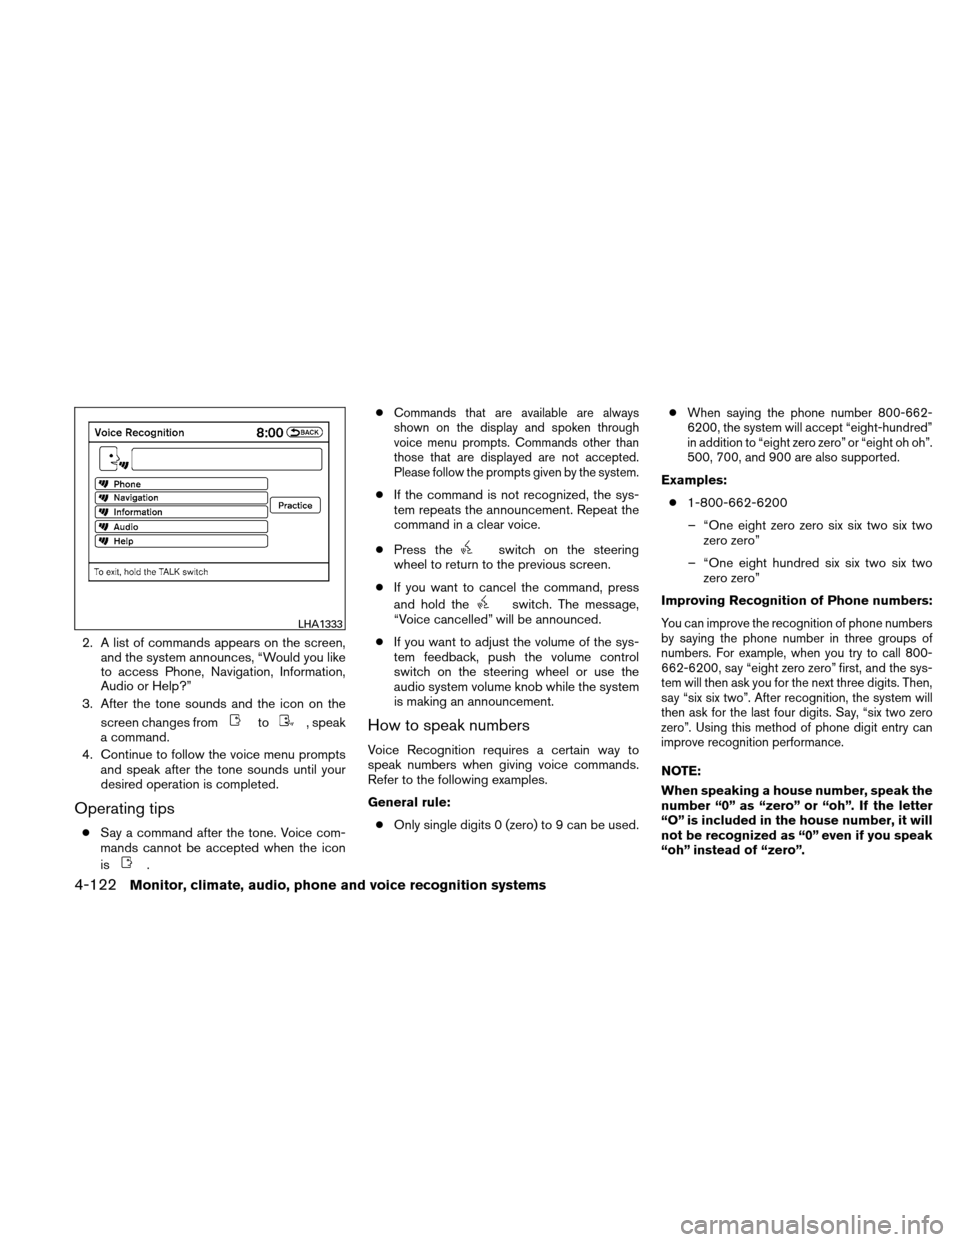
2. A list of commands appears on the screen,and the system announces, “Would you like
to access Phone, Navigation, Information,
Audio or Help?”
3. After the tone sounds and the icon on the
screen changes from
to, speak
a command.
4. Continue to follow the voice menu prompts and speak after the tone sounds until your
desired operation is completed.
Operating tips
●Say a command after the tone. Voice com-
mands cannot be accepted when the icon
is
. ●
Commands that are available are always
shown on the display and spoken through
voice menu prompts. Commands other than
those that are displayed are not accepted.
Please follow the prompts given by the system.
●
If the command is not recognized, the sys-
tem repeats the announcement. Repeat the
command in a clear voice.
● Press the
switch on the steering
wheel to return to the previous screen.
● If you want to cancel the command, press
and hold the
switch. The message,
“Voice cancelled” will be announced.
● If you want to adjust the volume of the sys-
tem feedback, push the volume control
switch on the steering wheel or use the
audio system volume knob while the system
is making an announcement.
How to speak numbers
Voice Recognition requires a certain way to
speak numbers when giving voice commands.
Refer to the following examples.
General rule:
● Only single digits 0 (zero) to 9 can be used. ●
When saying the phone number 800-662-
6200, the system will accept “eight-hundred”
in addition to “eight zero zero” or “eight oh oh”.
500, 700, and 900 are also supported.
Examples:
● 1-800-662-6200
– “One eight zero zero six six two six two zero zero”
– “One eight hundred six six two six two zero zero”
Improving Recognition of Phone numbers:
You can improve the recognition of phone numbers
by saying the phone number in three groups of
numbers. For example, when you try to call 800-
662-6200, say “eight zero zero” first, and the sys-
tem will then ask you for the next three digits. Then,
say “six six two”. After recognition, the system will
then ask for the last four digits. Say, “six two zero
zero”. Using this method of phone digit entry can
improve recognition performance.
NOTE:
When speaking a house number, speak the
number “0” as “zero” or “oh”. If the letter
“O” is included in the house number, it will
not be recognized as “0” even if you speak
“oh” instead of “zero”.
LHA1333
4-122Monitor, climate, audio, phone and voice recognition systems
Page 303 of 446
Before starting
To get the best performance from NISSAN Voice
Recognition, observe the following:● Keep the interior of the vehicle as quiet as
possible. Close the windows to eliminate the
surrounding noises (traffic noises, vibration
sounds, etc.) , which may prevent the system
from recognizing the voice commands cor-
rectly.
● When the climate control is in the AUTO
mode, the fan speed decreases automati-
cally for easy recognition.
● Wait until a tone sounds before speaking a
command.
● Speak in a natural voice without pausing
between words.
Giving voice commands
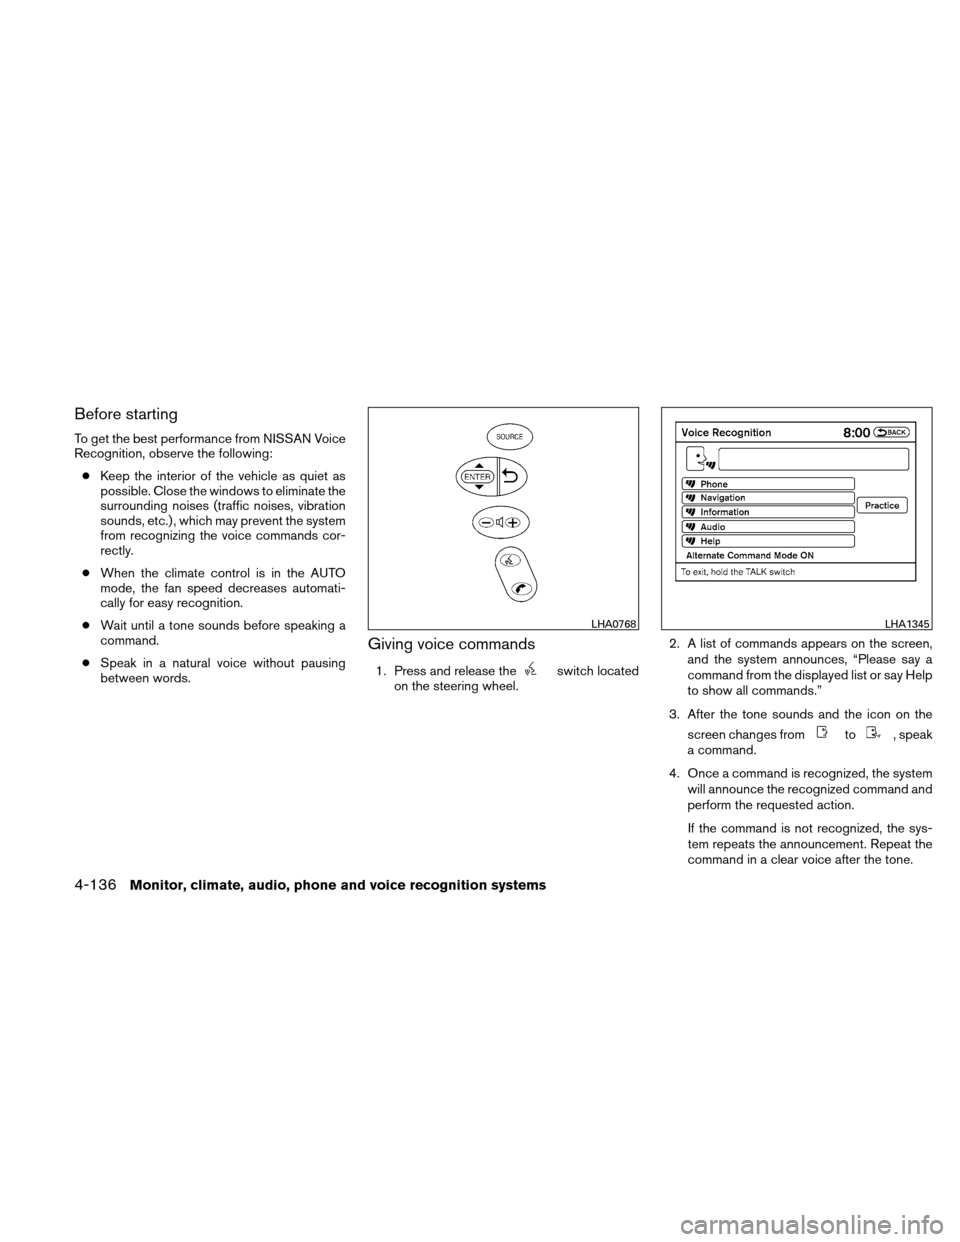
1. Press and release theswitch located
on the steering wheel. 2. A list of commands appears on the screen,
and the system announces, “Please say a
command from the displayed list or say Help
to show all commands.”
3. After the tone sounds and the icon on the screen changes from
to, speak
a command.
4. Once a command is recognized, the system will announce the recognized command and
perform the requested action.
If the command is not recognized, the sys-
tem repeats the announcement. Repeat the
command in a clear voice after the tone.
LHA0768LHA1345
4-136Monitor, climate, audio, phone and voice recognition systems
Page 304 of 446
Operating tips
●Say a command after the tone. Voice com-
mands cannot be accepted when the icon
is
.
● If the command is not recognized, the sys-
tem repeats the announcement. Repeat the
command in a clear voice.
● Press the
switch on the steering
wheel to return to the previous screen.
● If you want to cancel the command, press
and hold the
switch. The message,
“Voice cancelled” will be announced.
● If you want to adjust the volume of the sys-
tem feedback, push the volume control
switch on the steering wheel or use the
audio system volume knob while the system
is making an announcement.
● To minimize the amount of prompts spoken
by the system in Alternate Command Mode,
use the Minimize Voice Feedback function.
To access the Minimize Voice Feedback
function press the SETTING button, then
select the “Others” key. Then select the
“Voice Recognition” key.
How to speak numbers
Voice Recognition requires a certain way to
speak numbers when giving voice commands.
Refer to the following examples.
General rule:
● Only single digits 0 (zero) to 9 can be used.
● When saying the phone number 800-662-
6200, the system will accept “eight-
hundred” in addition to “eight zero zero” or
“eight oh oh”. 500, 700, and 900 are also
supported.
Examples: ● 1-800-662-6200
– “One eight zero zero six six two six two zero zero”
– “One eight hundred six six two six two zero zero”
Improving Recognition of Phone numbers:
You can improve the recognition of phone num-
bers by saying the phone number in three groups
of numbers. For example, when you try to call
800-662-6200, say “eight zero zero” first, and
the system will then ask you for the next three
digits. Then, say “six six two”. After recognition,
the system will then ask for the last four digits. Say, “six two zero zero”. Using this method of
phone digit entry can improve recognition perfor-
mance.
NOTE:
When speaking a house number, speak the
number “0” as “zero” or “oh”. If the letter
“O” is included in the house number, it will
not be recognized as “0” even if you speak
“oh” instead of “zero”.
Settings menu
The content of the Settings Menu differs when
the system is in the Alternate Command Mode.
Command List:
Displays the command list for Alternate Com-
mand Mode.
User Guide:
The user guide provides basic instructions for
using Voice Recognition and accessing some
voice commands.
NOTE:
The user guide can also be accessed from
within the INFO menu after pressing the
INFO button.
Monitor, climate, audio, phone and voice recognition systems4-137
Page 311 of 446
Additional information:● The TPMS does not monitor the tire
pressure of the spare tire.
● The TPMS will activate only when the vehicle
is driven at speeds above 16 MPH (25
km/h) . Also, this system may not detect a
sudden drop in tire pressure (for example a
flat tire while driving) .
● The low tire pressure warning light does not
automatically turn off when the tire pressure
is adjusted. After all 4 tires are inflated to the
recommended pressure, the vehicle must be
driven at speeds above 16 MPH (25 km/h)
to activate the TPMS and turn off the low tire
pressure warning light. Use a tire pressure
gauge to check the tire pressure.
● The CHECK TIRE PRESSURE warning ap-
pears in the vehicle information display when
the low tire pressure warning light is illumi-
nated and low tire pressure is detected. The
CHECK TIRE PRESSURE warning turns off
when the low tire pressure warning light
turns off.
● The CHECK TIRE PRESSURE warning
does not appear if the low tire pressure
warning light illuminates to indicate a TPMS
malfunction. ●
Tire pressure rises and falls depending on
the heat caused by the vehicle’s operation
and the outside temperature. Low outside
temperature can lower the temperature of
the air inside the tire which can cause a
lower tire inflation pressure. This may cause
the low tire pressure warning light to illumi-
nate. If the warning light illuminates in low
ambient temperature, check the tire pres-
sure for all four tires.
● The Tire and Loading Information label (also
referred to as the vehicle placard or tire
inflation pressure label) is located in the
driver’s door opening.
For additional information, see “Low tire pressure
warning light” in the “Instruments and controls”
section and “Tire Pressure Monitoring System
(TPMS)” in the “In case of emergency” section.
WARNING
● If the low tire pressure warning light
illuminates while driving, avoid sudden
steering maneuvers or abrupt braking,
reduce vehicle speed, pull off the road
to a safe location and stop the vehicle
as soon as possible. Driving with under-
inflated tires may permanently damage
the tires and increase the likelihood of tire failure. Serious vehicle damage
could occur and may lead to an acci-
dent and could result in serious per-
sonal injury. Check the tire pressure for
all four tires. Adjust the tire pressure to
the recommended COLD tire pressure
shown on the Tire and Loading Informa-
tion label to turn the low tire pressure
warning light OFF. If you have a flat tire,
replace it with a spare tire as soon as
possible. (See “Flat tire” in the “In case
of emergency” section for changing a
flat tire.)
● When a spare tire is mounted or a wheel
is replaced, tire pressure will not be
indicated, the TPMS will not function
and the low tire pressure warning light
will flash for approximately 1 minute.
The light will remain on after 1 minute.
Contact your NISSAN dealer as soon as
possible for tire replacement and/or
system resetting.
● Replacing tires with those not originally
specified by NISSAN could affect the
proper operation of the TPMS.
● Do not inject any tire liquid or aerosol
tire sealant into the tires, as this may
cause a malfunction of the tire pressure
sensors.
5-4Starting and driving
Page 313 of 446
OFF-ROAD RECOVERY
If the right side or left side wheels leave the road
surface, maintain control of the vehicle by follow-
ing the procedure below. Please note that this
procedure is only a general guide. The vehicle
must be driven as appropriate based on the con-
ditions of the vehicle, road and traffic.1. Remain calm and do not overreact.
2. Do not apply the brakes.
3. Maintain a firm grip on the steering wheel with both hands and try to hold a straight
course.
4. When appropriate , slowly release the accel- erator pedal to gradually slow the vehicle.
5. If there is nothing in the way, steer the ve- hicle to follow the road while vehicle speed
is reduced. Do not attempt to drive the ve-
hicle back onto the road surface until vehicle
speed is reduced.
6. When it is safe to do so, gradually turn the steering wheel until both tires return to the
road surface. When all tires are on the road
surface, steer the vehicle to stay in the ap-
propriate driving lane. ●
If you decide that it is not safe to return the
vehicle to the road surface based on vehicle,
road or traffic conditions, gradually slow the
vehicle to a stop in a safe place off the road.
RAPID AIR PRESSURE LOSS
Rapid air pressure loss or a “blow-out” can occur
if the tire is punctured or is damaged due to
hitting a curb or pothole. Rapid air pressure loss
can also be caused by driving on under-inflated
tires.
Rapid air pressure loss can affect the handling
and stability of the vehicle, especially at highway
speeds.
Help prevent rapid air pressure loss by maintain-
ing the correct air pressure and visually inspect
the tires for wear and damage. See “Wheels and
tires” in the “Maintenance and do-it-yourself”
section of this manual. If a tire rapidly loses air
pressure or “blows-out” while driving, maintain
control of the vehicle by following the procedure
below. Please note that this procedure is only a
general guide. The vehicle must be driven as
appropriate based on the conditions of the ve-
hicle, road and traffic.
WARNING
The following actions can increase the
chance of losing control of the vehicle if
there is a sudden loss of tire air pressure.
Losing control of the vehicle may cause a
collision and result in personal injury.
●The vehicle generally moves or pulls in
the direction of the flat tire.
● Do not rapidly apply the brakes.
● Do not rapidly release the accelerator
pedal.
● Do not rapidly turn the steering wheel.
1. Remain calm and do not over react.
2. Maintain a firm grip on the steering wheel with both hands and try to hold a straight
course.
3. When appropriate, slowly release the accel- erator pedal to gradually slow the vehicle.
4. Gradually steer the vehicle to a safe location off the road and away from traffic if possible.
5. Lightly apply the brake pedal to gradually stop the vehicle.
6. Turn on the hazard warning flashers and either contact a roadside emergency service
to change the tire or see “Changing a flat
tire” in the “In case of emergency” section of
this manual.
5-6Starting and driving
Page 331 of 446
The power assisted steering uses a hydraulic
pump, driven by the engine, to assist steering.
If the engine stops or the drive belt breaks, you
will still have control of the vehicle. However,
much greater steering effort is needed, especially
in sharp turns and at low speeds.
WARNING
If the engine is not running or is turned off
while driving, the power assist for the
steering will not work. Steering will be
harder to operate.The brake system has two separate hydraulic
circuits. If one circuit malfunctions, you will still
have braking at 2 wheels.
BRAKE PRECAUTIONS
Vacuum assisted brakes
The brake booster aids braking by using engine
vacuum. If the engine stops, you can stop the
vehicle by depressing the brake pedal. However,
greater foot pressure on the brake pedal will be
required to stop the vehicle and stopping dis-
tance will be longer.
Using the brakes
Avoid resting your foot on the brake pedal while
driving. This will overheat the brakes, wear out the
brake pads faster, and reduce gas mileage.
To help reduce brake wear and to prevent the
brakes from overheating, reduce speed and
downshift to a lower gear before going down a
slope or long grade. Overheated brakes may
reduce braking performance and could result in
loss of vehicle control.
WARNING
●
While driving on a slippery surface, be
careful when braking, accelerating or
downshifting. Abrupt braking or accel-
erating could cause the wheels to skid
and result in an accident. ●
If the engine is not running or is turned
off while driving, the power assist for
the brakes will not work. Braking will be
harder.
Parking brake break-in
Break-in the parking brake shoes whenever the
stopping effect of the parking brake is weakened
or whenever the parking brake shoes and/or
drum/rotors are replaced, in order to assure the
best brake performance.
This procedure is described in the vehicle service
manual and can be performed by a NISSAN
dealer.
Wet brakes
When the vehicle is washed or driven through
water, the brakes may get wet. As a result, your
braking distance will be longer and the vehicle
may pull to one side during braking.
To dry the brakes, drive the vehicle at a safe
speed while lightly pressing the brake pedal to
heat up the brakes. Do this until the brakes return
to normal. Avoid driving the vehicle at high
speeds until the brakes function correctly.
POWER STEERING BRAKE SYSTEM
5-24Starting and driving
Page 332 of 446
ANTI-LOCK BRAKING SYSTEM
(ABS)
WARNING
●The Anti-lock Braking System (ABS) is a
sophisticated device, but it cannot pre-
vent accidents resulting from careless
or dangerous driving techniques. It can
help maintain vehicle control during
braking on slippery surfaces. Remem-
ber that stopping distances on slippery
surfaces will be longer than on normal
surfaces even with ABS. Stopping dis-
tances may also be longer on rough,
gravel or snow covered roads, or if you
are using tire chains. Always maintain a
safe distance from the vehicle in front
of you. Ultimately, the driver is respon-
sible for safety.
● Tire type and condition may also affect
braking effectiveness.
– When replacing tires, install the specified size of tires on all four
wheels. – When installing a spare tire, make
sure that it is the proper size and type
as specified on the Tire and Loading
Information label. See “Tire and
Loading Information label” in the
“Technical and consumer informa-
tion” section of this manual.
– For detailed information, see “Wheels and tires” in the “Mainte-
nance and do-it-yourself” section of
this manual.
The Anti-lock Braking System (ABS) controls the
brakes so the wheels do not lock during hard
braking or when braking on slippery surfaces.
The system detects the rotation speed at each
wheel and varies the brake fluid pressure to pre-
vent each wheel from locking and sliding. By
preventing each wheel from locking, the system
helps the driver maintain steering control and
helps to minimize swerving and spinning on slip-
pery surfaces.
Using the system
Depress the brake pedal and hold it down. De-
press the brake pedal with firm steady pressure,
but do not pump the brakes. The ABS will oper-
ate to prevent the wheels from locking up. Steer
the vehicle to avoid obstacles.
WARNING
Do not pump the brake pedal. Doing so
may result in increased stopping
distances.
Self-test feature
The ABS includes electronic sensors, electric
pumps, hydraulic solenoids and a computer. The
computer has a built-in diagnostic feature that
tests the system each time you start the engine
and move the vehicle at a low speed in forward or
reverse. When the self-test occurs, you may hear
a “clunk” noise and/or feel a pulsation in the brake
pedal. This is normal and does not indicate a
malfunction. If the computer senses a malfunc-
tion, it switches the ABS off and illuminates the
ABS warning light on the instrument panel. The
brake system then operates normally, but without
anti-lock assistance.
If the ABS warning light illuminates during the
self-test or while driving, have the vehicle
checked by a NISSAN dealer.
Starting and driving5-25