Page 365 of 446
QR25DE engine
1. Power steering fluid reservoir
2. Engine oil filler cap
3. Brake fluid reservoir/Clutch fluidreservoir (M/T model)
4. Air cleaner
5. Fuse block
6. Battery
7. Fuse/Fusible link box
8. Engine oil dipstick
9. Radiator cap
10. Drive belt location
11. Engine coolant reservoir
12. Windshield-washer fluid reservoir
LDI0553
ENGINE COMPARTMENT CHECK
LOCATIONS
8-6Maintenance and do-it-yourself
Page 366 of 446
VQ35DE engine
1. Power steering fluid reservoir
2. Engine oil filler cap
3. Brake fluid reservoir/Clutch fluidreservoir (M/T model)
4. Air cleaner
5. Fuse block
6. Battery
7. Fuse/Fusible link box
8. Engine oil dipstick
9. Radiator cap
10. Drive belt location
11. Engine coolant reservoir
12. Windshield-washer fluid reservoir
LDI0552
Maintenance and do-it-yourself8-7
Page 370 of 446
CAUTION
Oil level should be checked regularly. Op-
erating the engine with an insufficient
amount of oil can damage the engine, and
such damage is not covered by warranty.
CHANGING ENGINE OIL
1. Park the vehicle on a level surface and applythe parking brake.
2. Start the engine and let it idle until it reaches operating temperature, then turn it off.
3. Remove the oil filler
�Acap by turning it
counterclockwise.
4. Place a large drain pan under the drain plug
�B. 5. Remove the drain plug
�Bwith a wrench by
turning it counterclockwise and completely
drain the oil.
If the oil filter is to be changed, remove and
replace it at this time. See “Changing engine
oil filter” in this section.
● Waste oil must be disposed of prop-
erly.
● Check your local regulations.
QR25DE
WDI0492
VQ35DE
WDI0493
Maintenance and do-it-yourself8-11
Page 371 of 446

WARNING
●Prolonged and repeated contact with
used engine oil may cause skin cancer.
● Try to avoid direct skin contact with
used oil. If skin contact is made, wash
thoroughly with soap or hand cleaner
as soon as possible.
● Keep used engine oil out of reach of
children.
CAUTION
Be careful not to burn yourself. The engine
oil may be hot.
6. Clean and reinstall the drain plug and a new washer. Securely tighten the drain plug with
a wrench. Do not use excessive force.
Drain plug tightening torque: 22 - 29 ft-lb (29 - 39 N·m)
7. Refill engine with recommended oil through the oil filler opening, then install the oil filler
cap securely.
See “Capacities and recommended
fuel/lubricants” in the “Technical and con-
sumer information” section of this manual for
drain and refill capacity. The drain and refill capacity depends on the
oil temperature and drain time. Use these
specifications for reference only. Always use
the dipstick to determine when the proper
amount of oil is in the engine.
8. Start the engine. Check for leakage around the drain plug and oil filter. Correct as re-
quired.
9. Turn the engine off and wait more than 10 minutes. Check the oil level with the dipstick.
Add engine oil if necessary.
CHANGING ENGINE OIL FILTER
1. Park the vehicle on a level surface and applythe parking brake.
2. Turn the engine off.
3. Place a large drain pan under the oil filter
�A.
4. Loosen the oil filter
�Awith an oil filter
wrench by turning it counterclockwise. Then
remove the oil filter by turning it by hand.
QR25DE
WDI0494
8-12Maintenance and do-it-yourself
Page 377 of 446

CAUTION
●Do not ground accessories directly to
the battery terminal. Doing so will by-
pass the variable voltage control sys-
tem and the vehicle battery may not
charge completely.
● Use electrical accessories with the en-
gine running to avoid discharging the
vehicle battery.
Your vehicle is equipped with a variable voltage
control system. This system measures the
amount of electrical discharge from the battery
and controls voltage generated by the generator.
The current sensor
�Ais located near the battery
along the negative battery cable. If you add elec-
trical accessories to your vehicle, be sure to
ground them to a suitable body ground such as
the frame or engine block area.1. Power steering fluid pump pulley
2. Water pump pulley
3. Generator
4. Air conditioner
5. Crankshaft pulley
6. Drive belt Automatic tensioner
WARNING
Be sure the ignition switch is placed in the
OFF or LOCK position before servicing
drive belt. The engine could rotate
unexpectedly.
LDI0694
QR25DE engine
WDI0673
VARIABLE VOLTAGE CONTROL
SYSTEM DRIVE BELT
8-18Maintenance and do-it-yourself
Page 383 of 446
ENGINE COMPARTMENT
CAUTION
Never use a fuse of a higher or lower
amperage rating than specified on the
fuse box cover. This could damage the
electrical system or cause a fire.
If any electrical equipment does not come on,
check for an open fuse. 1. Be sure the ignition switch and the headlight switch are OFF.
2. Open the engine hood. 3. Remove the fuse box cover by pushing the
tab and lifting the cover up.
4. Remove the fuse with the fuse puller. The fuse puller is located in the center of the fuse
block in the passenger compartment.
5. If the fuse is open
�A, replace it with a new
fuse
�B.
6. If a new fuse also opens, have the electrical system checked and repaired by a NISSAN
dealer.
Fusible links
If the electrical equipment does not operate and
fuses are in good condition, check the fusible
links. If any of these fusible links are melted,
replace with only Genuine NISSAN parts.
LDI0560WDI0452
8-24Maintenance and do-it-yourself
Page 385 of 446
Extended storage switch (if so
equipped)
If any electrical equipment does not operate,
remove the extended storage switch and check
for an open fuse.
NOTE:
The extended storage switch is used for
long term vehicle storage. Even if the ex-
tended storage switch is broken it is not
necessary to replace it. Replace only the
open fuse in the switch with a new fuse.How to replace the extended storage switch:
1. To remove the extended storage switch, be sure the ignition switch is in the OFF or
LOCK position.
2. Be sure the headlight switch is in the OFF position.
3. Remove the fuse box cover.
4. Pinch the locking tabs
�1found on each
side of the storage switch.
5. Pull the storage switch straight out from the fuse box
�2.
Type B
LDI0456LDI2035
8-26Maintenance and do-it-yourself
Page 394 of 446
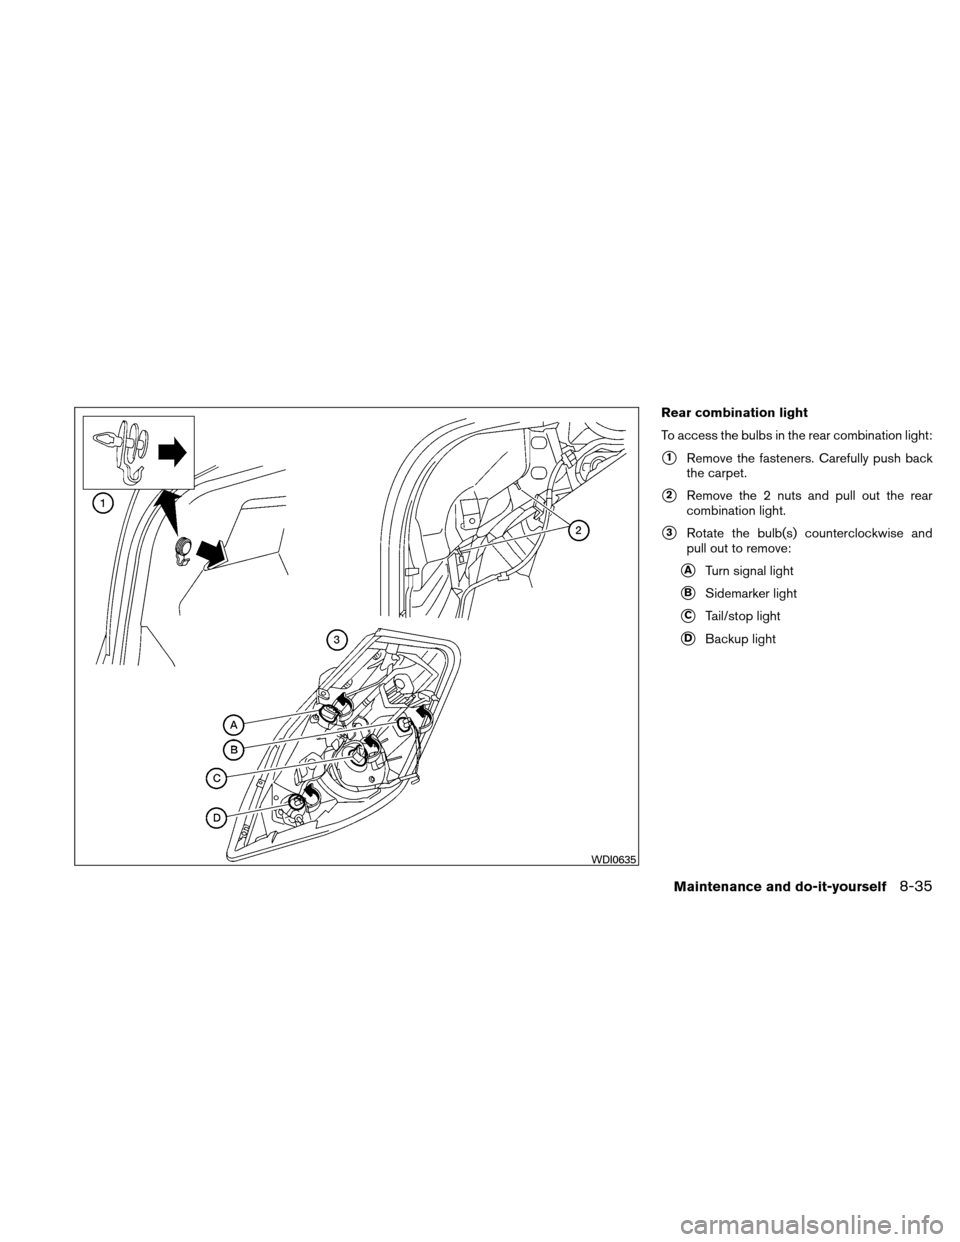
Rear combination light
To access the bulbs in the rear combination light:
�1Remove the fasteners. Carefully push back
the carpet.
�2Remove the 2 nuts and pull out the rear
combination light.
�3Rotate the bulb(s) counterclockwise and
pull out to remove:
�ATurn signal light
�BSidemarker light
�CTail/stop light
�DBackup light
WDI0635
Maintenance and do-it-yourself8-35

4. Air cleaner
5. Fuse block
6. Battery
7. Fuse/Fusible link box
8.")

4. Air cleaner
5. Fuse block
6. Battery
7. Fuse/Fusible link box
8.")


If any electrical equipment does not operate,
remove the extended storage switch and check
for an open fuse.
NOTE:
The extended storage switch is used for
long")