2011 NISSAN 370Z ROADSTER tires
[x] Cancel search: tiresPage 379 of 419
Black plate (379,1)
Model "Z34-D" EDITED: 2010/ 7/ 27
models to provide good performance all year,
including snowy and icy road conditions. All
Season tires are identified by ALL SEASON
and/or M&S (Mud and Snow) on the tire
sidewall. Snow tires have better snow traction
than All Season tires and may be more appro-
priate in some areas.Summer tiresNISSAN specifies summer tires on some
models to provide superior performance on dry
roads. Summer tire performance is substantially
reduced in snow and ice. Summer tires do not
have the tire traction rating M&S on the tire
sidewall.
If you plan to operate your vehicle in snowy or
icy conditions, NISSAN recommends the use of
SNOW tires or ALL SEASON tires on all four
wheels.Snow tiresIf snow tires are needed, it is necessary to select
tires equivalent in size and load rating to the
original equipment tires. If you do not, it can
adversely affect the safety and handling of your
vehicle.
Generally, snow tires will have lower speed
ratings than factory equipped tires and may not
match the potential maximum vehicle speed.
Never exceed the maximum speed rating of the
tire.If you install snow tires, they must be the same
brand, construction and tread pattern on all four
wheels, and the same sizes as the original tires.
For additional traction on icy roads, studded
tires may be used. However, some U.S. states
and Canadian provinces prohibit their use.
Check local, state and provincial laws before
installing studded tires. Skid and traction cap-
abilities of studded snow tires, on wet or dry
surfaces, may be poorer than that of non-
studded snow tires.
TIRE CHAINS
CAUTION
Tire chains/cables should not be in-
stalled on 19-inch size tires. Doing so
will cause damage to the vehicle. If you
plan to use tire chains/cables, you
should install 18-inch size tires on your
vehicle.
Use of tire chains may be prohibited according
to location. Check the local laws before instal-
ling tire chains. When installing tire chains, make
sure they are the proper size for the tires on your
vehicle and are installed according to the chain
manufacturer’s suggestions. Use only SAE
Class S chains. Class “S” chains are used on
vehicles with restricted tire to vehicle clearance. Vehicles that can use Class “S” chains are
designed to meet the SAE standard minimum
clearances between the tire and the closest
vehicle suspension or body component required
to accommodate the use of a winter traction
device (tire chains or cables) . The minimum
clearances are determined using the factory
equipped tire size. Other types may damage
your vehicle. Use chain tensioners when re-
commended by the tire chain manufacturer to
ensure a tight fit. Loose end links of the tire
chain must be secured or removed to prevent
the possibility of whipping action damage to the
fenders or underbody. If possible, avoid fully
loading your vehicle when using tire chains. In
addition, drive at a reduced speed. Otherwise,
your vehicle may be damaged and/or vehicle
handling and performance may be adversely
affected.
Tire chains must be installed only on the
rear wheels and not on the front wheels.
Never install tire chains on a TEMPORARY USE
ONLY spare tire.
Do not use tire chains on dry roads. Driving with
tire chains in such conditions can cause damage
to the various mechanisms of the vehicle due to
some overstress.
Maintenance and do-it-yourself
8-35
Page 380 of 419
Black plate (380,1)
Model "Z34-D" EDITED: 2010/ 7/ 27
CHANGING WHEELS AND TIRES
Tire rotationTires cannot be rotated on this vehicle
because the front tires are a different size
than the rear tires.
A pin is on the front brake rotor to prevent
the rear wheels from being installed in
place of the front wheels. The spare tire
can be installed in place of the front and
rear wheels. When installing the spare tire
in the front wheel, the hole in the spare tire
wheel must be aligned with the pin on the
brake rotor.
WARNING
.
Retighten the wheel nuts when
the vehicle has been driven for
600 miles (1,000 km) (also in
cases of a flat tire, etc.) .
.
For additional information re-
garding tires, refer to “Important
Tire Safety Information” (US) or
“Tire Safety Information” (Cana-
da) in the Warranty Information
Booklet.
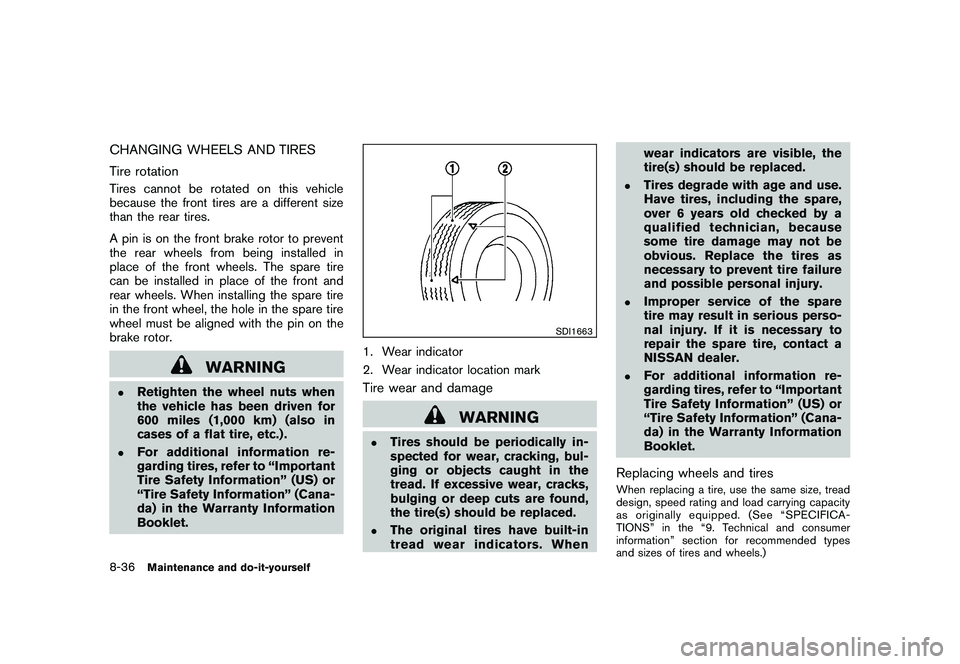
SDI1663
1. Wear indicator
2. Wear indicator location markTire wear and damage
WARNING
.
Tires should be periodically in-
spected for wear, cracking, bul-
ging or objects caught in the
tread. If excessive wear, cracks,
bulging or deep cuts are found,
the tire(s) should be replaced.
.
The original tires have built-in
tread wear indicators. Whenwear indicators are visible, the
tire(s) should be replaced.
.
Tires degrade with age and use.
Have tires, including the spare,
over 6 years old checked by a
qualified technician, because
some tire damage may not be
obvious. Replace the tires as
necessary to prevent tire failure
and possible personal injury.
.
Improper service of the spare
tire may result in serious perso-
nal injury. If it is necessary to
repair the spare tire, contact a
NISSAN dealer.
.
For additional information re-
garding tires, refer to “Important
Tire Safety Information” (US) or
“Tire Safety Information” (Cana-
da) in the Warranty Information
Booklet.
Replacing wheels and tiresWhen replacing a tire, use the same size, tread
design, speed rating and load carrying capacity
as originally equipped. (See “SPECIFICA-
TIONS” in the “9. Technical and consumer
information” section for recommended types
and sizes of tires and wheels.)
8-36
Maintenance and do-it-yourself
Page 381 of 419
Black plate (381,1)
Model "Z34-D" EDITED: 2010/ 7/ 27
WARNING
.The use of tires other than those
recommended or the mixed use of
tires of different brands, construc-
tion (bias, bias-belted or radial) , or
tread patterns can adversely affect
the ride, braking, handling, ground
clearance, body-to-tire clearance,
tire chain clearance, speedometer
calibration, headlight aim and bum-
per height. Some of these effects
may lead to accidents and could
result in serious personal injury.
. If the wheels are changed for any
reason, always replace with wheels
which have the same off-set dimen-
sion. Wheels of a different off-set
could cause premature tire wear,
degrade vehicle handling character-
istics and/or interference with the
brake discs/drums. Such interfer-
ence can lead to decreased braking
efficiency and/or early brake pad/
shoe wear. See “WHEELS AND
TIRES” in the “9. Technical and
consumer information” section of
this manual for wheel off-set dimen-
sions. .
When a spare tire is mounted or a
wheel is replaced, the TPMS will not
function and the low tire pressure
warning light will flash for approxi-
mately 1 minute. The light will
remain on after 1 minute. Contact
your NISSAN dealer as soon as
possible for tire replacement and/
or system resetting.
. Replacing tires with those not ori-
ginally specified by NISSAN could
affect the proper operation of the
TPMS.
. Do not install a deformed wheel or
tire even if it has been repaired.
Such wheels or tires could have
structural damage and could fail
without warning.
. The use of retread tire is not re-
commended.
. For additional information regard-
ing tires, refer to “Important Tire
Safety Information” (US) or “Tire
Safety Information” (Canada) in the
Warranty Information Booklet.
Wheel balanceUnbalanced wheels may affect vehicle handling
and tire life. Even with regular use, wheels can
get out of balance. Therefore, they should be
balanced as required.
Wheel balance service should be per-
formed with the wheels off the vehicle.
Spin balancing the wheels on the vehicle
could lead to mechanical damage.
For additional information regarding tires, refer
to “Important Tire Safety Information” (US) or
“Tire Safety Information” (Canada) in the
NISSAN Warranty Information Booklet.Care of wheelsSee “CLEANING EXTERIOR” in the “7. Ap-
pearance and care” section for details about
care of the wheels.Spare tire (TEMPORARY USE ONLY (T-
type) spare tire) (if so equipped)Observe the following precautions if the T-type
spare tire must be used, otherwise your vehicle
could be damaged or involved in an accident.
WARNING
.The T-type spare tire should be used
for emergency use. It should be
replaced with the standard tire at
Maintenance and do-it-yourself
8-37
Page 382 of 419
Black plate (382,1)
Model "Z34-D" EDITED: 2010/ 7/ 27
the first opportunity to avoid possi-
ble tire or differential damage.
. Drive carefully while the TEMPOR-
ARY USE ONLY spare tire is in-
stalled. Avoid sharp turns and
abrupt braking while driving.
. Periodically check spare tire infla-
tion pressure. Always keep the
pressure of the TEMPORARY USE
ONLY spare tire at 60 psi (420 kPa,
4.2 bar) . Always keep the pressure
of the full size spare tire (if so
equipped) at the recommended
pressure for standard tires, as in-
dicated on the Tire and Loading
Information label. For Tire and
Loading Information label location,
see “Tire and Loading Information
label” in the index of this manual.
. With the TEMPORARY USE ONLY
spare tire installed do not drive your
vehicle at speeds faster than 50
MPH (80 km/h) .
. When driving on roads covered with
snow or ice, the TEMPORARY USE
ONLY spare tire should be used on
the front wheels and original tire
used on the rear wheels (drive wheels) . Use tire chains only on the
two rear original tires.
. Tire tread of the TEMPORARY USE
ONLY spare tire will wear at a faster
rate than the standard tire. Replace
the spare tire as soon as the tread
wear indicators appear.
. Do not use the spare tire on other
vehicles.
. Do not use more than one spare tire
at the same time.
CAUTION
.Do not use tire chains on a TEM-
PORARY USE ONLY spare tire. Tire
chains will not fit properly and may
cause damage to the vehicle.
. Because the TEMPORARY USE
ONLY spare tire is smaller than the
original tire, ground clearance is
reduced. To avoid damage to the
vehicle, do not drive over obstacles.
Also do not drive the vehicle
through an automatic car wash
since it may get caught.
EMERGENCY TIRE PUNCTURE RE-
PAIR KIT (if so equipped)The emergency tire puncture repair kit (Emer-
gency Tire Sealant) is supplied with the vehicle
instead of a spare tire. It can be used to
temporarily repair minor tire punctures.
If possible, have the vehicle towed to a facility
that can repair or replace the flat tire. Using the
emergency tire puncture repair kit may cause a
malfunction of the tire pressure sensor and
cause the low tire pressure warning light to
illuminate.
See “FLAT TIRE” in the “6. In case of
emergency” section for more details.
8-38
Maintenance and do-it-yourself
Page 385 of 419
Black plate (28,1)
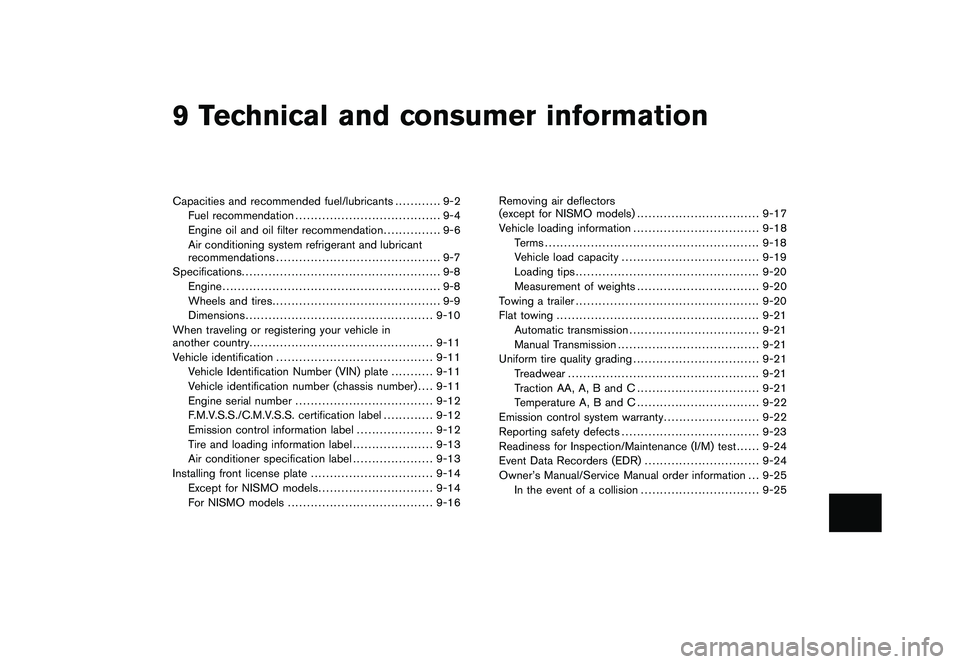
9 Technical and consumer information
Model "Z34-D" EDITED: 2010/ 7/ 28
Capacities and recommended fuel/lubricants............ 9-2
Fuel recommendation ...................................... 9-4
Engine oil and oil filter recommendation ............... 9-6
Air conditioning system refrigerant and lubricant
recommendations ........................................... 9-7
Specifications. ................................................... 9-8
Engine ......................................................... 9-8
Wheels and tires ............................................ 9-9
Dimensions ................................................. 9-10
When traveling or registering your vehicle in
another country ................................................ 9-11
Vehicle identification ......................................... 9-11
Vehicle Identification Number (VIN) plate ........... 9-11
Vehicle identification number (chassis number) .... 9-11
Engine serial number .................................... 9-12
F.M.V.S.S./C.M.V.S.S. certification label ............. 9-12
Emission control information label .................... 9-12
Tire and loading information label ..................... 9-13
Air conditioner specification label ..................... 9-13
Installing front license plate ................................ 9-14
Except for NISMO models .............................. 9-14
For NISMO models ...................................... 9-16 Removing air deflectors
(except for NISMO models)
................................ 9-17
Vehicle loading information ................................. 9-18
Terms ........................................................ 9-18
Vehicle load capacity .................................... 9-19
Loading tips ................................................ 9-20
Measurement of weights ................................ 9-20
Towing a trailer ................................................ 9-20
Flat towing ..................................................... 9-21
Automatic transmission .................................. 9-21
Manual Transmission ..................................... 9-21
Uniform tire quality grading ................................. 9-21
Treadwear .................................................. 9-21
Traction AA, A, B and C ................................ 9-21
Temperature A, B and C ................................ 9-22
Emission control system warranty ......................... 9-22
Reporting safety defects .................................... 9-23
Readiness for Inspection/Maintenance (I/M) test . . .... 9-24
Event Data Recorders (EDR) .............................. 9-24
Owner’s Manual/Service Manual order information . . . 9-25
In the event of a collision ............................... 9-25
Page 393 of 419
Black plate (393,1)
Model "Z34-D" EDITED: 2010/ 7/ 27
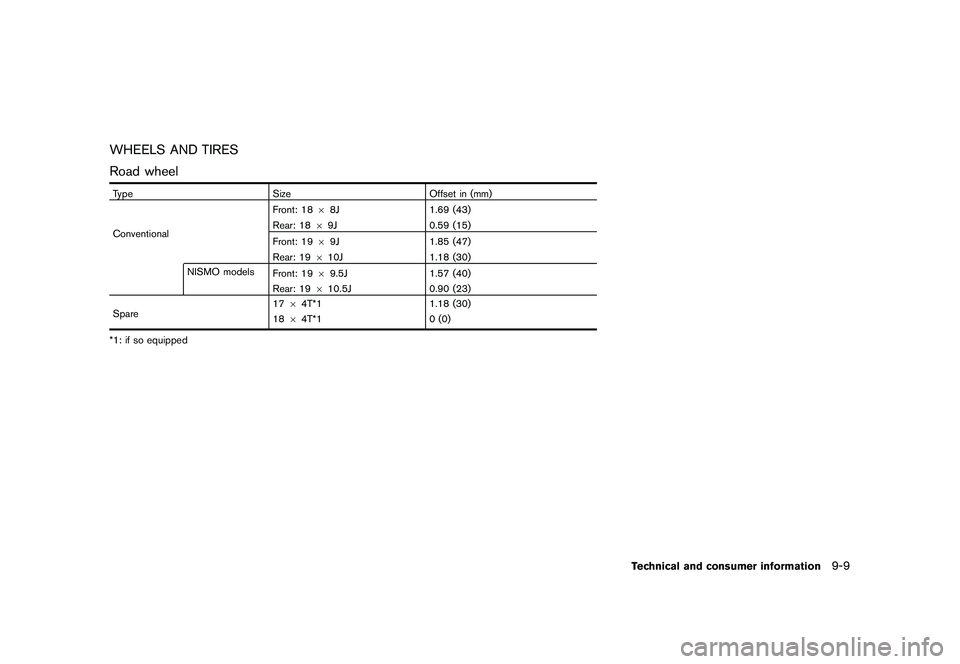
WHEELS AND TIRES
Road wheelTypeSizeOffset in (mm)
Conventional Front: 18
68J 1.69 (43)
Rear: 18 69J 0.59 (15)
Front: 19 69J 1.85 (47)
Rear: 19 610J 1.18 (30)
NISMO models Front: 1969.5J 1.57 (40)
Rear: 19 610.5J 0.90 (23)
Spare 17
64T*1 1.18 (30)
18 64T*1 0 (0)
*1: if so equipped
Technical and consumer information
9-9
Page 403 of 419
Black plate (403,1)
Model "Z34-D" EDITED: 2010/ 7/ 27
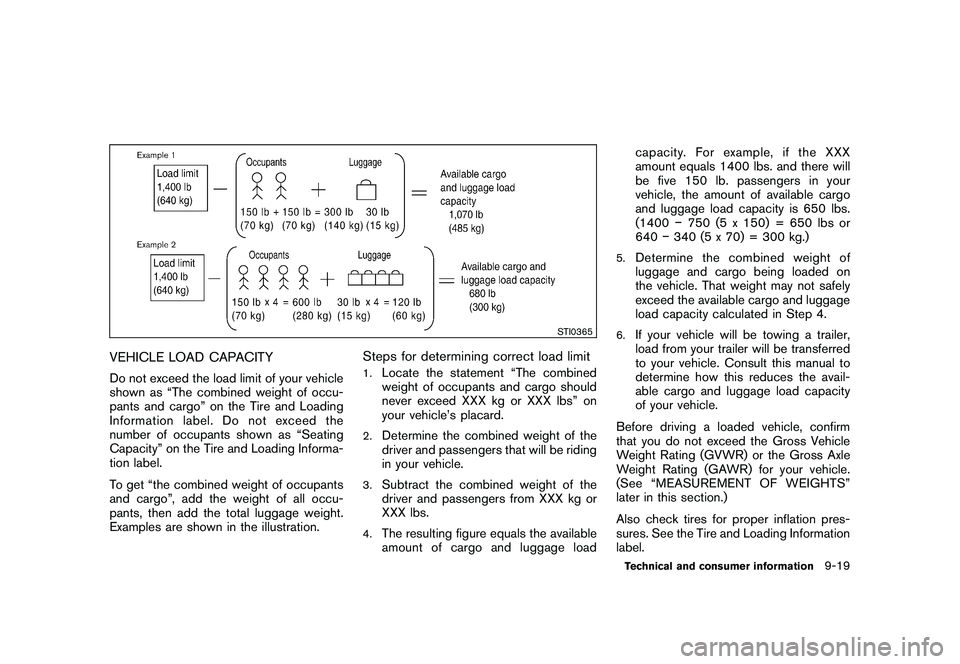
STI0365
VEHICLE LOAD CAPACITYDo not exceed the load limit of your vehicle
shown as “The combined weight of occu-
pants and cargo” on the Tire and Loading
Information label. Do not exceed the
number of occupants shown as “Seating
Capacity” on the Tire and Loading Informa-
tion label.
To get “the combined weight of occupants
and cargo”, add the weight of all occu-
pants, then add the total luggage weight.
Examples are shown in the illustration.
Steps for determining correct load limit1.
Locate the statement “The combined
weight of occupants and cargo should
never exceed XXX kg or XXX lbs” on
your vehicle’s placard.
2.
Determine the combined weight of the
driver and passengers that will be riding
in your vehicle.
3.
Subtract the combined weight of the
driver and passengers from XXX kg or
XXX lbs.
4.
The resulting figure equals the available
amount of cargo and luggage loadcapacity. For example, if the XXX
amount equals 1400 lbs. and there will
be five 150 lb. passengers in your
vehicle, the amount of available cargo
and luggage load capacity is 650 lbs.
(1400
�750 (5 x 150) = 650 lbs or
640 �340 (5 x 70) = 300 kg.)
5.
Determine the combined weight of
luggage and cargo being loaded on
the vehicle. That weight may not safely
exceed the available cargo and luggage
load capacity calculated in Step 4.
6.
If your vehicle will be towing a trailer,
load from your trailer will be transferred
to your vehicle. Consult this manual to
determine how this reduces the avail-
able cargo and luggage load capacity
of your vehicle.
Before driving a loaded vehicle, confirm
that you do not exceed the Gross Vehicle
Weight Rating (GVWR) or the Gross Axle
Weight Rating (GAWR) for your vehicle.
(See “MEASUREMENT OF WEIGHTS”
later in this section.)
Also check tires for proper inflation pres-
sures. See the Tire and Loading Information
label.Technical and consumer information
9-19
Page 404 of 419
Black plate (404,1)
Model "Z34-D" EDITED: 2010/ 7/ 27
LOADING TIPS.
The GVW must not exceed GVWR or
GAWR as specified on the F.M.V.S.S./
C.M.V.S.S. certification label.
.
Do not load the front and rear axle to
the GAWR. Doing so will exceed the
GVWR.
WARNING
.
Properly secure all cargo to help
prevent it from sliding or shift-
ing. Do not place cargo higher
than the seatbacks. In a sudden
stop or collision, unsecured car-
go could cause personal injury.
.
Do not load your vehicle any
heavier than the GVWR or the
maximum front and rear
GAWRs. If you do, parts of your
vehicle can break, tire damage
could occur, or it can change the
way your vehicle handles. This
could result in loss of control
and cause personal injury.
.
Overloading could not only
shorten the life of your vehicle
and the tires, but also could leadto hazardous vehicle handling
and long braking distance. This
may cause a premature tire
malfunction, which could result
in a serious accident and perso-
nal injury. Failures caused by
overloading are not covered by
the vehicle’s warranty.
MEASUREMENT OF WEIGHTSSecure loose items to prevent weight shifts
that could affect the balance of your
vehicle. When the vehicle is loaded, drive
to a scale and weigh the front and the rear
wheels separately to determine axle loads.
Individual axle loads should not exceed
either of the gross axle weight ratings
(GAWR) . The total of the axle loads should
not exceed the gross vehicle weight rating
(GVWR) . These ratings are given on the
vehicle certification label. If weight ratings
are exceeded, move or remove items to
bring all weights below the ratings.
Do not tow a trailer with your vehicle.TOWING A TRAILER
9-20
Technical and consumer information