2011 NISSAN 370Z COUPE homelink
[x] Cancel search: homelinkPage 16 of 419
Black plate (10,1)
Model "Z34-D" EDITED: 2010/ 7/ 27
SSI0650
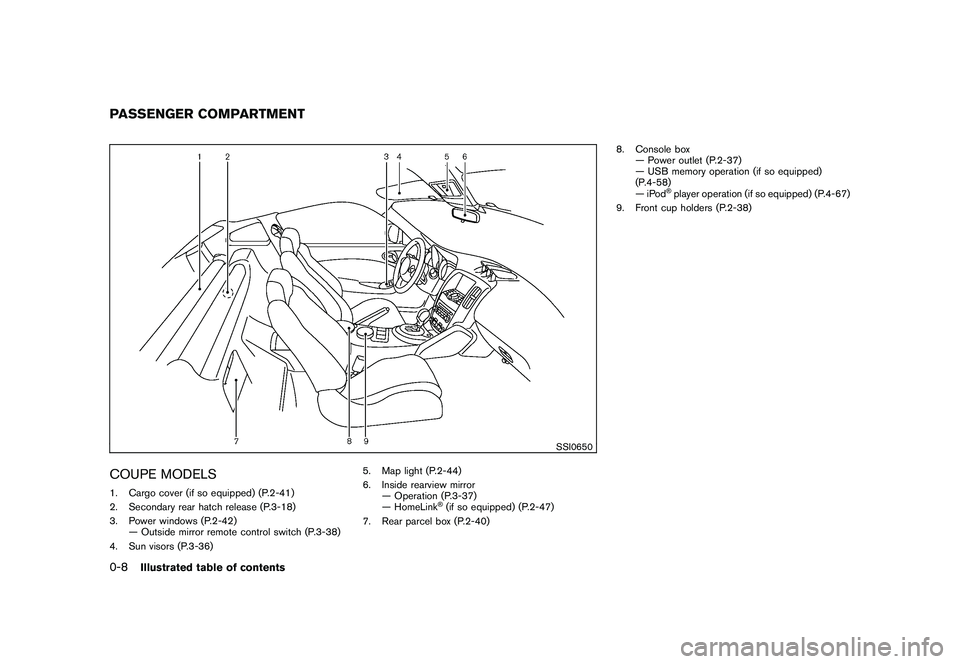
COUPE MODELS1. Cargo cover (if so equipped) (P.2-41)
2. Secondary rear hatch release (P.3-18)
3. Power windows (P.2-42)— Outside mirror remote control switch (P.3-38)
4. Sun visors (P.3-36) 5. Map light (P.2-44)
6. Inside rearview mirror
— Operation (P.3-37)
— HomeLink
®(if so equipped) (P.2-47)
7. Rear parcel box (P.2-40) 8. Console box
— Power outlet (P.2-37)
— USB memory operation (if so equipped)
(P.4-58)
—iPod
®player operation (if so equipped) (P.4-67)
9. Front cup holders (P.2-38)
PASSENGER COMPARTMENT0-8
Illustrated table of contents
Page 17 of 419
Black plate (11,1)
Model "Z34-D" EDITED: 2010/ 7/ 27
SSI0651
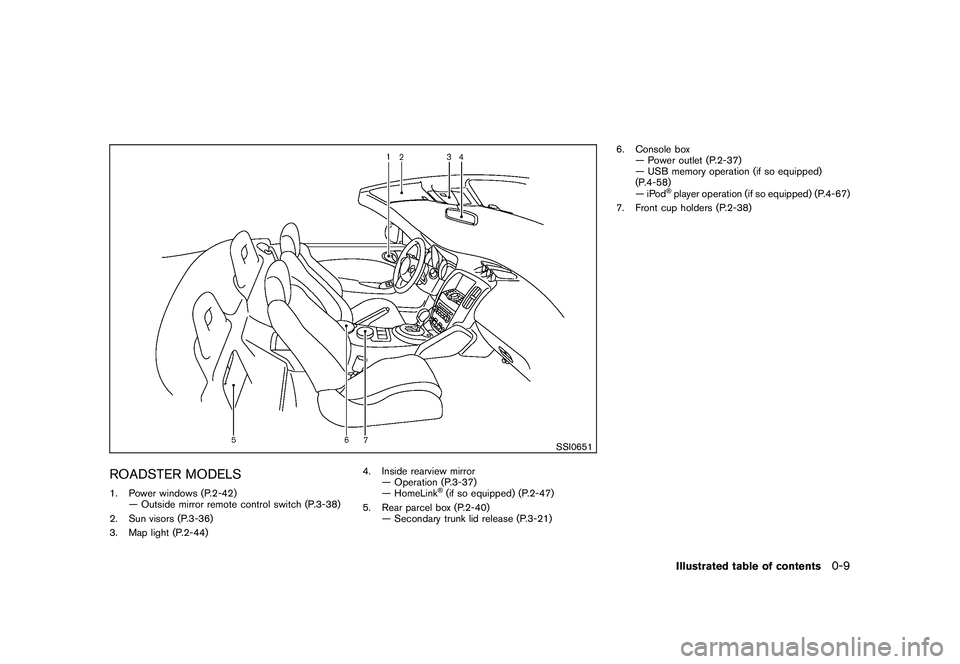
ROADSTER MODELS1. Power windows (P.2-42)— Outside mirror remote control switch (P.3-38)
2. Sun visors (P.3-36)
3. Map light (P.2-44) 4. Inside rearview mirror
— Operation (P.3-37)
— HomeLink
®(if so equipped) (P.2-47)
5. Rear parcel box (P.2-40) — Secondary trunk lid release (P.3-21) 6. Console box
— Power outlet (P.2-37)
— USB memory operation (if so equipped)
(P.4-58)
—iPod
®player operation (if so equipped) (P.4-67)
7. Front cup holders (P.2-38)Illustrated table of contents
0-9
Page 63 of 419
Black plate (8,1)
Model "Z34-D" EDITED: 2010/ 7/ 28
HomeLink
®Universal Transceiver (if so equipped).... 2-47
Programming HomeLink
®............................... 2-47
Programming HomeLink®for Canadian
customers .................................................. 2-49
Operating the HomeLink®Universal
Transceiver ................................................. 2-49 Programming trouble-diagnosis
....................... 2-49
Clearing the programmed information ................ 2-49
Reprogramming a single HomeLink
®button ........ 2-49
If your vehicle is stolen .................................. 2-50
Page 109 of 419
Black plate (105,1)
Model "Z34-D" EDITED: 2010/ 7/ 27
HomeLink
®Universal Transceiver provides a
convenient way to consolidate the functions of
up to three individual hand-held transmitters into
one built-in device.
HomeLink®Universal Transceiver:
. Will operate most Radio Frequency (RF)
devices such as garage doors, gates, home
and office lighting, entry door locks and
security systems.
. Is powered by your vehicle’s battery. No
separate batteries are required. If the
vehicle’s battery is discharged or is dis-
connected, HomeLink
®will retain all pro-
gramming.
Once HomeLink
®Universal Transceiver is
programmed, retain the original transmit-
ter for future programming procedures
(Example: new vehicle purchases) . Upon
sale of the vehicle, the programmed
HomeLink
®Universal Transceiver buttons
should be erased for security purposes.
For additional information, see “PRO-
GRAMMING HomeLink
®” later in this sec-
tion.
WARNING
. Do not use HomeLink
®Universal
Transceiver with any garage door
opener that lacks safety stop and reverse features as required by
federal safety standards. (These
standards became effective for
opener models manufactured after
April 1, 1982.) A garage door opener
which cannot detect an object in the
path of a closing garage door and
then automatically stop and reverse,
does not meet current federal safety
standards. Using a garage door
opener without these features in-
creases the risk of serious injury or
death.
. During programming procedure,
your garage door or security gate
may open or close. Make sure that
people and objects are clear of the
garage door, gate, etc. that you are
programming.
. Your vehicle’s engine should be
turned off while programming
HomeLink
®Universal Transceiver.
PROGRAMMING HomeLink
®
To program your HomeLink
®Transceiver to
operate a garage door, gate, or entry door
opener, home or office lighting, you need to be
at the same location as the device. Note:
Garage door openers (manufactured after 1996) have “rolling code protection”. To pro-
gram a garage door opener equipped with
“rolling code protection”; you will need to use
a ladder to get up to the garage door opener
motor to be able to access the “smart or learn”
program button.
HomeLink
®UNIVERSAL
TRANSCEIVER (if so equipped)
Instruments and controls
2-47
Page 110 of 419
Black plate (106,1)
Model "Z34-D" EDITED: 2010/ 7/ 27
SIC3612
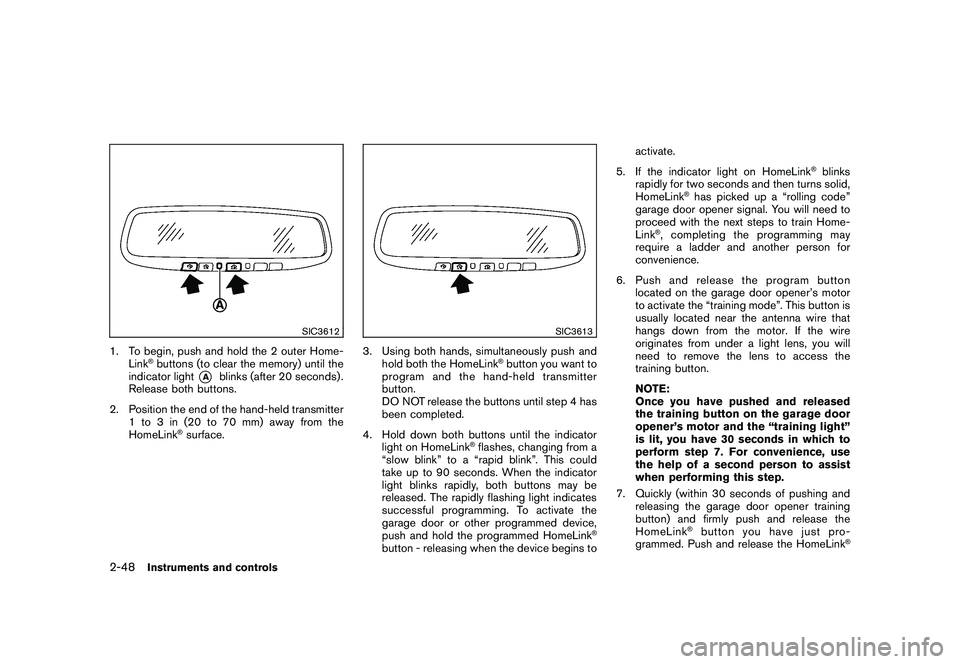
1. To begin, push and hold the 2 outer Home-Link
®buttons (to clear the memory) until the
indicator light
*A
blinks (after 20 seconds) .
Release both buttons.
2. Position the end of the hand-held transmitter 1 to 3 in (20 to 70 mm) away from the
HomeLink
®surface.
SIC3613
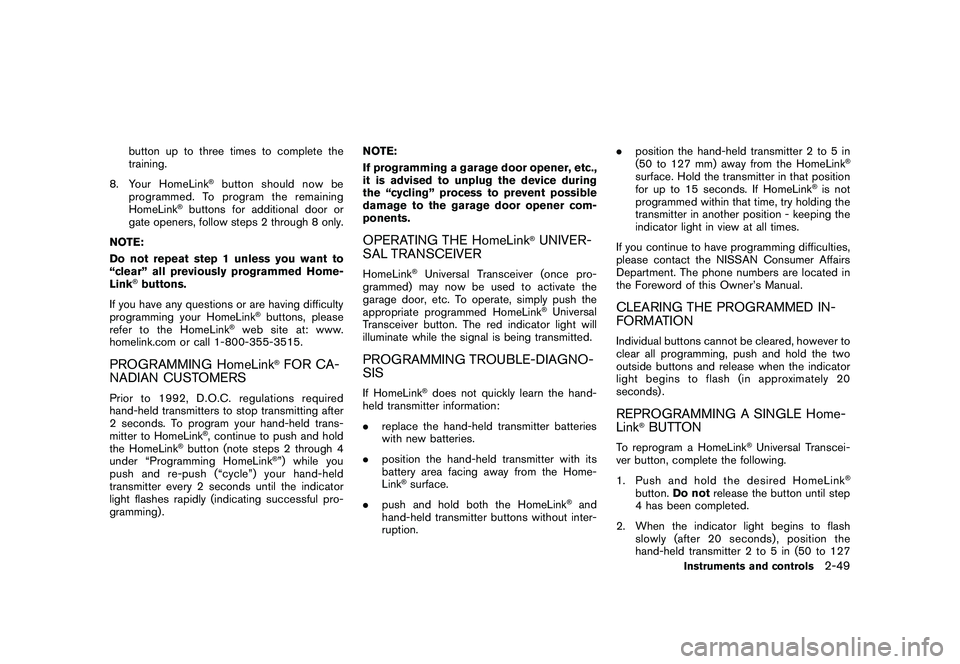
3. Using both hands, simultaneously push andhold both the HomeLink
®button you want to
program and the hand-held transmitter
button.
DO NOT release the buttons until step 4 has
been completed.
4. Hold down both buttons until the indicator light on HomeLink
®flashes, changing from a
“slow blink” to a “rapid blink”. This could
take up to 90 seconds. When the indicator
light blinks rapidly, both buttons may be
released. The rapidly flashing light indicates
successful programming. To activate the
garage door or other programmed device,
push and hold the programmed HomeLink
®
button - releasing when the device begins to activate.
5. If the indicator light on HomeLink
®blinks
rapidly for two seconds and then turns solid,
HomeLink
®has picked up a “rolling code”
garage door opener signal. You will need to
proceed with the next steps to train Home-
Link
®, completing the programming may
require a ladder and another person for
convenience.
6. Push and release the program button located on the garage door opener’s motor
to activate the “training mode”. This button is
usually located near the antenna wire that
hangs down from the motor. If the wire
originates from under a light lens, you will
need to remove the lens to access the
training button.
NOTE:
Once you have pushed and released
the training button on the garage door
opener’s motor and the “training light”
is lit, you have 30 seconds in which to
perform step 7. For convenience, use
the help of a second person to assist
when performing this step.
7. Quickly (within 30 seconds of pushing and releasing the garage door opener training
button) and firmly push and release the
HomeLink
®buttonyouhavejustpro-
grammed. Push and release the HomeLink
®
2-48
Instruments and controls
Page 111 of 419
Black plate (107,1)
Model "Z34-D" EDITED: 2010/ 7/ 27
button up to three times to complete the
training.
8. Your HomeLink
®button should now be
programmed. To prog ram the remaining
HomeLink
®buttons for additional door or
gate openers, follow steps 2 through 8 only.
NOTE:
Do not repeat step 1 unless you want to
“clear” all previously programmed Home-
Link
®buttons.
If you have any questions or are having difficulty
programming your HomeLink
®buttons, please
refer to the HomeLink
®web site at: www.
homelink.com or call 1-800-355-3515.
PROGRAMMING HomeLink
®FOR CA-
NADIAN CUSTOMERS
Prior to 1992, D.O.C. regulations required
hand-held transmitters to stop transmitting after
2 seconds. To program your hand-held trans-
mitter to HomeLink
®, continue to push and hold
the HomeLink
®button (note steps 2 through 4
under “Programming HomeLink
®”) while you
push and re-push (“cycle”) your hand-held
transmitter every 2 seconds until the indicator
light flashes rapidly (indicating successful pro-
gramming) . NOTE:
If programming a garage door opener, etc.,
it is advised to unplug the device during
the “cycling” process to prevent possible
damage to the garage door opener com-
ponents.
OPERATING THE HomeLink
®UNIVER-
SAL TRANSCEIVER
HomeLink
®Universal Transceiver (once pro-
grammed) may now be used to activate the
garage door, etc. To operate, simply push the
appropriate programmed HomeLink
®Universal
Transceiver button. The red indicator light will
illuminate while the signal is being transmitted.
PROGRAMMING TROUBLE-DIAGNO-
SISIf HomeLink
®does not quickly learn the hand-
held transmitter information:
. replace the hand-held transmitter batteries
with new batteries.
. position the hand-held transmitter with its
battery area facing away from the Home-
Link
®surface.
. push and hold both the HomeLink
®and
hand-held transmitter buttons without inter-
ruption. .
position the hand-held transmitter 2 to 5 in
(50 to 127 mm) away from the HomeLink
®
surface. Hold the transmitter in that position
for up to 15 seconds. If HomeLink
®is not
programmed within that time, try holding the
transmitter in another position - keeping the
indicator light in view at all times.
If you continue to have programming difficulties,
please contact the NISSAN Consumer Affairs
Department. The phone numbers are located in
the Foreword of this Owner’s Manual.
CLEARING THE PROGRAMMED IN-
FORMATIONIndividual buttons cannot be cleared, however to
clear all programming, push and hold the two
outside buttons and release when the indicator
light begins to flash (in approximately 20
seconds) .REPROGRAMMING A SINGLE Home-
Link
®BUTTON
To reprogram a HomeLink
®Universal Transcei-
ver button, complete the following.
1. PushandholdthedesiredHomeLink
®
button. Do not release the button until step
4 has been completed.
2. When the indicator light begins to flash slowly (after 20 seconds), position the
hand-held transmitter 2 to 5 in (50 to 127
Instruments and controls
2-49
Page 112 of 419
Black plate (108,1)
Model "Z34-D" EDITED: 2010/ 7/ 27
mm) away from the HomeLink
®surface.
3. Push and hold the hand-held transmitter button.
4. The HomeLink
®indicator light will flash, first
slowly and then rapidly. When the indicator
light begins to flash rapidly, release both
buttons.
The HomeLink
®Universal Transceiver button has
now been reprogrammed. The new device can
be activated by pushing the HomeLink
®button
that was just programmed. This procedure will
not affect any other programmed HomeLink
®
buttons.IF YOUR VEHICLE IS STOLENIf your vehicle is stolen, you should change the
codes of any non-rolling code device that has
been programmed into HomeLink
®. Consult the
Owner’s Manual of each device or call the
manufacturer or dealer of those devices for
additional information.
When your vehicle is recovered, you will
need to reprogram the HomeLink
®Univer-
sal Transceiver with your new transmitter
information. FCC Notice:
For USA:
This device complies with Part 15 of the
FCC Rules. Operation is subject to the
following two conditions:
(1) This device may not cause harmful
interference, and (2) this device must
accept any interference received, including
interference that may cause undesired
operation.
Note: Changes or modifications not ex-
pressly approved by the party responsible
for compliance could void the user’s
authority to operate the equipment.
For Canada:
This device complies with RSS-210 of
Industry Canada. Operation is subject to
the following two conditions:
(1) this device may not cause interference,
and (2) this device must accept any inter-
ference, including interference that may
cause undesired operation of the device.
2-50
Instruments and controls
Page 152 of 419
Black plate (148,1)
Model "Z34-D" EDITED: 2010/ 7/ 27
light will turn off. Push the “I” switch
*D
to turn
the system on.
Do not allow any object to cover the
sensors
*E
or apply glass cleaner on
them. Doing so will reduce the sensitivity
of the sensor, resulting in improper opera-
tion.
For the HomeLink®Universal Transceiver opera-
tion, see “HomeLink®UNIVERSAL TRANSCEI-
VER” in the “2. Instruments and controls”
section.
SPA2319
OUTSIDE MIRRORS
WARNING
Objects viewed in the outside mirror on
the passenger side are closer than they
appear. Be careful when moving to the
right. Using only this mirror could cause
an accident. Use the inside mirror or
glance over your shoulder to properly
judge distances to other objects.Adjusting outside mirrorsThe outside mirror control switch is located on
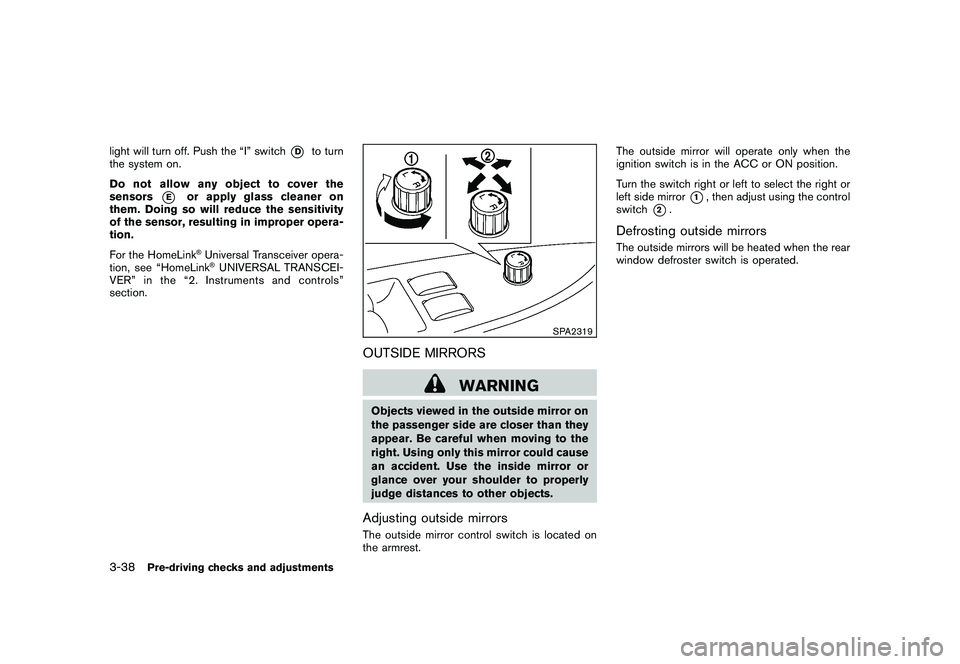
the armrest. The outside mirror will operate only when the
ignition switch is in the ACC or ON position.
Turn the switch right or left to select the right or
left side mirror
*1, then adjust using the control
switch
*2.
Defrosting outside mirrorsThe outside mirrors will be heated when the rear
window defroster switch is operated.
3-38
Pre-driving checks and adjustments