2011 NISSAN 370Z COUPE fuel cap
[x] Cancel search: fuel capPage 73 of 419
Black plate (69,1)
Model "Z34-D" EDITED: 2010/ 7/ 27
minute. Have the system checked by a NISSAN
dealer.
For additional information, see “TIRE PRES-
SURE MONITORING SYSTEM (TPMS)” in the
“5. Starting and driving” section.
WARNING
.If the light does not illuminate with
the ignition switch pushed ON, have
the vehicle checked by a NISSAN
dealer as soon as possible.
. If the light illuminates while driving,
avoid sudden steering maneuvers or
abrupt braking, reduce vehicle
speed, pull off the road to a safe
location and stop the vehicle as
soon as possible. Driving with un-
der-inflated tires may permanently
damage the tires and increase the
likelihood of tire failure. Serious
vehicle damage could occur and
may lead to an accident and could
result in serious personal injury.
Check the tire pressure for all four
tires. Adjust the tire pressure to the
recommended COLD tire pressure
shownontheTireandLoading
Information label to turn the low tire pressure warning light OFF. If
the light still illuminates while driv-
ing after adjusting the tire pressure,
a tire may be flat. If you have a flat
tire, replace it with a spare tire as
soon as possible.
. When a spare tire is mounted or a
wheel is replaced, the TPMS will not
function and the low tire pressure
warning light will flash for approxi-
mately 1 minute. The light will
remain on after the 1 minute. Con-
tact your NISSAN dealer as soon as
possible for tire replacement and/or
system resetting.
. Replacing tires with those not ori-
ginally specified by NISSAN could
affect the proper operation of the
TPMS.
CAUTION
.The TPMS is not a substitute for the
regular tire pressure check. Be sure
to check the tire pressure regularly.
. If the vehicle is being driven at
speeds of less than 16 MPH (25
km/h) , the TPMS may not operate correctly.
. Be sure to install the specified size
of tires to the four wheels correctly.
Master warning light
When the ignition switch is in the ON position,
the master warning light illuminates if any of the
following are displayed on the vehicle informa-
tion display:
.No key warning
. Low fuel warning
. Low washer fluid warning
. Parking brake release warning
. Door/rear hatch open warning
. Loose fuel cap warning
See “VEHICLE INFORMATION DISPLAY” later
in this section.
Seat belt warning light and chime
The light and chime remind you to fasten seat
belts. The light illuminates whenever the ignition
switch is pushed to the ON position, and will
remain illuminated until the driver’s seat belt is
fastened. At the same time, the chime will sound
for about 6 seconds unless the driver’s seat belt
Instruments and controls
2-11
Page 75 of 419
Black plate (71,1)
Model "Z34-D" EDITED: 2010/ 7/ 27
Cruise indicator light
Cruise main switch indicator:
This light illuminates when the cruise control
main switch is pushed. The light turns off when
the main switch is pushed again. When the
cruise main switch indicator light illuminates, the
cruise control system is operational. (See
“CRUISE CONTROL” in the “5. Starting and
driving” section.)
Cruise malfunction:
If the cruise indicator light blinks while the
engine is running, it may indicate the cruise
control system is not functioning properly. Have
the system checked by a NISSAN dealer. (See
“CRUISE CONTROL” in the “5. Starting and
driving” section.)
Front passenger air bag status
light
The front passenger air bag status light (
),
located on the center of the instrument panel,
will be lit and the passenger front air bag will be
OFF depending on how the front passenger
seat is being used.
For front passenger air bag status light opera-
tion,see“NISSANADVANCEDAIRBAG
SYSTEM (front seats)” in the “1. Safety — Seats, seat belts and supplemental restraint
system” section of this manual.
High beam indicator light
This light comes on when the headlight high
beam is on and goes out when the low beam is
selected.
Low beam indicator light
The light illuminates when the headlight switch is
turned to the
position.
Malfunction Indicator Light (MIL)
If the malfunction indicator light comes on
steady or blinks while the engine is running, it
may indicate a potential emission control mal-
function.
The malfunction indicator light may also come on
steady if the fuel-filler cap is loose or missing, or
if the vehicle runs out of fuel. Check to make
sure the fuel-filler cap is installed and closed
tightly, and that the vehicle has at least 3 US
gallons (14 liters) of fuel in the fuel tank.
After a few driving trips, the
light should
turn off if no other potential emission control
system malfunction exists.
If this indicator light remains on for 20 seconds and then blinks for 10 seconds when the engine
is not running, it indicates that the vehicle is not
ready for an emission control system inspection/
maintenance test. (See “READINESS FOR
INSPECTION/MAINTENANCE (I/M) TEST” in
the “9. Technical and consumer information”
section.)
Operation:
The malfunction indicator light will come on in
one of two ways:
.
Malfunction indicator light on steady — An
emission control system malfunction has
been detected. Check the fuel-filler cap if
the LOOSE FUEL CAP warning appears in
the vehicle information display. If the fuel-
filler cap is loose or missing, tighten or install
the cap and continue to drive the vehicle.
The
light should turn off after a few
driving trips. If the
light does not turn
off after a few driving trips, have the vehicle
inspected by a NISSAN dealer. You do not
need to have your vehicle towed to the
dealer.
. Malfunction indicator light blinking — An
engine misfire has been detected which may
damage the emission control system.
To reduce or avoid emission control system
damage:
a) Do not drive at speeds above 45 MPH
Instruments and controls
2-13
Page 80 of 419
Black plate (76,1)
Model "Z34-D" EDITED: 2010/ 7/ 27
SIC4677
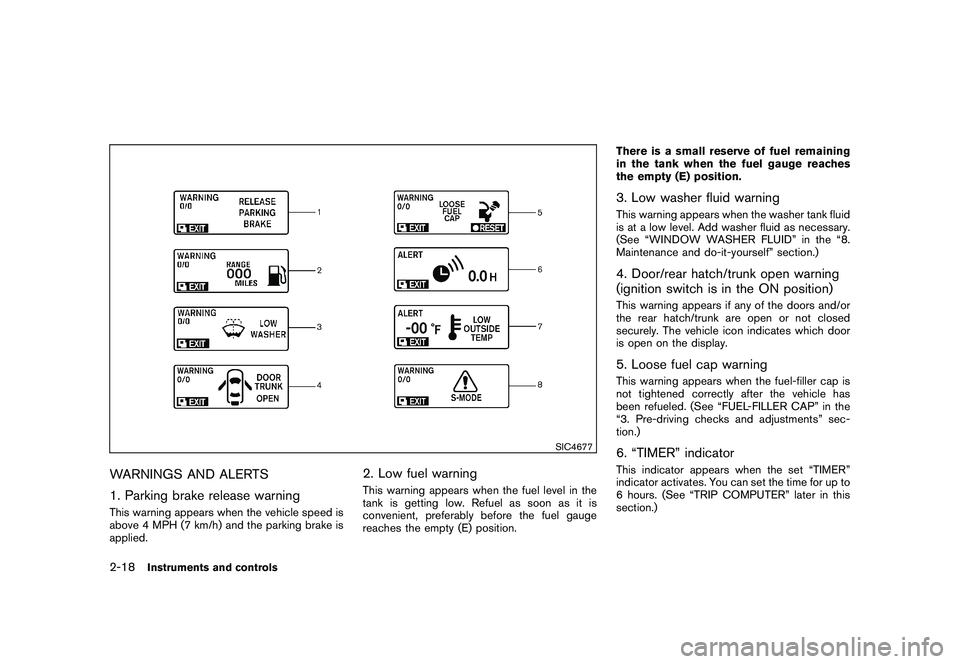
WARNINGS AND ALERTS
1. Parking brake release warningThis warning appears when the vehicle speed is
above 4 MPH (7 km/h) and the parking brake is
applied.
2. Low fuel warningThis warning appears when the fuel level in the
tank is getting low. Refuel as soon as it is
convenient, preferably before the fuel gauge
reaches the empty (E) position.There is a small reserve of fuel remaining
in the tank when the fuel gauge reaches
the empty (E) position.
3. Low washer fluid warningThis warning appears when the washer tank fluid
is at a low level. Add washer fluid as necessary.
(See “WINDOW WASHER FLUID” in the “8.
Maintenance and do-it-yourself” section.)4. Door/rear hatch/trunk open warning
(ignition switch is in the ON position)This warning appears if any of the doors and/or
the rear hatch/trunk are open or not closed
securely. The vehicle icon indicates which door
is open on the display.5. Loose fuel cap warningThis warning appears when the fuel-filler cap is
not tightened correctly after the vehicle has
been refueled. (See “FUEL-FILLER CAP” in the
“3. Pre-driving checks and adjustments” sec-
tion.)6. “TIMER” indicatorThis indicator appears when the set “TIMER”
indicator activates. You can set the time for up to
6 hours. (See “TRIP COMPUTER” later in this
section.)
2-18
Instruments and controls
Page 86 of 419
Black plate (82,1)
Model "Z34-D" EDITED: 2010/ 7/ 27
.LANGUAGE
Select this submenu to choose English or
French for display.
. UNIT
Select this submenu to choose the unit from
US or METRIC.
. EFFECTS
Select this menu to set the dial effects
described below to on or off.
— The indicator needles sweep in the meters when the engine is started.
To return to the top page of the setting mode,
select “BACK”.
SIC3993
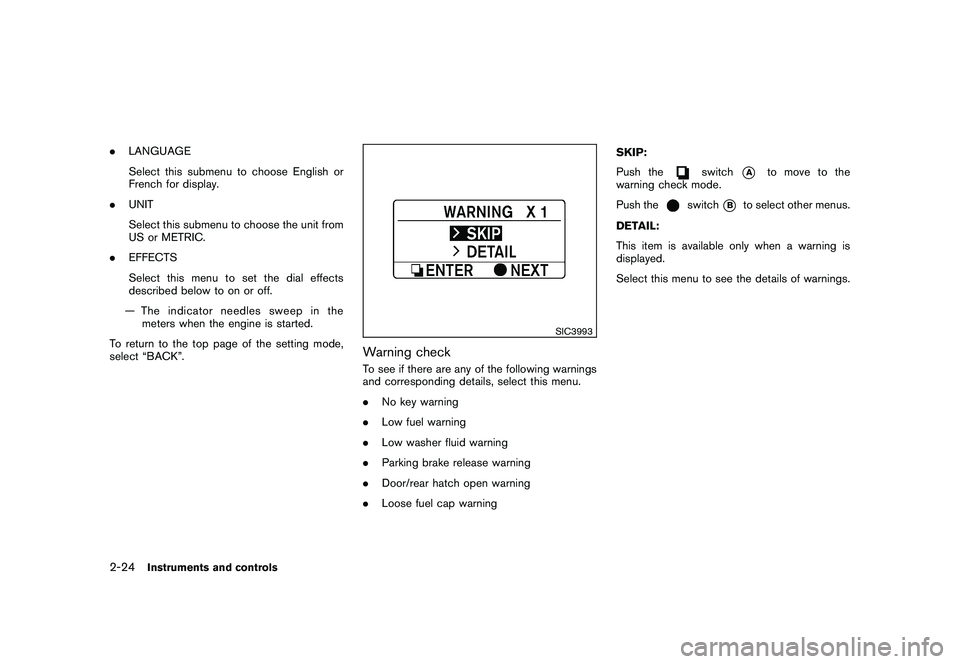
Warning checkTo see if there are any of the following warnings
and corresponding details, select this menu.
. No key warning
. Low fuel warning
. Low washer fluid warning
. Parking brake release warning
. Door/rear hatch open warning
. Loose fuel cap warning SKIP:
Push the
switch
*A
to move to the
warning check mode.
Push the
switch
*B
to select other menus.
DETAIL:
This item is available only when a warning is
displayed.
Select this menu to see the details of warnings.
2-24
Instruments and controls
Page 115 of 419
Black plate (10,1)
3 Pre-driving checks and adjustments
Model "Z34-D" EDITED: 2010/ 7/ 28
Keys ............................................................... 3-2Intelligent Key ................................................ 3-2
Valet hand-off ................................................ 3-3
Doors .............................................................. 3-4
Locking with mechanical key ............................. 3-4
Opening and closing windows with the
mechanical key .............................................. 3-4
Locking with inside lock knob ........................... 3-5
Locking with power door lock switch .................. 3-5
Automatic door locks ...................................... 3-5
Intelligent Key system .......................................... 3-6
Intelligent Key operating range .......................... 3-8
Door locks/unlocks precaution .......................... 3-8
Intelligent Key operation ................................... 3-9
Battery saver system ..................................... 3-11
Warning signals ........................................... 3-11
Troubleshooting guide ................................... 3-12
Remote keyless entry system .............................. 3-13
How to use remote keyless entry system ........... 3-13
Hood ............................................................ 3-16
Rear hatch (Coupe models) ................................ 3-17
Rear hatch opener switch .............................. 3-17
Secondary rear hatch release .......................... 3-18
Trunk lid (Roadster models) ................................ 3-19
Trunk lid opener switch .................................. 3-19 Trunk release power cancel switch
................... 3-19
Interior trunk lid release ................................. 3-20
Secondary trunk lid release ............................ 3-21
Soft top (Roadster models) ................................ 3-21
Before operating the top ................................ 3-21
When operating the top ................................. 3-23
Opening the top .......................................... 3-25
Closing the top ............................................ 3-26
Opening the top using the Intelligent Key ........... 3-26
Troubleshooting guide ................................... 3-27
If the top does not open or close electrically . . .... 3-28
Care of the soft top and the vehicle body .......... 3-32
Front, side and rear unique parts (NISMO
models) ......................................................... 3-32
Fuel-filler door ................................................. 3-34
Opening the fuel-filler door ............................. 3-34
Fuel-filler cap .............................................. 3-34
Tilt steering ..................................................... 3-36
Manual operation ......................................... 3-36
Sun visors ...................................................... 3-36
Mirrors ........................................................... 3-37
Inside mirror ................................................ 3-37
Outside mirrors ............................................ 3-38
Vanity mirror ................................................ 3-39
Page 148 of 419
Black plate (144,1)
Model "Z34-D" EDITED: 2010/ 7/ 27
SPA2581
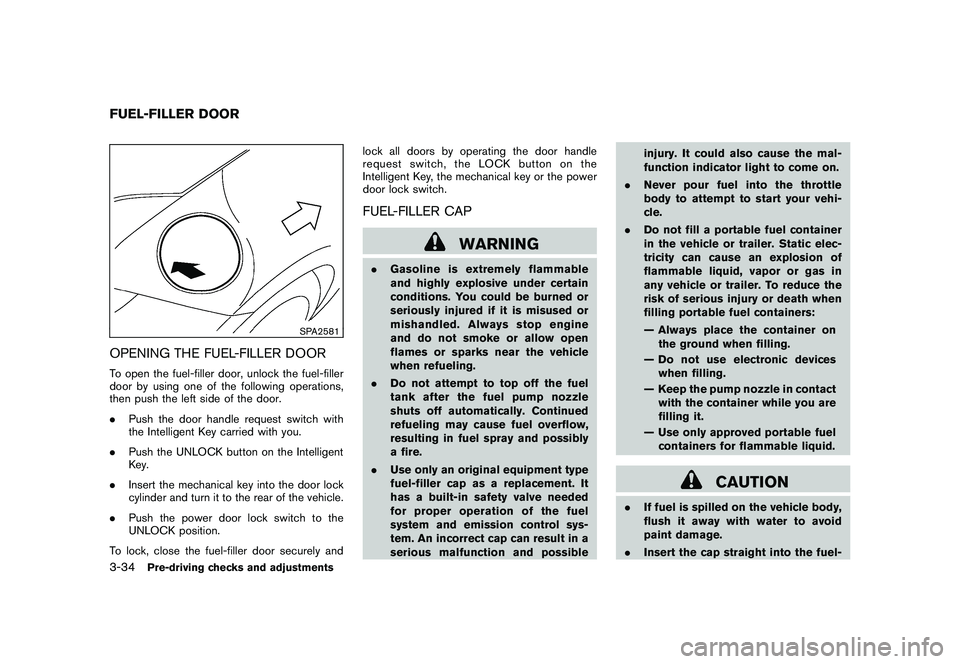
OPENING THE FUEL-FILLER DOORTo open the fuel-filler door, unlock the fuel-filler
door by using one of the following operations,
then push the left side of the door.
.Push the door handle request switch with
the Intelligent Key carried with you.
. Push the UNLOCK button on the Intelligent
Key.
. Insert the mechanical key into the door lock
cylinder and turn it to the rear of the vehicle.
. Push the power door lock switch to the
UNLOCK position.
To lock, close the fuel-filler door securely and lock all doors by operating the door handle
request switch, the LOCK button on the
Intelligent Key, the mechanical key or the power
door lock switch.
FUEL-FILLER CAP
WARNING
.
Gasoline is extremely flammable
and highly explosive under certain
conditions. You could be burned or
seriously injured if it is misused or
mishandled. Always stop engine
and do not smoke or allow open
flames or sparks near the vehicle
when refueling.
. Do not attempt to top off the fuel
tank after the fuel pump nozzle
shuts off automatically. Continued
refueling may cause fuel overflow,
resulting in fuel spray and possibly
a fire.
. Use only an original equipment type
fuel-filler cap as a replacement. It
has a built-in safety valve needed
for proper operation of the fuel
system and emission control sys-
tem. An incorrect cap can result in a
serious malfunction and possible injury. It could also cause the mal-
function indicator light to come on.
. Never pour fuel into the throttle
body to attempt to start your vehi-
cle.
. Do not fill a portable fuel container
in the vehicle or trailer. Static elec-
tricity can cause an explosion of
flammable liquid, vapor or gas in
any vehicle or trailer. To reduce the
risk of serious injury or death when
filling portable fuel containers:
— Always place the container on
the ground when filling.
— Do not use electronic devices when filling.
— Keep the pump nozzle in contact with the container while you are
filling it.
— Use only approved portable fuel containers for flammable liquid.
CAUTION
. If fuel is spilled on the vehicle body,
flush it away with water to avoid
paint damage.
. Insert the cap straight into the fuel-
FUEL-FILLER DOOR3-34
Pre-driving checks and adjustments
Page 149 of 419
Black plate (145,1)
Model "Z34-D" EDITED: 2010/ 7/ 27
filler tube, then tighten until the
fuel-filler cap clicks. Failure to tight-
en the fuel-filler cap properly may
cause the
malfunction indicator
light (MIL) to illuminate. If the
light illuminates because the fuel-
filler cap is loose or missing, tighten
or install the cap and continue to
drive the vehicle. The
light
should turn off after a few driving
trips. If the
light does not turn
off after a few driving trips, have the
vehicle inspected by a NISSAN deal-
er.
. The LOOSE FUEL CAP warning will
appear if the fuel-filler cap is not
properly tightened. Failure to tight-
en the fuel-filler cap properly after
the LOOSE FUEL CAP warning ap-
pears may cause the
Malfunc-
tion Indicator Light (MIL) to
illuminate.
SPA2837
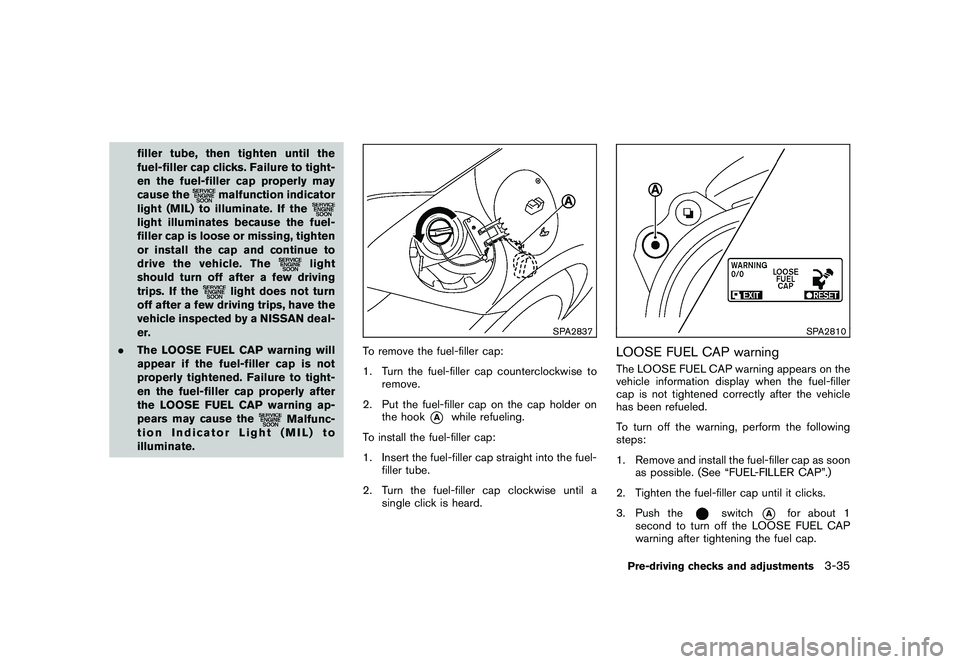
To remove the fuel-filler cap:
1. Turn the fuel-filler cap counterclockwise to remove.
2. Put the fuel-filler cap on the cap holder on the hook
*A
while refueling.
To install the fuel-filler cap:
1. Insert the fuel-filler cap straight into the fuel- filler tube.
2. Turn the fuel-filler cap clockwise until a single click is heard.
SPA2810
LOOSE FUEL CAP warningThe LOOSE FUEL CAP warning appears on the
vehicle information display when the fuel-filler
cap is not tightened correctly after the vehicle
has been refueled.
To turn off the warning, perform the following
steps:
1. Remove and install the fuel-filler cap as soonas possible. (See “FUEL-FILLER CAP”.)
2. Tighten the fuel-filler cap until it clicks.
3. Push the
switch
*A
for about 1
second to turn off the LOOSE FUEL CAP
warning after tightening the fuel cap.
Pre-driving checks and adjustments
3-35
Page 184 of 419
Black plate (180,1)
Model "Z34-D" EDITED: 2010/ 7/ 27
SERVICING AIR CONDITIONERThe air conditioning system in your NISSAN is
charged with a refrigerant designed with the
environment in mind.This refrigerant will not
harm the earth’s ozone layer. However,
special charging equipment and lubricant are
required when servicing your NISSAN air con-
ditioner. Using improper refrigerants or lubri-
cants will cause severe damage to your air
conditioning system. (See “CAPACITIES AND
RECOMMENDED FUEL/LUBRICANTS” in the
“9. Technical and consumer information” section
for air conditioning system refrigerant and
lubricant recommendations.)
Your NISSAN dealer will be able to service your
environmentally friendly air conditioning system.
WARNING
The system contains refrigerant under
high pressure. To avoid personal injury,
any air conditioner service should be
done only by an experienced technician
with the proper equipment.
AUDIO OPERATION PRECAUTIONS
RadioPush the ignition switch to the ACC or ON
position and push the radio band select button
to turn on the radio. If you listen to the radio with
the engine not running, the ignition switch
should be pushed to the ACC position.
Radio reception is affected by station signal
strength, distance from radio transmitter, build-
ings, bridges, mountains and other external
influences. Intermittent changes in reception
quality normally are caused by these external
influences.
Using a cellular phone in or near the
vehicle may influence radio reception
quality.
Radio reception:
Your NISSAN radio system is equipped with
state-of-the-art electronic circuits to enhance
radio reception. These circuits are designed to
extend reception range, and to enhance the
quality of that reception.
However there are some general characteristics
of both FM and AM radio signals that can affect
radio reception quality in a moving vehicle, even
when the finest equipment is used. These
characteristics are completely normal in a given
reception area, and do not indicate any mal- function in your NISSAN radio system.
Reception conditions will constantly change
because of vehicle movement. Buildings, terrain,
signal distance and interference from other
vehicles can work against ideal reception.
Described below are some of the factors that
can affect your radio reception.
Some cellular phones or other devices may
cause interference or a buzzing noise to come
from the audio system speakers. Storing the
device in a different location may reduce or
eliminate the noise.AUDIO SYSTEM
4-30
Center display, heater, air conditioner, audio, phone and voice recognition systems