2011 NISSAN 370Z COUPE check engine light
[x] Cancel search: check engine lightPage 148 of 419
Black plate (144,1)
Model "Z34-D" EDITED: 2010/ 7/ 27
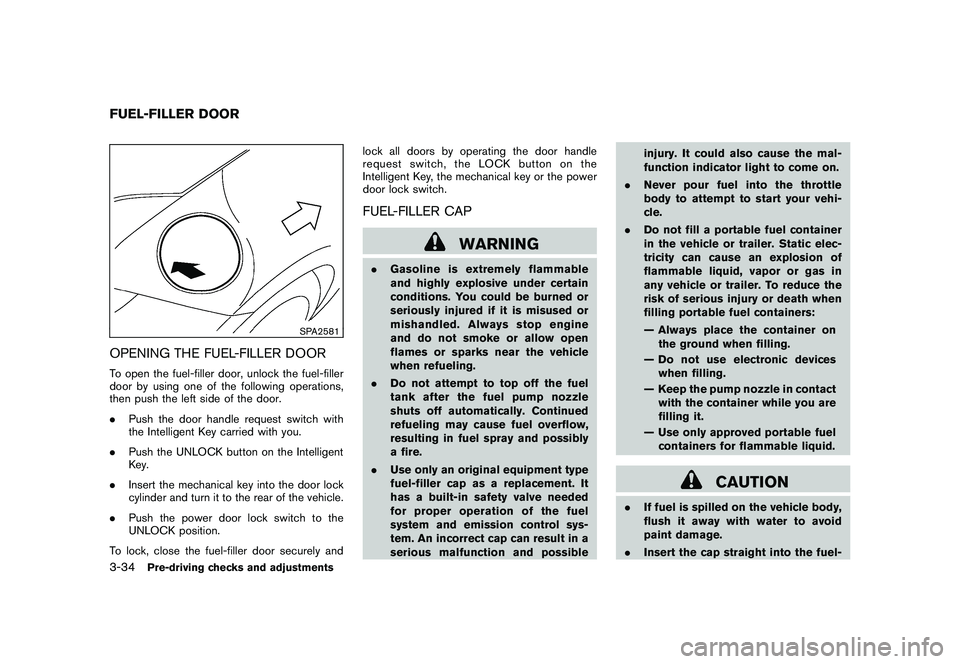
SPA2581
OPENING THE FUEL-FILLER DOORTo open the fuel-filler door, unlock the fuel-filler
door by using one of the following operations,
then push the left side of the door.
.Push the door handle request switch with
the Intelligent Key carried with you.
. Push the UNLOCK button on the Intelligent
Key.
. Insert the mechanical key into the door lock
cylinder and turn it to the rear of the vehicle.
. Push the power door lock switch to the
UNLOCK position.
To lock, close the fuel-filler door securely and lock all doors by operating the door handle
request switch, the LOCK button on the
Intelligent Key, the mechanical key or the power
door lock switch.
FUEL-FILLER CAP
WARNING
.
Gasoline is extremely flammable
and highly explosive under certain
conditions. You could be burned or
seriously injured if it is misused or
mishandled. Always stop engine
and do not smoke or allow open
flames or sparks near the vehicle
when refueling.
. Do not attempt to top off the fuel
tank after the fuel pump nozzle
shuts off automatically. Continued
refueling may cause fuel overflow,
resulting in fuel spray and possibly
a fire.
. Use only an original equipment type
fuel-filler cap as a replacement. It
has a built-in safety valve needed
for proper operation of the fuel
system and emission control sys-
tem. An incorrect cap can result in a
serious malfunction and possible injury. It could also cause the mal-
function indicator light to come on.
. Never pour fuel into the throttle
body to attempt to start your vehi-
cle.
. Do not fill a portable fuel container
in the vehicle or trailer. Static elec-
tricity can cause an explosion of
flammable liquid, vapor or gas in
any vehicle or trailer. To reduce the
risk of serious injury or death when
filling portable fuel containers:
— Always place the container on
the ground when filling.
— Do not use electronic devices when filling.
— Keep the pump nozzle in contact with the container while you are
filling it.
— Use only approved portable fuel containers for flammable liquid.
CAUTION
. If fuel is spilled on the vehicle body,
flush it away with water to avoid
paint damage.
. Insert the cap straight into the fuel-
FUEL-FILLER DOOR3-34
Pre-driving checks and adjustments
Page 292 of 419
Black plate (288,1)
Model "Z34-D" EDITED: 2010/ 7/ 27
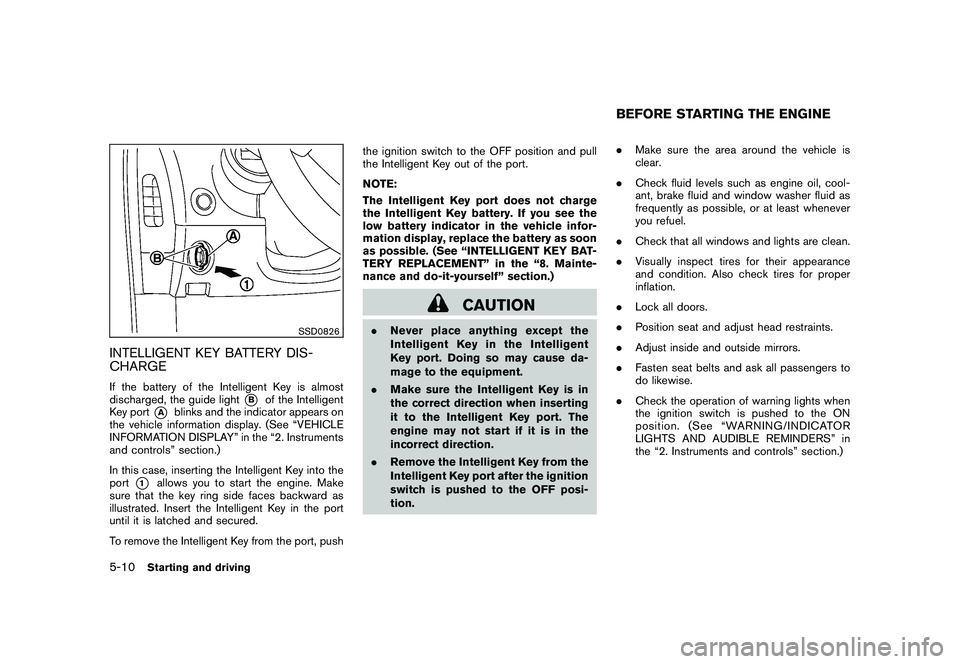
SSD0826
INTELLIGENT KEY BATTERY DIS-
CHARGEIf the battery of the Intelligent Key is almost
discharged, the guide light
*B
of the Intelligent
Key port
*A
blinks and the indicator appears on
the vehicle information display. (See “VEHICLE
INFORMATION DISPLAY” in the “2. Instruments
and controls” section.)
In this case, inserting the Intelligent Key into the
port
*1
allows you to start the engine. Make
sure that the key ring side faces backward as
illustrated. Insert the Intelligent Key in the port
until it is latched and secured.
To remove the Intelligent Key from the port, push the ignition switch to the OFF position and pull
the Intelligent Key out of the port.
NOTE:
The Intelligent Key port does not charge
the Intelligent Key battery. If you see the
low battery indicator in the vehicle infor-
mation display, replace the battery as soon
as possible. (See “INTELLIGENT KEY BAT-
TERY REPLACEMENT” in the “8. Mainte-
nance and do-it-yourself” section.)
CAUTION
.
Never place anything except the
Intelligent Key in the Intelligent
Key port. Doing so may cause da-
mage to the equipment.
. Make sure the Intelligent Key is in
the correct direction when inserting
it to the Intelligent Key port. The
engine may not start if it is in the
incorrect direction.
. Remove the Intelligent Key from the
Intelligent Key port after the ignition
switch is pushed to the OFF posi-
tion. .
Make sure the area around the vehicle is
clear.
. Check fluid levels such as engine oil, cool-
ant, brake fluid and window washer fluid as
frequently as possible, or at least whenever
you refuel.
. Check that all windows and lights are clean.
. Visually inspect tires for their appearance
and condition. Also check tires for proper
inflation.
. Lock all doors.
. Position seat and adjust head restraints.
. Adjust inside and outside mirrors.
. Fasten seat belts and ask all passengers to
do likewise.
. Check the operation of warning lights when
the ignition switch is pushed to the ON
position. (See “WARNING/INDICATOR
LIGHTS AND AUDIBLE REMINDERS” in
the “2. Instruments and controls” section.)
BEFORE STARTING THE ENGINE
5-10
Starting and driving
Page 297 of 419
Black plate (293,1)
Model "Z34-D" EDITED: 2010/ 7/ 27
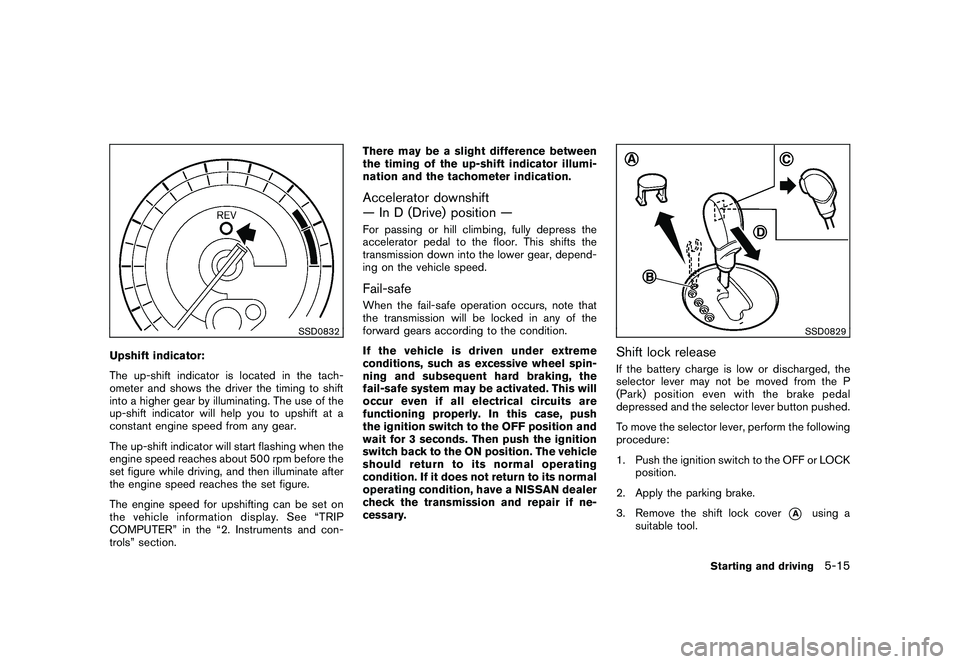
SSD0832
Upshift indicator:
The up-shift indicator is located in the tach-
ometer and shows the driver the timing to shift
into a higher gear by illuminating. The use of the
up-shift indicator will help you to upshift at a
constant engine speed from any gear.
The up-shift indicator will start flashing when the
engine speed reaches about 500 rpm before the
set figure while driving, and then illuminate after
the engine speed reaches the set figure.
The engine speed for upshifting can be set on
the vehicle information display. See “TRIP
COMPUTER” in the “2. Instruments and con-
trols” section.There may be a slight difference between
the timing of the up-shift indicator illumi-
nation and the tachometer indication.
Accelerator downshift
— In D (Drive) position —For passing or hill climbing, fully depress the
accelerator pedal to the floor. This shifts the
transmission down into the lower gear, depend-
ing on the vehicle speed.Fail-safeWhen the fail-safe operation occurs, note that
the transmission will be locked in any of the
forward gears according to the condition.
If the vehicle is driven under extreme
conditions, such as excessive wheel spin-
ning and subsequent hard braking, the
fail-safe system may be activated. This will
occur even if all electrical circuits are
functioning properly. In this case, push
the ignition switch to the OFF position and
wait for 3 seconds. Then push the ignition
switch back to the ON position. The vehicle
should return to its normal operating
condition. If it does not return to its normal
operating condition, have a NISSAN dealer
check the transmission and repair if ne-
cessary.
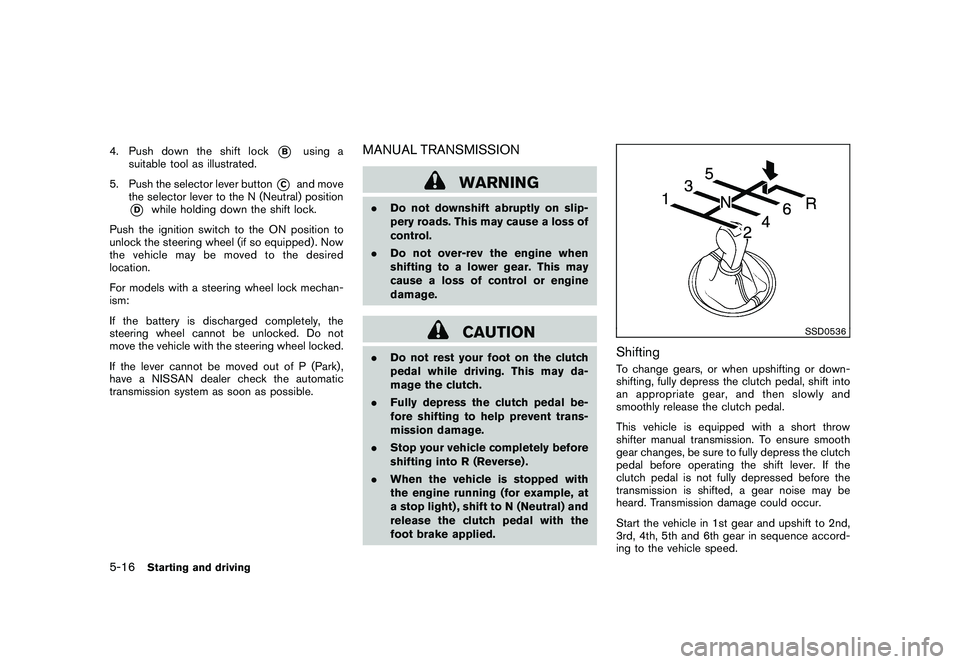
SSD0829
Shift lock releaseIf the battery charge is low or discharged, the
selector lever may not be moved from the P
(Park) position even with the brake pedal
depressed and the selector lever button pushed.
To move the selector lever, perform the following
procedure:
1. Push the ignition switch to the OFF or LOCK
position.
2. Apply the parking brake.
3. Remove the shift lock cover
*A
using a
suitable tool.
Starting and driving
5-15
Page 298 of 419
Black plate (294,1)
Model "Z34-D" EDITED: 2010/ 7/ 27
4. Push down the shift lock
*B
using a
suitable tool as illustrated.
5. Push the selector lever button
*C
and move
the selector lever to the N (Neutral) position
*D
while holding down the shift lock.
Push the ignition switch to the ON position to
unlock the steering wheel (if so equipped) . Now
the vehicle may be moved to the desired
location.
For models with a steering wheel lock mechan-
ism:
If the battery is discharged completely, the
steering wheel cannot be unlocked. Do not
move the vehicle with the steering wheel locked.
If the lever cannot be moved out of P (Park) ,
have a NISSAN dealer check the automatic
transmission system as soon as possible.
MANUAL TRANSMISSION
WARNING
. Do not downshift abruptly on slip-
pery roads. This may cause a loss of
control.
. Do not over-rev the engine when
shifting to a lower gear. This may
cause a loss of control or engine
damage.
CAUTION
.Do not rest your foot on the clutch
pedal while driving. This may da-
mage the clutch.
. Fully depress the clutch pedal be-
fore shifting to help prevent trans-
mission damage.
. Stop your vehicle completely before
shifting into R (Reverse) .
. When the vehicle is stopped with
the engine running (for example, at
a stop light) , shift to N (Neutral) and
release the clutch pedal with the
foot brake applied.
SSD0536
ShiftingTo change gears, or when upshifting or down-
shifting, fully depress the clutch pedal, shift into
an appropriate gear, and then slowly and
smoothly release the clutch pedal.
This vehicle is equipped with a short throw
shifter manual transmission. To ensure smooth
gear changes, be sure to fully depress the clutch
pedal before operating the shift lever. If the
clutch pedal is not fully depressed before the
transmission is shifted, a gear noise may be
heard. Transmission damage could occur.
Start the vehicle in 1st gear and upshift to 2nd,
3rd, 4th, 5th and 6th gear in sequence accord-
ing to the vehicle speed.
5-16
Starting and driving
Page 299 of 419
Black plate (295,1)
Model "Z34-D" EDITED: 2010/ 7/ 27
To back up, depress the shift knob and then
move the shift lever to the R (Reverse) position
after stopping the vehicle completely.
The shift knob returns to its original position
when the shift lever is moved to the N (Neutral)
position.
If it is difficult to move the shift lever into R
(Reverse) or 1st (Low gear) , shift to N (Neutral) ,
then release the clutch pedal. Fully depress the
clutch pedal again and shift into R or 1st.SynchroRev Match mode (S-MODE) (if
so equipped for Manual Transmission
models)The SynchroRev Match mode (S-MODE) auto-
matically adjusts the engine speed to match the
selecting gear ratio while changing gears.
Precautions:
.Shift lever and clutch pedal operations are
not different than a conventional manual
transmission.
. Fully depress the clutch pedal. Insufficient
pedal depression may cause slow response
of this system.
. When the clutch pedal is depressed with
the gear still engaged, the engine speed is
kept at the proper level for the engaged
gear. Thus, the engine speed may be kept high depending on the gear position and
vehicle speed.
. When the clutch pedal is depressed with
the transmission in neutral, the system
operates for approximately 2 seconds, and
then the engine speed will decrease to the
idle speed.
. When the engine coolant temperature is low
right after starting the engine, engine speed
synchronization will be delayed or may be
insufficient.
. The system controls the engine speed up to
the rev limit. Note that S-MODE is not a
function that prevents over-revving resulting
from shifting mistakes.
. The system does not operate while the
vehicle is backing up.
. If the engine speed is limited lower than
usual when the engine oil temperature is
extremely high, the system will control up to
the limited engine speed.
. If the malfunction indicator light illuminates,
the system may not operate and the S-
MODE indicator turns off.
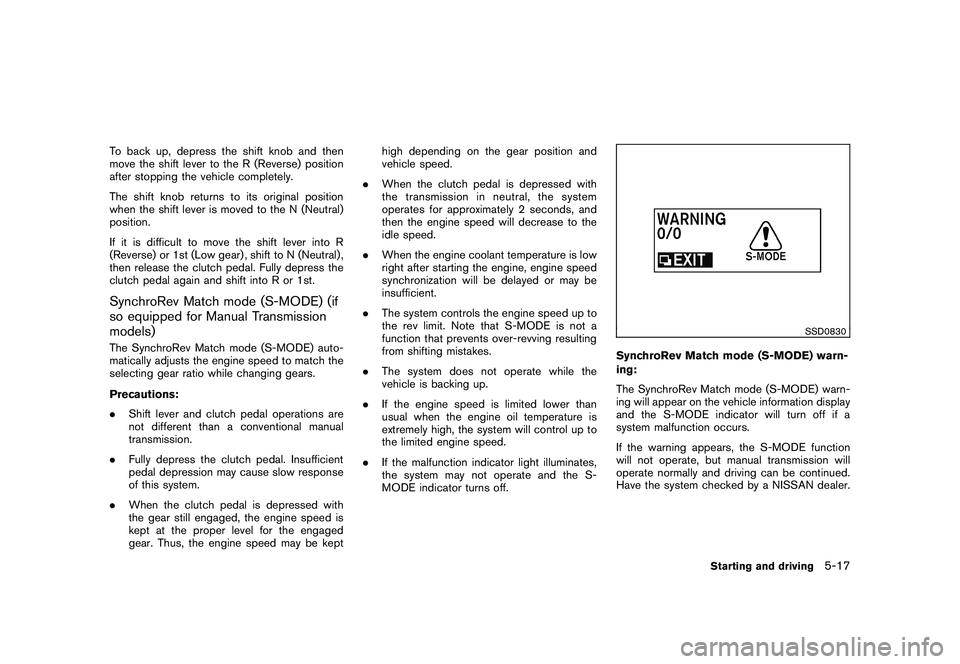
SSD0830
SynchroRev Match mode (S-MODE) warn-
ing:
The SynchroRev Match mode (S-MODE) warn-
ing will appear on the vehicle information display
and the S-MODE indicator will turn off if a
system malfunction occurs.
If the warning appears, the S-MODE function
will not operate, but manual transmission will
operate normally and driving can be continued.
Have the system checked by a NISSAN dealer.
Starting and driving
5-17
Page 303 of 419
Black plate (299,1)
Model "Z34-D" EDITED: 2010/ 7/ 27
PRECAUTIONS ON CRUISE CON-
TROL.If the cruise control system malfunctions, it
will cancel automatically. The CRUISE in-
dicator light on the meter panel will then
blink to warn the driver.
. If the engine coolant temperature becomes
excessively high, the cruise control system
will cancel automatically.
. If the CRUISE indicator light blinks, turn the
cruise control main switch off and have the
system checked by a NISSAN dealer.
. The CRUISE indicator light may blink when
the cruise control main switch is turned ON
while pushing the RESUME/ACCELERATE,
SET/COAST or CANCEL switch. To prop-
erly set the cruise control system, perform
the following procedures.
WARNING
Do not use the cruise control when
driving under the following conditions:
.when it is not possible to keep the
vehicle at a set speed
. in heavy traffic or in traffic that
varies in speed
. on winding or hilly roads .
on slippery roads (rain, snow, ice,
etc.)
. in very windy areas
Doing so could cause a loss of vehicle
control and result in an accident.
CAUTION
On manual transmission models, do not
shift into N (Neutral) without depres-
sing the clutch pedal when the cruise
control is set. Should this occur, de-
press the clutch pedal and turn the
main switch off immediately. Failure to
do so may cause engine damage.
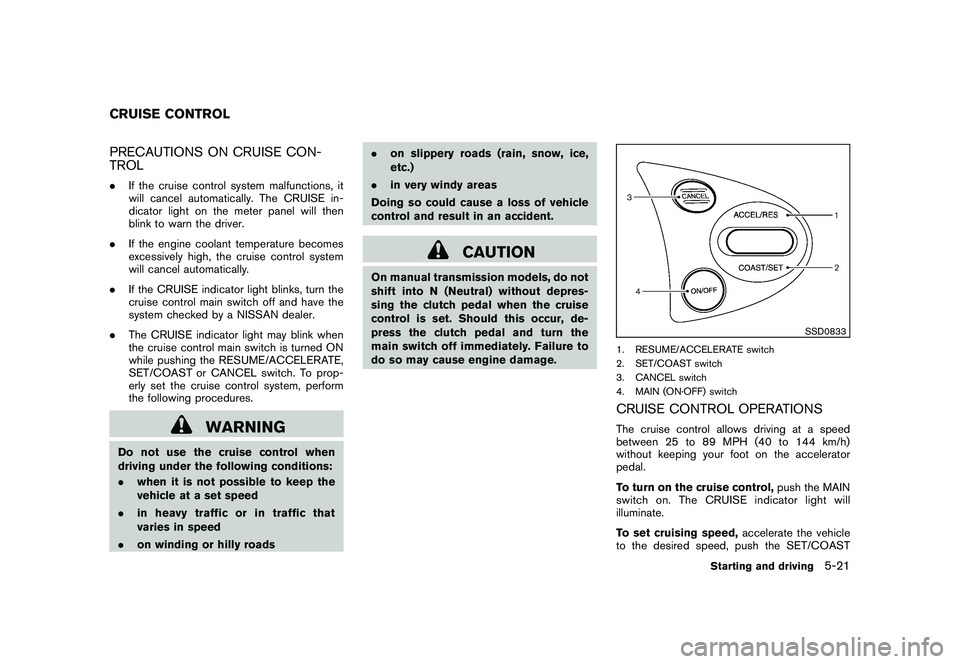
SSD0833
1. RESUME/ACCELERATE switch
2. SET/COAST switch
3. CANCEL switch
4. MAIN (ON·OFF) switchCRUISE CONTROL OPERATIONSThe cruise control allows driving at a speed
between 25 to 89 MPH (40 to 144 km/h)
without keeping your foot on the accelerator
pedal.
To turn on the cruise control, push the MAIN
switch on. The CRUISE indicator light will
illuminate.
To set cruising speed, accelerate the vehicle
to the desired speed, push the SET/COAST
CRUISE CONTROL
Starting and driving
5-21
Page 309 of 419
Black plate (305,1)
Model "Z34-D" EDITED: 2010/ 7/ 27
distances may also be longer on
rough, gravel or snow covered
roads, or if you are using tire chains.
Alwaysmaintainasafedistance
from the vehicle in front of you.
Ultimately, the driver is responsible
for safety.
. Tire type and condition may also
affect braking effectiveness.
— When replacing tires, install the
specified size of tires on all four
wheels.
— When installing a spare tire, make sure that it is the proper
size and type as specified on the
Tire and Loading Information
label. See “TIRE AND LOADING
INFORMATION LABEL” in the “9.
Technical and consumer infor-
mation” section of this manual.
— For detailed information, see “WHEELS AND TIRES” in the
“8. Maintenance and do-it-your-
self” section of this manual.
The Anti-lock Braking System (ABS) controls
the brakes so the wheels do not lock during hard
braking or when braking on slippery surfaces.
The system detects the rotation speed at each wheel and varies the brake fluid pressure to
prevent each wheel from locking and sliding. By
preventing each wheel from locking, the system
helps the driver maintain steering control and
helps to minimize swerving and spinning on
slippery surfaces.
Using the systemDepress the brake pedal and hold it down.
Depress the brake pedal with firm steady
pressure, but do not pump the brakes. The
ABS will operate to prevent the wheels from
locking up. Steer the vehicle to avoid obstacles.
WARNING
Do not pump the brake pedal. Doing so
may result in increased stopping dis-
tances.Self-test featureThe ABS includes electronic sensors, electric
pumps, hydraulic solenoids and a computer. The
computer has a built-in diagnostic feature that
tests the system each time you start the engine
and move the vehicle at a low speed in forward
or reverse. When the self-test occurs, you may
hear a “clunk” noise and/or feel a pulsation in the
brake pedal. This is normal and does not
indicate a malfunction. If the computer senses
a malfunction, it switches the ABS off and
illuminates the ABS warning light on theinstrument panel. The brake system then oper-
ates normally, but without anti-lock assistance.
If the ABS warning light illuminates during the
self-test or while driving, have the vehicle
checked by a NISSAN dealer.
Normal operationThe ABS operates at speeds above 3 to 6 MPH
(5 to 10 km/h) .
When the ABS senses that one or more wheels
are close to locking up, the actuator rapidly
applies and releases hydraulic pressure. This
action is similar to pumping the brakes very
quickly. You may feel a pulsation in the brake
pedal and hear a noise from under the hood or
feel a vibration from the actuator when it is
operating. This is normal and indicates that the
ABS is operating properly. However, the pulsa-
tion may indicate that road conditions are
hazardous and extra care is required while
driving.
Starting and driving
5-27
Page 316 of 419
Black plate (314,1)
Model "Z34-D" EDITED: 2010/ 7/ 27
To shut off the engine in an emergency situation
while driving, perform the following procedure:
.Rapidly push the push-button ignition switch
3 consecutive times, or
. Push and hold the push-button ignition
switch for more than 2 seconds.
TIRE PRESSURE MONITORING SYS-
TEM (TPMS)This vehicle is equipped with the Tire Pressure
Monitoring System (TPMS) . It monitors tire
pressure of all tires except the spare. When
the low tire pressure warning light is lit, one or
more of your tires is significantly under-inflated.
If the vehicle is being driven with low tire
pressure, the TPMS will activate and warn you
of it by the low tire pressure warning light. This
system will activate only when the vehicle is
driven at speeds above 16 MPH (25 km/h) . For
more details, see “WARNING/INDICATOR
LIGHTS AND AUDIBLE REMINDERS” in the
“2. Instruments and controls” section and “TIRE
PRESSURE MONITORING SYSTEM (TPMS)”
in the “5. Starting and driving” section.
WARNING
.If the low tire pressure warning light
illuminates while driving, avoid sud-
den steering maneuvers or abrupt
braking, reduce vehicle speed, pull
off the road to a safe location and
stop the vehicle as soon as possi-
ble. Driving with under-inflated tires
may permanently damage the tires
and increase the likelihood of tire
failure. Serious vehicle damage could occur and may lead to an
accident and could result in serious
personal injury. Check the tire pres-
sure for all four tires. Adjust the tire
pressure to the recommended COLD
tire pressure shown on the Tire and
Loading Information label to turn
the low tire pressure warning light
OFF. If the light still illuminates
while driving after adjusting the tire
pressure, a tire may be flat. If you
have a flat tire, replace it with a
spare tire as soon as possible.
. When a spare tire is mounted or a
wheel is replaced, the TPMS will not
function and the low tire pressure
warning light will flash for approxi-
mately 1 minute. The light will
remain on after 1 minute. Contact
your NISSAN dealer as soon as
possible for tire replacement and/
or system resetting.
. Replacing tires with those not ori-
ginally specified by NISSAN could
affect the proper operation of the
TPMS.
. Do not inject any tire liquid or
aerosol tire sealant into the tires,
as this may cause a malfunction of
EMERGENCY ENGINE SHUT OFF FLAT TIRE6-2
In case of emergency