2011 NISSAN 370Z COUPE check oil
[x] Cancel search: check oilPage 299 of 419
Black plate (295,1)
Model "Z34-D" EDITED: 2010/ 7/ 27
To back up, depress the shift knob and then
move the shift lever to the R (Reverse) position
after stopping the vehicle completely.
The shift knob returns to its original position
when the shift lever is moved to the N (Neutral)
position.
If it is difficult to move the shift lever into R
(Reverse) or 1st (Low gear) , shift to N (Neutral) ,
then release the clutch pedal. Fully depress the
clutch pedal again and shift into R or 1st.SynchroRev Match mode (S-MODE) (if
so equipped for Manual Transmission
models)The SynchroRev Match mode (S-MODE) auto-
matically adjusts the engine speed to match the
selecting gear ratio while changing gears.
Precautions:
.Shift lever and clutch pedal operations are
not different than a conventional manual
transmission.
. Fully depress the clutch pedal. Insufficient
pedal depression may cause slow response
of this system.
. When the clutch pedal is depressed with
the gear still engaged, the engine speed is
kept at the proper level for the engaged
gear. Thus, the engine speed may be kept high depending on the gear position and
vehicle speed.
. When the clutch pedal is depressed with
the transmission in neutral, the system
operates for approximately 2 seconds, and
then the engine speed will decrease to the
idle speed.
. When the engine coolant temperature is low
right after starting the engine, engine speed
synchronization will be delayed or may be
insufficient.
. The system controls the engine speed up to
the rev limit. Note that S-MODE is not a
function that prevents over-revving resulting
from shifting mistakes.
. The system does not operate while the
vehicle is backing up.
. If the engine speed is limited lower than
usual when the engine oil temperature is
extremely high, the system will control up to
the limited engine speed.
. If the malfunction indicator light illuminates,
the system may not operate and the S-
MODE indicator turns off.
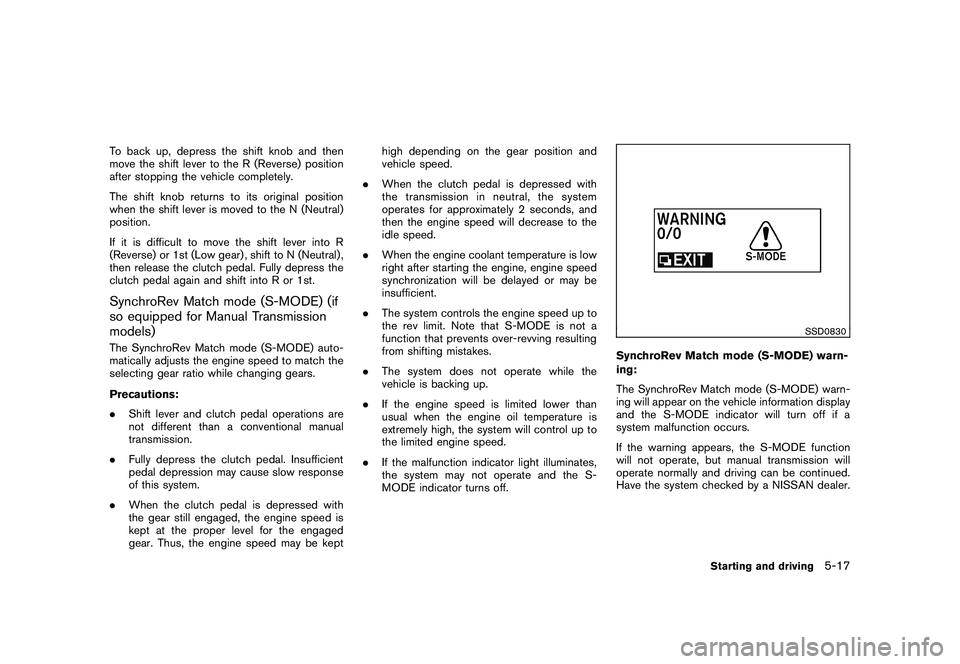
SSD0830
SynchroRev Match mode (S-MODE) warn-
ing:
The SynchroRev Match mode (S-MODE) warn-
ing will appear on the vehicle information display
and the S-MODE indicator will turn off if a
system malfunction occurs.
If the warning appears, the S-MODE function
will not operate, but manual transmission will
operate normally and driving can be continued.
Have the system checked by a NISSAN dealer.
Starting and driving
5-17
Page 320 of 419
Black plate (318,1)
Model "Z34-D" EDITED: 2010/ 7/ 27
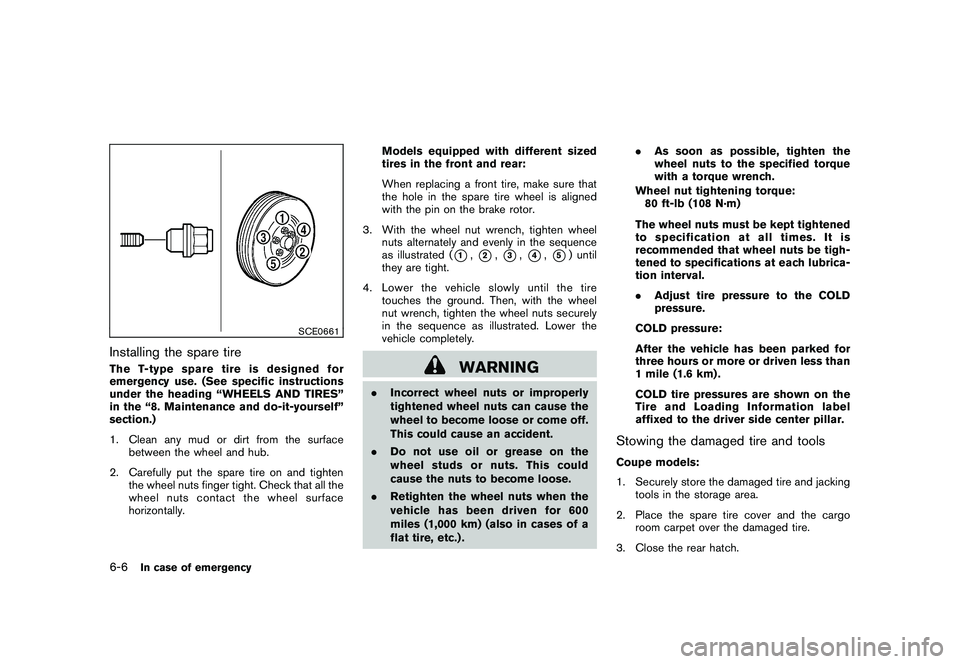
SCE0661
Installing the spare tireThe T-type spare tire is designed for
emergency use. (See specific instructions
under the heading “WHEELS AND TIRES”
in the “8. Maintenance and do-it-yourself”
section.)
1. Clean any mud or dirt from the surfacebetween the wheel and hub.
2. Carefully put the spare tire on and tighten the wheel nuts finger tight. Check that all the
wheel nuts contact the wheel surface
horizontally. Models equipped with different sized
tires in the front and rear:
When replacing a front tire, make sure that
the hole in the spare tire wheel is aligned
with the pin on the brake rotor.
3. With the wheel nut wrench, tighten wheel nuts alternately and evenly in the sequence
as illustrated (
*1,*2,*3,*4,*5) until
they are tight.
4. Lower the vehicle slowly until the tire touches the ground. Then, with the wheel
nut wrench, tighten the wheel nuts securely
in the sequence as illustrated. Lower the
vehicle completely.
WARNING
.Incorrect wheel nuts or improperly
tightened wheel nuts can cause the
wheel to become loose or come off.
This could cause an accident.
. Do not use oil or grease on the
wheel studs or nuts. This could
cause the nuts to become loose.
. Retighten the wheel nuts when the
vehicle has been driven for 600
miles (1,000 km) (also in cases of a
flat tire, etc.) . .
As soon as possible, tighten the
wheel nuts to the specified torque
with a torque wrench.
Wheel nut tightening torque: 80 ft-lb (108 N·m)
The wheel nuts must be kept tightened
to specification at all times. It is
recommended that wheel nuts be tigh-
tened to specifications at each lubrica-
tion interval.
. Adjust tire pressure to the COLD
pressure.
COLD pressure:
After the vehicle has been parked for
three hours or more or driven less than
1 mile (1.6 km) .
COLD tire pressures are shown on the
Tire and Loading Information label
affixed to the driver side center pillar.
Stowing the damaged tire and toolsCoupe models:
1. Securely store the damaged tire and jacking tools in the storage area.
2. Place the spare tire cover and the cargo room carpet over the damaged tire.
3. Close the rear hatch.
6-6
In case of emergency
Page 340 of 419
Black plate (338,1)
Model "Z34-D" EDITED: 2010/ 7/ 27
proper product.
.Wax your vehicle only after a thorough
washing. Follow the instructions supplied
with the wax.
. Do not use a wax containing any abrasives,
cutting compounds or cleaners that may
damage the vehicle finish.
Machine compound or aggressive polishing on a
base coat/clear coat paint finish may dull the
finish or leave swirl marks.REMOVING SPOTSRemove tar and oil spots, industrial dust,
insects, and tree sap as quickly as possible
from the paint surface to avoid lasting damage
or staining. Special cleaning products are
available at a NISSAN dealer or any automotive
accessory stores.UNDERBODYIn areas where road salt is used in winter, the
underbody must be cleaned regularly. This will
prevent dirt and salt from building up and
causing the acceleration of corrosion on the
underbody and suspension. Before the winter
period and again in the spring, the underseal
must be checked and, if necessary, re-treated.
GLASSUse glass cleaner to remove smoke and dust
film from the glass surfaces. It is normal for glass
to become coated with a film after the vehicle is
parked in the hot sun. Glass cleaner and a soft
cloth will easily remove this film.
CAUTION
. When cleaning the inside of the
windows, do not use sharp-edged
tools, abrasive cleaners or chlorine-
based disinfectant cleaners. They
could damage the electrical conduc-
tors, radio antenna elements or rear
window defroster elements.
. If glass cleaner gets on the soft top,
immediately wash it off with clean
water (Roadster models) .WHEELSWash the wheels when washing the vehicle to
maintain their appearance.
.Clean the inner side of the wheels when the
wheel is changed or the underside of the
vehicle is washed.
. Inspect wheel rims regularly for dents or
corrosion. Such damage may cause loss of pressure or poor seal at the tire bead.
. NISSAN recommends that the road wheels
be waxed to protect against road salt in
areas where it is used during winter.
CAUTION
Do not use abrasive cleaners when
washing the wheels.Aluminum alloy wheelsWash regularly with a sponge dampened in a
mild soap solution, especially during winter
months in areas where road salt is used. Salt
could discolor the wheels if not removed.
CAUTION
Follow the directions below to avoid
staining or discoloring the wheels:
.Do not use a cleaner that uses
strong acid or alkali contents to
clean the wheels.
. Do not apply wheel cleaners to the
wheels when they are hot. The
wheel temperature should be the
same as ambient temperature.
. Rinse the wheel to completely re-
move the cleaner within 15 minutes
7-4
Appearance and care
Page 342 of 419
Black plate (340,1)
Model "Z34-D" EDITED: 2010/ 7/ 27
and damaging to the leather sur-
faces and should be removed
promptly. Do not use saddle soap,
car waxes, polishes, oils, cleaning
fluids, solvents, detergents or am-
monia-based cleaners as they may
damage the leather’s natural finish.
. Only use fabric protectors approved
by NISSAN.
. Do not use glass or plastic cleaner
on meter or gauge lens covers. It
may damage the lens cover.
AIR FRESHENERSMost air fresheners use a solvent that could
affect the vehicle interior. If you use an air
freshener, take the following precautions:
.Hanging-type air fresheners can cause
permanent discoloration when they contact
vehicle interior surfaces. Place the air
freshener in a location that allows it to hang
free and not contact an interior surface.
. Liquid-type air fresheners typically clip on
the vents. These products can cause
immediate damage and discoloration when
spilled on interior surfaces.
Carefully read and follow the manufacturer’s
instructions before using air fresheners.
FLOOR MATS
WARNING
To avoid potential pedal interference
that may result in a collision or injury:
. NEVER place a floor mat on top of
another floor mat in the driver front
position.
. Use only genuine NISSAN floor
mats specifically designed for use
in your vehicle model. See your
NISSAN dealer for more informa-
tion.
. Properly position the mats in the
floorwell using the floor mat posi-
tioning aid. See “Floor mat posi-
tioning aid” later in this section.
The use of genuine NISSAN floor mats can
extend the life of your vehicle carpet and make it
easier to clean the interior. Mats should be
maintained with regular cleaning and replaced if
they become excessively worn.
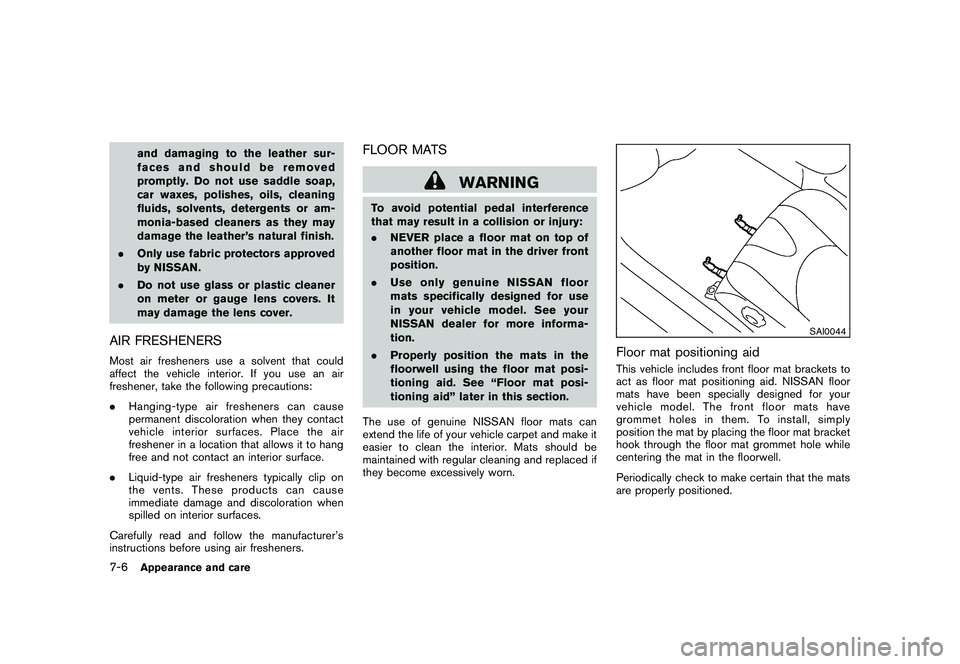
SAI0044
Floor mat positioning aidThis vehicle includes front floor mat brackets to
act as floor mat positioning aid. NISSAN floor
mats have been specially designed for your
vehicle model. The front floor mats have
grommet holes in them. To install, simply
position the mat by placing the floor mat bracket
hook through the floor mat grommet hole while
centering the mat in the floorwell.
Periodically check to make certain that the mats
are properly positioned.
7-6
Appearance and care
Page 345 of 419

Black plate (25,1)
8 Maintenance and do-it-yourself
Model "Z34-D" EDITED: 2010/ 7/ 28
Maintenance requirement..................................... 8-2
Scheduled maintenance ................................... 8-2
General maintenance ...................................... 8-2
Where to go for service ................................... 8-2
General maintenance .......................................... 8-2
Explanation of maintenance items ....................... 8-2
Maintenance precautions ..................................... 8-5
Engine compartment check locations ...................... 8-7
VQ37VHR engine model. ................................. 8-7
Engine cooling system ......................................... 8-8
Checking engine coolant level ........................... 8-9
Changing engine coolant ................................. 8-9
Engine oil ......................................................... 8-9
Checking engine oil level ................................. 8-9
Changing engine oil and filter .......................... 8-10
Automatic transmission fluid ................................ 8-12
Power steering fluid .......................................... 8-12
Brake and clutch fluid ....................................... 8-13
Brake fluid .................................................. 8-13
Clutch fluid ................................................. 8-13
Window washer fluid ........................................ 8-14
Battery .......................................................... 8-14
Jump starting .............................................. 8-16
Variable voltage control system ............................ 8-16
Drive belts ...................................................... 8-17 Spark plugs
.................................................... 8-17
Replacing spark plugs ................................... 8-18
Air cleaner ...................................................... 8-18
Windshield wiper blades .................................... 8-19
Cleaning .................................................... 8-19
Replacing ................................................... 8-19
Brakes ........................................................... 8-20
Self-adjusting brakes .................................... 8-20
Brake pad wear warning ................................ 8-20
Fuses ............................................................ 8-21
Engine compartment ..................................... 8-21
Passenger compartment ................................ 8-22
Intelligent Key battery replacement ....................... 8-23
Lights ............................................................ 8-25
Coupe ....................................................... 8-25
Roadster .................................................... 8-26
Headlights .................................................. 8-27
Exterior and interior lights ............................... 8-27
Wheels and tires .............................................. 8-29
Tire pressure ............................................... 8-29
Tire labeling ................................................ 8-32
Types of tires .............................................. 8-34
Tire chains .................................................. 8-35
Changing wheels and tires ............................. 8-36
Emergency tire puncture repair kit
(if so equipped) ........................................... 8-38
Page 348 of 419
Black plate (348,1)
Model "Z34-D" EDITED: 2010/ 7/ 27
Warning lights and chimes:Make sure that
all warning lights and chimes are operating
properly.
Windshield defroster: Check that the air
comes out of the defroster outlets properly and
in sufficient quantity when operating the heater
or air conditioner.
Windshield wiper and washer*: Check that
the wipers and washer operate properly and that
the wipers do not streak.Under the hood and vehicleThe maintenance items listed here should be
checked periodically (for example, each time you
check the engine oil or refuel) .
Battery*: Check the fluid level in each cell. It
should be between the MAX and MIN lines.
Vehicles operated in high temperatures or under
severe condition require frequent checks of the
battery fluid level.
Brake and clutch fluid levels*: Make sure
that the brake and clutch fluid levels are
between the MAX and MIN lines on the
reservoirs.
Engine coolant level*: Check the coolant level
when the engine is cold.
Engine drive belts*: Make sure that no belt is
frayed, worn, cracked or oily. Engine oil level*:
Check the level after parking
the vehicle on a level spot and turning off the
engine. Wait more than 15 minutes for the oil to
drain back into the oil pan.
Exhaust system: Make sure there are no loose
supports, cracks or holes. If the sound of the
exhaust seems unusual or there is a smell of
exhaust fumes, immediately have the exhaust
system inspected by a NISSAN dealer. (See
“PRECAUTIONS WHEN STARTING AND
DRIVING” in the “5. St arting and driving”
section for exhaust gas (carbon monoxide) .)
Fluid leaks: Check under the vehicle for fuel,
oil, water or other fluid leaks after the vehicle has
been parked for a while. Water dripping from the
air conditioner after use is normal. If you should
notice any leaks or if gasoline fumes are evident,
check for the cause and have it corrected
immediately.
Power steering fluid level* and lines: Check
the level with the engine off. Check the lines for
proper attachment, leaks, cracks, etc.
Radiator and hoses: Check the front of the
radiator and clean off any dirt, insects, leaves,
etc., that may have accumulated. Make sure the
hoses have no cracks, deformation, rot or loose
connections. Underbody:
The underbody is frequently ex-
posed to corrosive substances such as those
used on icy roads or to control dust. It is very
important to remove these substances, other-
wise rust will form on the floor pan, frame, fuel
lines and around the exhaust system. At the end
of winter, the underbody should be thoroughly
flushed with plain water, being careful to clean
those areas where mud and dirt may accumu-
late. For additional information, see “CLEANING
EXTERIOR” in the “7. Appearance and care”
section.
Windshield washer fluid*: Check that there is
adequate fluid in the reservoir.8-4
Maintenance and do-it-yourself
Page 351 of 419
Black plate (351,1)
Model "Z34-D" EDITED: 2010/ 7/ 27
SSI0510
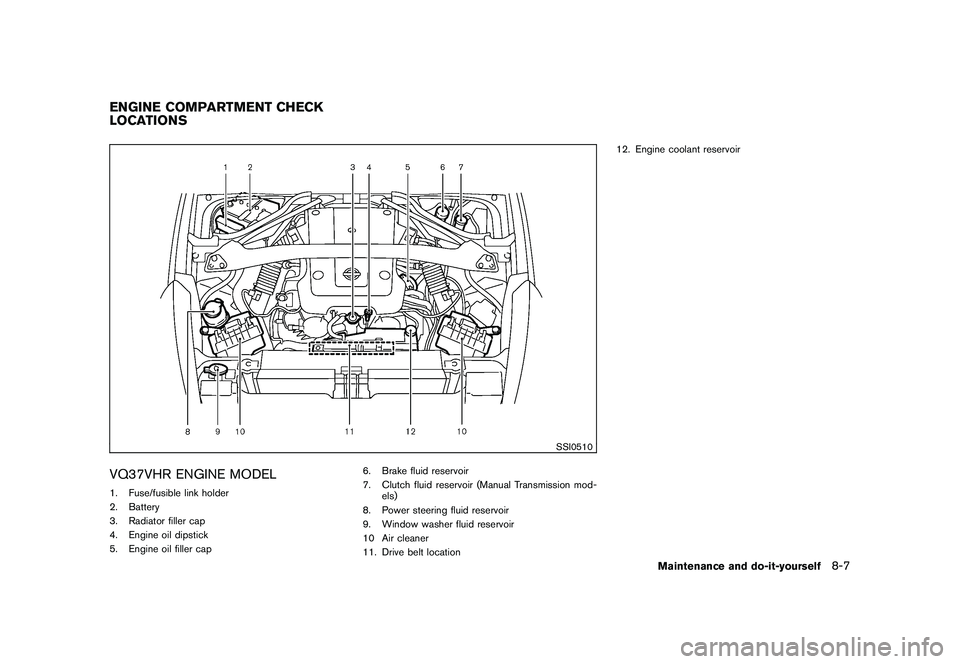
VQ37VHR ENGINE MODEL1. Fuse/fusible link holder
2. Battery
3. Radiator filler cap
4. Engine oil dipstick
5. Engine oil filler cap6. Brake fluid reservoir
7. Clutch fluid reservoir (Manual Transmission mod-
els)
8. Power steering fluid reservoir
9. Window washer fluid reservoir
10 Air cleaner
11. Drive belt location 12. Engine coolant reservoirENGINE COMPARTMENT CHECK
LOCATIONS
Maintenance and do-it-yourself
8-7
Page 353 of 419
Black plate (353,1)
Model "Z34-D" EDITED: 2010/ 7/ 27
SDI2043
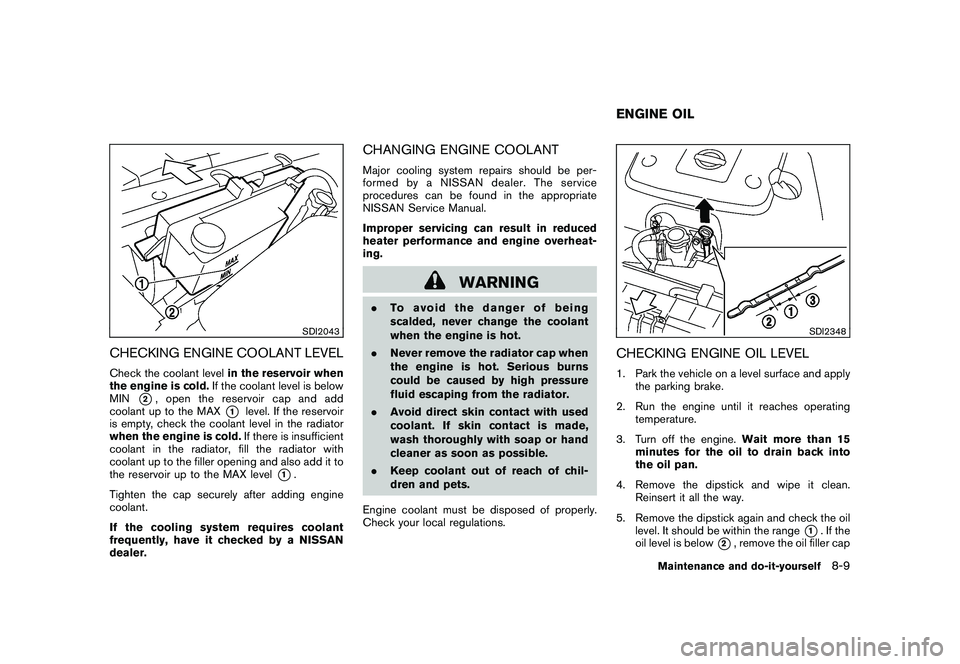
CHECKING ENGINE COOLANT LEVELCheck the coolant levelin the reservoir when
the engine is cold. If the coolant level is below
MIN
*2, open the reservoir cap and add
coolant up to the MAX
*1
level. If the reservoir
is empty, check the coolant level in the radiator
when the engine is cold. If there is insufficient
coolant in the radiator, fill the radiator with
coolant up to the filler opening and also add it to
the reservoir up to the MAX level
*1.
Tighten the cap securely after adding engine
coolant.
If the cooling system requires coolant
frequently, have it checked by a NISSAN
dealer.
CHANGING ENGINE COOLANTMajor cooling system repairs should be per-
formed by a NISSAN dealer. The service
procedures can be found in the appropriate
NISSAN Service Manual.
Improper servicing can result in reduced
heater performance and engine overheat-
ing.
WARNING
. To avoid the danger of being
scalded, never change the coolant
when the engine is hot.
. Never remove the radiator cap when
the engine is hot. Serious burns
could be caused by high pressure
fluid escaping from the radiator.
. Avoid direct skin contact with used
coolant. If skin contact is made,
wash thoroughly with soap or hand
cleaner as soon as possible.
. Keep coolant out of reach of chil-
dren and pets.
Engine coolant must be disposed of properly.
Check your local regulations.
SDI2348
CHECKING ENGINE OIL LEVEL1. Park the vehicle on a level surface and apply the parking brake.
2. Run the engine until it reaches operating temperature.
3. Turn off the engine. Wait more than 15
minutes for the oil to drain back into
the oil pan.
4. Remove the dipstick and wipe it clean. Reinsert it all the way.
5. Remove the dipstick again and check the oil level. It should be within the range
*1. If the
oil level is below
*2, remove the oil filler cap
ENGINE OIL
Maintenance and do-it-yourself
8-9