2011 MITSUBISHI TRITON tyre pressure
[x] Cancel search: tyre pressurePage 18 of 369

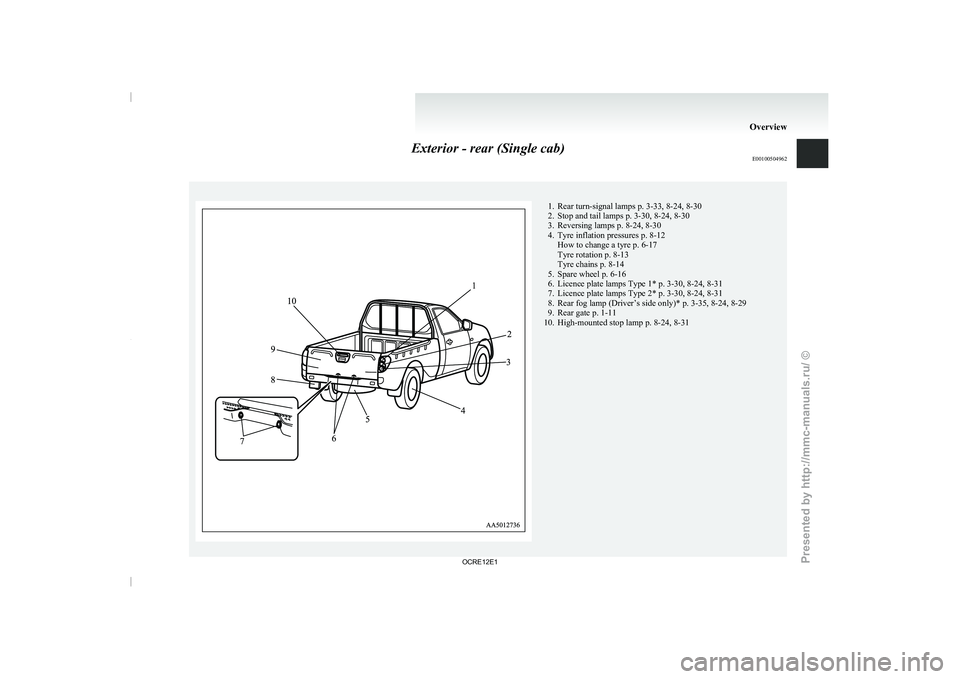
Exterior - rear (Single cab)
E00100504962 1. Rear turn-signal lamps p. 3-33, 8-24, 8-30
2. Stop and tail lamps p. 3-30, 8-24, 8-30
3. Reversing lamps p. 8-24, 8-30
4.
Tyre inflation pressures p. 8-12
How to change a tyre p. 6-17
Tyre rotation p. 8-13
Tyre chains p. 8-14
5.
Spare wheel p. 6-16
6. Licence plate lamps Type 1* p. 3-30, 8-24, 8-31
7. Licence plate lamps Type 2* p. 3-30, 8-24, 8-31
8. Rear fog lamp (Driver’s side only)* p. 3-35, 8-24, 8-29
9. Rear gate p. 1-11
10. High-mounted stop lamp p. 8-24, 8-31 Overview
OCRE12E1
Presented by http://mmc-manuals.ru/ \251
Page 20 of 369

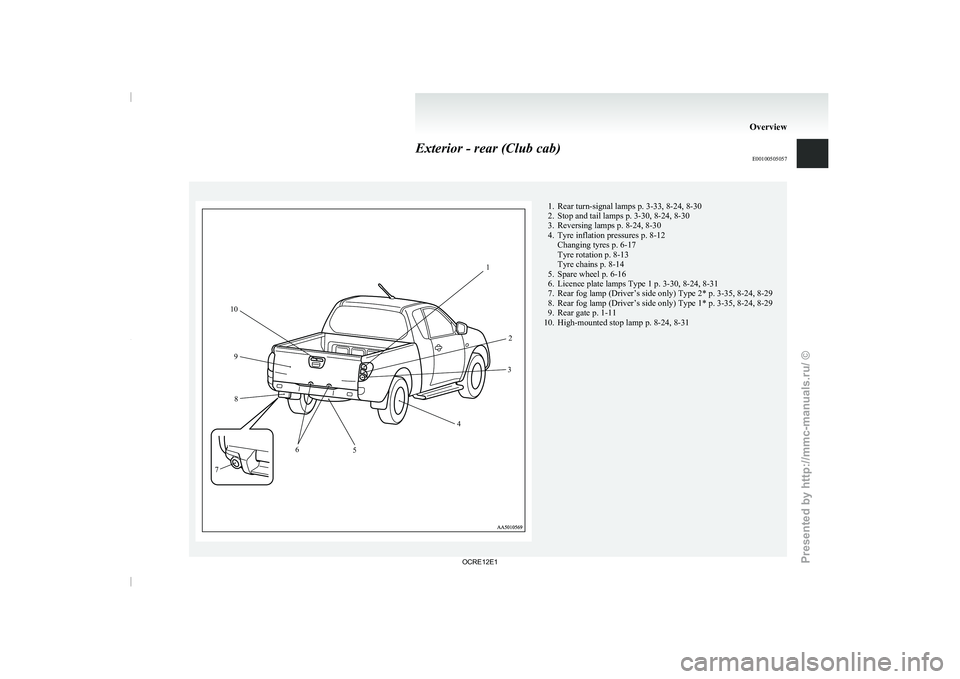
Exterior - rear (Club cab)
E00100505057 1. Rear turn-signal lamps p. 3-33, 8-24, 8-30
2. Stop and tail lamps p. 3-30, 8-24, 8-30
3. Reversing lamps p. 8-24, 8-30
4.
Tyre inflation pressures p. 8-12
Changing tyres p. 6-17
Tyre rotation p. 8-13
Tyre chains p. 8-14
5.
Spare wheel p. 6-16
6. Licence plate lamps Type 1 p. 3-30, 8-24, 8-31
7. Rear fog lamp (Driver’s side only) Type 2* p. 3-35, 8-24, 8-29
8. Rear fog lamp (Driver’s side only) Type 1* p. 3-35, 8-24, 8-29
9. Rear gate p. 1-11
10. High-mounted stop lamp p. 8-24, 8-31 Overview1
2
3
4
5
6
7 8
9
10
OCRE12E1
Presented by http://mmc-manuals.ru/ \251
Page 22 of 369

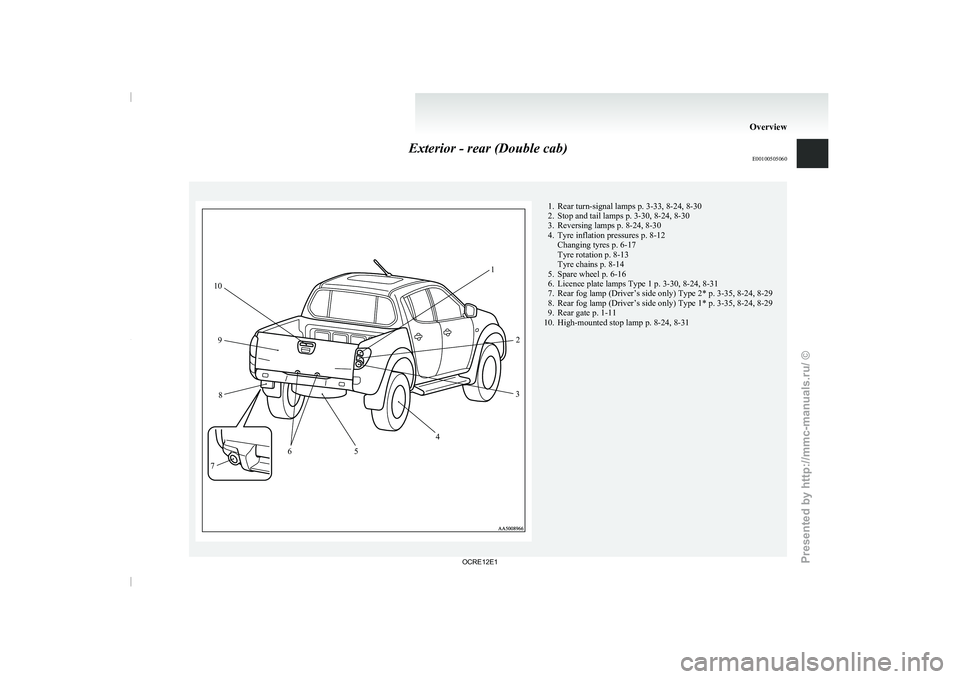
Exterior - rear (Double cab)
E00100505060 1. Rear turn-signal lamps p. 3-33, 8-24, 8-30
2. Stop and tail lamps p. 3-30, 8-24, 8-30
3. Reversing lamps p. 8-24, 8-30
4.
Tyre inflation pressures p. 8-12
Changing tyres p. 6-17
Tyre rotation p. 8-13
Tyre chains p. 8-14
5.
Spare wheel p. 6-16
6. Licence plate lamps Type 1 p. 3-30, 8-24, 8-31
7. Rear fog lamp (Driver’s side only) Type 2* p. 3-35, 8-24, 8-29
8. Rear fog lamp (Driver’s side only) Type 1* p. 3-35, 8-24, 8-29
9. Rear gate p. 1-11
10. High-mounted stop lamp p. 8-24, 8-31 Overview1
2
3
4
5
6
7 8
9
10
OCRE12E1
Presented by http://mmc-manuals.ru/ \251
Page 127 of 369

Economical driving
E00600100620
For economical driving, there are
some technical re-
quirements that have to be met. The prerequisite
for low fuel consumption is a properly adjusted en-
gine. In order to achieve longer life of the vehicle
and the most economical operation, we recommend
you to have the vehicle checked at regular intervals
in accordance with the service standards.
Fuel economy and generation of exhaust gas and
noise are highly influenced by personal driving hab-
its as well as the particular operating conditions.
The following points should be observed in order
to minimize wear of brakes, tyres and engine as
well as to reduce environmental pollution.
Starting
Avoid rapid acceleration and sudden starts; such op-
eration will result in higher fuel consumption.
Shifting
Shift only at an appropriate speed and engine
speed. Always use the highest gear possible.
The transfer shift lever should be set to “2H” when
driving 4WD vehicles on normal roads and express
ways to obtain best possible fuel economy.
City traffic
Frequent starting and stopping increases the aver-
age fuel consumption. Use roads with smooth traf-
fic flow whenever possible. When driving on con-
gested roads, avoid use of a low gear at high en-
gine speeds.
Idling
The vehicle consumes fuel even during idling.
Avoid extended idling whenever possible. Speed
The higher the vehicle
speed,
the more fuel con-
sumed. Avoid driving at full speed. Even a slight re-
lease of the accelerator pedal will save a significant
amount of fuel.
Tyre inflation pressure
Check the tyre inflation pressures at regular inter-
vals. Low tyre inflation pressure increases road re-
sistance and fuel consumption. In addition, low
tyre pressures adversely affect tyre wear and driv-
ing stability.
Load
Do not drive with unnecessary articles in the cargo
area. Especially during city driving where frequent
starting and stopping is necessary, the increased
weight of the vehicle will greatly affect fuel con-
sumption.
Cold engine starting
Starting of a cold engine consumes more fuel.
Unnecessary fuel consumption is also caused by
keeping a hot engine running. After the engine is
started, commence driving as soon as possible.
Air conditioning*
The use of the air conditioning will increase the
fuel consumption. Driving, alcohol and drugs
E00600200012
Driving after drinking alcohol is
one of the most fre-
quent causes of accidents.
Your driving ability can be seriously impaired even
with blood alcohol levels far below the legal mini-
mum. If you have been drinking, don’t drive. Ride
with a designated non-drinking driver, call a cab or
a friend, or use public transportation.
Drinking coffee or taking a cold shower will not
make you sober.
Similarly, prescription and nonprescription drugs af-
fect your alertness, perception and reaction time.
Consult with your doctor or pharmacist before driv-
ing while under the influence of any of these medi-
cations. WARNING
l NEVER DRINK AND DRIVE.
Your perceptions are less
accurate,
your
reflexes are slower and your judgment is
impaired. Starting and driving
4-02
4
OCRE12E1
Presented by http://mmc-manuals.ru/ \251
Page 165 of 369

WARNING
l When attempting to rock your vehicle out
of a stuck position, be
sure that the area
around the vehicle is clear of people and
physical objects. The rocking motion may
cause the vehicle to suddenly launch for-
ward or backward, causing injury or dam-
age to nearby people or objects.
NOTE l Avoid
sudden braking, acceleration, and
turn-
ing; such operations could result in the vehi-
cle becoming stuck.
l If the vehicle becomes stuck in sandy or mud-
dy roads, it can often be moved a rocking mo-
tion. Move the selector lever rhythmically be-
tween the “D” (DRIVE) and “R” (RE-
VERSE) position (with M/T, between 1 st
and
Reverse), while applying slight pressure to
the accelerator pedal.
l It is recommended to start the vehicle with
parking brake partially, but not completely,
applied by slightly pulling the parking brake
lever.
After the vehicle has become free, do not for-
get to release the parking brake.
l If it is necessary to drive in extremely muddy
conditions, the use of tyre chains is recom-
mended. Because the extent of muddy condi-
tions is difficult to judge and the vehicle
could become bogged down very deeply, op-
eration should be at a low speed. If possible,
get out of the vehicle and check the condi-
tions ahead before proceeding. l
Driving over roads in
coastal
areas or roads
on which anti-skid preparations have been
spread can cause rust on the vehicle; wash
the vehicle thoroughly as soon as possible af-
ter such use.
Climbing sharp grades
Set the transfer shift lever to “4L” position (easy se-
lect 4WD), “4LLc” position (super select 4WD) to
maximize the engine torque. WARNING
l Go
straight
up. Do
not
try to traverse
across a steep slope.
l If you begin to lose traction, ease off the
accelerator pedal and gently turn the
steering wheel alternatively left and right
to regain adequate traction again.
NOTE l Choose
as smooth a slope
as possible with
few stones or other obstacles.
l Before attempting to drive up the slope, walk
up it to confirm that the vehicle can handle
the grade.
Descending sharp grades
Set the transfer shift lever to “4L” position (easy se-
lect 4WD), “4LLc” position (super select 4WD),
use the engine brake (downshifting) and descend
slowly. WARNING
l Avoid snaking down a sharp
grade. De-
scend the grade as straight as possible.
NOTE l When descending a sharp grade, if the brakes
are
applied suddenly because of
an obstacle
encountered, control of the vehicle could be
lost. Before descending the slope, walk down
it and confirm the path.
l Before descending a grade, it is necessary to
choose the appropriate gear. Avoid changing
gears or depressing the clutch while descend-
ing the grade.
l MITSUBISHI MOTORS is not responsible
to the operator for any damage or injury
caused or liability incurred by improper and
negligent operation of a vehicle. All techni-
ques of vehicle operation described herein de-
pend on the skill and experience of the opera-
tor and other participating parties and any de-
viation from the recommended operation in-
structions above is at their own risk.
Turning sharp corners
When turning a sharp corner in “4H” or “4L” posi-
tion (easy select 4WD), “4HLc” or “4LLc” posi-
tion (super select 4WD) at low speed, a slight dif-
ference in steering may be experienced similar to
as if the brakes were applied. This is called tight cor-
ner braking and results from each of the 4 tyres be-
ing at a different distance from the corner.
The phenomenon is peculiar to 4-wheel drive vehi-
cles. If this occurs, either straighten the steering
wheel, or change to rear-wheel drive. Starting and driving
4-40
4
OCRE12E1
Presented by http://mmc-manuals.ru/ \251
Page 166 of 369

Crossing a stream
4-wheel drive vehicles are
not
necessarily water-
proof. If the electrical circuits become wet, further
operation of the vehicle will be impossible; there-
fore, avoid crossing streams unless absolutely nec-
essary. If crossing a stream is unavoidable, use the
following procedure: 1. Check depths of a stream and geographicalfeatures before attempting to cross a stream
and ford the stream where the water is as shal-
low as practicable.
2. Set the transfer shift lever to “4L” position (easy select 4WD), “4LLc” position (super se-
lect 4WD).
3. Drive slowly at a speed of approximately 5 km/h (3 mph) to avoid splashing too much
water. CAUTION
l
Never cross a stream
where
the water is
deep.
Do not change gears while crossing the
stream.
Frequent crossing of streams can adverse-
ly affect the life span of the vehicle; we rec-
ommend you to take the necessary meas-
ures to prepare, inspect, and repair the ve-
hicle.
After crossing a stream, apply the brakes to be sure
they are functioning
properly. If
the brakes are wet
and not functioning properly, dry them out by driv-
ing slowly while lightly depressing the brake pedal.
Inspect each part of the vehicle carefully. Inspection and maintenance
following rough road operation E00606700048
After operating
the vehicle
in
rough road condi-
tions, be sure to perform the following inspection
and maintenance procedures:
l Check that the vehicle has not been damaged
by rocks, gravel, etc.
l Carefully wash the vehicle with water.
After washing, drive the vehicle slowly
while lightly depressing the brake pedal in or-
der to dry out the brakes. If the brakes still
do not function properly, we recommend you
to have the brakes checked as soon as possible.
l Remove the insects, dried grass, etc. clog-
ging the radiator core.
l After crossing a stream, be sure to have the
following items inspected at a MITSUBISHI
MOTORS Authorized Service Point and take
the necessary measures.
• Check the brake system and, if necessary,have it serviced.
• Check the engine, transmission, transfer, and differential oil or grease level and tur-
bidity. If the oil or grease is milky, it indi-
cates water contamination. Replace it
with new oil or grease.
• Grease the propeller shaft.
• Check the inside of the vehicle. If ingress of water is found, dry the carpet etc.
• Inspect the headlamps. If the headlamp bulb is flooded with water, we recom-
mend you to have it drained. Cautions on handling of 4-wheel
drive vehicles E00606800368
Tyres and wheels
Since the driving torque can
be applied to the 4
wheels, the performance of the vehicle when oper-
ating in 4-wheel drive is greatly affected by the con-
dition of the tyres.
Pay close attention to the tyres.
l Install specified tyres on all wheels. Refer to
“Tyres and wheels” on page 9-18.
l Be sure to fit all 4 tyres and wheels of the
same size and type.
When replacement of any of the tyres or
wheels is necessary, replace all of them.
l All tyres should be rotated whenever the
wear difference between the front and rear
tyres is recognizable.
Good vehicle performance cannot be expected if
there is a difference in wear between tyres. Refer to
“Tyre rotation” on page 8-13. l Check the tyre inflation pressure regularly. Starting and driving
4-41 4
OCRE12E1
Presented by http://mmc-manuals.ru/ \251
Page 281 of 369

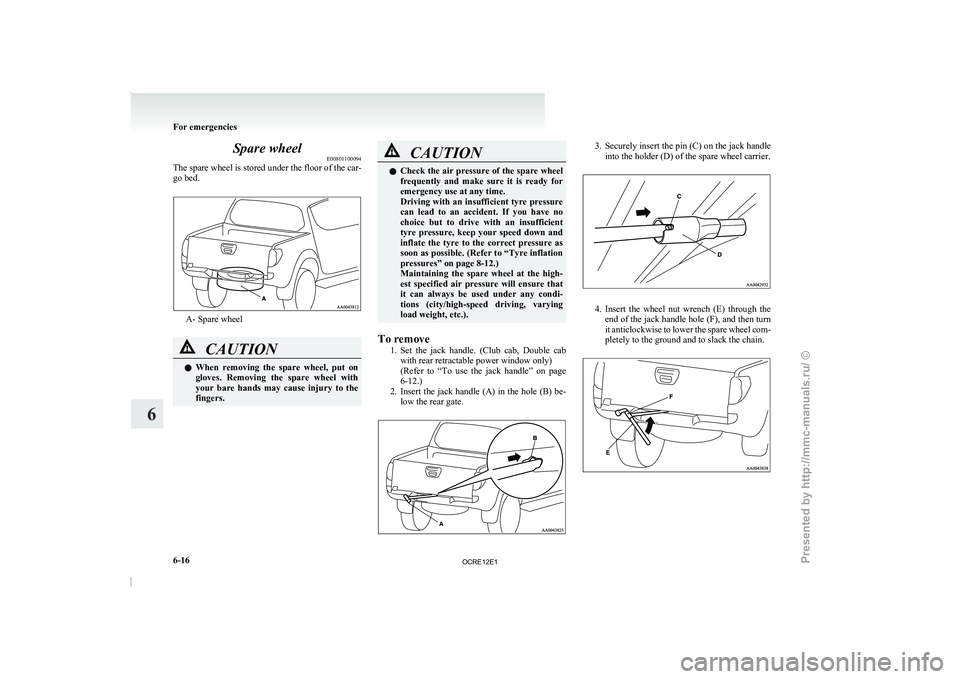
Spare wheel
E00801100094
The spare wheel is stored
under the floor of the car-
go bed. A- Spare wheel
CAUTION
l
When removing the spare
wheel,
put on
gloves. Removing the spare wheel with
your bare hands may cause injury to the
fingers. CAUTION
l
Check the air pressure of
the spare wheel
frequently and make sure it is ready for
emergency use at any time.
Driving with an insufficient tyre pressure
can lead to an accident. If you have no
choice but to drive with an insufficient
tyre pressure, keep your speed down and
inflate the tyre to the correct pressure as
soon as possible. (Refer to “Tyre inflation
pressures” on page 8-12.)
Maintaining the spare wheel at the high-
est specified air pressure will ensure that
it can always be used under any condi-
tions (city/high-speed driving, varying
load weight, etc.).
To remove 1. Set the jack handle. (Club
cab, Double cab
with rear retractable power window only)
(Refer to “To use the jack handle” on page
6-12.)
2. Insert the jack handle (A) in the hole (B) be- low the rear gate. 3. Securely insert the pin (C) on the jack handle
into the holder (D) of the spare wheel carrier. 4. Insert the wheel nut wrench (E) through the
end of the jack
handle hole (F), and then turn
it anticlockwise to lower the spare wheel com-
pletely to the ground and to slack the chain. For emergencies
6-16
6
OCRE12E1
Presented by http://mmc-manuals.ru/ \251
Page 285 of 369

Six wheel nutsCAUTION
l
Never use your foot
or
a pipe extension
for extra force in the wheel nut wrench.
If you do so, you will tighten the nut too
much.
13. Lower and remove the jack, then store the
jack, jack
handle, wheel
nut wrench, flat
tyre, and chocks. Have your damaged tyre re-
paired as soon as possible.
14. Check your tyre inflation pressure. The cor- rect pressures are shown on the door label.
See the illustration. CAUTION
l
The tyre pressure should
be
periodically
checked and maintained at the specified
pressure while the tyre is stowed.
l After changing the tyre and driving the ve-
hicle about 1,000 km (620 miles), retight-
en the wheel nuts to make sure that they
have not come loose.
l If the steering wheel vibrates when driv-
ing after changing the tyre, we recom-
mend you to have the tyres checked for
balance.
l Do not mix one type of tyre with another
or use a different size from the one listed.
This would cause early wear and poor han-
dling. Towing
E00801503640
If your vehicle needs to be towed
If towing is necessary, we
recommend you to have
it done by your MITSUBISHI MOTORS Author-
ized Service Point or a commercial tow truck service.
In the following cases, transport the vehicle using a
tow truck.
l The engine runs but the vehicle does not
move or abnormal noise is produced.
l Inspection of the vehicle’s underside reveals
that oil or some other fluid is leaking.
If a wheel gets stuck in a ditch, do not try to tow
the vehicle. Please contact your MITSUBISHI
MOTORS Authorized Service Point or a commer-
cial tow truck service for assistance.
Only when you cannot receive a towing service
from a MITSUBISHI MOTORS Authorized Serv-
ice Point or commercial tow truck service, tow
your vehicle carefully in accordance with the in-
structions given in “Emergency towing” in this part. For emergencies
6-20
6
OCRE12E1
Presented by http://mmc-manuals.ru/ \251