2011 MITSUBISHI TRITON sunroof
[x] Cancel search: sunroofPage 13 of 369

Interior - front area (Double cab)
E00100203904 1. Lock switch* p. 1-09
2. Electric window control switch* p. 1-08
3. Sunroof switch* p. 1-13
4.
Sunglasses holder p. 5-77
5.
Personal lamps p. 5-74, 8-24, 8-32
6. Digital clock* p. 5-73
7. Inside rear-view mirror p. 4-09
8. Room lamp (front) p. 5-73, 8-24, 8-32
9. Sun visors p. 5-69 Card holder p. 5-69
Vanity mirror p. 5-70
10. Front seats p. 2-03 Seat under tray* p. 5-78
11. Supplemental restraint system (SRS) - side airbag (for front seat)* p. 2-35
12. Bottle holder p. 5-79
13. Floor console box p. 5-76 Accessory socket* p. 5-72
Auxiliary Audio connector (RCA)* p. 5-39
Auxiliary Video connector (RCA)* p. 5-39
14. Supplemental restraint system (SRS) - curtain airbag* p. 2-35
15. Coat hook* p. 5-80
16. Seat belts p. 2-09 Adjustable seat belt anchor (front seats) p. 2-11 OverviewLHD
1
2 3
4
5
6
7
8
9
10
1
1
12
13
14
15 16
OCRE12E1
Presented by http://mmc-manuals.ru/ \251
Page 14 of 369

1. Sunroof switch* p. 1-13
2. Sunglasses holder p. 5-77
3. Personal lamps p. 5-74, 8-24, 8-32 4. Digital clock* p. 5-73
5.
Inside rear-view mirror p. 4-09
6. Room lamp (front) p. 5-73, 8-24, 8-32
7. Lock switch* p. 1-09
8. Electric window control switch* p. 1-08
9. Seat belts p. 2-09 Adjustable seat belt anchor (front seats) p. 2-11
10. Coat hook* p. 5-80
11. Supplemental restraint system (SRS) - curtain airbag* p. 2-35
12. Floor console box p. 5-76 Accessory socket* p. 5-72
Auxiliary Audio connector (RCA)* p. 5-39
Auxiliary Video connector (RCA)* p. 5-39
13. Bottle holder p. 5-79
14. Supplemental restraint system (SRS) - side airbag (for front seat)* p. 2-35
15. Front seats p. 2-03 Seat under tray* p. 5-78
16. Sun visors p. 5-69 Card holder p. 5-69
Vanity mirror p. 5-70 OverviewRHD
1 7
8 9
10
1
1
12
13
14
15 16 2
34
5
6
OCRE12E1
Presented by http://mmc-manuals.ru/ \251
Page 21 of 369

Exterior - front (Double cab)
E00100503981 1. Wiper and washers p. 3-36
2. Rain sensor* p. 3-36
3. Antenna* p. 5-50
4. Sunroof* p. 1-13
5.
Antenna* p. 5-50
6.
Outside rear-view mirrors p. 4-10
7. Fuel tank filler door p. 02
8. Locking and unlocking p. 1-02 Keyless entry system* p. 1-04
9. Side turn-signal lamps p. 3-33, 8-24, 8-28
10. Front turn-signal lamps p. 3-33, 8-24, 8-27
11. Headlamps p. 3-30, 8-24, 3-31 Position lamps p. 3-30, 8-24, 8-27
12. Front fog lamps* p. 3-34, 8-24, 8-28
13. Headlamp washers* p. 3-39
14. Engine compartment p. 9-22 Bonnet p. 8-03 Overview1
2
3 4 5
6 7
8
9
10
1
1
13
14
12
OCRE12E1
Presented by http://mmc-manuals.ru/ \251
Page 30 of 369

Keys..............................................................................................
1-02
Electronic immobilizer (Anti-theft starting system) .....................1-03
Keyless entry system*.................................................................. 1-04
Doors............................................................................................ 1-06
Central door locks* ....................................................................... 1-07
“Child-protection” rear doors (Double cab) .................................1-08
Manual window control* .............................................................. 1-08
Electric window control*..............................................................1-08
Quarter window (Club cab) .......................................................... 1-12
Rear gate ....................................................................................... 1-13
Sunroof* ....................................................................................... 1-13Locking and unlocking
1
OCRE12E1
Presented by http://mmc-manuals.ru/ \251
Page 42 of 369

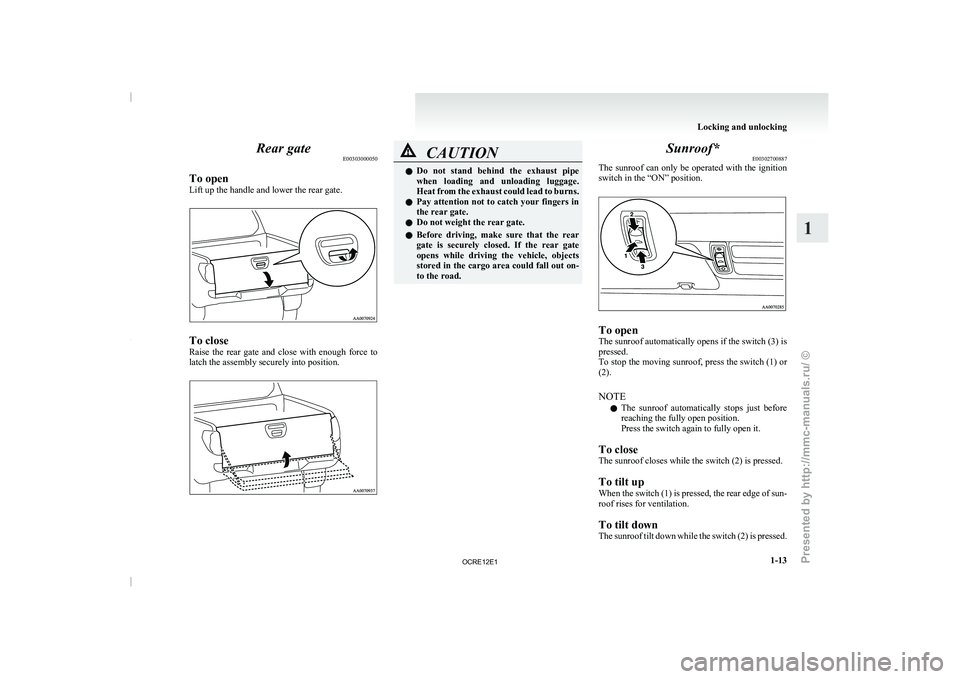
Rear gate
E00303000050
To open
Lift up the handle and lower the rear gate. To close
Raise the rear gate
and
close with enough force to
latch the assembly securely into position. CAUTION
l
Do not stand behind the
exhaust pipe
when loading and unloading luggage.
Heat from the exhaust could lead to burns.
l Pay attention not to catch your fingers in
the rear gate.
l Do not weight the rear gate.
l Before driving, make sure that the rear
gate is securely closed. If the rear gate
opens while driving the vehicle, objects
stored in the cargo area could fall out on-
to the road. Sunroof*
E00302700887
The sunroof can only be
operated with the ignition
switch in the “ON” position. To open
The sunroof automatically opens if the switch (3) is
pressed.
To stop the moving
sunroof,
press the switch (1) or
(2).
NOTE
l The sunroof automatically stops just before
reaching the fully open position.
Press the switch again to fully open it.
To close
The sunroof closes while the switch (2) is pressed.
To tilt up
When the switch (1) is pressed, the rear edge of sun-
roof rises for ventilation.
To tilt down
The sunroof tilt down while the switch (2) is pressed. Locking and unlocking
1-13 1
OCRE12E1
Presented by http://mmc-manuals.ru/ \251
Page 43 of 369

Safety mechanism
E00303800029
If a hand or head
is trapped in the closing sunroof,
it will reopen automatically.
Nonetheless, make sure that nobody puts their head
or hand out of the sunroof when opening or closing.
The opened sunroof will become operational after
a few seconds.
If the safety mechanism is activated 5 or more
times consecutively or the switch (1) is kept press-
ed for 10 seconds or longer with the sunroof station-
ary in the fully tilted up position, normal closing of
the sunroof will be aborted. In such an event, you
should take the following steps: 1. Press the switch (1) repeatedly until the sun-roof has been fully tilt up.
2. Once the fully tilt up position has been reached, press again and hold the switch (1)
for at least 3 seconds.
3. After pressing the switch (3) to perform full opening, press the switch (2) to fully close
the sunroof.
NOTE l The safety mechanism can be activated if the
driving conditions or other circumstances
cause the sunroof to be subjected to a physi-
cal shock similar to that caused by a trapped
hand or head.
l Avoid stopping the sunroof before it reaches
the opening or closing end during operations.
If this should accidentally happen, repeat the
process from step 1. CAUTION
l
The safety mechanism is cancelled
just be-
fore the sunroof is fully closed. This al-
lows the sunroof to close completely.
Therefore be especially careful that no fin-
gers are trapped in the sunroof.
4. Following this action,
it should
be possible
to operate the sunroof in the normal manner.
Sunshade E00307900044
Slide the sunshade manually to open and close it. CAUTION
l
Be careful that hands are
not trapped
when closing the sunshade.
NOTE l The
sunshade will operate together
with the
sunroof when the sunroof is opened. l
Be sure to tilt
down
the sunroof before clos-
ing the sunshade.
l The sunshade cannot be closed with the sun-
roof opened. Do not attempt to close the sun-
shade when the sunroof is opened. WARNING
l Do not put head,
hands
or anything else
out of the sunroof opening while driving
the vehicle.
l Never leave a child (or other person who
might not be capable of safe operation of
the sunroof switch) in the vehicle alone.
l Before operating the sunroof, make sure
that nothing is capable of being trapped
(head, hand, finger, etc.).
NOTE l The
sunroof stops just before
reaching the
fully open position.
If the vehicle is driven with the sunroof in
this position, wind throb is lower than with
the sunroof fully open.
l When leaving the vehicle unattended, make
sure you close the sunroof and remove the ig-
nition key.
l Do not try to operate the sunroof if it is fro-
zen closed (after snow fall or during extreme
cold).
l Do not sit or place heavy luggage on the sun-
roof or roof opening edge.
l Release the switch as soon as the sunroof rea-
ches the fully open or fully closed position. Locking and unlocking
1-14
1
OCRE12E1
Presented by http://mmc-manuals.ru/ \251
Page 44 of 369

l
If the sunroof does
not operate when the sun-
roof switch is operated, release the switch
and check whether something is trapped by
the sunroof. If nothing is trapped, we recom-
mend you to have the sunroof checked.
l Depending on the model of ski carriers or
roof carriers, the sunroof may make contact
with the carrier when the sunroof is tilted up.
Be careful when tilting up the sunroof if such
a ski carrier or a roof carrier is installed.
l Be sure to close the sunroof completely
when washing the vehicle or when leaving
the vehicle.
l Be careful, not to put any wax on the weath-
erstrip (black rubber) around the sunroof
opening. If stained with wax, the weather-
strip cannot maintain a weatherproof seal
with the sunroof.
l After washing the vehicle or after it has
rained, wipe off any water that is on the sun-
roof before operating it.
l Operating the sunroof repeatedly with the en-
gine stationary will run down the battery. Op-
erate the sunroof while the engine is running. Locking and unlocking
1-15 1
OCRE12E1
Presented by http://mmc-manuals.ru/ \251
Page 107 of 369

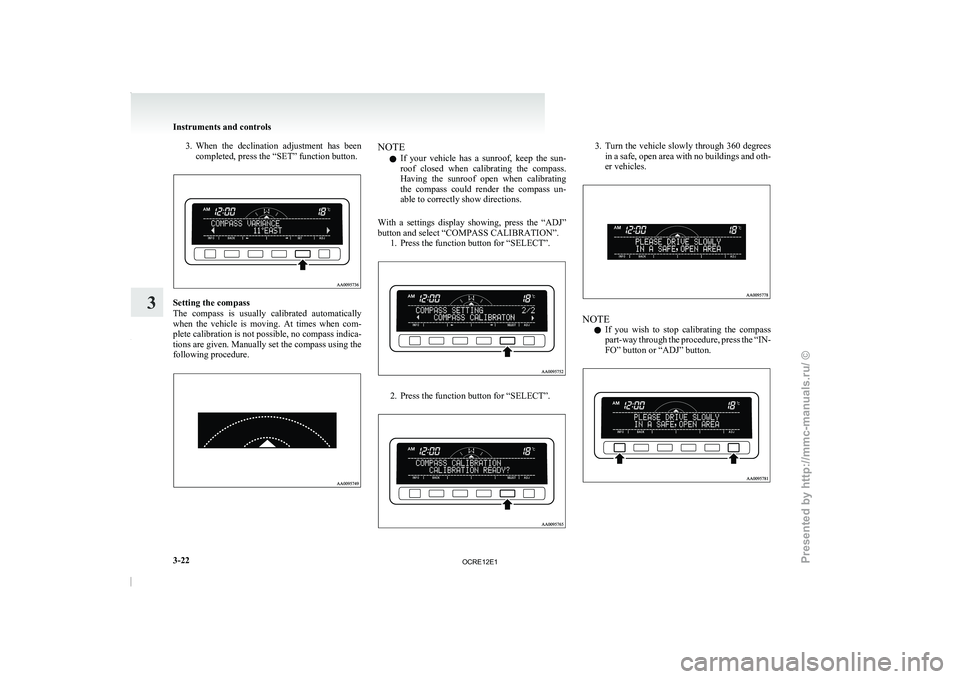
3. When the declination adjustment has been
completed, press the “SET” function button. Setting the compass
The compass is usually
calibrated
automatically
when the vehicle is moving. At times when com-
plete calibration is not possible, no compass indica-
tions are given. Manually set the compass using the
following procedure. NOTE
l If
your vehicle has a
sunroof, keep the sun-
roof closed when calibrating the compass.
Having the sunroof open when calibrating
the compass could render the compass un-
able to correctly show directions.
With a settings display showing, press the “ADJ”
button and select “COMPASS CALIBRATION”. 1. Press the function button for “SELECT”. 2. Press the function button for “SELECT”. 3. Turn the vehicle slowly through 360 degrees
in a safe, open area with no buildings and oth-
er vehicles. NOTE
l If
you wish to stop
calibrating the compass
part-way through the procedure, press the “IN-
FO” button or “ADJ” button. Instruments and controls
3-22
3
OCRE12E1
Presented by http://mmc-manuals.ru/ \251