2011 MITSUBISHI TRITON fuel
[x] Cancel search: fuelPage 299 of 369

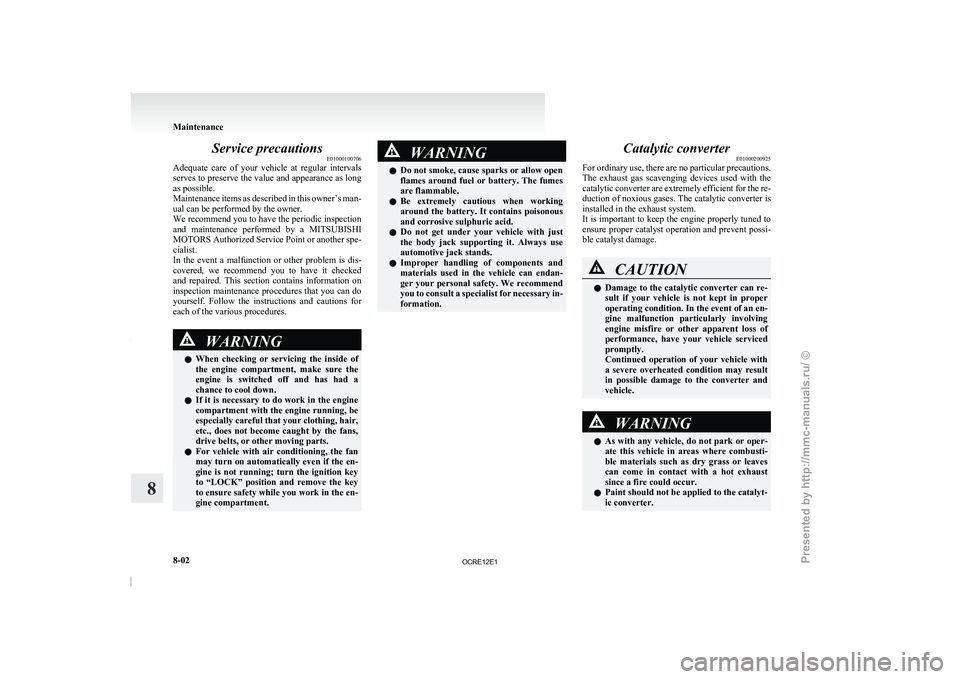
Service precautions
E01000100706
Adequate care of your vehicle
at regular intervals
serves to preserve the value and appearance as long
as possible.
Maintenance items as described in this owner’s man-
ual can be performed by the owner.
We recommend you to have the periodic inspection
and maintenance performed by a MITSUBISHI
MOTORS Authorized Service Point or another spe-
cialist.
In the event a malfunction or other problem is dis-
covered, we recommend you to have it checked
and repaired. This section contains information on
inspection maintenance procedures that you can do
yourself. Follow the instructions and cautions for
each of the various procedures. WARNING
l When checking or servicing
the
inside of
the engine compartment, make sure the
engine is switched off and has had a
chance to cool down.
l If it is necessary to do work in the engine
compartment with the engine running, be
especially careful that your clothing, hair,
etc., does not become caught by the fans,
drive belts, or other moving parts.
l For vehicle with air conditioning, the fan
may turn on automatically even if the en-
gine is not running; turn the ignition key
to “LOCK” position and remove the key
to ensure safety while you work in the en-
gine compartment. WARNING
l Do not smoke, cause sparks
or allow open
flames around fuel or battery. The fumes
are flammable.
l Be extremely cautious when working
around the battery. It contains poisonous
and corrosive sulphuric acid.
l Do not get under your vehicle with just
the body jack supporting it. Always use
automotive jack stands.
l Improper handling of components and
materials used in the vehicle can endan-
ger your personal safety. We recommend
you to consult a specialist for necessary in-
formation. Catalytic converter
E01000200925
For ordinary use, there are
no particular precautions.
The exhaust gas scavenging devices used with the
catalytic converter are extremely efficient for the re-
duction of noxious gases. The catalytic converter is
installed in the exhaust system.
It is important to keep the engine properly tuned to
ensure proper catalyst operation and prevent possi-
ble catalyst damage. CAUTION
l
Damage to the catalytic
converter
can re-
sult if your vehicle is not kept in proper
operating condition. In the event of an en-
gine malfunction particularly involving
engine misfire or other apparent loss of
performance, have your vehicle serviced
promptly.
Continued operation of your vehicle with
a severe overheated condition may result
in possible damage to the converter and
vehicle. WARNING
l As with any vehicle, do
not park or oper-
ate this vehicle in areas where combusti-
ble materials such as dry grass or leaves
can come in contact with a hot exhaust
since a fire could occur.
l Paint should not be applied to the catalyt-
ic converter. Maintenance
8-02
8
OCRE12E1
Presented by http://mmc-manuals.ru/ \251
Page 300 of 369

The catalytic converter itself gets hot quickly, and
may be damaged if overheated.
The following
points should be noted in order to prevent the igni-
tion of unburned fuel within the catalytic converter.
l Do not drive with an extremely low fuel lev-
el; running out of fuel could cause damage to
the catalytic converter.
l Do not switch OFF the ignition switch while
driving.
l Do not attempt to start the engine by pushing
the vehicle. If the battery is weak or dis-
charged, use another battery to start the en-
gine.
l Do not idle the engine for prolonged periods
during very rough idle or malfunctioning op-
erating conditions.
l Do not race the engine when turning off the
ignition switch. This will cause the catalytic
converter to be damaged due to contact with
unburnt fuel.
l Stop driving the vehicle if you think the per-
formance is noticeably low, or if the engine
has a malfunction such as with the ignition,
etc.
If it is impractical to stop driving immediate-
ly, reduce the speed and drive for only a
short time. We recommend you to have your
vehicle inspected as soon as possible.
l In unusual situations involving major engine
problems, a burnt smell may indicate severe
and abnormal catalyst overheating.
If this occurs, the vehicle should be stopped
in a safe place, the engine switched off and
the vehicle allowed to cool. Once the engine
is cool, a service, including a tune-up to man-
ufacturer’s specifications, should be obtained
immediately. Bonnet
E01000302281
To open
Pull the release lever towards
you to unlock the bon-
net. Raise the bonnet while pressing the safety lock.
NOTE
l Only
open the bonnet when
the wipers are in
the parked position. Failure to do so may
cause damage to the bonnet, wiper arms or
front windscreen.
Support the bonnet by inserting the support bar in
its slot. Maintenance
8-03 8LHD RHD
OCRE12E1
Presented by http://mmc-manuals.ru/ \251
Page 302 of 369

7. If the oil level is below the specified limit, re-
move the cap located on the cylinder head
cover and add enough oil to raise the level to
within the specified range. Do not overfill to
avoid engine damage. Be sure to use the speci-
fied engine oil and do not mix various types
of oil.
8. After adding oil, close the cap securely.
9. Confirm the oil level by repeating step 4 to 6.
Use only the recommended oils with an ACEA or
API classification as specified in this manual.
NOTE l Check or refill the oil according to the follow-
ing manner.
• When the oil level is checked in step 6above, check it on a low side of the dip-
stick because it is different in appearance
of oil level in the two sides of the dipstick.
• On vehicles without diesel particulate fil- ter (DPF), the oil level should be within
the range (A) to (B) on the dipstick.
• On vehicles with DPF, the oil level should be within the range (A) to (C) (oil
replacement indication mark) on the dip-
stick.
If the oil level is beyond the oil replace-
ment indication mark (C), replace the oil
as soon as possible.
Then, the oil should be refilled to the max-
imum level (B). • On vehicles with DPF, the engine oil will
increase due to a little fuel getting mixed
in the engine oil when the DPF regener-
ates to burn away the PM (particulate mat-
ter). However, it does not indicate a mal-
function.
l The engine oil will deteriorate rapidly if the
vehicle is subjected to severe conditions, re-
quiring earlier oil replacement. Please refer
to the maintenance schedule.
l For handling of used engine oils, refer to
page 05.
Selection of engine oil
Vehicles without diesel particulate filter (DPF) l
Select engine oil of
the
proper SAE viscosity
number according to the atmospheric temper-
ature.
l Use engine oil conforming to the following
classification:
• ACEA classification:“For service A1/ B1, A3/B3, A3/B4,
A5/B5” • API classification:
“For service CF-4”
NOTE l Use
of additives is not
recommended since
they may reduce the effectiveness of addi-
tives already included in the engine oil. It
may result in failure of the mechanical assem-
bly.
Vehicles with diesel particulate filter (DPF) l
Select engine oil of
the
proper SAE viscosity
number according to the atmospheric temper-
ature.
l Use engine oil conforming to the following
classification:
• ACEA classification:“For service C1, C2, C3 or C4”
• JASO classification: “For service DL-1”
If those classifications are not available, con-
tact a MITSUBISHI MOTORS Authorized
Service Point. Maintenance
8-05 8
OCRE12E1
Presented by http://mmc-manuals.ru/ \251
Page 315 of 369

NOTE
l Do
not allow the wiper
arm to fall onto the
windscreen; it could damage the glass.
3. Attach the retainers (C) to a new wiper blade. Refer to the illustration to ensure that the re-
tainers are correctly aligned as you attach
them. 4. Insert the wiper blade into the arm, starting
with the opposite end
of the blade from the
stopper. Make sure the hook (B) is fitted cor-
rectly in the grooves in the blade.
NOTE l If retainers are not supplied with the new wip-
er blade, use the retainers from the old blade. 5. Push the wiper blade until the hook (B) en-
gages securely with the stopper (A). General maintenance
E01002700113
Fuel, engine coolant, oil and exhaust
gas leakage
Look under the body of
your vehicle to check for
fuel, engine coolant, oil and exhaust gas leaks. WARNING
l If
you
see a
suspicious
fuel leak or if you
smell fuel, do not operate the vehicle; we
recommend you to call for assistance.
Exterior and interior lamp operation
Operate the combination lamp switch
to check that
all lamps are functioning properly.
If the lamps do not illuminate, the probable cause
is a blown fuse or defective lamp bulb. Check the
fuses first. If there is no blown fuses, check the
lamp bulbs.
For information regarding the inspection and re-
placement of the fuses and the lamp bulbs, refer to
“Fuses” on page 8-20 and “Replacement of lamp
bulbs” on page 8-23.
If the fuses and bulbs are all OK, we recommend
you to have your vehicle checked and repaired.
Meter, gauge and indicator/warning
lamps operation
Run the engine to check the operation of all meters,
gauges, and indicator/warning lamps.
If there is anything wrong, we recommend you to
have your vehicle inspected. Maintenance
8-18
8
OCRE12E1
Presented by http://mmc-manuals.ru/ \251
Page 319 of 369

Engine compartment fuse location table
E01008000583Engine compartment fuse location
FrontNo. Symbol Electrical system Ca-
pacity
1 — ——
2 Electric window system
40 A
3 Ignition switch
40 A
4 Air conditioning compres-
sor
10 A
5 Condenser fan motor
20 A No. Symbol Electrical system Ca-
pacity
6 Headlamp high-beam
(left)
10 A
7 Headlamp high-beam
(right)
10 A
8 Headlamp low beam (left)
10 A
9 Headlamp low beam
(right)
10 A
10 Engine control
20 A
11 Alternator
7.5 A
12 Stop lamps
15 A
13 Horn
10 A
14 Automatic transmission
20 A
15 Hazard warning flasher
10 A
16 Fuel pump
15 A
17 Front fog lamps
15 A
18 Audio amp
20 A l
Some fuses may not
be
installed on your ve-
hicle, depending on the vehicle model or spec-
ifications.
l The table above shows the main equipment
corresponding to each fuse. Identification of fuse
E01008100308 Capacity Colour
7.5 A Brown
10 A Red
15 A Blue
20 A Yellow
30 A Green (fuse type)/
Pink (fusible link type)
40 A Green (fusible link type) Fuse replacement
E01007800656
1. Before replacing a fuse, always turn off the
electrical circuit concerned and
place the ig-
nition switch in the “LOCK” position.
2. Pull the fuse lid (A) to remove it.
3. Remove the fuse puller (B) from the fuse lid (A). Maintenance
8-22
8 LHD
OCRE12E1
Presented by http://mmc-manuals.ru/ \251
Page 332 of 369

Vehicle labeling
............................................................................ 9-02
Vehicle dimensions....................................................................... 9-03
Vehicle performance.....................................................................9-09
Vehicle weight .............................................................................. 9-10
Engine specifications .................................................................... 9-15
Transmission specifications .......................................................... 9-16
Electrical system ........................................................................... 9-17
Tyres and wheels.......................................................................... 9-18
Other specifications ...................................................................... 9-19
Fuel consumption ......................................................................... 9-20
Refill capacities ............................................................................ 9-22Specifications
9
OCRE12E1
Presented by http://mmc-manuals.ru/ \251
Page 350 of 369

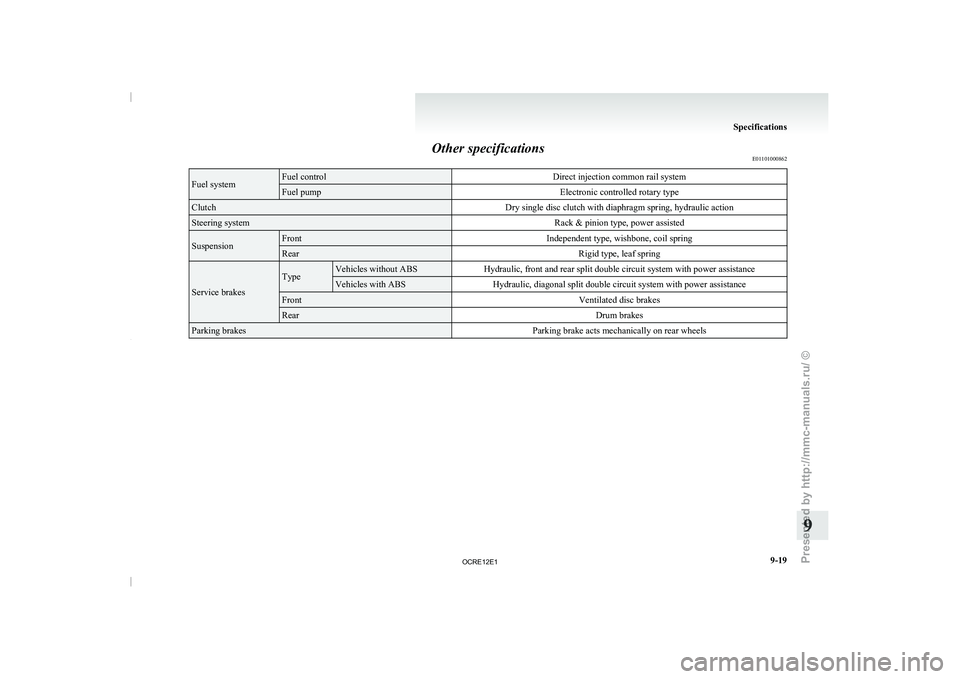
Other specifications
E01101000862Fuel system Fuel control
Direct injection common rail systemFuel pump
Electronic controlled rotary typeClutch
Dry single disc clutch with diaphragm spring, hydraulic actionSteering system
Rack & pinion type, power assistedSuspension Front
Independent type, wishbone, coil springRear
Rigid type, leaf springService brakes Type Vehicles without ABS
Hydraulic, front and rear split double circuit system with power assistance Vehicles with ABS
Hydraulic, diagonal split double circuit system with power assistanceFront
Ventilated disc brakesRear
Drum brakesParking brakes
Parking brake acts mechanically on rear wheels Specifications
9-19 9
OCRE12E1
Presented by http://mmc-manuals.ru/ \251
Page 351 of 369

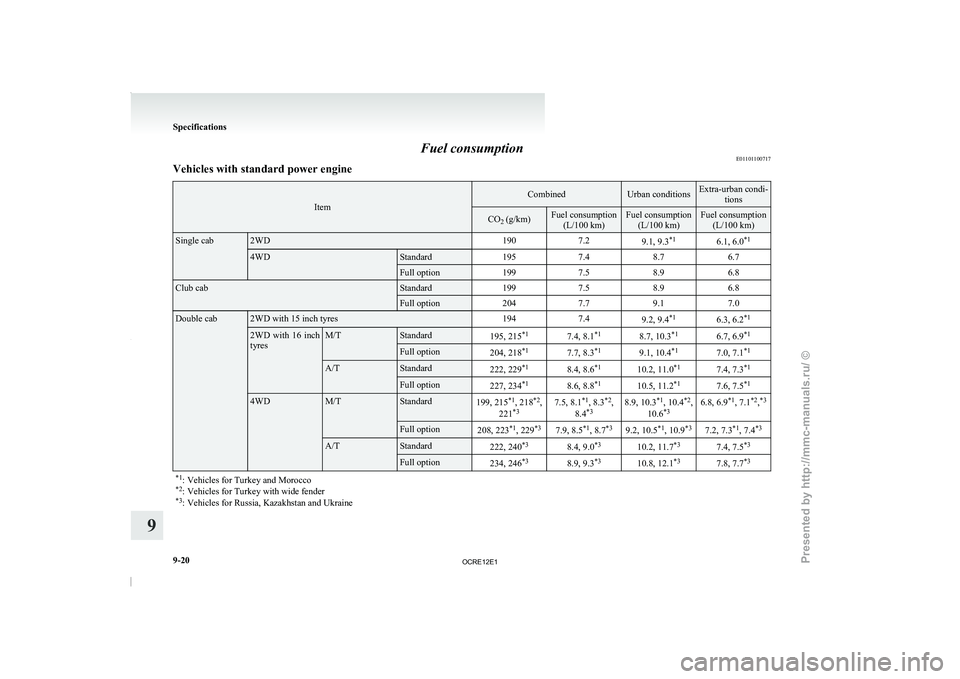
Fuel consumption
E01101100717
Vehicles with standard power engine Item Combined Urban conditions Extra-urban condi-
tions CO
2 (g/km) Fuel consumption
(L/100 km) Fuel consumption
(L/100 km) Fuel consumption
(L/100 km) Single cab 2WD
1907.2
9.1, 9.3*1
6.1, 6.0*1 4WD Standard
1957.48.76.7 Full option
1997.58.96.8Club cab Standard
1997.58.96.8 Full option
2047.79.17.0Double cab 2WD with 15 inch tyres
1947.4
9.2, 9.4*1
6.3, 6.2*1 2WD with 16 inch
tyres M/T Standard
195, 215*1
7.4, 8.1*1
8.7, 10.3*1
6.7, 6.9*1 Full option
204, 218*1
7.7, 8.3*1
9.1, 10.4*1
7.0, 7.1*1 A/T Standard
222, 229*1
8.4, 8.6*1
10.2, 11.0*1
7.4, 7.3*1 Full option
227, 234*1
8.6, 8.8*1
10.5, 11.2*1
7.6, 7.5*1 4WD M/T Standard
199, 215*1
, 218 *2
,
221 *3 7.5, 8.1
*1
, 8.3 *2
,
8.4 *3 8.9, 10.3
*1
, 10.4 *2
,
10.6 *3 6.8, 6.9
*1
, 7.1 *2
,*3 Full option
208, 223*1
, 229 *3
7.9, 8.5 *1
, 8.7 *3
9.2, 10.5 *1
, 10.9 *3
7.2, 7.3 *1
, 7.4 *3 A/T Standard
222, 240*3
8.4, 9.0*3
10.2, 11.7*3
7.4, 7.5*3 Full option
234, 246*3
8.9, 9.3*3
10.8, 12.1*3
7.8, 7.7*3
*1 : Vehicles for Turkey and Morocco
*2 : Vehicles for Turkey with wide fender
*3 : Vehicles for Russia, Kazakhstan and Ukraine Specifications
9-20
9
OCRE12E1
Presented by http://mmc-manuals.ru/ \251