Page 652 of 714
Vehicle care and maintenance
7-55
7
Headlights (low beam, except for vehicles
equipped with high intensity discharge head-
lights)
N00901800033
1. When replacing the bulb on the driver’s side (3.0 liter
models only) remove the bolt (A) holding down the relay
box and move the relay box toward the rear of the vehicle. 2. Turn the bulb (B) counterclockwise to remove it.*- Front of the vehicle
*- Front of the vehicle
BK0122500US.book 55 ページ 2010年5月12日 水曜日 午前11時11分
Page 654 of 714
Vehicle care and maintenance
7-57
7
Headlights (high beam, except for vehicles
equipped with high intensity discharge head-
lights)
N00901900034
1. Turn the cap (A) counterclockwise to remove it.2. Turn the bulb (B) counterclockwise to remove it.*- Front of the vehicle
*- Front of the vehicle
BK0122500US.book 57 ページ 2010年5月12日 水曜日 午前11時11分
Page 656 of 714
Vehicle care and maintenance
7-59
7
Daytime running lights (for vehicles equipped
with high intensity discharge headlights)
N00902000032
1. Turn the cap (A) counterclockwise to remove it.2. Turn the socket (B) counterclockwise to remove it.*- Front of the vehicle
*- Front of the vehicle
BK0122500US.book 59 ページ 2010年5月12日 水曜日 午前11時11分
Page 657 of 714
7-60 Vehicle care and maintenance
7
3. Turn the bulb counterclockwise while pressing it and pull
it out of the socket.
4. To install the bulb, perform the removal steps in reverse.
Headlights (low/high beam, for vehicles equipped
with high intensity discharge headlights)
N00900300073
Do not attempt to disassemble or repair headlights, and do not
attempt to replace their bulbs.Adjustment of headlight aim
N00943200121
The alignment of the headlights should be checked by an
authorized Mitsubishi Motors dealer or a repair facility of your
choice.
WA R N I N G
!�A high voltage is present in the power circuit and in
the bulbs and bulb terminals. To avoid the risk of an
electric shock, contact an authorized Mitsubishi
dealer whenever repair or replacement is necessary.
BK0122500US.book 60 ページ 2010年5月12日 水曜日 午前11時11分
Page 658 of 714
Vehicle care and maintenance
7-61
7
Front side-marker and parking lights
N00917300408
1. When replacing the bulb on the driver’s side (3.0 liter
models only) remove the bolt (A) holding down the relay
box and move the relay box toward the rear of the vehicle.2. Turn the socket (B) counterclockwise to remove it.*- Front of the vehicle
*- Front of the vehicle
BK0122500US.book 61 ページ 2010年5月12日 水曜日 午前11時11分
Page 660 of 714
Vehicle care and maintenance
7-63
7
2. Turn the socket (B) counterclockwise to remove it. 3. Pull the bulb out of the socket.
4. To install the bulb, perform the removal steps in reverse.*- Front of the vehicle
BK0122500US.book 63 ページ 2010年5月12日 水曜日 午前11時11分
Page 662 of 714
Vehicle care and maintenance
7-65
7
Front fog lights
(if so equipped)
N00943600633
1. Turn the bezel (A) counterclockwise to remove it.2. Remove the 3 screws (B) and remove the light unit.*- Front of the vehicle
*- Front of the vehicle
BK0122500US.book 65 ページ 2010年5月12日 水曜日 午前11時11分
Page 664 of 714
Vehicle care and maintenance
7-67
7
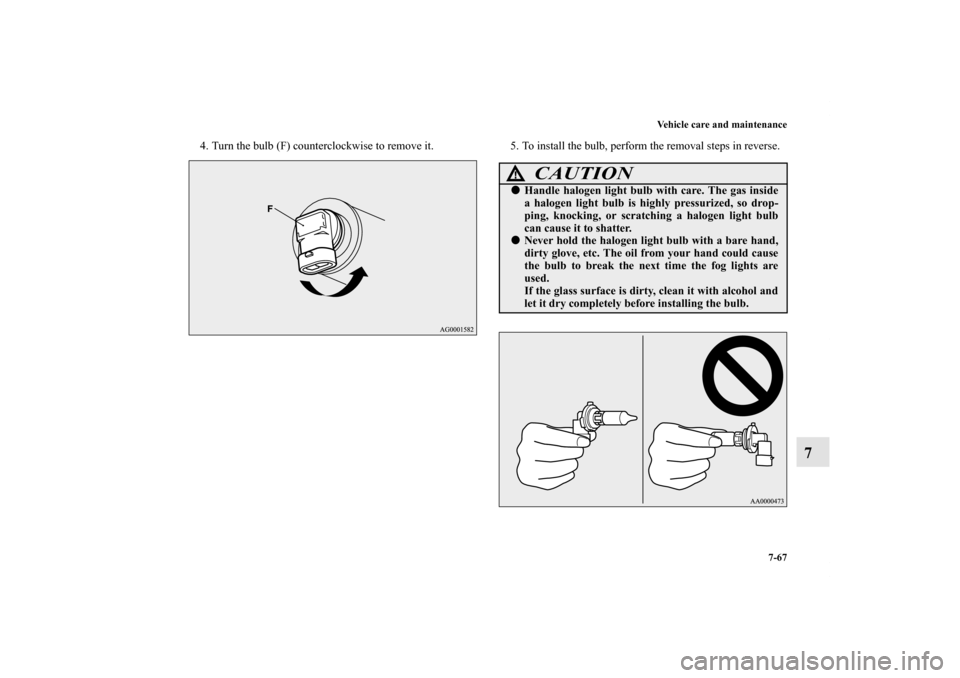
4. Turn the bulb (F) counterclockwise to remove it. 5. To install the bulb, perform the removal steps in reverse.
CAUTION
!�Handle halogen light bulb with care. The gas inside
a halogen light bulb is highly pressurized, so drop-
ping, knocking, or scratching a halogen light bulb
can cause it to shatter.�Never hold the halogen light bulb with a bare hand,
dirty glove, etc. The oil from your hand could cause
the bulb to break the next time the fog lights are
used.
If the glass surface is dirty, clean it with alcohol and
let it dry completely before installing the bulb.
BK0122500US.book 67 ページ 2010年5月12日 水曜日 午前11時11分

N00901800033
1. When replacing the bulb on the driver’s side (3.0")

N00901900034
1. Turn the cap (A) counterclockwise to remove it.2. T")

N00902000032
1. Turn the cap (A) counterclockwise to remove it.2. Turn the")

 remove the bolt (A) holding down the rel")
 counterclockwise to remove it. 3. Pull the bulb out of the socket.
4. To install the bulb, perform the removal steps in reverse.*- Front of t")

N00943600633
1. Turn the bezel (A) counterclockwise to remove it.2. Remove the 3 screws (B) and remove the light unit.*- Front of")