Page 644 of 714

Vehicle care and maintenance
7-47
7
No.
Symbol
Electrical system
Capacity
1 Front fog lights 15 A
2Engine7.5 A
3 Automatic transaxle 20 A
4 Horn 10 A
5 Alternator 7.5 A
6 Headlight washer 20 A
7 Air conditioning 10 A
8ETV/Oil cooler fan
(Twin Clutch SST)15 A
9 Security horn 20 A
10 Wiper deicer 15 A
11 — — —
12 Power gate 30 A
13 Daytime running lights 10 A
14Headlight
(high beam) (left)10 A
15Headlight
(high beam) (right)10 A
16Headlight
(low beam)
(left)Discharge 20 A
17Headlight
(low beam)
(right)Discharge 20 A
18Headlight
(low beam)
(left)Halogen 10 A
19Headlight
(low beam)
(right)Halogen 10 A
20 ENG/POWER 10 A
21 Ignition coil 10 A
22ENG/POWER 20 A
Fuel line heater 25 A
23 Fuel pump 15 A
24 Starter 30 A*
25 — — —
26 Anti-lock braking system 40 A*
27 Anti-lock braking system 30 A*
28Air conditioning condenser fan
motor30 A*
29 Radiator fan 40 A*
30 IOD IOD 30 A
31 Audio amplifier 30 ANo.
Symbol
Electrical system
Capacity
BK0122500US.book 47 ページ 2010年5月12日 水曜日 午前11時11分
Page 647 of 714
7-50 Vehicle care and maintenance
7
4. Use the fuse location diagrams and the matching tables, to
check the fuse that is related to the problem. If the fuse is
not blown, something else must be causing the problem.
Have the system inspected by your authorized Mitsubishi
Motors dealer or a repair facility of your choice.5. Insert a new fuse of the same capacity securely into the
appropriate slot.B- Fuse is OK
C- Blown fuse
CAUTION
!�Never use a fuse with a capacity greater than the one
listed or any substitute, such as wire, foil etc. This
would cause the circuit wiring to heat up and could
cause a fire.�If the replacement fuse blows again after a short
time, have the electrical system checked by an
authorized Mitsubishi Motors dealer or a repair
facility of your choice to find and correct the cause.
BK0122500US.book 50 ページ 2010年5月12日 水曜日 午前11時11分
Page 648 of 714

Vehicle care and maintenance
7-51
7 Replacement of light bulbs
N00942900310
Before replacing the bulb, be sure the light is off. Do not touch
the glass part of the new bulb with your bare fingers; the oil
from your skin will stay on the glass and dim or destroy the
bulb when it gets hot.NOTE�If you are unsure of how to carry out the work as required,
it is recommended that these procedures be carried out by
an authorized Mitsubishi Motors dealer or a repair facility
of your choice.
�Be careful not to scratch the vehicle body when removing
a light and lens.
�When it rains, or when the vehicle has been washed, the
inside of the lens sometimes becomes temporarily foggy.
This is the same phenomenon as when window glass mists
up on a humid day, and does not indicate a functional
problem.
When the light is switched on, the heat will remove the
fog. However, if water gathers inside the light, please
have it checked by an authorized Mitsubishi Motors
dealer or a repair facility of your choice.
Bulb capacity
N00943000132
The bulb should only be replaced with a new bulb with the
same rating and type. The type and rating are listed on the base
of the bulb.Outside
N00950300775
CAUTION
!�Bulbs are extremely hot immediately after being
turned off.
When replacing the bulb, wait for it to cool suffi-
ciently before touching it. You could otherwise be
burned.
BK0122500US.book 51 ページ 2010年5月12日 水曜日 午前11時11分
Page 653 of 714
7-56 Vehicle care and maintenance
7
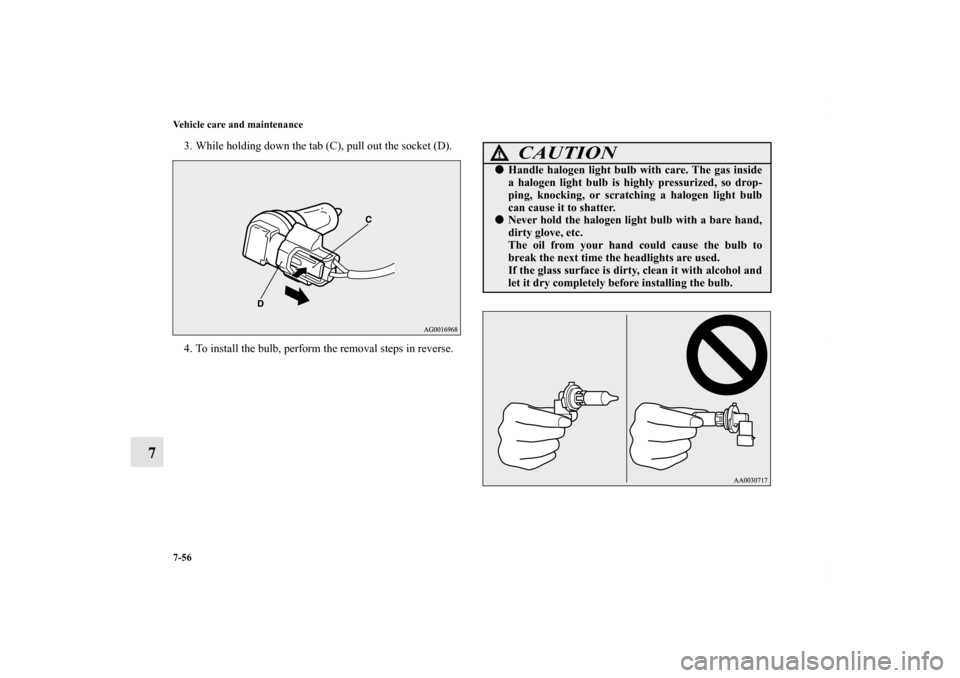
3. While holding down the tab (C), pull out the socket (D).
4. To install the bulb, perform the removal steps in reverse.
CAUTION
!�Handle halogen light bulb with care. The gas inside
a halogen light bulb is highly pressurized, so drop-
ping, knocking, or scratching a halogen light bulb
can cause it to shatter.�Never hold the halogen light bulb with a bare hand,
dirty glove, etc.
The oil from your hand could cause the bulb to
break the next time the headlights are used.
If the glass surface is dirty, clean it with alcohol and
let it dry completely before installing the bulb.
BK0122500US.book 56 ページ 2010年5月12日 水曜日 午前11時11分
Page 655 of 714
7-58 Vehicle care and maintenance
7
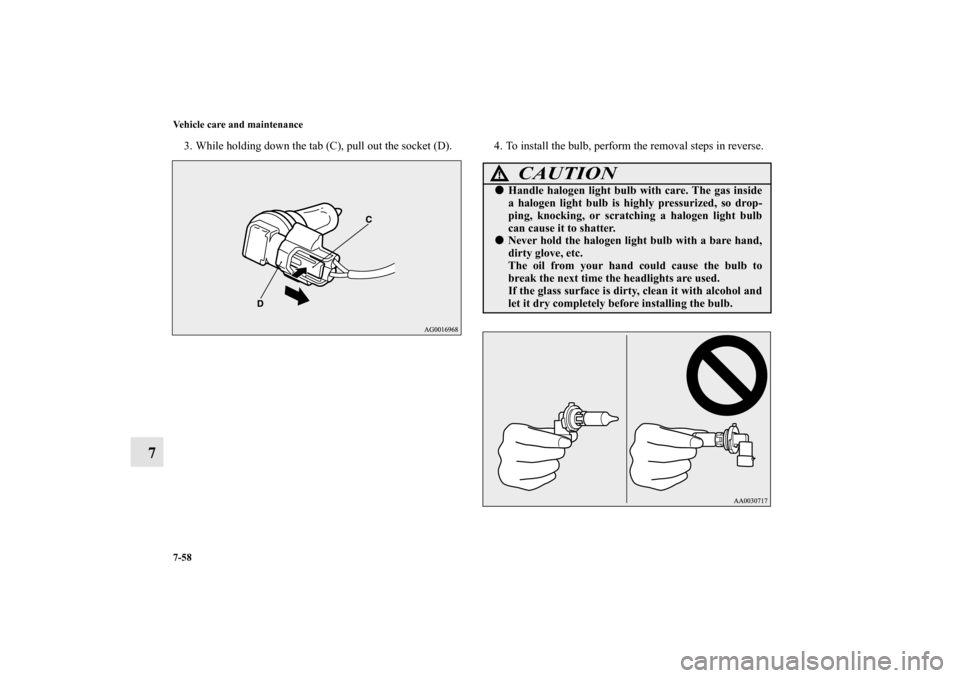
3. While holding down the tab (C), pull out the socket (D). 4. To install the bulb, perform the removal steps in reverse.
CAUTION
!�Handle halogen light bulb with care. The gas inside
a halogen light bulb is highly pressurized, so drop-
ping, knocking, or scratching a halogen light bulb
can cause it to shatter.�Never hold the halogen light bulb with a bare hand,
dirty glove, etc.
The oil from your hand could cause the bulb to
break the next time the headlights are used.
If the glass surface is dirty, clean it with alcohol and
let it dry completely before installing the bulb.
BK0122500US.book 58 ページ 2010年5月12日 水曜日 午前11時11分
Page 664 of 714
Vehicle care and maintenance
7-67
7
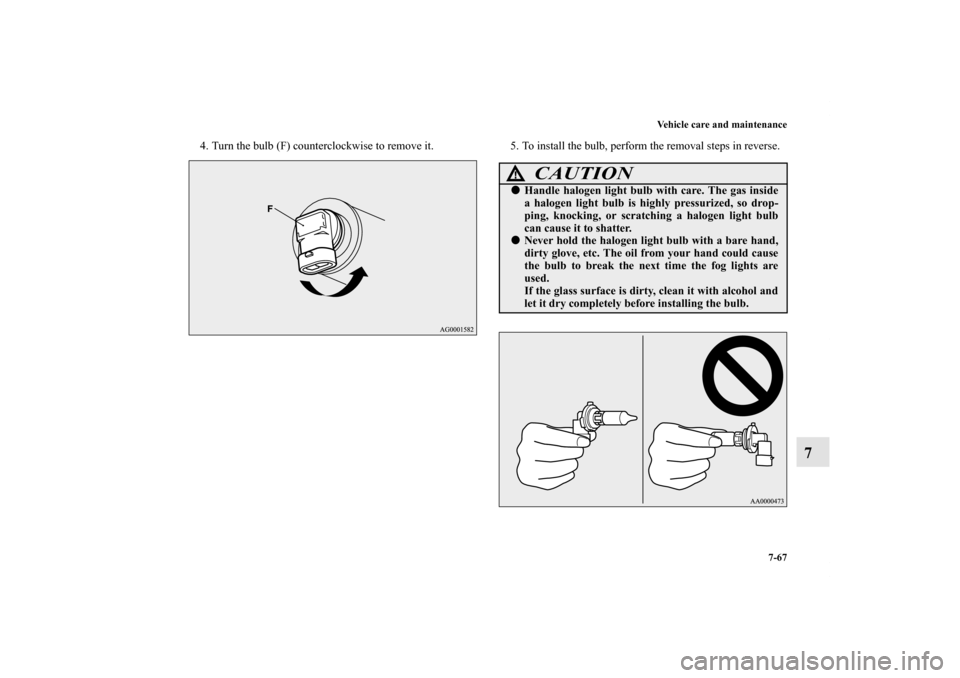
4. Turn the bulb (F) counterclockwise to remove it. 5. To install the bulb, perform the removal steps in reverse.
CAUTION
!�Handle halogen light bulb with care. The gas inside
a halogen light bulb is highly pressurized, so drop-
ping, knocking, or scratching a halogen light bulb
can cause it to shatter.�Never hold the halogen light bulb with a bare hand,
dirty glove, etc. The oil from your hand could cause
the bulb to break the next time the fog lights are
used.
If the glass surface is dirty, clean it with alcohol and
let it dry completely before installing the bulb.
BK0122500US.book 67 ページ 2010年5月12日 水曜日 午前11時11分
Page 679 of 714

7-82 Vehicle care and maintenance
7Cleaning the inside of your vehicle
N00945200095
After washing the inside of your vehicle with any cleaner, wipe
it dry in a shady, well ventilated area.NOTE�Always read the instructions on the cleaner label.Plastic, vinyl leather, fabric and flocked parts
N00945300155
1. Lightly wipe these off with a soft cloth soaked in a 3%
solution of gentle soap and water.
2. To rinse, dip the cloth in fresh water, wring it out well, and
wipe off all the soap.
NOTE�Do not use cleaners, conditioners, and protectants contain-
ing silicones or wax.
Such products, when applied to the instrument panels or
other parts, may cause reflections on the windshield and
obscure vision.
Also, if such products get on the switches of the electrical
accessories, it may lead to failure of these accessories.Upholstery
N00945500128
1. To maintain the value of your new vehicle, maintain the
upholstery carefully and keep the interior clean.
Use a vacuum cleaner and brush to clean the seats. If
stained, vinyl and synthetic leather should be cleaned with
an appropriate cleaner. Cloth fabrics can be cleaned with
either upholstery cleaner or a 3% solution of gentle soap
in lukewarm water.
2. Clean the carpeting with a vacuum cleaner and remove
any stains with carpet cleaner. Oil and grease can be
removed by lightly dabbing with a clean white cloth and
spot remover.NOTE�If fuzzing is difficult to remove from the seat upholstery,
draw a suitable defuzzing brush over the surface in one
direction.
CAUTION
!�Do not use organic substances (solvents, benzine,
kerosene, alcohol, gasoline, etc.) or alkaline or acidic
solutions.
These chemicals can cause discoloring, staining or
cracking of the surface.
If you use cleaners or polishing agents, make sure
their ingredients do not include the substances men-
tioned above.
BK0122500US.book 82 ページ 2010年5月12日 水曜日 午前11時11分
Page 680 of 714

N00945600187
1. To clean, lightly wipe the leather with a soft cloth soaked
in a 5% solution of gentle soap and water.
2. To rinse,")
Vehicle care and maintenance
7-83
7
Genuine leather (if so equipped)
N00945600187
1. To clean, lightly wipe the leather with a soft cloth soaked
in a 5% solution of gentle soap and water.
2. To rinse, dip the cloth in fresh water, wring it out well, and
wipe off all the soap.
3. To preserve and protect, use a leather protecting agent on
the genuine leather surface.NOTE�If genuine leather is wet with water, wipe it with a dry,
soft cloth. If left damp, mildew may grow.
�The genuine leather surface can be damaged if brushed
with a nylon or synthetic fiber brush.
�Organic solvents such as benzine, kerosene, alcohol, gaso-
line, or acid or alkaline solvents can discolor the genuine
leather surface and should not be used.
�Genuine leather can mildew if not kept clean. Clean up
any oil stains immediately.
�The genuine leather surface may harden and shrink if it is
exposed to the direct sunlight for long hours. When your
vehicle is parked, place it in the shade as much as possi-
ble.
�When the temperature of the vehicle interior rises in sum-
mer, vinyl products left on the genuine leather seat may
deteriorate and stick to the seat.
Cleaning the outside of your vehicle
N00945700058
To protect your vehicle’s finish, wash it often and thoroughly.
If desired, you may wax your vehicle using a nonabrasive auto-
mobile wax.Foreign material
N00945800033
Industrial pollution, road tar, bird droppings, tree sap, insect
remains, sea water and other foreign matters can damage the
finish on your vehicle.
Generally, the longer any foreign material stays on the finish,
the worse the damage. Wash your vehicle as soon as possible
whenever the finish gets soiled.Wa s h i n g
N00945900542
Chemicals contained in the dirt and dust picked up from air,
rain, snow, or road surfaces can damage the paint and body of
your vehicle if left on.
Frequent washing and waxing is the best way to protect your
vehicle from this damage.
Do not wash the vehicle in direct sunlight. Park the vehicle in
the shade and spray it with water to remove dust. Next, using
plenty of clean water and a car washing mitt or sponge, wash
the vehicle from top to bottom.
Use a mild car washing soap if necessary. Rinse thoroughly
and wipe dry with a chamois or soft cloth. After washing the
vehicle, carefully clean the joints and flanges of the doors,
hood, etc., where dirt is likely to remain.
BK0122500US.book 83 ページ 2010年5月12日 水曜日 午前11時11分