Page 332 of 714
. The lights will go back to normal when you let
go. While the high")
Features and controls
3-217
3
Headlight flasher
N00550000185
You can flash the high beams by pulling the lever gently
toward you (2). The lights will go back to normal when you let
go. While the high beam is on, you will see a blue light on the
instrument panel.NOTE�You can flash the high beams by pulling the lever toward
you, even if the light switch is off.
�If you turn the lights off with the head lights set to high-
beam illumination, the headlights are automatically
returned to their low-beam setting when the light switch is
next turned to the “ ” position.
Welcome light
N00563200077
This function turns on the front side-marker and parking lights
for about 30 seconds after the UNLOCK button (A) on the
remote control transmitter is pressed when the combination
headlights and dimmer switch is in the “OFF” or “AUTO”
position (for vehicles equipped with the automatic light con-
trol). On vehicles equipped with the automatic light control,
the welcome light function will operate only when it is dark
outside the vehicle.
BK0122500US.book 217 ページ 2010年5月12日 水曜日 午前11時11分
Page 333 of 714
 on the remote control tra")
3-218 Features and controls
3
NOTE�While the welcome light function is operating, perform
one of the following operations to cancel the function.
• Push the LOCK button (B) on the remote control trans-
mitter.
• Turn the combination headlights and dimmer switch to
the “ ” or “ ” position.
• Turn the ignition switch to the “ON” position.
�It is possible to modify functions as follows:
• The headlights can be set to come on in the low beam
setting.
• The welcome light function can be deactivated.
For details, consult a Mitsubishi Motors dealer.
On vehicles equipped with Mitsubishi Multi-Communica-
tion System, screen operations can be used to make the
adjustment.
Refer to separate owner’s manual for details.
Coming home light
N00547300070
This function turns on the headlights in the low beam setting
for about 30 seconds after the ignition switch is turned to the
“LOCK” position.
1. Turn the combination headlights and dimmer switch to the
“OFF” or “AUTO” position (for vehicles equipped with
the automatic light control).
2. Turn the ignition switch to the “LOCK” position. Also, if
a key was used to start the engine, remove the key from
the ignition switch.
3. Within 60 seconds of turning the ignition switch to the
“LOCK” position, pull the turn signal lever toward you.
BK0122500US.book 218 ページ 2010年5月12日 水曜日 午前11時11分
Page 334 of 714

Features and controls
3-219
3
4. The headlights will come on in the low beam setting for
about 30 seconds. After the headlights go off, the head-
lights can be turned on again in the low beam setting for
about 30 seconds by pulling the turn signal lever toward
you within 60 seconds of turning the ignition switch to the
“LOCK” position. To turn on the headlights again after 60
seconds of turning the ignition switch to the “LOCK”
position, repeat the process from step 1.NOTE�While the coming home light function is operating, per-
form one of the following operations to cancel the func-
tion.
• Pull the turn signal lever toward you.
• Turn the combination headlights and dimmer switch to
the “ ” or “ ” position.
• Turn the ignition switch to the “ON” position.
�It is possible to modify functions as follows:
• The time that the headlights remain on can be changed.
• The coming home light function can be deactivated.
For details, consult a Mitsubishi Motors dealer.
On vehicles equipped with Mitsubishi Multi-Communica-
tion System, screen operations can be used to make the
adjustment.
Refer to separate owner’s manual for details.
Headlight leveling switch
(if so equipped)
N00537100075
The direction of the headlight beam (the direction in which the
light shines) alters according to the number of people and the
load in the vehicle. Lower the headlight angle if it is too high
due to the number of people and/or the load in the vehicle so
that the headlights’ glare does not distract the drivers of
approaching vehicles. First set the light switch to the “ ”
position, then turn the headlight leveling switch knob to lower
the beam. The greater the number on the headlight leveling
switch knob, the lower the beam will point.
Set the switch to the appropriate position so that the headlight
beam is level with the road.
BK0122500US.book 219 ページ 2010年5月12日 水曜日 午前11時11分
Page 337 of 714

N00522800348
The front fog lights illuminate only when the headlights are on
low beam.
Turning the knob in the direction of the �")
3-222 Features and controls
3Front fog light switch
(if so equipped)
N00522800348
The front fog lights illuminate only when the headlights are on
low beam.
Turning the knob in the direction of the “ON” position turns on
the front fog lights as well as the indicator in the instrument
cluster. To turn them off, turn the knob in the direction of the
“OFF” position.
The knob will return to the neutral position when it is released.NOTE�If the headlights are switched to high beam, the front fog
lights will go out; they will illuminate again when the
headlights are switched back to low beam.�If the light switch is rotated to the “OFF” or “ ” posi-
tion while the front fog lights are illuminated, they will
automatically turn off. They can be turned back on again
by rotating the combination headlights and dimmer switch
back to “ ” position, and turning the knob in the direc-
tion of the “ON” position.
�Do not use fog lights except in conditions of fog, other-
wise excessive light glare may temporarily blind oncom-
ing vehicle drivers.
BK0122500US.book 222 ページ 2010年5月12日 水曜日 午前11時11分
Page 408 of 714

Driving safety
4-5
4 Safe driving techniques
N00629200094
Even this vehicle’s safety equipment, and your safest driving,
cannot guarantee that you can avoid an accident or injury.
However, if you give extra attention to the following areas, you
can better protect yourself and your passengers:
�Drive defensively. Be aware of traffic, road and weather
conditions. Leave plenty of stopping distance between
your vehicle and the vehicle ahead.
�Before changing lanes, check your mirrors and use your
turn-signal light.
�While driving, watch the behavior of other drivers, bicy-
clists, and pedestrians.
�Always obey applicable laws and regulations. Be a polite
and alert driver. Always leave room for unexpected
events, such as sudden braking.
�If you plan to drive in another country, obey their vehicle
registration laws and make sure you will be able to get the
right fuel.
Driving during cold weather
N00629400373
�Check the battery. At the same time, check the terminals
and wiring. During extremely cold weather, the battery
will not be as strong. Also, the battery power level may
drop because more power is used for cold starting and
driving.
Before driving the vehicle, check to see if the engine runs
at the proper speed and if the headlights are as bright as
normally. Charge or replace the battery if necessary. Dur-
ing extreme cold weather, it is possible that a very low
battery could freeze.
�Warm the engine sufficiently. After starting the engine,
allow a short warm-up time to distribute oil to all cylin-
ders. Then drive your vehicle slowly.
Stay at low speeds at first so that the transaxle, transfer
case and rear axle oil have time to spread to all lubrication
points.
WA R N I N G
!�The battery gives off explosive hydrogen gas. Any
spark or flame can cause the battery to explode,
which could cause serious injury or death.
Always wear protective clothes and a face mask
when working with your battery, or let a skilled
mechanic do it.
BK0122500US.book 5 ページ 2010年5月12日 水曜日 午前11時11分
Page 649 of 714
7-52 Vehicle care and maintenance
7
[For vehicles without high intensity discharge headlights]
[For vehicles equipped with high intensity discharge head-
lights]
Description
Wa t t a g e
ANSI Trade
No. or Bulb
type
1 - Front turn signal light 21 W WY21W
2 - Headlight, high beam 60 W9005
HB3
3 - Headlight, low beam 51 W9006
HB4
4 - Front fog light
(if so equipped)55 W H11
5 - Front side-marker and
parking light5 W WY5W
6 - Side turn signal light
(on fender)
(if so equipped)5 W —
7 - Side turn signal light
(on outside rearview
mirror)
(if so equipped)——
Description
Wattage or Candle
power
ANSI Trade
No. or Bulb
type
1 - Front turn signal light 21 W WY21W
2 - Daytime running light27 W
32 cp11 56
3 - Headlight, low/high
beam
(Discharge bulb)35 W —
4 - Front fog light
(if so equipped)55 W H11
5 - Front side-marker and
parking light5 W WY5W
7 - Side turn signal light
(on outside rearview
mirror)——
BK0122500US.book 52 ページ 2010年5月12日 水曜日 午前11時11分
Page 652 of 714
Vehicle care and maintenance
7-55
7
Headlights (low beam, except for vehicles
equipped with high intensity discharge head-
lights)
N00901800033
1. When replacing the bulb on the driver’s side (3.0 liter
models only) remove the bolt (A) holding down the relay
box and move the relay box toward the rear of the vehicle. 2. Turn the bulb (B) counterclockwise to remove it.*- Front of the vehicle
*- Front of the vehicle
BK0122500US.book 55 ページ 2010年5月12日 水曜日 午前11時11分
Page 653 of 714
7-56 Vehicle care and maintenance
7
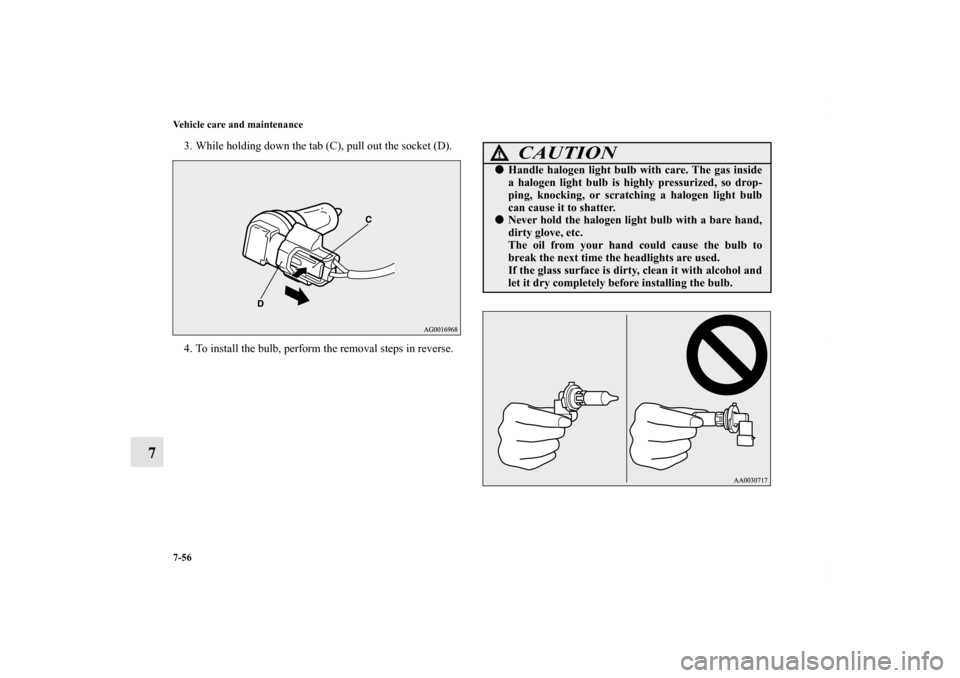
3. While holding down the tab (C), pull out the socket (D).
4. To install the bulb, perform the removal steps in reverse.
CAUTION
!�Handle halogen light bulb with care. The gas inside
a halogen light bulb is highly pressurized, so drop-
ping, knocking, or scratching a halogen light bulb
can cause it to shatter.�Never hold the halogen light bulb with a bare hand,
dirty glove, etc.
The oil from your hand could cause the bulb to
break the next time the headlights are used.
If the glass surface is dirty, clean it with alcohol and
let it dry completely before installing the bulb.
BK0122500US.book 56 ページ 2010年5月12日 水曜日 午前11時11分
![MITSUBISHI OUTLANDER 2011 2.G Owners Manual 7-52 Vehicle care and maintenance
7
[For vehicles without high intensity discharge headlights]
[For vehicles equipped with high intensity discharge head-
lights]
Description
Wa t t a g e
ANSI Tra](/manual-img/19/7521/w960_7521-648.png "MITSUBISHI OUTLANDER 2011 2.G Owners Manual 7-52 Vehicle care and maintenance
7
[For vehicles without high intensity discharge headlights]
[For vehicles equipped with high intensity discharge head-
lights]
Description
Wa t t a g e
ANSI Tra")

N00901800033
1. When replacing the bulb on the driver’s side (3.0")