Page 309 of 706

3-214 Features and controls
3Indicators
N00519900156
Turn signal indicators/Hazard warning lights
N00520000229
The arrows will flash in time with the corresponding exterior
turn signals when the turn signal lever is used.
Both arrows will flash when the hazard warning flasher switch
is pressed.NOTE�If the indicator flashes faster than usual or if the indicator
stays on without flashing, check for a malfunctioning turn
signal light bulb or turn signal connection.High beam indicator
N00520100086
A blue light comes on when the headlights are on high beam.Front fog light indicator
N00520200218
This indicator comes on while the front fog lights are on.Position indicator
N00551300026
This indicator light illuminates while the position lights are on.
Warning lights
N00520300147
Brake warning light
N00520400366
When the ignition switch is turned to the “ON” position, this
indicator normally comes on and goes out a few seconds later.
A warning is also displayed in the multi-information display.
The warning light also illuminates after starting the engine
under the following conditions:
�When the parking brake is still applied.
�When the brake fluid level is low.
�When the brake system circuit is not working properly.
Before driving, be sure that the parking brake is fully released
and brake warning light is off.
CAUTION
!�If the brake warning light and the anti-lock braking
system warning light are illuminated at the same
time, the braking force distribution function will not
operate, so the vehicle may be destabilized during
sudden braking under the following conditions.
• When the brake warning light does not go out even
when the parking brake is released.
• When the brake warning light stays on while driv-
ing.
• If the above occurs, avoid sudden braking and
high-speed driving. Park the vehicle in a safe
place, and contact an authorized Mitsubishi
Motors dealer or a repair facility of your choice as
soon as possible.
BK0125300US.book 214 ページ 2010年5月18日 火曜日 午後1時53分
Page 638 of 706
![MITSUBISHI LANCER SPORTBACK 2011 8.G Owners Manual Vehicle care and maintenance
7-59
7
[For vehicles without high intensity discharge headlights] [For vehicles equipped with high intensity discharge head-
lights]
Description
Wattage
ANSI Trade
No. or](/manual-img/19/7501/w960_7501-637.png "MITSUBISHI LANCER SPORTBACK 2011 8.G Owners Manual Vehicle care and maintenance
7-59
7
[For vehicles without high intensity discharge headlights] [For vehicles equipped with high intensity discharge head-
lights]
Description
Wattage
ANSI Trade
No. or")
Vehicle care and maintenance
7-59
7
[For vehicles without high intensity discharge headlights] [For vehicles equipped with high intensity discharge head-
lights]
Description
Wattage
ANSI Trade
No. or Bulb
type
1-Front turn signal
light21 W WY21W
2- Headlight, high beam 60 W9005
HB3
3-Headlight, low beam
(Halogen bulb)51 W9006
HB4
4- Front fog light 55 W H11
5-Front side-marker
and parking light5 W WY5W
6- Side turn signal light 5 W —
Description
Wattage or Candle
power
ANSI Trade
No. or Bulb
type
1-Front turn signal
light21 W WY21W
2-Daytime running
light27 W
32 cp1156
3-Headlight, low/high
beam (Discharge
bulb)35 W —
4- Front fog light 55 W H11
5-Front side-marker
and parking light5 W WY5W
6- Side turn signal light 5 W —
WA R N I N G
!�Check with an authorized Mitsubishi Motors dealer
or a repair facility of your choice when it is neces-
sary to repair a discharge headlight or to replace the
bulb.
The power circuit, bulb and electrodes generate high
voltages that may cause a severe electrical shock.
BK0125300US.book 59 ページ 2010年5月18日 火曜日 午後1時53分
Page 641 of 706
7-62 Vehicle care and maintenance
7
Headlights (low beam, except for vehicles
equipped with high intensity discharge head-
lights)
N00901800088
1. For vehicles equipped with turbocharger, when replacing
the bulb on the driver’s side, remove the bolt (A) holding
down the relay box and move the relay box toward the
rear of the vehicle.2. For vehicles equipped with turbocharger, when replacing
the bulb on the passenger’s side, lift up the engine coolant
reservoir (B).*- Front of the vehicle
*- Front of the vehicle
BK0125300US.book 62 ページ 2010年5月18日 火曜日 午後1時53分
Page 642 of 706
Vehicle care and maintenance
7-63
7
3. Turn the bulb (C) counterclockwise, and then remove the
headlight bulb with holder.4. While holding down the tab (D), pull out the bulb (E).
5. To install the bulb, perform the removal steps in reverse.*- Front of the vehicle
BK0125300US.book 63 ページ 2010年5月18日 火曜日 午後1時53分
Page 643 of 706
7-64 Vehicle care and maintenance
7
Headlights (high beam, except for vehicles
equipped with high intensity discharge head-
lights)
N00901900047
1. When replacing the bulb on the front passenger’s side,
remove the bolt (A) holding down the washer tank spout
and move the spout toward the rear of the vehicle.
CAUTION
!�Handle halogen light bulb with care. The gas inside
a halogen light bulb is highly pressurized, so drop-
ping, knocking, or scratching a halogen light bulb
can cause it to shatter.�Never hold the halogen light bulb with a bare hand,
dirty glove, etc.
The oil from your hand could cause the bulb to
break the next time the headlights are used.
If the glass surface is dirty, clean it with alcohol and
let it dry completely before installing the bulb.
*- Front of the vehicle
BK0125300US.book 64 ページ 2010年5月18日 火曜日 午後1時53分
Page 645 of 706
7-66 Vehicle care and maintenance
7
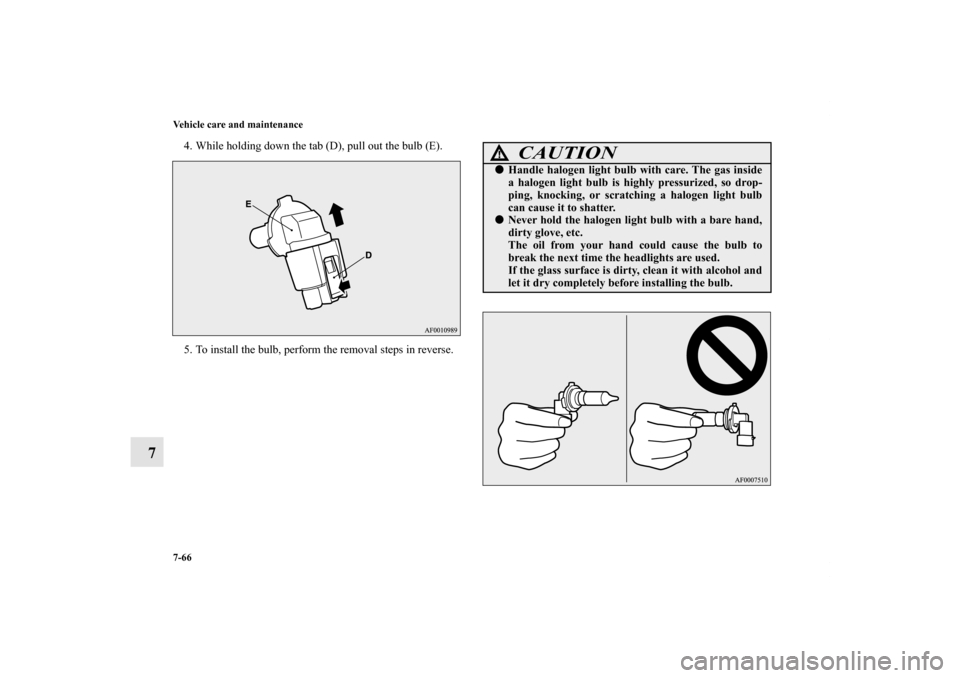
4. While holding down the tab (D), pull out the bulb (E).
5. To install the bulb, perform the removal steps in reverse.
CAUTION
!�Handle halogen light bulb with care. The gas inside
a halogen light bulb is highly pressurized, so drop-
ping, knocking, or scratching a halogen light bulb
can cause it to shatter.�Never hold the halogen light bulb with a bare hand,
dirty glove, etc.
The oil from your hand could cause the bulb to
break the next time the headlights are used.
If the glass surface is dirty, clean it with alcohol and
let it dry completely before installing the bulb.
BK0125300US.book 66 ページ 2010年5月18日 火曜日 午後1時53分
Page 646 of 706
Vehicle care and maintenance
7-67
7
Daytime running lights (for vehicles equipped
with high intensity discharge headlights)
N00900300086
1. When replacing the bulb on the front passenger’s side,
remove the bolt (A) holding down the washer tank spout
and move the spout toward the rear of the vehicle.2. Turn the cap (B) counterclockwise to remove it.*- Front of the vehicle
*- Front of the vehicle
BK0125300US.book 67 ページ 2010年5月18日 火曜日 午後1時53分
Page 648 of 706

N00902000029
Do not attempt to disassemble or repair headlights, and do not")
Vehicle care and maintenance
7-69
7
Headlights (low/high beam, for vehicles equipped
with high intensity discharge lights)
N00902000029
Do not attempt to disassemble or repair headlights, and do not
attempt to replace their bulbs.Adjustment of headlight aim
N00943200121
The alignment of the headlights should be checked by an
authorized Mitsubishi Motors dealer or a repair facility of your
choice.
Front side-marker and parking lights (except for
vehicles equipped with high intensity discharge
headlights)
N00917300495
1. For vehicles equipped with turbocharger, when replacing
the bulb on the driver’s side, remove the bolt (A) holding
down the relay box and move the relay box toward the
rear of the vehicle.
WA R N I N G
!�A high voltage is present in the power circuit and in
the bulbs and bulb terminals. To avoid the risk of an
electric shock, contact an authorized Mitsubishi
dealer whenever repair or replacement is necessary.
*- Front of the vehicle
BK0125300US.book 69 ページ 2010年5月18日 火曜日 午後1時53分

N00901800088
1. For vehicles equipped with turbocharger, when replac")
 counterclockwise, and then remove the
headlight bulb with holder.4. While holding down the tab (D), pull out the bulb (E).
5. To install the bu")

N00901900047
1. When replacing the bulb on the front passenger’s")

N00900300086
1. When replacing the bulb on the front passenger’s side,
re")