Page 213 of 424
N00554300027
HomeLink® Wireless Control System is a registered trademark
of Johnson Controls Inc..
HomeLink® provide")
3-124 Features and controls
3HomeLink® Wireless Control System
(if so
equipped)N00554300027
HomeLink® Wireless Control System is a registered trademark
of Johnson Controls Inc..
HomeLink® provides a convenient way to consolidate the
functions of up to three individual hand-held transmitters into
one built-in device.
HomeLink® will operate most radio frequency devices such as
garage doors, gates, home and office lighting, entry door locks
and security systems.NOTE�Your vehicle’s engine should be turned off while program-
ming HomeLink®.�HomeLink® is powered by your vehicle’s battery. No sep-
arate batteries are required. If the vehicle’s battery is dis-
charged or is disconnected, HomeLink® will retain all
programming.
�Once HomeLink® is programmed, retain the original
transmitter for future programming procedures (for exam-
ple, new vehicle purchases). Upon sale of the vehicle, the
programmed HomeLink® buttons should be erased for
security purposes.
WA R N I N G
!�Do not use HomeLink® with any garage door
opener that lacks safety stop and reverse features as
required by U.S. Federal Regulations. A garage door
opener which cannot detect an object in the path of
a closing garage door and then automatically stop
and reverse, does not meet current U.S. Federal
Regulations. Using a garage door opener without
these features increases the risk of serious injury or
death.�During programming, your garage door or gate may
open or close. Make sure that people and objects are
clear of the garage door or gate that you are pro-
gramming.
BK0121200US.book 124 ページ 2010年4月14日 水曜日 午前11時24分
Page 222 of 424
Features and controls
3-133
3 Cup holder
N00527300263
For the front seatThe cup holder is located in the middle of the floor console.
The cup holder is designed for holding cups or drink-cans
securely in its holes.
For the rear seat
N00537000032
This cup holder is located in the rear seat arm rest (A).
Pull the rear arm rest down to use the cup holder.
CAUTION
!�Do not drink beverages while driving your vehicle.
This is distracting and could cause an accident.
BK0121200US.book 133 ページ 2010年4月14日 水曜日 午前11時24分
Page 223 of 424
3-134 Features and controls
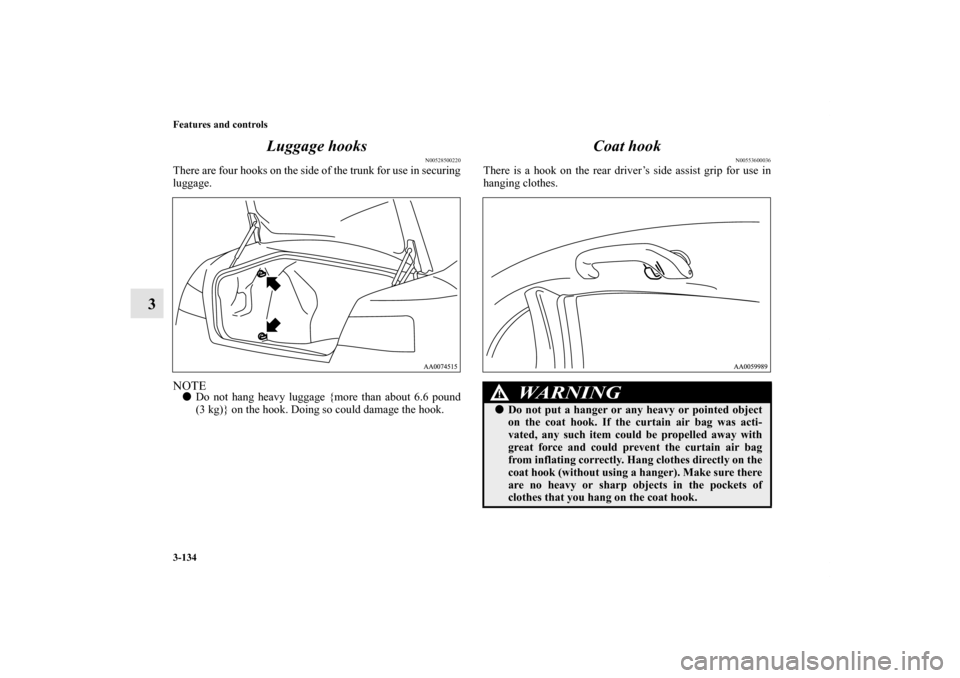
3Luggage hooks
N00528500220
There are four hooks on the side of the trunk for use in securing
luggage.NOTE�Do not hang heavy luggage {more than about 6.6 pound
(3 kg)} on the hook. Doing so could damage the hook.
Coat hook
N00553600036
There is a hook on the rear driver’s side assist grip for use in
hanging clothes.
WA R N I N G
!�Do not put a hanger or any heavy or pointed object
on the coat hook. If the curtain air bag was acti-
vated, any such item could be propelled away with
great force and could prevent the curtain air bag
from inflating correctly. Hang clothes directly on the
coat hook (without using a hanger). Make sure there
are no heavy or sharp objects in the pockets of
clothes that you hang on the coat hook.
BK0121200US.book 134 ページ 2010年4月14日 水曜日 午前11時24分
Page 226 of 424

Driving safety
4-3
4 Vehicle preparation before driving
N00629000597
For a safer and more enjoyable trip, always observe the follow-
ing: Seat belts and seats �Before starting the vehicle, make certain that you and all
passengers are seated and wearing their seat belts properly
(with children in the rear seat, in appropriate restraints),
and that all the doors are locked.
�Move the driver’s seat as far backward as possible, while
still keeping good visibility, and good control of the steer-
ing wheel, brakes, accelerator, and controls. Check the
instrument panel indicators for any possible problem.
�Move the front passenger seat as far back as possible.
�Make sure that infants and small children are properly
restrained in accordance with all laws and regulations.
Floor matAlways properly position floor mat and assure it does not inter-
fere with operation of the pedals.
Always use retaining clip on the driver’s floorboard to secure
the Mitsubishi genuine floor mat. When used, this clip will
help prevent the floor mat from moving forward and possibly
interfering with the operation of the pedals.
To prevent the floor mat from moving forward and possibly
interfering with the operation of the pedals, Mitsubishi genuine
floor mats are recommended.
WA R N I N G
!�Always properly position floor mat and assure it
does not interfere with operation of the pedals.�Always use retaining clip on the driver’s floorboard
to secure the Mitsubishi genuine floor mat.�Always install the mat with the correct side facing
down.�Never install a second mat over an existing floor
mat.
BK0121200US.book 3 ページ 2010年4月14日 水曜日 午前11時24分
Page 266 of 424
 to turn the audio system on and
off. The system turns on in the last mode used.
2. Press the RADIO button (3) to")
Comfort controls
5-29
5
To listen to the radio
N00735000825
1. Press the PWR switch (1) to turn the audio system on and
off. The system turns on in the last mode used.
2. Press the RADIO button (3) to select the desired band
(AM/FM1/FM2).
3. Press the SEEK button (4 or 5) to tune to a station, or
press one of the memory select buttons (2) to tune in to a
station memorized for that button.To tune the radioAutomatic tuning
1. After pressing the SEEK button (4 or 5), reception of the
selected station will begin.
2. Press the SCAN button (6). SCAN indicator (8) will come
on and the radio will tune consecutively to each available
station for about 5 seconds per station. If you want to stop
scanning, press the SCAN button again.
The frequency display of the current station blinks once
per second during SCAN.
Manual tuning
The frequency changes every time the TUNE/FOLDER switch
(7) is turned.
Turn the switch to select the desired station. To enter frequencies into the memoryAs many as 6 AM and 12 FM stations can be entered into the
memory.To store a frequency in the memory, follow these steps:
1. Press the SEEK button (4 or 5), or turn the
TUNE/FOLDER switch (7) to tune to the frequency you
wish to keep in the memory.
2. Press one of the memory select buttons (2) until it beeps.
The sound will be momentarily interrupted while the fre-
quency is being entered into the memory. The number of
the button matching the entry in the memory as well as the
frequency are displayed.
3. The preset memory setting is retrieved by pressing the
button and then releasing it within about 2 seconds.
NOTE�Disconnecting the battery cables erases all the radio sta-
tion settings stored in the memory.
BK0121200US.book 29 ページ 2010年4月14日 水曜日 午前11時24分
Page 280 of 424
 or RADIO button (3) to turn on
the radio.
Press the PWR switch again to switch it off.
2. Press the RADIO butto")
Comfort controls
5-43
5
To listen to the radio
N00735000870
1. Press the PWR switch (1) or RADIO button (3) to turn on
the radio.
Press the PWR switch again to switch it off.
2. Press the RADIO button (3) to select the desired band
(AM/FM1/FM2).
3. Press the SEEK button (4 or 5) to tune to a station, or
press one of the memory select buttons (2) to tune in to a
station memorized for that button.To tune the radioAutomatic tuning
1. After pressing the SEEK button (4 or 5), reception of the
selected station will begin.
2. Press the SCAN button (6). SCAN indicator (8) will come
on and the radio will tune consecutively to each available
station for about 5 seconds per station. If you want to stop
scanning, press the SCAN button again.
The frequency display of the current station blinks once
per second during SCAN.
Manual tuning
The frequency changes every time the TUNE/FOLDER switch
(7) is turned.
Turn the switch to select the desired station. To enter frequencies into the memoryAs many as 6 AM and 12 FM stations can be entered into the
memory.To store a frequency in the memory, follow these steps:
1. Press the SEEK button (4 or 5), or turn the
TUNE/FOLDER switch (7) to tune to the frequency you
wish to keep in the memory.
2. Press one of the memory select buttons (2) until it beeps.
The sound will be momentarily interrupted while the fre-
quency is being entered into the memory. The number of
the button matching the entry in the memory as well as the
frequency are displayed.
3. The preset memory setting is retrieved by pressing the
button and then releasing it within about 2 seconds.
NOTE�Disconnecting the battery cables erases all the radio sta-
tion settings stored in the memory.
BK0121200US.book 43 ページ 2010年4月14日 水曜日 午前11時24分
Page 282 of 424
 or RADIO button (3) to turn on
the radio.
Press the PWR switch again to switch it off.
2. Press the RADIO butto")
Comfort controls
5-45
5
To listen to the radio
N00735000883
1. Press the PWR switch (1) or RADIO button (3) to turn on
the radio.
Press the PWR switch again to switch it off.
2. Press the RADIO button (3) to select the desired band
(AM/FM1/FM2/SAT1/SAT2/SAT3/SAT4).
3. Press the SEEK button (4 or 5) to tune to a station, or
press one of the memory select buttons (2) to tune in to a
station memorized for that button.To tune the radioAutomatic tuning
1. After pressing the SEEK button (4 or 5), reception of the
selected station will begin.
2. Press the SCAN button (6). SCAN indicator (8) will come
on and the radio will tune consecutively to each available
station for about 5 seconds per station. If you want to stop
scanning, press the SCAN button again.
The frequency display of the current station blinks once
per second during SCAN.
Manual tuning
The frequency changes every time the TUNE/FOLDER switch
(7) is turned.
Turn the switch to select the desired station. To enter frequencies into the memoryAs many as 6 AM, 12 FM and 24 SAT stations can be entered
into the memory.To store a frequency in the memory, follow these steps:
1. Press the SEEK button (4 or 5), or turn the
TUNE/FOLDER switch (7) to tune to the frequency you
wish to keep in the memory.
2. Press one of the memory select buttons (2) until it beeps.
The sound will be momentarily interrupted while the fre-
quency is being entered into the memory. The number of
the button matching the entry in the memory as well as the
frequency are displayed.
3. The preset memory setting is retrieved by pressing the
button and then releasing it within about 2 seconds.
NOTE�Disconnecting the battery cables erases all the radio sta-
tion settings stored in the memory.
BK0121200US.book 45 ページ 2010年4月14日 水曜日 午前11時24分
Page 303 of 424
5-66 Comfort controls
5Error codes (SIRIUS Satellite Radio)
N00736100735
If an error code (1) appears in the display, take action in accordance with the table below.
Error display
Problem
Description
Repair
ANT Antenna errorThe antenna may be faulty, not securely con-
nected, or open-circuited.Take the vehicle to your authorized
Mitsubishi Motors dealer or a repair facility
of your choice.
LINKINGCannot pick up sig-
nal.The signal is too weak to be received.Move to a place where the signal is easy to
receive.
CALL 888-539-SIR-
IUSUnauthorized chan-
nelContract does not include reception of this
channel.Contact SIRIUS Satellite Radio and obtain a
contract.
-----
(Hyphen)There is no select-
able channel.There is no selectable channel. Cancel SKIP settings.
BK0121200US.book 66 ページ 2010年4月14日 水曜日 午前11時24分


N00736100735
If an error code (1) appears in the display, take action in accordance with the table below.
Error display
Problem
Description")