Page 223 of 424
3-134 Features and controls
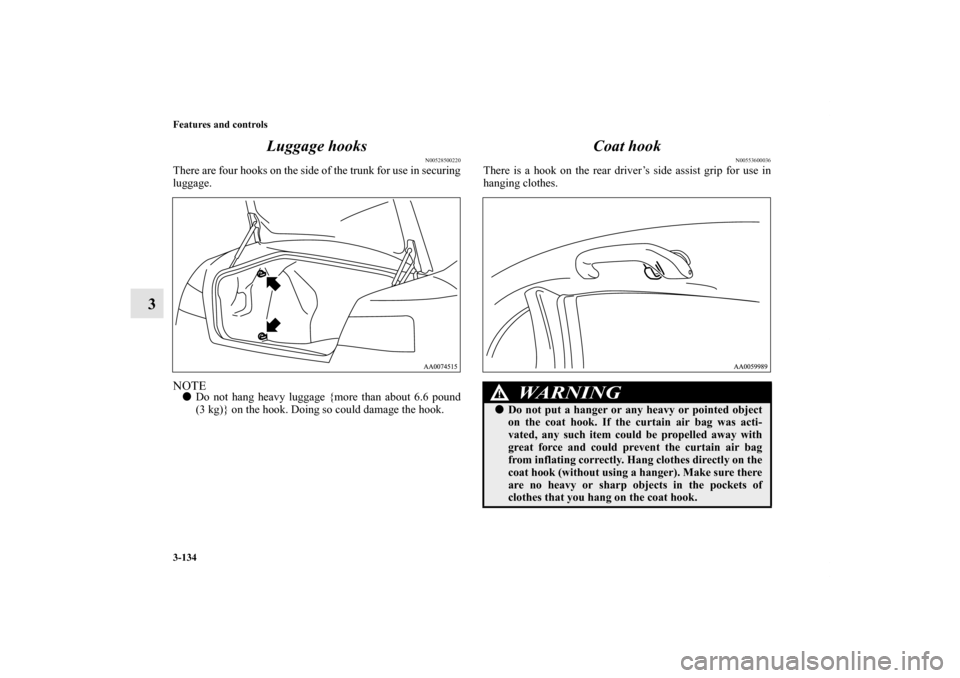
3Luggage hooks
N00528500220
There are four hooks on the side of the trunk for use in securing
luggage.NOTE�Do not hang heavy luggage {more than about 6.6 pound
(3 kg)} on the hook. Doing so could damage the hook.
Coat hook
N00553600036
There is a hook on the rear driver’s side assist grip for use in
hanging clothes.
WA R N I N G
!�Do not put a hanger or any heavy or pointed object
on the coat hook. If the curtain air bag was acti-
vated, any such item could be propelled away with
great force and could prevent the curtain air bag
from inflating correctly. Hang clothes directly on the
coat hook (without using a hanger). Make sure there
are no heavy or sharp objects in the pockets of
clothes that you hang on the coat hook.
BK0121200US.book 134 ページ 2010年4月14日 水曜日 午前11時24分
Page 318 of 424
For emergencies
6-7
6
9. Start the engine, and slowly add coolant, up to the bottom
of the filler neck. Use plain water if you have to (and
replace it with the right coolant as soon as possible).
10. Replace the radiator cap and tighten it fully. Check the
temperature indicator. You can drive when the indicator
returns to the normal zone.
11. Have your vehicle checked by your authorized Mitsubishi
Motors dealer or a repair facility of your choice.
Tools and jack
N00836600308
StorageThe tools and the jack are stowed in the trunk.
Before removing the tools and the jack, lift up the luggage
floor board.1- Tools
2- Jack
3- Jack storage box
BK0121200US.book 7 ページ 2010年4月14日 水曜日 午前11時24分
Page 321 of 424

6-10 For emergencies
6
NOTE�The chocks shown in the illustration do not come with
your vehicle. It is recommended that you purchase chocks
or blocks and keep them in the vehicle for use if needed.
�If chocks or blocks are not available, use stones or any
other objects that are large enough to hold the wheel in
position.
6. Get the jack, bar and wheel nut wrench ready.
Refer to “Tools and jack” on page 6-7.Spare tire information
N00849600243
Compact spare tireThe compact spare tire is designed to save space in the trunk.
Its lighter weight makes it easier to use if a flat tire occurs.
WA R N I N G
!�Tires, including spare tire, degrade over time with
age even when they are not being used. It is recom-
mended that tires over 6 years generally be replaced
even if damage is not obvious.
CAUTION
!�While the compact spare tire is stowed, the inflation
pressure should be checked at least once a month to
assure that it remains at the recommended inflation
pressure. See the tire and loading information plac-
ard attached to the driver’s door sill. Refer to “Tire
and loading information placard” on page 9-3.
�Driving with an improperly inflated tire can cause
an accident. If you have no choice but to drive with
an under-inflated tire, keep your speed down and
avoid sudden steering or braking, if possible. Inflate
the tire to the correct pressure as soon as possible.
Refer to “Tire inflation pressures” on page 7-23.�The compact spare tire should be used only tempo-
rarily. While the compact spare tire is being used,
the tire pressure monitoring system will not function
properly. Have the tire replaced or repaired at an
authorized Mitsubishi Motors dealer or a repair
facility of your choice as soon as possible.�If your vehicle has aluminum type wheels, you can
use the same wheel nuts on the compact spare tire
wheel.�Do not go over 50 mph (80 km/h) when driving with
the compact spare tire.�Avoid fast starting and braking when driving with
the compact spare tire. �Do not drive through automatic car washes and over
obstacles that could possibly damage the underside
of your vehicle. Because the compact spare tire is
smaller than the original tire, there is less clearance
between the ground and your vehicle. �Because the compact spare tire is designed only for
your vehicle, do not use it on any other vehicle.
CAUTION
!
BK0121200US.book 10 ページ 2010年4月14日 水曜日 午前11時24分
Page 381 of 424
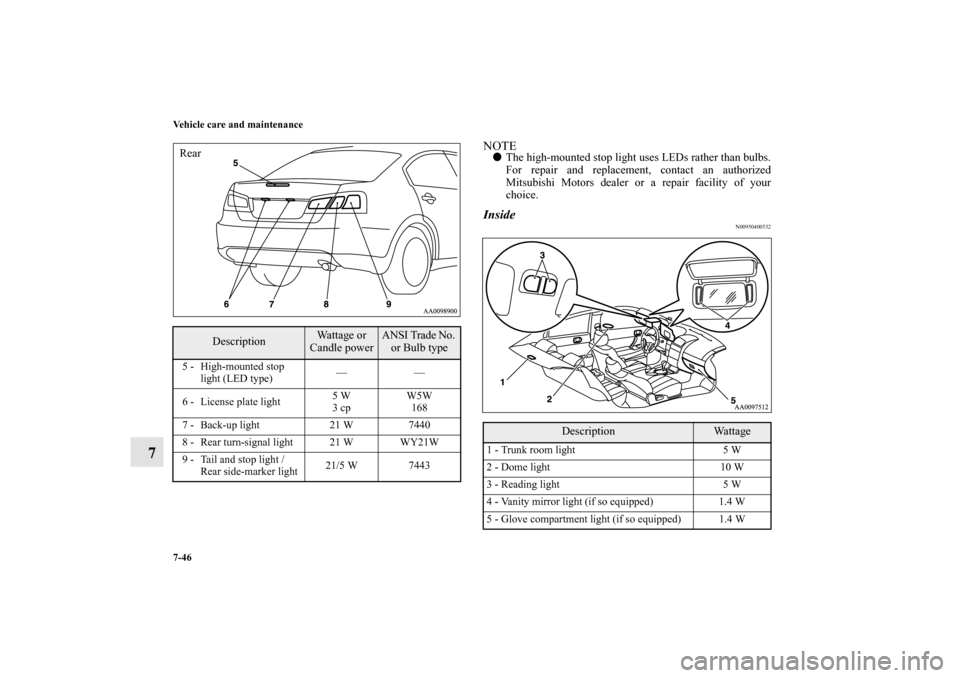
7-46 Vehicle care and maintenance
7
NOTE�The high-mounted stop light uses LEDs rather than bulbs.
For repair and replacement, contact an authorized
Mitsubishi Motors dealer or a repair facility of your
choice.Inside
N00950400532
Description
Wattage or
Candle power
ANSI Trade No.
or Bulb type
5 - High-mounted stop
light (LED type)——
6 - License plate light5 W
3 cpW5W
168
7 - Back-up light 21 W 7440
8 - Rear turn-signal light 21 W WY21W
9 - Tail and stop light /
Rear side-marker light21/5 W 7443Rear
Description
Wa t t a g e
1 - Trunk room light 5 W
2 - Dome light 10 W
3 - Reading light 5 W
4 - Vanity mirror light (if so equipped) 1.4 W
5 - Glove compartment light (if so equipped) 1.4 W
BK0121200US.book 46 ページ 2010年4月14日 水曜日 午前11時24分
Page 389 of 424
7-54 Vehicle care and maintenance
7
Back-up lights
N00901200053
1. Open the trunk lid.
On vehicles equipped with the trunk lid grip, remove the
screws (A), and remove the trunk lid grip (B).2. On vehicles equipped with the cover, remove the clips (C)
by prying with a straight blade (or minus) screwdriver,
and remove the cover (D).
BK0121200US.book 54 ページ 2010年4月14日 水曜日 午前11時24分
Page 392 of 424
Vehicle care and maintenance
7-57
7
License plate light
N00944000373
1. Open the trunk lid.
On vehicles equipped with the trunk lid grip, remove the
screws (A), and remove the trunk lid grip (B).2. On vehicles equipped with the cover, remove the clips (C)
by prying with a straight blade (or minus) screwdriver,
and remove the cover (D).
BK0121200US.book 57 ページ 2010年4月14日 水曜日 午前11時24分
Page 393 of 424
7-58 Vehicle care and maintenance
7
3. Open the trunk lid.
Remove the socket and bulb assembly by turning it coun-
terclockwise.4. Remove the bulb by pulling it out.
5. To install the bulb, perform the removal steps in reverse.
BK0121200US.book 58 ページ 2010年4月14日 水曜日 午前11時24分
Page 395 of 424
7-60 Vehicle care and maintenance
7
Trunk room light
N00944800081
1. Pull both clips (A) away from the center as shown and
remove the light unit. Then remove the bulb by pulling
out.
2. To install the bulb, perform the removal steps in reverse.
Vanity mirror lights
(if so equipped)
N00952800064
1. Insert the tip of a screwdriver at the edge of the lens, pry
gently to remove the lens, and then remove the bulb from
the light holder.NOTE�Wrap a cloth around the tip of the screwdriver to keep
from scratching the lens.
2. To install the bulb, perform the removal steps in reverse.
BK0121200US.book 60 ページ 2010年4月14日 水曜日 午前11時24分
.
10.")
, and remove the trunk lid grip (B).2. On vehi")
, and remove the trunk lid grip (B).2. On")

 away from the center as shown and
remove the light unit. Then remove the bulb by pulling
out.
2. To install the")