Page 246 of 424
 blinks. Press
the air conditioning switch once to turn it off, then")
Comfort controls
5-9
5
NOTE�If a problem is detected in the air conditioning compres-
sor, the air conditioning indicator light (A) blinks. Press
the air conditioning switch once to turn it off, then once
more to turn it back on. If the air conditioning indicator
light does not blink, there is no problem. If it does blink,
have it checked at an authorized Mitsubishi Motors dealer
or a repair facility of your choice.
�Sometimes, for example after using a high-pressure car
wash, the condenser can get wet, and the air conditioning
indicator light (A) blinks temporarily. In this case there is
nothing wrong. Wait for a while, press the air conditioning
switch once to turn the system off, then once more to turn
it back on. Once the water evaporates, the blinking will
stop.
Operating the air conditioning system
N00731100235
Heating Set the mode selection dial to the “ ” position and set the air
selection switch (A) to the outside position.
Turn the temperature control dial clockwise or counterclock-
wise to the desired temperature. Select the desired blower
speed.
BK0121200US.book 9 ページ 2010年4月14日 水曜日 午前11時24分
Page 254 of 424
 will come on.
Push the switch a")
Comfort controls
5-17
5
Air conditioning switch
N00737300330
Push the switch, and the air conditioning compressor will turn
on. The air conditioning indicator light (A) will come on.
Push the switch again and the air conditioning compressor will
stop and the air conditioning indicator light goes off.
NOTE�If a problem is detected in the air conditioning compres-
sor, the air conditioning indicator light (A) blinks. Press
the air conditioning switch once to turn it off, then once
more to turn it back on. If the air conditioning indicator
light does not blink, there is no problem. If it does blink,
have it checked at an authorized Mitsubishi Motors dealer
or a repair facility of your choice.
�Sometimes, for example after using a high-pressure car
wash, the condenser can get wet, and the air conditioning
indicator light (A) blinks temporarily. In this case there is
nothing wrong. Wait for a while, press the air conditioning
switch once to turn the system off, then once more to turn
it back on. Once the water evaporates, the blinking will
stop.
CAUTION
!�Using the air conditioning slightly increases the
engine idle speed. Therefore, make sure your foot is
firmly on the brake pedal when shifting the
transaxle into drive.
(Green)
BK0121200US.book 17 ページ 2010年4月14日 水曜日 午前11時24分
Page 291 of 424
 and the CD mode will be selected,
starting a playback.NOTE�As many as 6 CDs can be inserted into the CD
autochanger.
2")
5-54 Comfort controls
5
To listen to a CD
N00735501029
1. Press the CD button (6) and the CD mode will be selected,
starting a playback.NOTE�As many as 6 CDs can be inserted into the CD
autochanger.
2. To adjust the volume and tone, refer to “To adjust the vol-
ume” on page 5-38 and “To adjust the tone” on page 5-38.
3. To stop the disc, turn off the power by pressing the PWR
switch (4) or switch to the other mode by pressing the
RADIO button (5).NOTE�For information concerning the handling of the compact
discs, refer to “Handling of compact discs” on page 5-68.
To set a discThe indicator light (A) shows the condition of each disc slot.
To set a disc:
1. Press the LOAD/EJECT button (1).
2. Press one of the Disc select buttons (3) to select the disc
which you wish to insert.
3. If there is already a disc loaded in the slot, the disc is auto-
matically ejected. If there is no disc, insert the disc in the
slot (2) after the READY light (B) illuminates.Light off: No disc
Amber: Disc is set
Green: Disc is played (or selected)
BK0121200US.book 54 ページ 2010年4月14日 水曜日 午前11時24分
Page 334 of 424

For emergencies
6-23
6 Operation under adverse driving conditions
N00837200688
If your vehicle becomes stuck in sand, mud or
snow If your vehicle becomes stuck in snow, sand, or mud, it can
often be moved by a rocking motion. Move the selector lever
rhythmically between “Sports mode” and “R” (REVERSE)
position, while pressing lightly on the accelerator pedal.
Do not rev the engine or spin the wheels. Constant efforts to
free a stuck vehicle can cause overheating and transaxle fail-
ure. Let the engine idle for a few minutes to cool the transaxle
before trying again.
If your vehicle is still stuck after several rocking attempts, call
for a commercial tow truck service.
On wet roads
WA R N I N G
!�When trying to rock your vehicle out of a stuck posi-
tion, make sure that there are no people nearby. The
rocking motion can make your vehicle suddenly
lurch forward or backward, and injure any
bystanders.
CAUTION
!�Avoid flooded roads. Water is often deeper than it
looks, and you could be seriously hurt by driving
into flood water. �When driving in rain, on water-covered roads, or
through a car wash, water could get into the brake
discs and make them fail temporarily. In such cases,
lightly press the brake pedal to see if they are work-
ing properly. If they are not, press the pedal lightly
several times while driving to dry the brake pads,
then check them again. �When driving in rain, a layer of water may form
between the tires and the road surface (aquaplan-
ing). This loosens your tires’ grip on the road, mak-
ing it difficult to steer or brake properly. When
driving on a wet road:
• Drive your vehicle at a safe speed.
• Do not drive on worn tires.
• Always keep the tires at the correct inflation pres-
sures.
BK0121200US.book 23 ページ 2010年4月14日 水曜日 午前11時24分
Page 340 of 424
Vehicle care and maintenance
7-5
7
Support the engine hood with the hood prop. Insert the hood
prop securely in the opening under the hood marked with an
arrow.
To closeUnlatch the prop from the engine hood and put it back in its
retainer.
Slowly lower the engine hood about 8 inches (20 cm), then let
it drop from its own weight. NOTE�If this does not close the engine hood properly, drop it
again from a slightly higher position.
�Do not push down strongly on the engine hood. Depend-
ing on how strongly or where you push down, you could
create a dent in the vehicle body.
CAUTION
!�Always insert the support prop into the hole spe-
cially made for it. Propping the engine hood at any
other place could cause the prop to slip out and lead
to an accident. �The hood prop can fall out if the hood is lifted by a
strong wind.
CAUTION
!�Be careful not to trap your hands or fingers when
closing the engine hood.
BK0121200US.book 5 ページ 2010年4月14日 水曜日 午前11時24分
Page 374 of 424
Vehicle care and maintenance
7-39
7
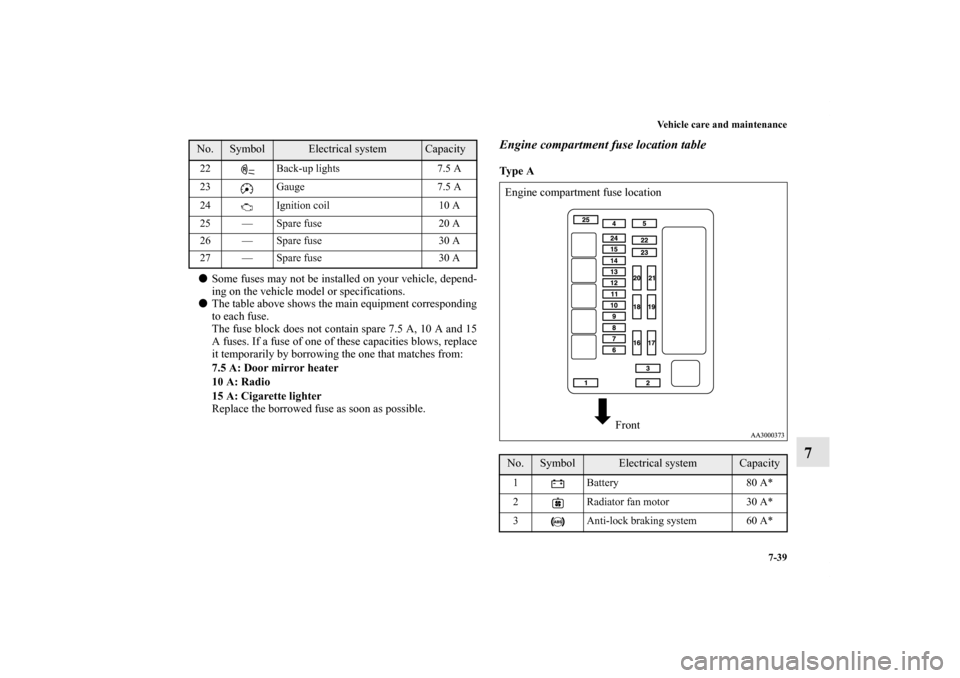
�Some fuses may not be installed on your vehicle, depend-
ing on the vehicle model or specifications.
�The table above shows the main equipment corresponding
to each fuse.
The fuse block does not contain spare 7.5 A, 10 A and 15
A fuses. If a fuse of one of these capacities blows, replace
it temporarily by borrowing the one that matches from:
7.5 A: Door mirror heater
10 A: Radio
15 A: Cigarette lighter
Replace the borrowed fuse as soon as possible.
Engine compartment fuse location tableTy p e A
22 Back-up lights 7.5 A
23 Gauge 7.5 A
24 Ignition coil 10 A
25 — Spare fuse 20 A
26 — Spare fuse 30 A
27 — Spare fuse 30 A No.
Symbol
Electrical system
Capacity
No.
Symbol
Electrical system
Capacity
1 Battery 80 A*
2 Radiator fan motor 30 A*
3 Anti-lock braking system 60 A*Engine compartment fuse location
Front
BK0121200US.book 39 ページ 2010年4月14日 水曜日 午前11時24分
Page 381 of 424
7-46 Vehicle care and maintenance
7
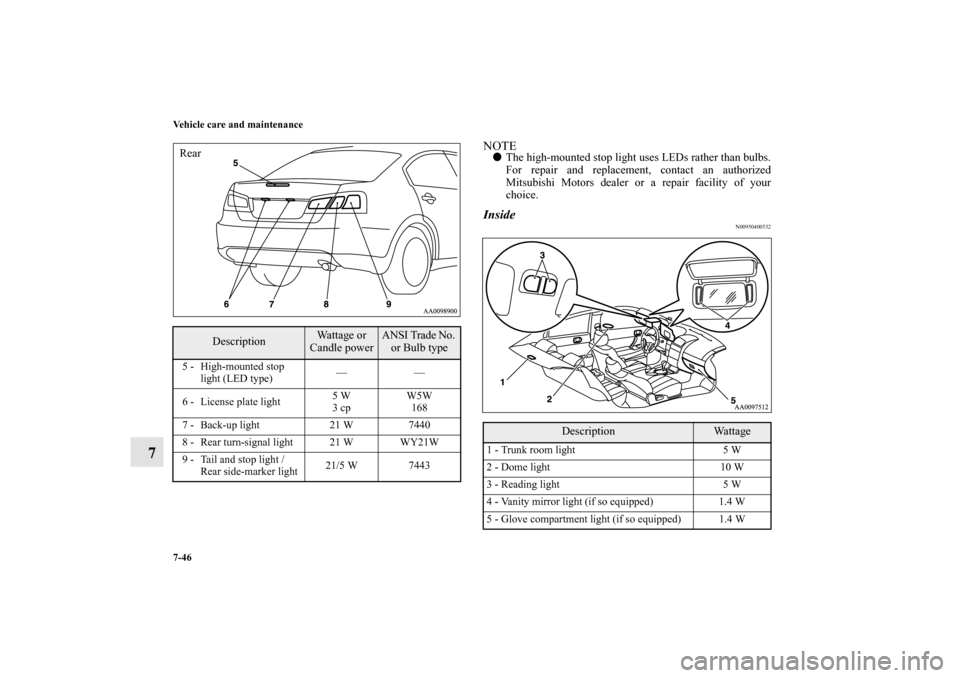
NOTE�The high-mounted stop light uses LEDs rather than bulbs.
For repair and replacement, contact an authorized
Mitsubishi Motors dealer or a repair facility of your
choice.Inside
N00950400532
Description
Wattage or
Candle power
ANSI Trade No.
or Bulb type
5 - High-mounted stop
light (LED type)——
6 - License plate light5 W
3 cpW5W
168
7 - Back-up light 21 W 7440
8 - Rear turn-signal light 21 W WY21W
9 - Tail and stop light /
Rear side-marker light21/5 W 7443Rear
Description
Wa t t a g e
1 - Trunk room light 5 W
2 - Dome light 10 W
3 - Reading light 5 W
4 - Vanity mirror light (if so equipped) 1.4 W
5 - Glove compartment light (if so equipped) 1.4 W
BK0121200US.book 46 ページ 2010年4月14日 水曜日 午前11時24分
Page 389 of 424
7-54 Vehicle care and maintenance
7
Back-up lights
N00901200053
1. Open the trunk lid.
On vehicles equipped with the trunk lid grip, remove the
screws (A), and remove the trunk lid grip (B).2. On vehicles equipped with the cover, remove the clips (C)
by prying with a straight blade (or minus) screwdriver,
and remove the cover (D).
BK0121200US.book 54 ページ 2010年4月14日 水曜日 午前11時24分

, and remove the trunk lid grip (B).2. On vehi")