Page 383 of 424
7-48 Vehicle care and maintenance
7
3. Remove the locking cap (D) by turning it counterclock-
wise.4. Remove the headlight bulb (E) with holder.
5. To install the bulb, perform the removal steps in reverse.
BK0121200US.book 48 ページ 2010年4月14日 水曜日 午前11時24分
Page 384 of 424
Vehicle care and maintenance
7-49
7
Adjustment of headlight aim
N00943200121
The alignment of the headlights should be checked by an
authorized Mitsubishi Motors dealer or a repair facility of your
choice.
CAUTION
!�Handle halogen light bulb with care. The gas inside
a halogen light bulb is highly pressurized, so drop-
ping, knocking, or scratching a halogen light bulb
can cause it to shatter.�Never hold the halogen light bulb with a bare hand,
dirty glove, etc. The oil from your hand could cause
the bulb to break the next time the headlights are
used.
If the glass surface is dirty, clean it with alcohol and
let it dry completely before installing the bulb.
BK0121200US.book 49 ページ 2010年4月14日 水曜日 午前11時24分
Page 385 of 424
7-50 Vehicle care and maintenance
7
Front turn-signal and parking lights
N00917300424
1. Turn the bulb socket counterclockwise to remove it. And
remove the bulb from the socket by turning it counter-
clockwise while pressing in.
2. To install the bulb, perform the removal steps in reverse.
Front side-marker lights
N00943400282
1. Turn the bulb socket counterclockwise to remove it. And
remove the bulb from the socket by pulling out.
2. To install the bulb, perform the removal steps in reverse.
BK0121200US.book 50 ページ 2010年4月14日 水曜日 午前11時24分
Page 386 of 424
Vehicle care and maintenance
7-51
7
Front fog lights
(if so equipped)
N00943600691
1. Remove the clips (A) and screws (B), then remove the
cover (C).2. Remove the socket and bulb assembly (D) by turning it
counterclockwise.
BK0121200US.book 51 ページ 2010年4月14日 水曜日 午前11時24分
Page 387 of 424
7-52 Vehicle care and maintenance
7
3. Pull part (E) in the direction of the arrow (F) to undo the
lock, thereby freeing the fog light bulb from the connec-
tor.
4. To install the bulb, perform the removal steps in reverse.
CAUTION
!�Handle halogen light bulb with care. The gas inside
a halogen light bulb is highly pressurized, so drop-
ping, knocking, or scratching a halogen light bulb
can cause it to shatter.�Never hold the halogen lights bulb with a bare hand,
dirty glove, etc. The oil from your hand could cause
the bulb to break the next time the fog lights are
used.
If the glass surface is dirty, clean it with alcohol and
let it dry completely before installing the bulb.
BK0121200US.book 52 ページ 2010年4月14日 水曜日 午前11時24分
Page 388 of 424
Vehicle care and maintenance
7-53
7
Rear combination lights
N00943700416
1. Open the lid.
Partially take off the trim cover (A).2. Remove each socket and bulb assembly by turning it
counterclockwise.
3. To install the bulb, perform the removal steps in reverse.
B- Rear turn-signal light
Remove the bulb by pulling it out.
C- Tail and stop light
Remove the bulb by pulling it out.
BK0121200US.book 53 ページ 2010年4月14日 水曜日 午前11時24分
Page 390 of 424
Vehicle care and maintenance
7-55
7
3. Remove the socket and bulb assembly by turning it coun-
terclockwise.4. Remove the bulb by pulling it out.E- Back-up light
BK0121200US.book 55 ページ 2010年4月14日 水曜日 午前11時24分
Page 391 of 424
7-56 Vehicle care and maintenance
7
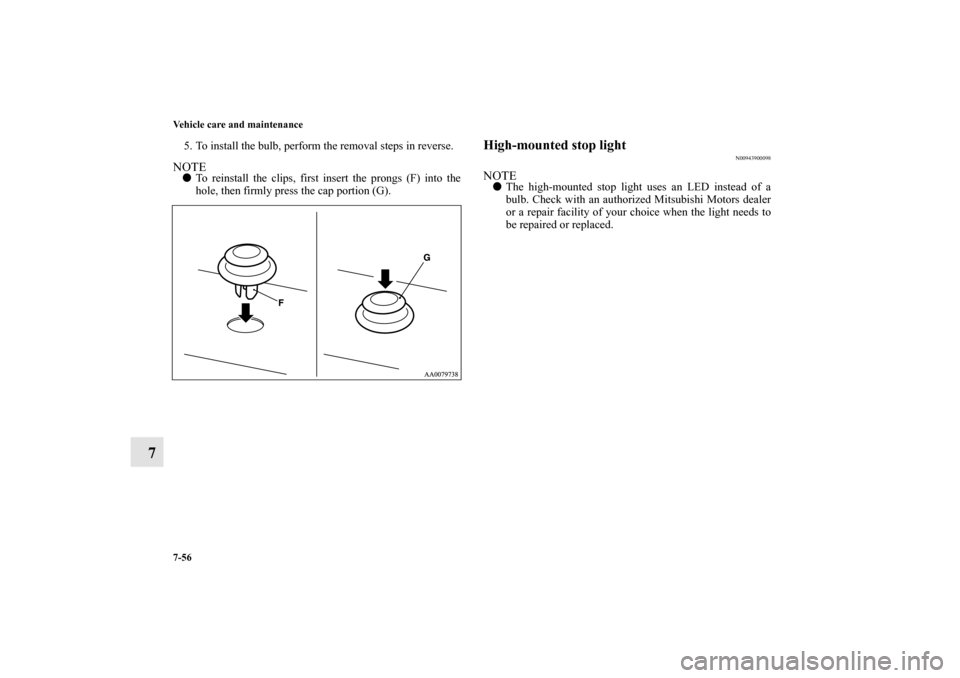
5. To install the bulb, perform the removal steps in reverse.NOTE�To reinstall the clips, first insert the prongs (F) into the
hole, then firmly press the cap portion (G).
High-mounted stop light
N00943900098
NOTE�The high-mounted stop light uses an LED instead of a
bulb. Check with an authorized Mitsubishi Motors dealer
or a repair facility of your choice when the light needs to
be repaired or replaced.
BK0121200US.book 56 ページ 2010年4月14日 水曜日 午前11時24分
 by turning it counterclock-
wise.4. Remove the headlight bulb (E) with holder.
5. To install the bulb, perform the removal steps in re")


N00943600691
1. Remove the clips (A) and screws (B), then remove the
cover (C).2. Remove the socket and bulb assembly (D) by turn")
 in the direction of the arrow (F) to undo the
lock, thereby freeing the fog light bulb from the connec-
tor.
4. To install the bulb, perform the r")
.2. Remove each socket and bulb assembly by turning it
counterclockwise.")