2011 MITSUBISHI COLT remote control
[x] Cancel search: remote controlPage 4 of 274

Instruments and controlsE00100104085
Except for Clear Tec (LHD)123456789101213111. Steering wheel audio remote control switch* p. 5-28
2. Combination headlamps and dipper switch p. 3-20 Turn-signal lever p. 3-23
Headlamp levelling switch p. 3-22
3. Instruments p. 3-02
4. Windscreen wiper and washer switch p. 3-25 Rear window wiper and washer switch p. 3-29
5. Cruise control switch* p. 4-32
6. Ignition switch p. 4-10
7. Supplemental restraint system (SRS) - airbag (for driver’s seat) p. 2-22
Horn switch p. 3-30
8. Steering wheel height adjustment p. 4-07
9. Bonnet release lever p. 8-03
10. Fuses p. 8-19
11. Rear fog lamp switch p. 3-24
12. Electric remote-controlled outside rear-view mirrors switch* p. 4-09
13. Front fog lamp switch* p. 3-24
Overview
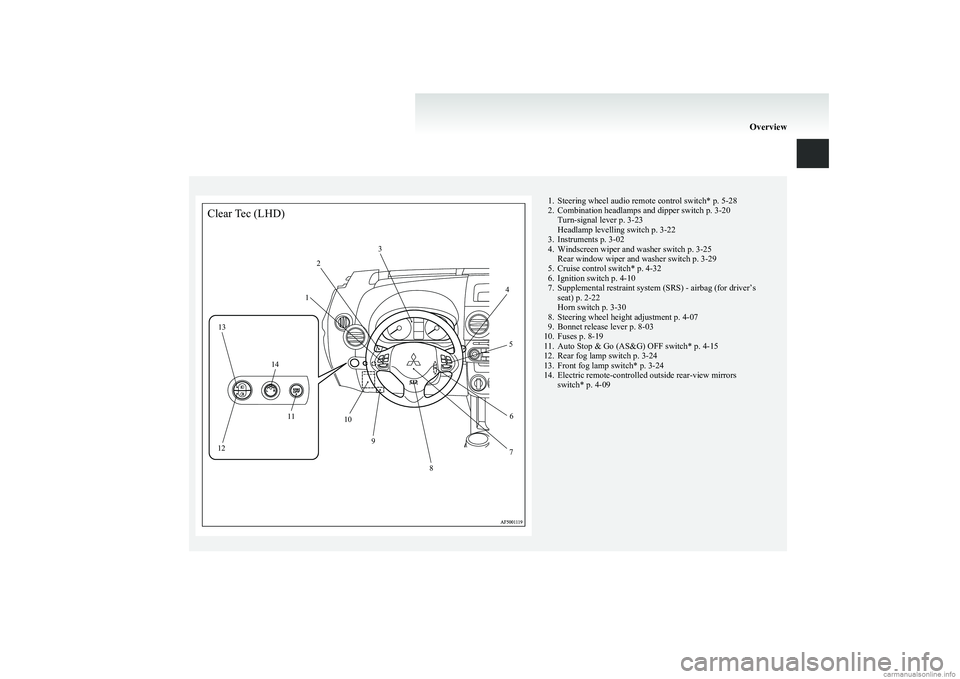
Page 5 of 274

1. Steering wheel audio remote control switch* p. 5-28
2. Combination headlamps and dipper switch p. 3-20 Turn-signal lever p. 3-23
Headlamp levelling switch p. 3-22
3. Instruments p. 3-02
4. Windscreen wiper and washer switch p. 3-25 Rear window wiper and washer switch p. 3-29
5. Cruise control switch* p. 4-32
6. Ignition switch p. 4-10
7. Supplemental restraint system (SRS) - airbag (for driver’s seat) p. 2-22
Horn switch p. 3-30
8. Steering wheel height adjustment p. 4-07
9. Bonnet release lever p. 8-03
10. Fuses p. 8-19
11. Auto Stop & Go (AS&G) OFF switch* p. 4-15
12. Rear fog lamp switch p. 3-24
13. Front fog lamp switch* p. 3-24
14. Electric remote-controlled outside rear-view mirrors switch* p. 4-09
OverviewClear Tec (LHD)12
3
4
5
6
7
8
9
10
11
12 13
14
Page 6 of 274

Except for Clear Tec (RHD)1235467891011121. Instruments p. 3-02
2. Windscreen wiper and washer switch p. 3-25 Rear window wiper and washer switch p. 3-29
3. Cruise control switch* p. 4-32
4. Front fog lamp switch* p. 3-24
5. Electric remote-controlled outside rear-view mirrors switch* p. 4-09
6. Rear fog lamp switch p. 3-24
7. Ignition switch p. 4-10
8. Bonnet release lever p. 8-03
9. Steering wheel height adjustment p. 4-07
10. Supplemental restraint system (SRS) - airbag (for driver’s seat) p. 2-22
Horn switch p. 3-30
11. Steering wheel audio remote control switch* p. 5-28
12. Combination headlamps and dipper switch p. 3-20 Turn-signal lever p. 3-23
Headlamp levelling switch p. 3-22
Overview
Page 7 of 274

Clear Tec (RHD)123456789101112131. Instruments p. 3-02
2. Windscreen wiper and washer switch p. 3-25 Rear window wiper and washer switch p. 3-29
3. Cruise control switch* p. 4-32
4. Electric remote-controlled outside rear-view mirrors switch* p. 4-09
5. Front fog lamp switch* p. 3-24
6. Rear fog lamp switch p. 3-24
7. Auto Stop & Go (AS&G) OFF switch* p. 4-15
8. Bonnet release lever p. 8-03
9. Ignition switch p. 4-10
10. Steering wheel height adjustment p. 4-07
11. Supplemental restraint system (SRS) - airbag (for driver’s seat) p. 2-22
Horn switch p. 3-30
12. Steering wheel audio remote control switch* p. 5-28
13. Combination headlamps and dipper switch p. 3-20 Turn-signal lever p. 3-23
Headlamp levelling switch p. 3-22
Overview
Page 31 of 274

•When the key grip contacts metal of an-
other key (Type B)
• When the key contacts or is close to other
immobilizing keys (including keys of oth-
er vehicles) (Type C)
In cases like these, remove the object or
additional key from the vehicle key. Then
try again to start the engine. If the engine
does not start, we recommend you to con-
tact your MITSUBISHI MOTORS Au-
thorized Service Point.NOTE
l If you lose your key, order a key from your
MITSUBISHI MOTORS Authorized Service
Point as soon as possible.
To obtain a replacement or extra spare key,
take your vehicle and all remaining keys to
your MITSUBISHI MOTORS Authorized
Service Point. All the keys have to be re-reg-
istered in the immobilizer computer unit.
The immobilizer can register up to 8 differ-
ent keys for use.CAUTIONl Do not modify or add parts to the immo-
bilizer system. Doing so could cause the
immobilizer to malfunction.Keyless entry system E00300301831
Press the remote control switch, and all doors and
the tailgate will be locked or unlocked as desired.
1- LOCK switch
2- UNLOCK switch
To lock
Press the LOCK switch (1). All doors and the tail-
gate will be locked. When they are locked with the
turn-signal lamps blink once.
NOTE l With a vehicle that has a Dead Lock System,
pressing the LOCK switch (1) two times in
succession causes the Dead Lock System to
be set. (Refer to “Setting the system” on
page 1-07.)
To unlock
Press the UNLOCK switch (2). All doors and the
tailgate will be unlocked.
If they are unlocked while the room lamp is not il-
luminated, the room lamp will be turned on for ap-
proximately 15 seconds and the turn-signal lamps
will blink twice.
Locking and unlocking
1-03
1
Page 32 of 274

NOTEl If the UNLOCK switch (2) is pressed and
any of the doors or tailgate is not opened with-
in approximately 30 seconds: relocking will
automatically occur.
l It is possible to modify functions as follows:
For further information, contact your
MITSUBISHI MOTORS Authorized Service
Point. •The time from pressing the UNLOCK
switch (2) to the moment of automatic
locking can be changed.
• The confirmation function (flashing of
the turn-signal lamps) can be set to oper-
ate only when the doors and tailgate are
locked or only when the doors and tail-
gate are unlocked.
• The confirmation function (this indicates
locking or unlocking of the doors and tail-
gate with the flash of the turn-signal
lamps) can be deactivated.
• The number of times the turn-signal
lamps are flashed by the confirmation
function can be changed.
Operation of the Dead Lock System
With a vehicle that has a Dead Lock System, it is
possible to set the Dead Lock System using the re-
mote controller.
(Refer to “Dead Lock System” on page 1-07.)
NOTE l With a vehicle that has a Dead Lock System,
the keyless entry system does not work while
the key is in the ignition switch.l Pressing the LOCK switch (1) has no effect
(no locking takes place) while a door or the
tailgate is open.
l The remote control switch will operate with-
in about 4 m from the vehicle. However, the
operating range of the remote control switch
may change if the vehicle is located near a
TV transmitting tower, power station, or ra-
dio broadcasting station.
l If the turn-signal lamps flash nine times
when you press the remote control switch,
the battery may have run down. For further
information, please consult your
MITSUBISHI MOTORS Authorized Service
Point.
If you replace the battery yourself, refer to
“ Procedure for replacing the remote control
switch battery” on page 1-04.
l If your remote control switch is lost or dam-
aged, please contact your MITSUBISHI
MOTORS Authorized Service Point for a re-
placement remote control switch.
l If you wish to add a remote control switch,
we recommend you to contact your
MITSUBISHI MOTORS Authorized Service
Point.
A maximum of 8 remote control switches are
available for your vehicle.Procedure for replacing the remote
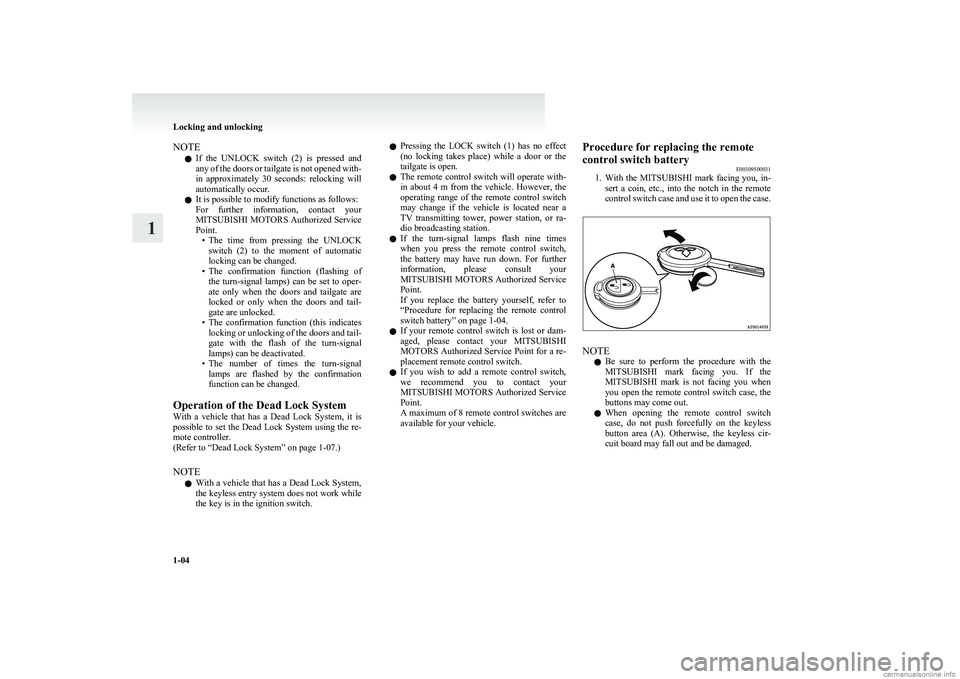
control switch battery E00309500031
1. With the MITSUBISHI mark facing you, in-
sert a coin, etc., into the notch in the remote
control switch case and use it to open the case.
NOTE
l Be sure to perform the procedure with the
MITSUBISHI mark facing you. If the
MITSUBISHI mark is not facing you when
you open the remote control switch case, the
buttons may come out.
l When opening the remote control switch
case, do not push forcefully on the keyless
button area (A). Otherwise, the keyless cir-
cuit board may fall out and be damaged.
Locking and unlocking
1-04
1
Page 33 of 274

2.Insert a straight blade (or minus) screwdriver
into the notch in the remote control switch
case (B) and remove the old battery.
3. Install a new battery with the + side (C)
down, and then close the remote control
switch case firmly.
+ side- sideCoin type battery
CR2016
NOTE
l Make sure you hear a “click” when you in-
stall the battery and close the case.
4. Check the keyless entry system to see that it
works.
NOTE l You may purchase a replacement battery at
an electric appliance store.
l A MITSUBISHI MOTORS
Authorized Serv-
ice Point can replace the battery for you if
you prefer.CAUTIONl When the remote control switch case is
opened, be careful to keep water, dust,
etc. out. Also, do not touch the internal
components.Doors E00300401890CAUTIONlMake sure the doors are closed: driving
with doors incompletely closed is danger-
ous.
l Never leave children in the vehicle unat-
tended.
l Be careful not to lock the doors while the
key is inside the vehicle.
To lock or unlock with the key
1- Insert or remove the key
2- Lock
3- Unlock
Locking and unlocking
1-05
1
Page 113 of 274

Manual remote-controlled outside rear-view mir-
rors*
Adjust the mirror position by operating the lever as
indicated by the arrows.
1- Up
2- Down
3- Right
4- Left
Electric remote-controlled outside rear-view mir-
rors* E00610900054
The electric remote-controlled outside rear-view
mirrors can be operated when the ignition switch is
in the “ON” or “ACC” position. 1.Turn the switch to the same side as the mir-
ror whose adjustment is desired.
L- Left outside mirror adjustment
R- Right outside mirror adjustment
NOTE l After adjustment, return the switch to centre
position.
2. Adjust the mirror by moving the switch left,
right, up or down.
1- Up
2- Down
3- Right
4- Left
To fold the mirror E00601100454
The outside mirror can be folded in towards the
side window to prevent damage when parking in
narrow areas.Heated mirror* E00601200413
When the rear window demister switch is pressed,
the outside rear-view mirrors are demisted or de-
frosted. Current will flow through the heater ele-
ment inside the mirrors, thus clearing away frost or
condensation.
Starting and driving
4-09
4