2011 MINI Countryman bulb
[x] Cancel search: bulbPage 52 of 254

CONTROLSDriving
50
on the steering wheel. The transmission auto-
matically switches to manual mode.
If you do not shift gears with the shift paddles or
accelerate for a certai n amount of time, the
transmission automatically returns to D, auto-
matic drive.
> Pull one of the shift paddles.
Transmission shifts up.
> Push one of the shift paddles.
Transmission shifts down.
M1 through M6 are displayed in the tachometer.
Manually releasing the selector lever
lock
Should the selector lever refuse to move out of
position P even though the ignition is switched
on, the brake is depressed and the button on the
selector lever is pressed, the selector lever lock
can be overridden:
1. Unclip the sleeve of the selector lever.
2. Pull the sleeve up over the selector lever
until the sleeve is inside out. Disconnect the
cable connector if necessary.
3. Insert extractor hook 1 into the loop on the
passenger's side. 4.
Pull the loop up.
5. Move the selector lever into the desired
position by pressing the button on the front
of the selector lever.
Before manually unlocking the selector
lever lock, firmly set the parking brake to
prevent the vehicle from rolling away. <
Turn signals/
headlamp flasher
1Turn signal
2 Headlamp flasher
Using turn signals
Press the lever beyond the resistance point.
To turn off manually, press the lever to the resis-
tance point. Unusually rapid flashi ng of the indicator
lamp indicates that an indicator bulb has
failed. <
Indicating a turn briefly
Press the lever as far as the resistance point for
as long as you wish to indicate a turn.
Triple turn signal activation
Press the lever as far as the resistance point.
You can set whether the turn signal flashes once
or three times.
1."Settings"
2. "Lighting"
Page 210 of 254

MOBILITYReplacing components
208
Replacing components
Wiper blades
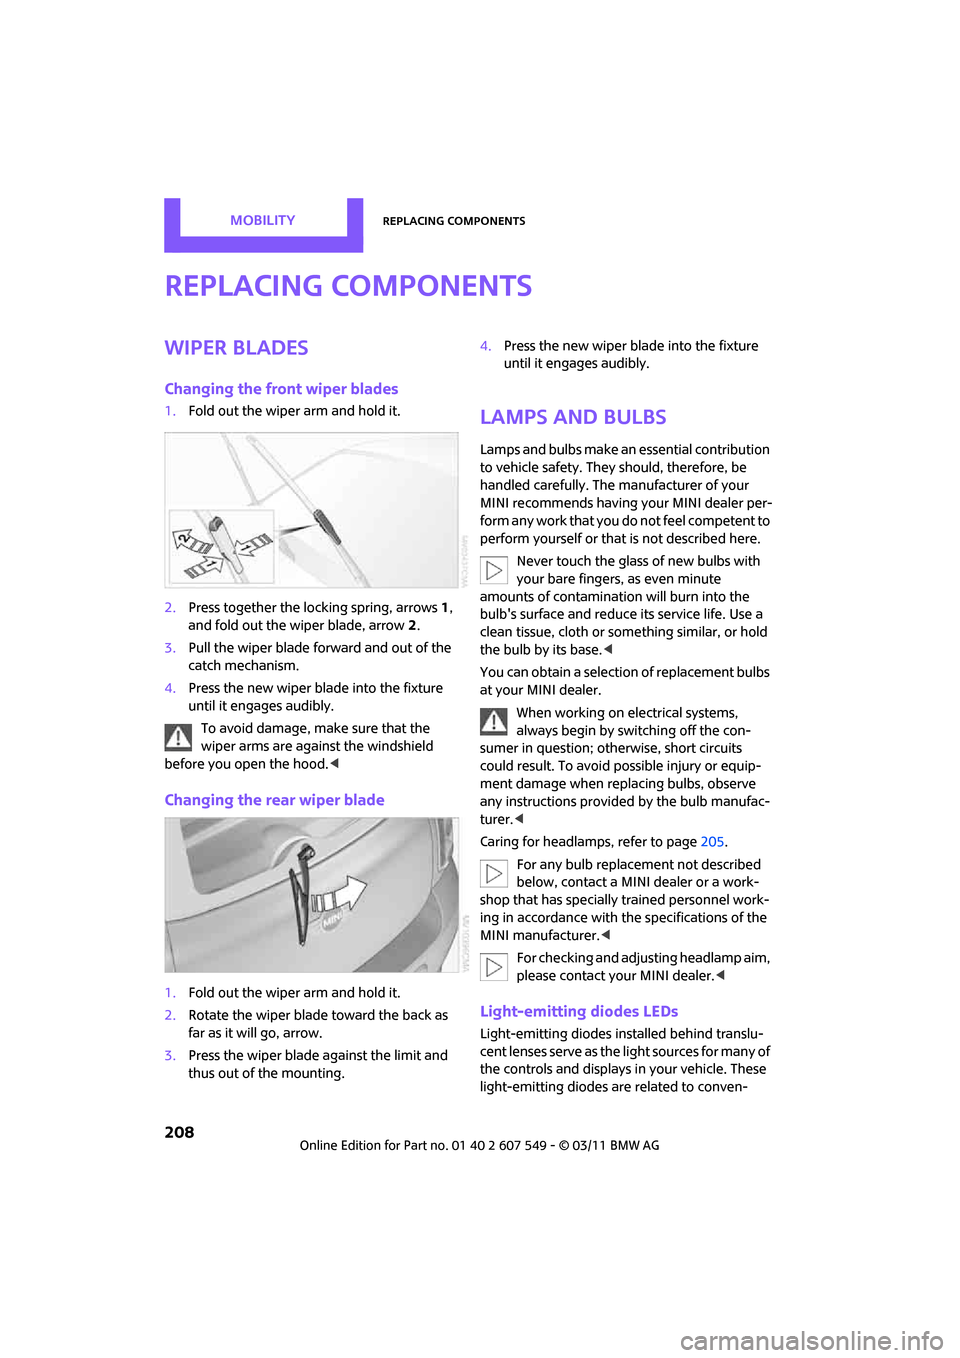
Changing the front wiper blades
1.Fold out the wiper arm and hold it.
2. Press together the lo cking spring, arrows1,
and fold out the wiper blade, arrow 2.
3. Pull the wiper blade forward and out of the
catch mechanism.
4. Press the new wiper blade into the fixture
until it engages audibly.
To avoid damage, make sure that the
wiper arms are against the windshield
before you open the hood. <
Changing the rear wiper blade
1.Fold out the wiper arm and hold it.
2. Rotate the wiper blade toward the back as
far as it will go, arrow.
3. Press the wiper blade against the limit and
thus out of the mounting. 4.
Press the new wiper blade into the fixture
until it engages audibly.
Lamps and bulbs
Lamps and bulbs make an essential contribution
to vehicle safety. They should, therefore, be
handled carefully. The manufacturer of your
MINI recommends having your MINI dealer per-
form any work that you do not feel competent to
perform yourself or that is not described here.
Never touch the glass of new bulbs with
your bare fingers, as even minute
amounts of contaminatio n will burn into the
bulb's surface and reduce its service life. Use a
clean tissue, cloth or some thing similar, or hold
the bulb by its base. <
You can obtain a selectio n of replacement bulbs
at your MINI dealer.
When working on electrical systems,
always begin by switching off the con-
sumer in question; otherwise, short circuits
could result. To avoid possible injury or equip-
ment damage when replacing bulbs, observe
any instructions provided by the bulb manufac-
turer. <
Caring for headlamp s, refer to page205.
For any bulb replacement not described
below, contact a MINI dealer or a work-
shop that has specially trained personnel work-
ing in accordance with th e specifications of the
MINI manufacturer. <
For checking and adjusting headlamp aim,
please contact your MINI dealer. <
Light-emitting diodes LEDs
Light-emitting diodes installed behind translu-
cent lenses serve as the light sources for many of
the controls and displays in your vehicle. These
light-emitting diodes are related to conven-
Page 211 of 254

Replacing componentsMOBILITY
209
tional laser diodes, and legislation defines them
as Class 1 light-emitting diodes.
Do not remove the covers or expose the
eyes directly to the unfiltered light source
for several hours; otherw ise, this could cause
irritation of the retina. <
Headlamp glass lens
In cool or humid weather, condensation may
occur on the interior of outside lights. The con-
densation disappears a short time after the light
is switched on. The headlamps do not need to
be changed. If a lot of moisture is present, e.g.
water droplets in the light, have them checked
by your service center.
Xenon lamps*
The service life of these bulbs is very long and
the probability of failure very low, provided that
they are not switched on and off an excessive
number of times. If a xenon lamp fails neverthe-
less, switch on the fog lamps and continue the
journey with great care, provided that local leg-
islation does not prohibit this.
Have any work on the xenon lamp system,
including bulb replac ement, carried out
only by a MINI dealer or a workshop that has
specially trained personnel working in accor-
dance with the specifications of the MINI manu-
facturer. Due to high voltage, there is a risk of
fatal injury if work on the xenon lamps is carried
out improperly. <
Halogen low beams and high beams
H13 bulb, 60/55 watts
The H13 bulb is pressurized. Therefore,
wear safety glasses an d protective gloves.
Otherwise, there is a risk of injury if the bulb is
damaged. <
Be careful when insta lling the cover; oth-
erwise, leaks could occur and cause dam-
age to the headlamp system. <
Accessing the lamp from the engine
compartment
The low-beam/high-beam bulb can be changed
from the engine compartment.
Removing the cover:
1.Press the tab.
2. Flip open the cover and take it out of the
holder.
Follow the same steps in reverse order to reat-
tach the cover. Be careful when insta lling the cover; oth-
erwise, leaks could occur and cause dam-
age to the headlamp system. <
Replacing the bulb
1.Turn the lamp counterclockwise, arrow 1,
and remove it, arrow 2.
Page 212 of 254

MOBILITYReplacing components
210
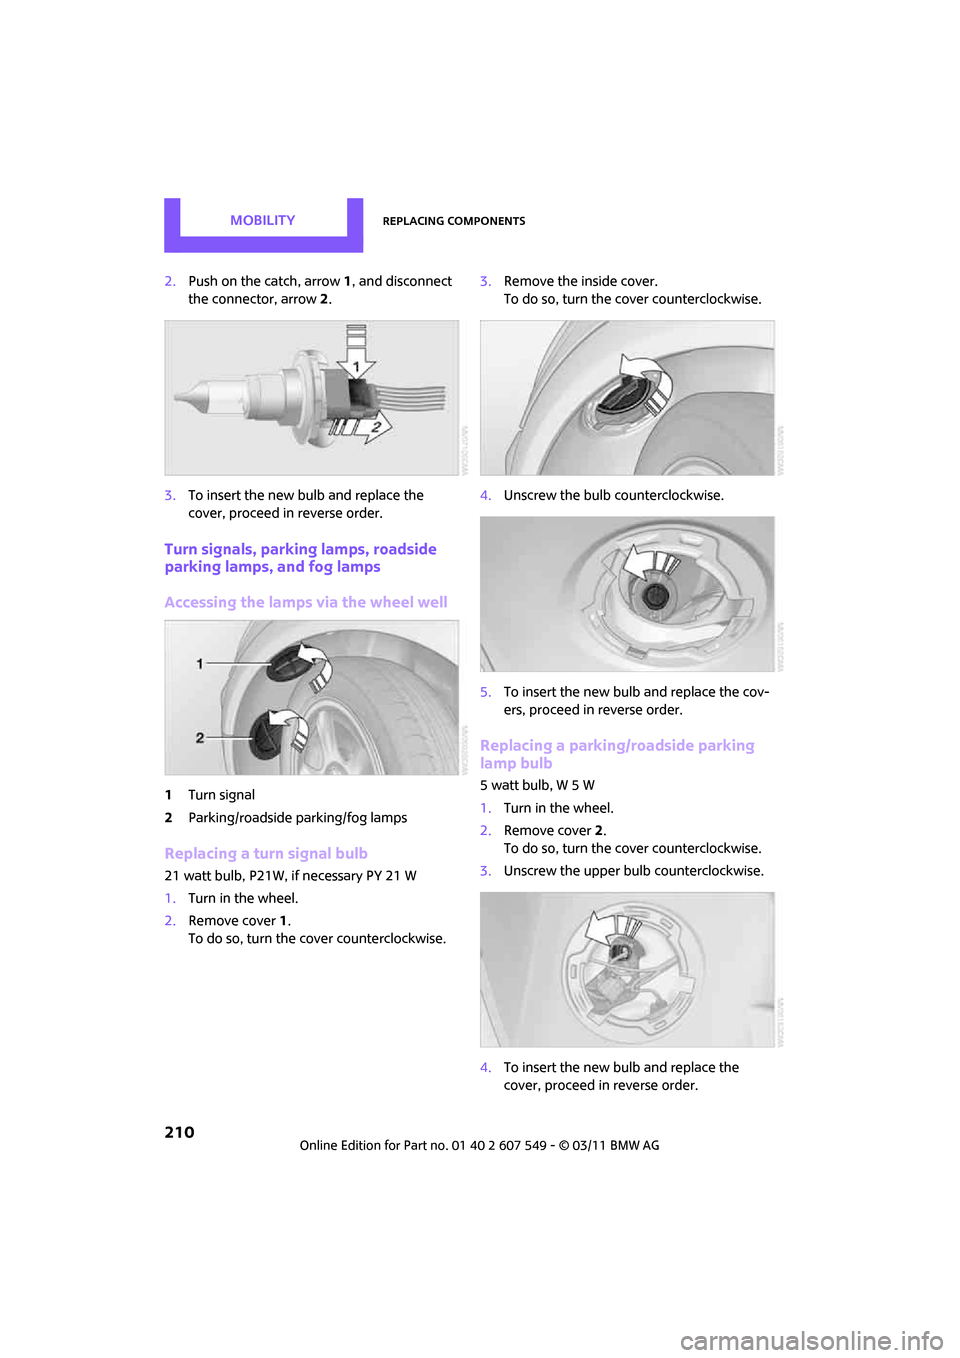
2.Push on the catch, arrow 1, and disconnect
the connector, arrow 2.
3. To insert the new bulb and replace the
cover, proceed in reverse order.
Turn signals, parking lamps, roadside
parking lamps, and fog lamps
Accessing the lamps via the wheel well
1Turn signal
2 Parking/roadside parking/fog lamps
Replacing a turn signal bulb
21 watt bulb, P21W, if necessary PY 21 W
1.Turn in the wheel.
2. Remove cover 1.
To do so, turn the cover counterclockwise. 3.
Remove the inside cover.
To do so, turn the cover counterclockwise.
4. Unscrew the bulb counterclockwise.
5. To insert the new bulb and replace the cov-
ers, proceed in reverse order.
Replacing a parking/roadside parking
lamp bulb
5 watt bulb, W 5 W
1.Turn in the wheel.
2. Remove cover 2.
To do so, turn the cover counterclockwise.
3. Unscrew the upper bulb counterclockwise.
4. To insert the new bulb and replace the
cover, proceed in reverse order.
Page 213 of 254

Replacing componentsMOBILITY
211
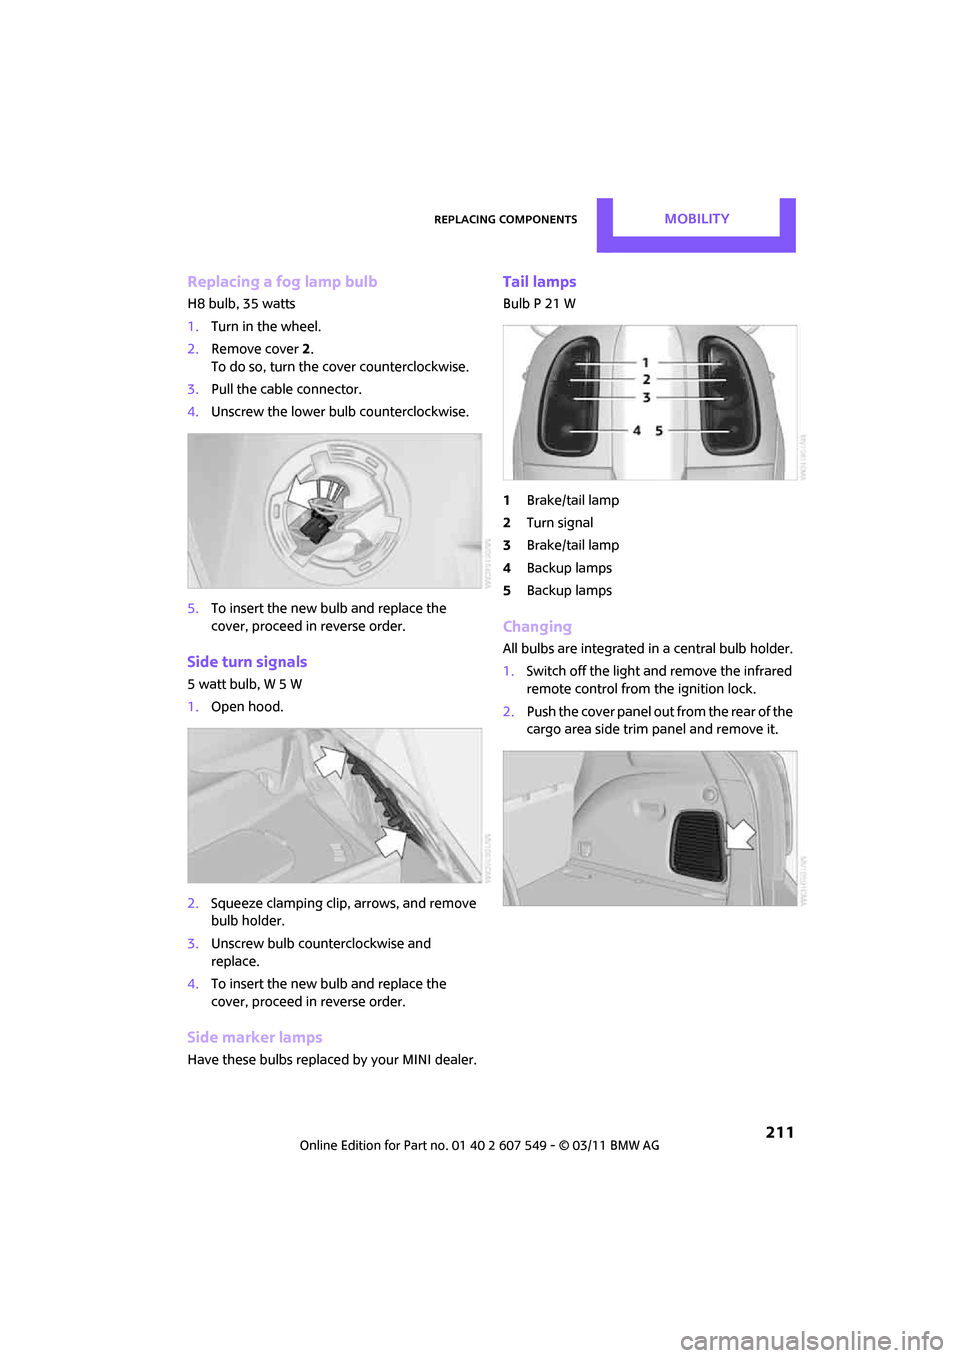
Replacing a fog lamp bulb
H8 bulb, 35 watts
1.Turn in the wheel.
2. Remove cover 2.
To do so, turn the cover counterclockwise.
3. Pull the cable connector.
4. Unscrew the lower bulb counterclockwise.
5. To insert the new bulb and replace the
cover, proceed in reverse order.
Side turn signals
5watt bulb, W5W
1.Open hood.
2. Squeeze clamping clip, arrows, and remove
bulb holder.
3. Unscrew bulb counterclockwise and
replace.
4. To insert the new bulb and replace the
cover, proceed in reverse order.
Side marker lamps
Have these bulbs replaced by your MINI dealer.
Tail lamps
Bulb P 21 W
1Brake/tail lamp
2 Turn signal
3 Brake/tail lamp
4 Backup lamps
5 Backup lamps
Changing
All bulbs are integrated in a central bulb holder.
1.Switch off the light and remove the infrared
remote control from the ignition lock.
2. Push the cover panel out from the rear of the
cargo area side trim panel and remove it.
Page 214 of 254

MOBILITYReplacing components
212
3.Disengage the bulb holder by pressing down
on the clamping clip, arrow.
4. Remove bulb holder.
5. Apply gentle pressure to the bulb while turn-
ing it to the left for removal and replace-
ment.
6. Re-engage the bulb holder so that it audibly
clicks into place.
7. Replace the cover panel.
License plate lamps
5 watt bulb, C 5 W
1.Using a screwdriver, push the lamp to the
left in the tab of the lamp housing, arrow 1.
2. Remove the lamp, arrow 2.
3. Replace the bulb.
4. Insert the lamp.
Center brake lamp
This lamp uses LED techno logy for operation. In
the event of a malfunction, contact your MINI
dealer or a workshop th at has specially trained
personnel working in acco rdance with the spec-
ifications of your MINI manufacturer.
Repairing a flat tire
Safety measures in the event of a break-
down:
Park the vehicle as far as possible from moving
traffic and switch on the hazard warning flash-
ers.
Turn the steering wheel until the front wheels
are in the straight-ahead position and engage
the steering wheel lock. Engage the parking
brake and shift into 1st or reverse gear or place
the selector leve r in position P.
All passengers should be outside the vehicle and
in a safe place, e.g. behind a guardrail.
Erect a warning triangle or warning flasher at the
appropriate distance if necessary. Comply with
all safety guidelines and regulations. <
In the event of a flat ti re, different procedures
should be followed depending on the equip-
ment included in your vehicle:
> MINI Mobility System, refer to the following
section
> Run-flat tires, page 196
MINI Mobility System*
The Mobility System is located under the left
front seat.
Preparations
Use of the MINI Mobility System may be ineffec-
tive if the tire puncture measures approx. 1/8 in/
4 mm or more. Contact the nearest MINI dealer
if the tire cannot be made drivable with the
Mobility System.
Do not remove foreign bodies which have pen-
etrated the tire if possible.
Follow the instructions on using the Mobil-
ity System found on the compressor and
the sealant bottle. <
Remove the adhesive label for the speed limit
from the sealant bottle an d affix it to the steer-
ing wheel.
Page 239 of 254

Everything from A to ZREFERENCE
237
B
Background lighting, refer to
Ambient lighting 82
Backrests, refer to Seats 38
Backup lamps
– replacing bulb 211
Band-aids, refer to First aid pouch 218
Bar, refer to Tow-starting,
towing away 220
Base plate for telephone or mobile phone
– refer to Snap-in adapter 174
Bass sounds, refer to Tone control 131
Battery 216
– charging 216
– disposal 34,216
– jump-starting 218
– temporary power failure 216
Battery renewal
– remote control 34
Being towed 220
Belt tensioner, refer to Safety
belts 40
Belts, refer to Safety belts 40
Beverage holders, refer to
Cupholders 92
Black ice, refer to External
temperature warning 56
Blower, refer to Air flow rate 84,86
Bluetooth, activating/ deactivating 154,164
Bluetooth audio 146
– device pairing 146
– disconnecting an audio connection 148
– playback 147
– unpairing device 148
– What to do if... 148
Bottle holders, refer to Cupholders 92
Brake Assist 67
Brake fluid, refer to Service requirements 59 Brake lamps
– replacing bulbs
211
Brake pads, breaking in 96
Brake rotors 97
– brakes 96
– breaking in 96
Brake system 96
– breaking in 96
– disc brakes 97
– MINI Maintenance
System 202
Brakes
– ABS 67
– b
reaking in 96
– MINI Maintenance System 202
– parking brake 47
– service requirements 59
Brakes, refer to Braking
safely 97
Breakdown service, refer to Roadside Assistance 218
Break-in period 96
Breaking in the clutch 96
Brightness of Control
Display 65
Bulb changing, refer to Lamps and bulbs 208
Button for starting the engine 46
Buttons on the steering wheel 11
C
Calendar 179
– displaying appointment 180
– selecting calendar day 180
California Proposition 65
warning 5
Call
– accepting 157,168
– ending 157,168
– muting the microphone 158,170
– rejecting 157,168 Calling, refer to Phone
numbers, dialing 157,169
Can holders, refer to Cupholders 92
Capacities 226
Car battery, refer to Vehicle battery 216
Car care 204
Car key, refer to Keys/remote controls 26
Car phone
– installation location, refer to Center armrest 91
Car phone, refer to Telephone 154,163
Car radio, refer to Radio 132
Car wash
– before driving in 47
Car wash, care 204
Car washes 204
Care 204
– car washes 204
– car-care products 204
– CD/DVD drives 207
– external 204
– high-pressure washers 205
– internal 206
– leather 206
– manual washing 205
– upholstery and fabrics 206
– windows 205
– wiper blades 205
Cargo area 98
– capacity 226
– Comfort Access 33
– lamp 82
– opening from outside 30
– trunk lid, refer to Liftgate 30
Cargo area, expanding 98
Cargo area lamp 82
Cargo area li
d, refer to
Liftgate 30
Cargo area partition net, refer to Cargo net 100
Page 240 of 254

REFERENCEEverything from A to Z
238
Cargo loading101
– securing cargo 102
– stowing cargo 102
– vehicle 98
Cargo net 100
Cargo, securing 102
Carpets, care 206
Catalytic conver ter, refer to
Hot exhaust system 96
CD, audio playback 140
CD player 140
– controls 130
– fast forward/reverse 141
– random order 141
– selecting a track 140
– switching on/off 130
– tone control 131
– volume 130
Center armrest 91
Center brake lamp 212
Center console, refer to Around the center
console 14
Center Rail 91
Center Rail, refer to Storage
compartments 91
Central locking system 27
– Comfort Access 32
– from inside 30
– from outside 27
– setting unlocking behavior 27
Changing bulbs 208
Changing the language on the Control Display 65
Changing the measurement
units on the Control
Display 58
Changing wheels 214
Chassis number, refer to Engine compartment 199
Check Control 62
Child restraint fixing system LATCH 44
Child restraint systems 43
Child seats 43
Child-safety locks 45Chrome parts, care
206
Chrome parts, refer to Care 204
Cigarette lighter 92
Cleaning headlamps 52
– washer fluid 53
Clock
– 12 h/24 h mode 61
– setting time 61
Closing
– f
rom inside 30
– from outside 27
Clothes hooks 92
Cockpit 10
Cold start, refer to Starting the engine 46
Comfort Access 32
– replacing the battery 34
– what to observe before
entering a car wash 34
Comfort area, refer to Around the center console 14
Compartment for remote control, refer to Ignition
lock 46
Computer 56
– displays on Control Display 57
Condensation, refer to When the vehicle is parked 98
Condition Based Service CBS 202
Configuring settings, refer to
Personal Profile 26
Connecting vacuum cleaner, refer to Connecting electrical
appliances 92
Consumption, refer to Average fuel consumption 56
Contacts 161,176
– deleting 162,179
– displaying 162
– editing 162
– exporting/importing 179
– new contact 178
Control Display
– adjusting brightness 65Control Display, refer to iDrive
– switching on/off
19
Control Display, refer to On- board computer
– adjusting brightness 65
Control Display, refer to On-board computer 16
Control stick, refer to On-board computer 16
Control unit, refer to On-board
computer 16
Controls and displays 10
Convenient access, refer to
Comfort Access 32
Convenient operation
– windows 28
Convenient star t, refer to
Starting the engine 46
Coolant 200
– checking level 201
– filling 201
– temperature 201
Coolant temperature 201
Coo
ling fluid, refer to
Coolant 200
Cooling, maximum 86
Copyright 2
Cornering light, refer to
Adaptive Light Control 80
Criteria for route 118
Cruise control
– indicator lamp 13
Cruising range 56
Cupholders 92
Curb weight, refer to Weights 226
Current fuel consumption 56
Current playback
– external devices 145
D
Dashboard instruments, refer
to Displays 12
Dashboard lighting, refer to
Instrument lighting 81
Dashboard, refer to Cockpit 10