2011 MINI COOPER lock
[x] Cancel search: lockPage 49 of 210

DrivingCONTROLS
47
Radio readiness and ignition off
All indicator and warning lamps in the displays
go out.
The ignition automatically turns off
* when the
driver's door is opened. Pressing the Start/Stop
button again switches the ignition back on.
The ignition is not switched off in situations such
as the following:
> The clutch or brake is depressed
> The low beams are switched on
Starting the engine
Do not allow the engine to run in enclosed
areas; otherwise, inhalation of the noxious
exhaust gases can lead to loss of consciousness
and death. Exhaust gases contain carbon mon-
oxide, an odorless and colorless, but highly toxic
gas. Never leave an unattended vehicle with
the engine running; otherwise, such a vehicle
represents a potent ial safety hazard.
Before leaving the car while the engine is run-
ning, place the transmission in neutral or move
the selector lever to position P and forcefully
apply the parking brake to prevent the car from
moving. <
Avoid frequent starting in quick succes-
sion or repeated start attempts in which
the engine does not start. Otherwise, the fuel is
not burned or inadequately burned and there is
a danger of overheating and damaging the
catalytic converter. <
Do not let the engine warm up with the vehicle
at a standstill. Move of f immediately at a moder-
ate engine speed.
When starting the engine, do not depress the
accelerator pedal.
Manual transmission
Key in ignition lock or inside vehicle with
Comfort Access, refer to page 28.
1. Depress the brake.
2. Depress the clutch.
3. Press the Start/Stop button.
Automatic transmission*
Key in ignition lock or inside vehicle with
Comfort Access, refer to page 28.
1. Depress the brake.
2. Shift the selector lever into position P or N.
3. Press the Start/Stop button.
The starter operates auto matically for a certain
time, and stops automatically as soon as the
engine has started.
Switching off the engine
Always take the key with you when you
leave the vehicle.
When parking, apply the parking brake force-
fully; otherwise, the vehicle could begin to roll. <
Manual transmission
1.With the car at a standstill, press the Start/
Stop button.
2. Shift into first gear or reverse.
3. Forcefully apply the parking brake.
Page 50 of 210

CONTROLSDriving
48
Automatic transmission*
1.With the car at a stop, move the selector
lever to position P.
2. Press the Start/Stop button.
3. Forcefully apply the parking brake.
Before driving into a car wash
By following these steps, the vehicle is able to
roll:
1.Place the remote control, even with Comfort
Access, in the ignition lock.
2. Depress the brake.
3. Move the selector lever to position N.
4. Switch off the engine.
Parking brake
The parking brake is primarily intended to
prevent the vehicle from rolling while parked;
it brakes the rear wheels.
Applying
The lever locks in position automatically.
Releasing
Pull slightly upward, press the button and lower
the lever.
In exceptional cases, if the parking brake
has to be used to slow or stop the car,
do not pull the lever up too hard. In doing so,
continuously press the button of the parking
brake lever.
Otherwise, excessive force could lead to over-
braking and loss of traction, i.e. fishtailing, at the
rear axle. <
Manual transmission
When shifting into 5t h or 6th gear, press
the gearshift lever to the right. Otherwise,
the engine could be damaged if you inadvert-
ently shift into 3rd or 4th gear. <
Reverse gear
Select this only when the vehicle is stationary.
When the gearshift lever is pressed to the left, a
slight resistance has to be overcome.
Automatic transmission*
with Steptronic
In addition to the fully automatic mode, you can
shift gears manually using Steptronic, page 49.
Parking the vehicle
To prevent the vehicle from rolling, always
select position P and apply the parking
brake before leaving the vehicle with the engine
running. <
Removing the key
To remove the key from the ignition lock, first
move the selector lever into position P and then
switch off the engine: in terlock. Remove the key
from the ignition lock, refer to page 46.
Selector lever positions
P R N D M/S + –
Page 51 of 210

DrivingCONTROLS
49
Displays in the tachometer
P R N D DS M1 to M6
The selector lever position is displayed, or the
current gear in the manual mode.
Changing selector lever positions
>The selector lever can only be moved out of
position P when the ignition is switched on
or the engine is running.
> Before moving the lever away from P or N
with the vehicle stationary, first depress the
brake; otherwise, the selector lever will
refuse to move: shiftlock.
To prevent the vehicle from creeping
after you select a driving position,
depress the brake until you are ready to
start. <
A lock prevents accidental shifting into selector
lever positions R and P.
Overriding the selector lever lock
Press the button on the front of the selector
lever, arrow.
P Park
Select this only when the vehicle is stationary.
The transmission locks to prevent the drive
wheels from turning.
R Reverse
Select this only when the vehicle is stationary.
N Neutral
Select this when you are in a car wash, for
example. The vehicle can roll.
D Drive, automatic position
Position for normal ve hicle operation. All
forward gears are selected automatically.
Under normal operation conditions, fuel con-
sumption is lowest when you drive in position D.
Kickdown
Kickdown enables you to achieve maximum
performance.
Depress the accelerator pedal beyond the full-
throttle resistance point.
Sport program and manual mode M/S
Move the selector lever from position D to the
left into the M/S shifting slot:
The Sport program is activated and DS is dis-
played. This position is recommended for a
performance-oriented driving style.
To deactivate the Sport program or manual
mode M/S, move the selector lever to the right
into position D.
Page 52 of 210

CONTROLSDriving
50
Shifting with the selector lever
Push the selector lever forward or pull it back to
activate manual operation. Steptronic shifts the
gear.
> Pull the selector lever in the + direction.
Transmission shifts up.
> Push the selector leve r in the – direction.
Transmission shifts down.
The selected gear is displayed in the tachome-
ter, e.g. M1.
To use the automatic mode again, move the
selector lever to the right into position D.
Upshifts and downshifts are executed only when
they will result in a plausible combination of
engine and vehicle speed; thus, for example, a
downshift that would cause the engine to over-
rev will not be executed by the system. The
selected gear is displayed briefly, followed by
the current gear.
Shifting on the steering wheel*
With the selector lever in position D, automatic
drive, you can shift gears using the shift paddles
on the steering wheel. The transmission auto-
matically switches to manual mode.
If you do not shift gears with the shift paddles or
accelerate for a certai n amount of time, the
transmission automatically returns to D, auto-
matic drive.
> Pull one of the shift paddles.
Transmission shifts up.
> Push one of the shift paddles.
Transmission shifts down.
M1 through M6 are displayed in the tachometer.
Manually releasing the selector lever
lock
Should the selector lever refuse to move out of
position P even though the ignition is switched
on, the brake is depressed and the button on the
selector lever is pressed, the selector lever lock
can be overridden:
1. Unclip the sleeve of the selector lever.
2. Pull the sleeve up over the selector lever
until the sleeve is insi de out. Disconnect the
cable connector if necessary.
3. Insert extractor hook 1 from the onboard
vehicle toolkit into the loop on the passen-
ger's side.
4. Pull the loop up.
5. Move the selector lever into the desired
position by pressing the button on the front
of the selector lever.
Before manually unlocking the selector
lever lock, firmly set the parking brake to
prevent the vehicle from rolling away. <
Page 62 of 210

CONTROLSControls overview
60
Exiting displays
1.Press the button on the turn signal indicator
as often as necessary until "HOME" is
displayed.
2. Press the button for a longer period.
Current vehicle speed is once again displayed.
Displays are also exited if no entries are made
for approx. 8 seconds.
Next setting or item of information
1. Within a setting or information, press the
button on the turn signal indicator as often
as necessary until "NEXT" is displayed.
2. Press the button for a longer period.
The display changes direct ly to the next setting
or item of information.
Setting formats and units
of measure, resetting to
factory settings
61
Adjusting settings >Confirmation sig-
nals when locking
and unlocking the
vehicle 23
> Response during
unlocking
procedure 22
> Automatic
locking 25
> Pathway
lighting 79
> Daytime running
lights 80
> Triple turn signal
activation 51
Exiting the menu
SymbolFunction
Page 65 of 210
Controls overviewCONTROLS
63
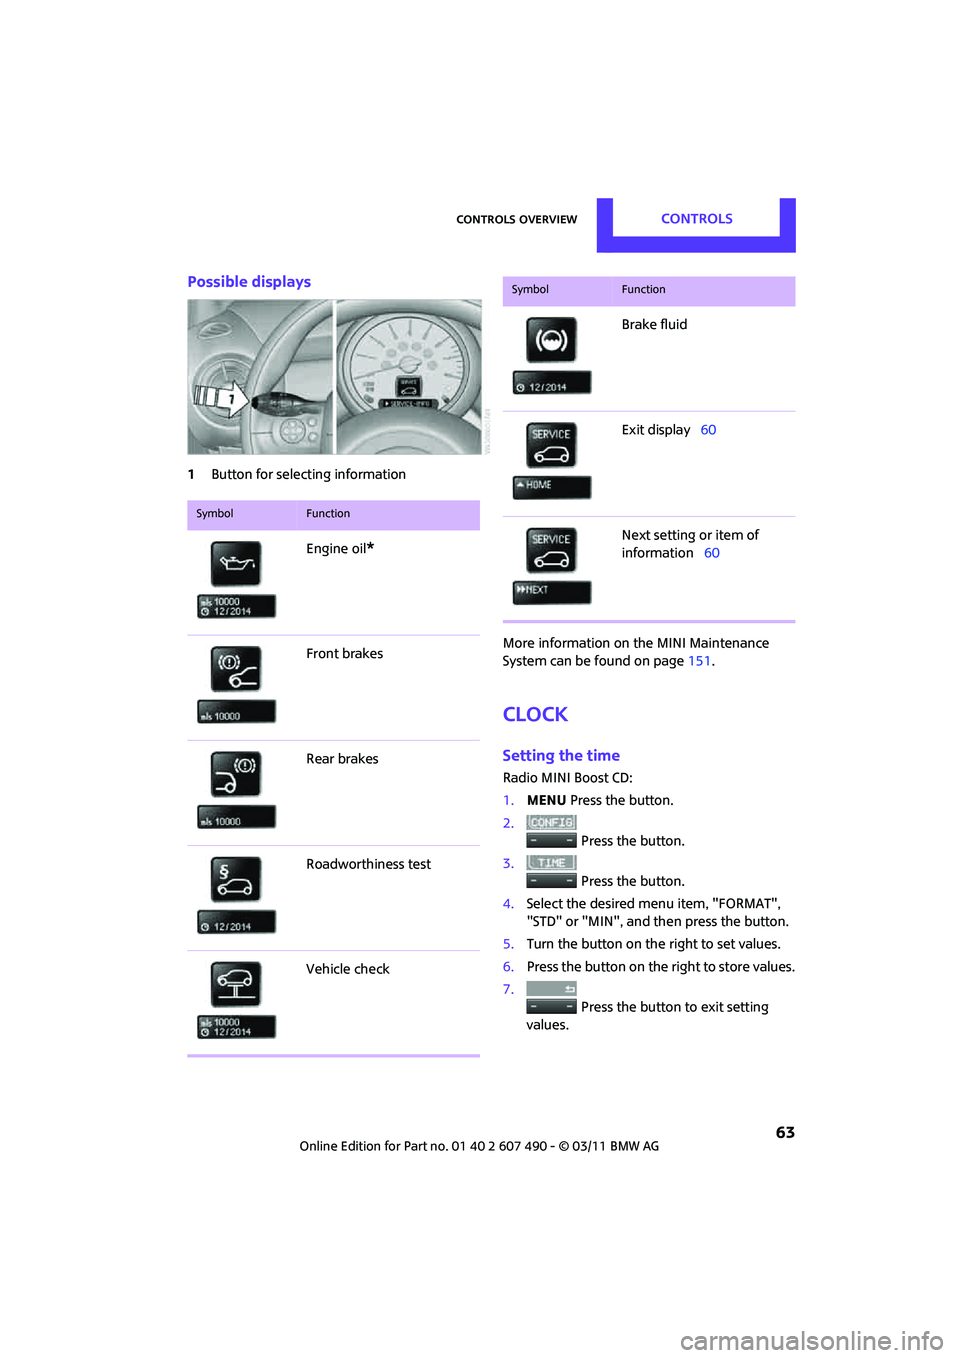
Possible displays
1Button for select ing information
More information on the MINI Maintenance
System can be found on page151.
Clock
Setting the time
Radio MINI Boost CD:
1.MENU Press the button.
2. Press the button.
3. Press the button.
4. Select the desired menu item, "FORMAT",
"STD" or "MIN", and then press the button.
5. Turn the button on the right to set values.
6. Press the button on the right to store values.
7. Press the button to exit setting
values.
SymbolFunction
Engine oil*
Front brakes
Rear brakes
Roadworthiness test
Vehicle check
Brake fluid
Exit display 60
Next setting or item of
information 60
SymbolFunction
Page 69 of 210

Technology for driving comfort and safetyCONTROLS
67
Driving stability control
systems
Your MINI has a number of systems that help to
maintain the vehicle's st ability even in adverse
driving conditions.
The laws of physics cannot be repealed,
even with driving stab ility control systems.
An appropriate driving style always remains the
responsibility of the driver. Therefore do not
reduce the additional safety margin by engaging
in hazardous driving thereby running the risk of
an accident. <
Antilock Brake System ABS
ABS prevents locking of the wheels during
braking. Safe steering response is maintained
even during full braking. Active safety is thus
increased.
Braking safely, refer to page 97.
ABS is operational every time you start the
engine.
Cornering Brake Control CBC
Driving stability and steering characteristics are
further enhanced while braking in turns or
during a lane change.
Electronic brake-forc e distribution EBV
The system controls the brake pressure in the
rear wheels to ensure stable braking behavior.
Brake Assist
Rapidly depressing the brake causes this system
to automatically develop maximum braking
force. Thus, the system helps keep braking
distance to a minimum. At the same time, all the
benefits provided by ABS are exploited.
Do not reduce the pressure on the brake for the
duration of the full braking application.
Dynamic Stability Control DSC
The concept
DSC prevents the driving wheels from losing
traction when you pull away from rest or
accelerate.
DSC also detects unstable driving conditions
such as when the vehicle' s rear end fishtails or
the vehicle is sliding on its front wheels. In these
cases, DSC helps the vehicle maintain a safe
course within physical limits by reducing engine
output and through br aking actions at the
individual wheels.
Every time that the engine is started, the DSC is
ready to operate.
Deactivating DSC
Press the button until the DSC OFF indicator light
on the speedometer is on and DSC OFF is dis-
played on the tachometer. DSC is deactivated.
Stabilizing and pr opulsion promoting actions are
no longer executed.
When driving with snow chains or to 'rock free'
in snow, it can be helpfu l to switch off DSC for a
brief period.
To increase vehicle stability, activate DSC again
as soon as possible.
Activating DSC
Press the button again: the DSC indicator lamps
in the display elements go out.
Page 71 of 210
Technology for driving comfort and safetyCONTROLS
69
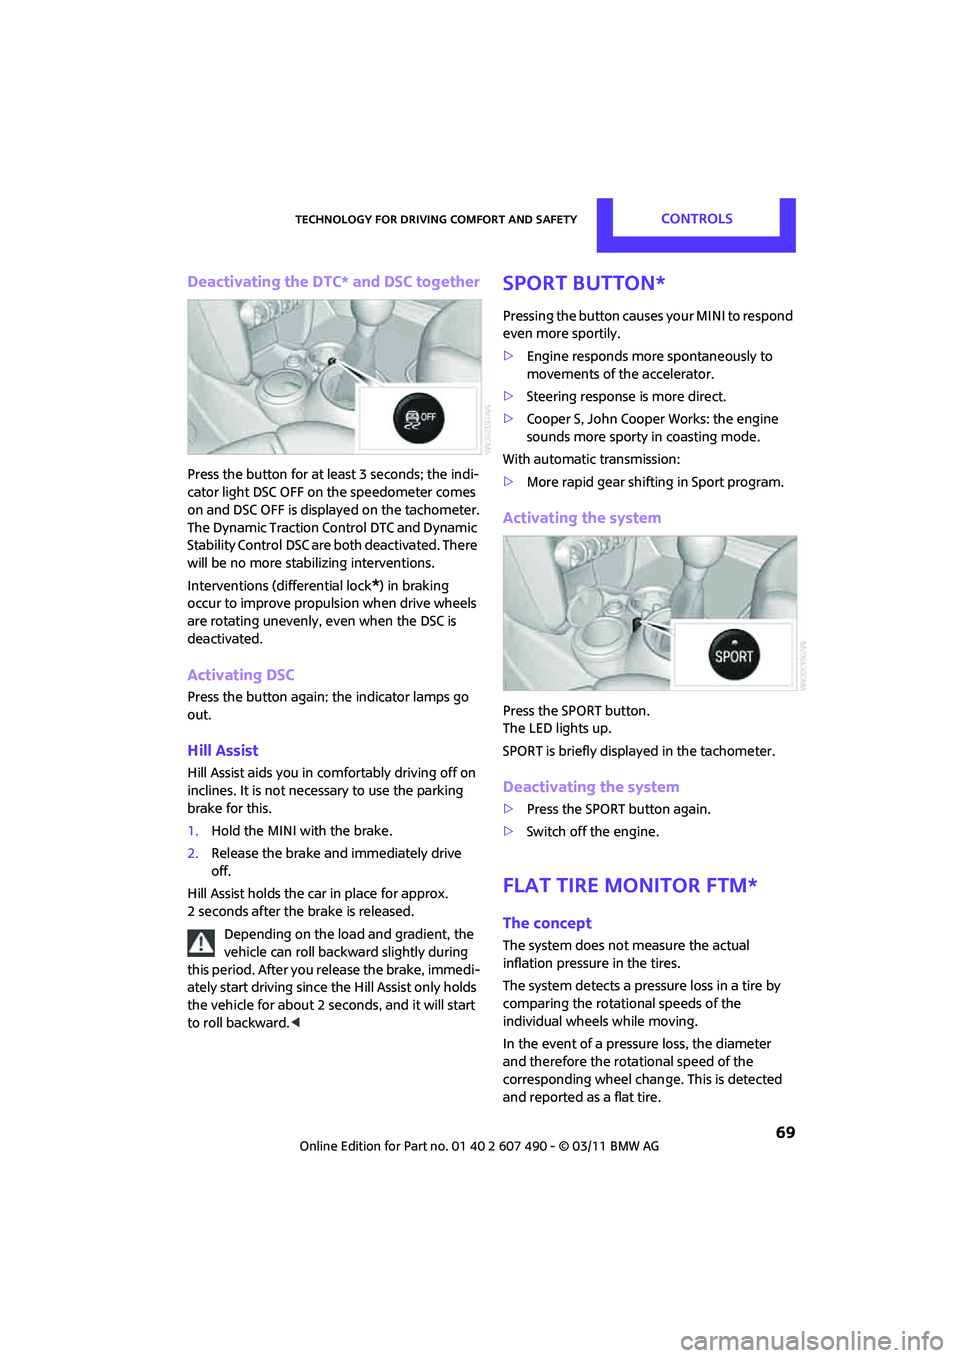
Deactivating the DTC* and DSC together
Press the button for at least 3 seconds; the indi-
cator light DSC OFF on the speedometer comes
on and DSC OFF is displayed on the tachometer.
The Dynamic Traction Control DTC and Dynamic
Stability Control DSC are both deactivated. There
will be no more stab ilizing interventions.
Interventions (differential lock
*) in braking
occur to improve propulsion when drive wheels
are rotating unevenly, even when the DSC is
deactivated.
Activating DSC
Press the button again: the indicator lamps go
out.
Hill Assist
Hill Assist aids you in co mfortably driving off on
inclines. It is not necessary to use the parking
brake for this.
1. Hold the MINI with the brake.
2. Release the brake and immediately drive
off.
Hill Assist holds the car in place for approx.
2 seconds after the brake is released. Depending on the load and gradient, the
vehicle can roll backwa rd slightly during
this period. After you release the brake, immedi-
ately start driving since the Hill Assist only holds
the vehicle for about 2 seconds, and it will start
to roll backward. <
Sport button*
Pressing the button causes your MINI to respond
even more sportily.
>Engine responds more spontaneously to
movements of the accelerator.
> Steering response is more direct.
> Cooper S, John Cooper Works: the engine
sounds more sporty in coasting mode.
With automatic transmission:
> More rapid gear shifting in Sport program.
Activating the system
Press the SPORT button.
The LED lights up.
SPORT is briefly displayed in the tachometer.
Deactivating the system
>Press the SPORT button again.
> Switch off the engine.
Flat Tire Monitor FTM*
The concept
The system does not measure the actual
inflation pressure in the tires.
The system detects a pre ssure loss in a tire by
comparing the rotational speeds of the
individual wheels while moving.
In the event of a pressure loss, the diameter
and therefore the rota tional speed of the
corresponding wheel chan ge. This is detected
and reported as a flat tire.