2011 MERCEDES-BENZ SLS automatic transmission
[x] Cancel search: automatic transmissionPage 271 of 436
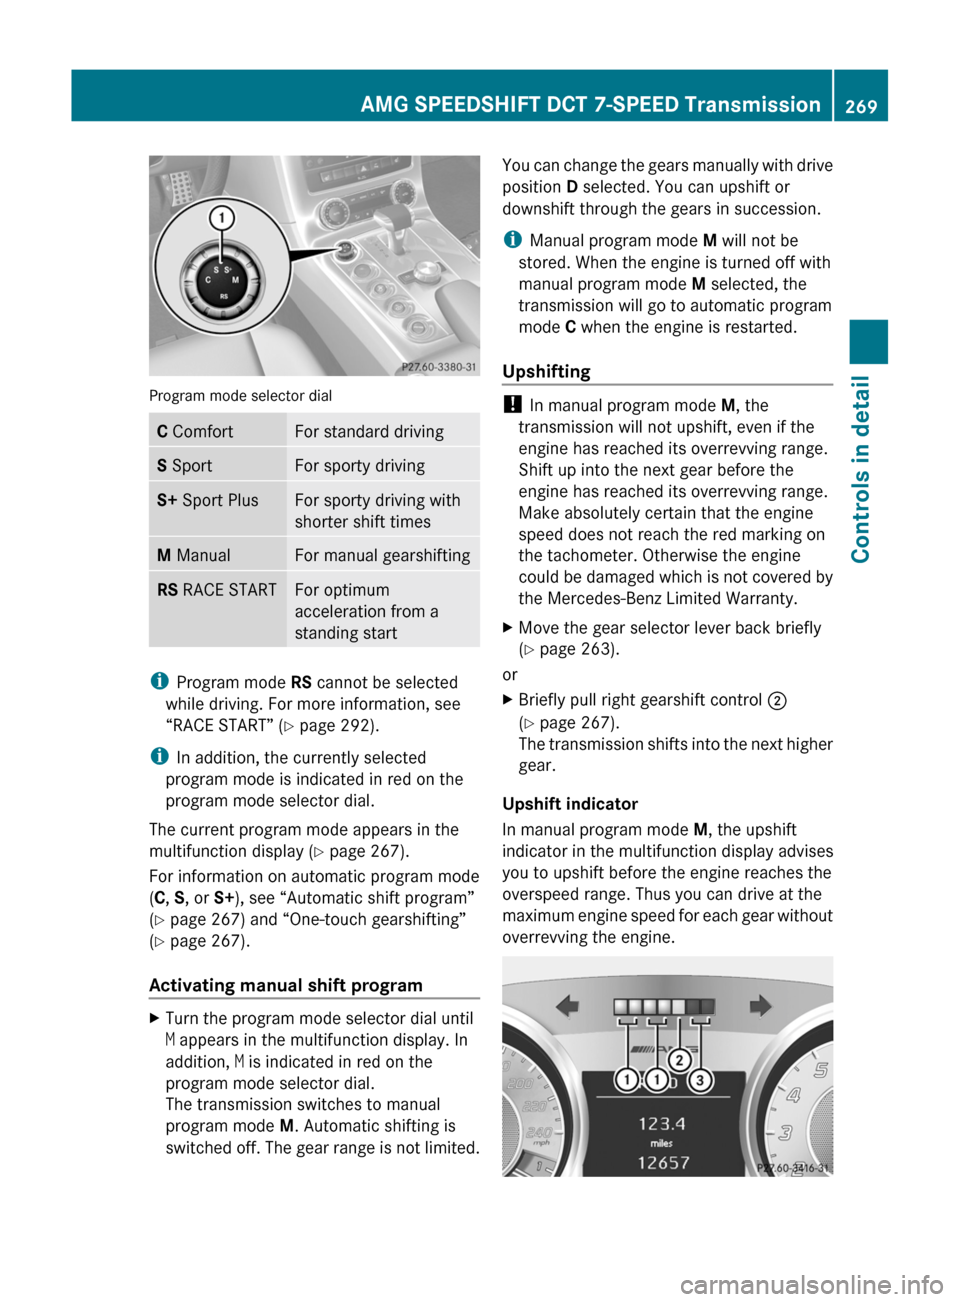
Program mode selector dial
C ComfortFor standard drivingS SportFor sporty drivingS+ Sport PlusFor sporty driving with
shorter shift times
M ManualFor manual gearshiftingRS RACE STARTFor optimum
acceleration from a
standing start
iProgram mode RS cannot be selected
while driving. For more information, see
“RACE START” (Y page 292).
iIn addition, the currently selected
program mode is indicated in red on the
program mode selector dial.
The current program mode appears in the
multifunction display (Y page 267).
For information on automatic program mode
(C, S, or S+), see “Automatic shift program”
(Y page 267) and “One-touch gearshifting”
(Y page 267).
Activating manual shift program
XTurn the program mode selector dial until
M appears in the multifunction display. In
addition, M is indicated in red on the
program mode selector dial.
The transmission switches to manual
program mode M. Automatic shifting is
switched off. The gear range is not limited.
You can change the gears manually with drive
position D selected. You can upshift or
downshift through the gears in succession.
iManual program mode M will not be
stored. When the engine is turned off with
manual program mode M selected, the
transmission will go to automatic program
mode C when the engine is restarted.
Upshifting
! In manual program mode M, the
transmission will not upshift, even if the
engine has reached its overrevving range.
Shift up into the next gear before the
engine has reached its overrevving range.
Make absolutely certain that the engine
speed does not reach the red marking on
the tachometer. Otherwise the engine
could be damaged which is not covered by
the Mercedes-Benz Limited Warranty.
XMove the gear selector lever back briefly
(Y page 263).
or
XBriefly pull right gearshift control ;
(Y page 267).
The transmission shifts into the next higher
gear.
Upshift indicator
In manual program mode M, the upshift
indicator in the multifunction display advises
you to upshift before the engine reaches the
overspeed range. Thus you can drive at the
maximum engine speed for each gear without
overrevving the engine.
AMG SPEEDSHIFT DCT 7-SPEED Transmission269Controls in detailBA 197 USA, CA Edition A 2011; 1; 27, en-UShereepeVersion: 3.0.3.52010-03-24T15:31:10+01:00 - Seite 269Z
Page 272 of 436
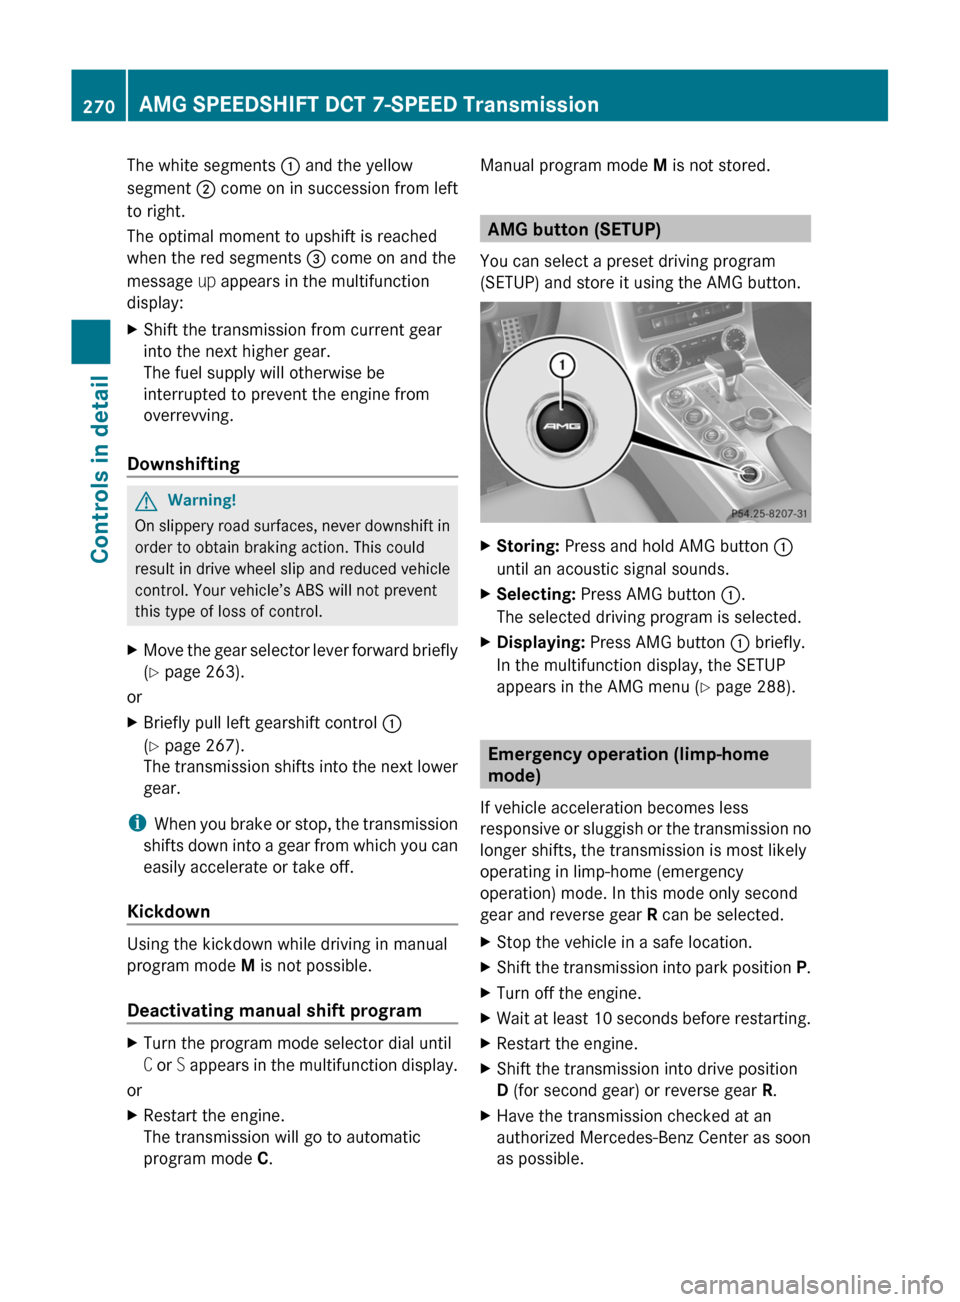
The white segments : and the yellow
segment ; come on in succession from left
to right.
The optimal moment to upshift is reached
when the red segments = come on and the
message up appears in the multifunction
display:
XShift the transmission from current gear
into the next higher gear.
The fuel supply will otherwise be
interrupted to prevent the engine from
overrevving.
Downshifting
GWarning!
On slippery road surfaces, never downshift in
order to obtain braking action. This could
result in drive wheel slip and reduced vehicle
control. Your vehicle’s ABS will not prevent
this type of loss of control.
XMove the gear selector lever forward briefly
(Y page 263).
or
XBriefly pull left gearshift control :
(Y page 267).
The transmission shifts into the next lower
gear.
iWhen you brake or stop, the transmission
shifts down into a gear from which you can
easily accelerate or take off.
Kickdown
Using the kickdown while driving in manual
program mode M is not possible.
Deactivating manual shift program
XTurn the program mode selector dial until
C or S appears in the multifunction display.
or
XRestart the engine.
The transmission will go to automatic
program mode C.
Manual program mode M is not stored.
AMG button (SETUP)
You can select a preset driving program
(SETUP) and store it using the AMG button.
XStoring: Press and hold AMG button :
until an acoustic signal sounds.
XSelecting: Press AMG button :.
The selected driving program is selected.
XDisplaying: Press AMG button : briefly.
In the multifunction display, the SETUP
appears in the AMG menu (Y page 288).
Emergency operation (limp-home
mode)
If vehicle acceleration becomes less
responsive or sluggish or the transmission no
longer shifts, the transmission is most likely
operating in limp-home (emergency
operation) mode. In this mode only second
gear and reverse gear R can be selected.
XStop the vehicle in a safe location.XShift the transmission into park position P.XTurn off the engine.XWait at least 10 seconds before restarting.XRestart the engine.XShift the transmission into drive position
D (for second gear) or reverse gear R.
XHave the transmission checked at an
authorized Mercedes-Benz Center as soon
as possible.
270AMG SPEEDSHIFT DCT 7-SPEED TransmissionControls in detail
BA 197 USA, CA Edition A 2011; 1; 27, en-UShereepeVersion: 3.0.3.52010-03-24T15:31:10+01:00 - Seite 270
Page 289 of 436
wheel when the easy-entry/exit feature is
activated.
To stop steering wheel movement, move
steering wheel adjustment stalk or press one
of the memory position buttons.
Do not leave children unattended in the
vehicle, or with access to an unlocked vehicle.
Children could open the driver’s door and
unintentionally activate the easy-entry/exit
feature, which could result in an accident
and/or serious personal injury.XPress button = or ; to select the
Settings menu.XPress button : or 9 to select the
Convenience submenu.XPress button a.XPress button : or 9 to select the
Easy Entry/Exit: function.
The current setting Enabled or Disabled
is shown.XPress button a to change the current
status.
Depending on the previous status, the
Easy Entry/Exit: feature will be
Enabled or Disabled .
Switching fold-in function for exterior rear
view mirrors on or off
Use this function to set the exterior rear view
mirrors to be folded in automatically when
you lock your vehicle.
With this function set to Enabled and the
exterior rear view mirrors folded in using the
button on the door control panel
( Y page 248), the exterior rear view mirrors
will not fold out when you switch on the
ignition. You will then have to fold out the
exterior rear view mirrors using the button on
the door control panel ( Y page 248).
Make sure both exterior rear view mirrors are
folded out completely before driving off.XPress button = or ; to select the
Settings menu.XPress button : or 9 to select the
Convenience submenu.XPress a.XPress button : or 9 to select the
Fold Mirrors in when Locking:
function.
The current setting Enabled or Disabled
is shown.XPress button a to change the current
status.
Depending on the previous status, the
automatic fold-in function for exterior rear
view mirrors will be Enabled or Disabled .
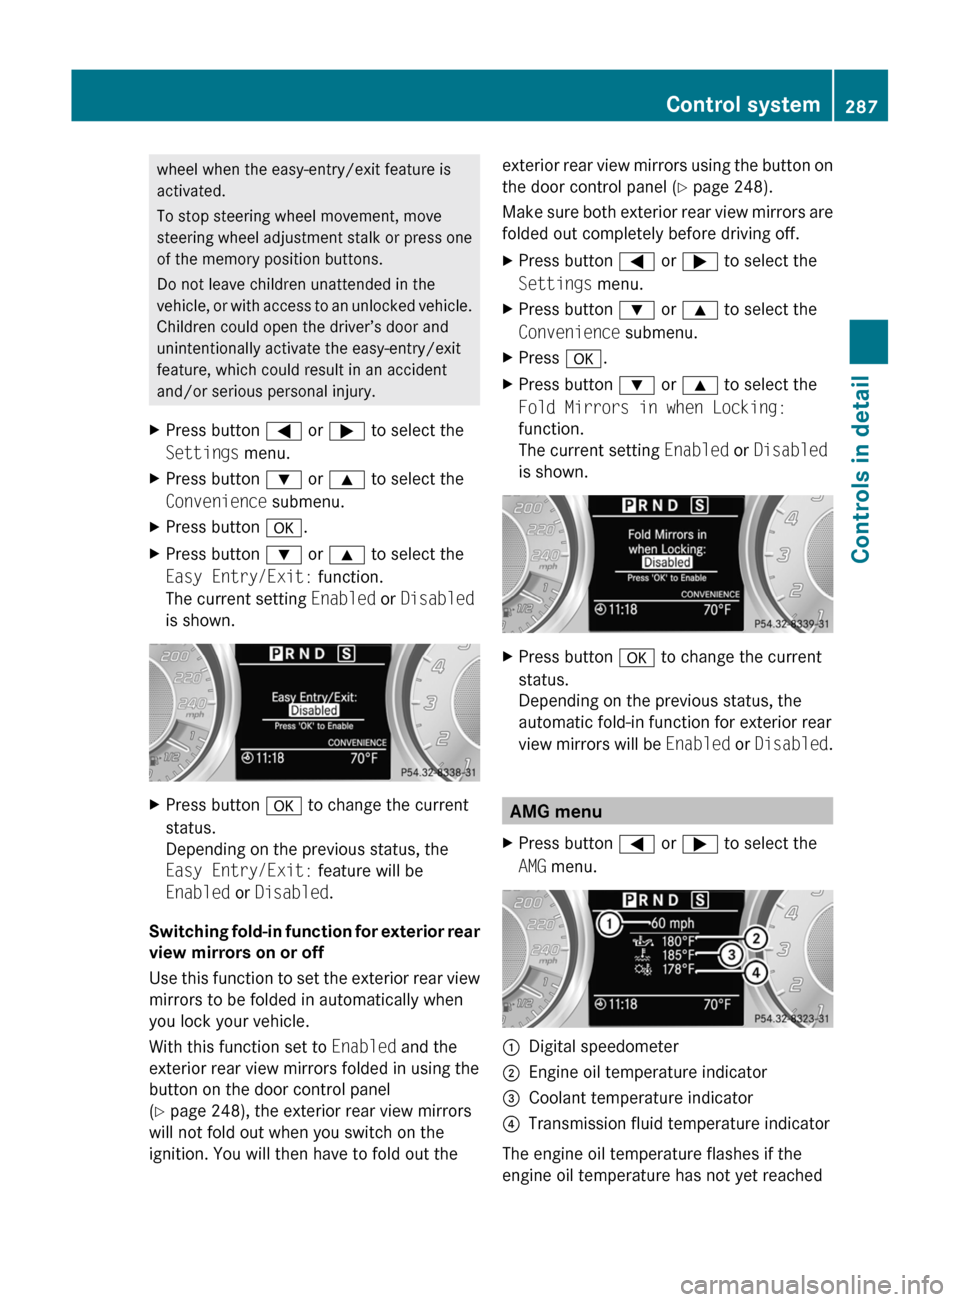
AMG menu
XPress button = or ; to select the
AMG menu.:Digital speedometer;Engine oil temperature indicator=Coolant temperature indicator?Transmission fluid temperature indicator
The engine oil temperature flashes if the
engine oil temperature has not yet reached
Control system287Controls in detailBA 197 USA, CA Edition A 2011; 1; 27, en-UShereepeVersion: 3.0.3.52010-03-24T15:31:10+01:00 - Seite 287Z
Page 293 of 436
Rwhen the transmission is in park position
P , reverse gear R, or neutral position N
R the ESC is switched off or has switched off
due to a malfunction
The vehicle speed displayed in the
speedometer can briefly vary from the speed
setting for the cruise control system.
Setting current speed XAccelerate or decelerate to the desired
speed.XBriefly lift the cruise control lever in
direction of arrow : or press in direction
of arrow ;.XRemove your foot from the accelerator
pedal.
i On uphill grades, the cruise control may
not be able to maintain the set speed. Once
the grade eases, the set speed will be
resumed.
On downhill grades, the cruise control
maintains the set speed by braking with the
vehicle’s brake system. In addition, on
longer downhill grades the transmission
will downshift automatically.
Canceling cruise control
XDepress the brake pedal.
or
XBriefly push the cruise control lever in
direction of arrow =.
The last set speed is stored for later use.
The last stored speed is deleted from memory
when the engine is turned off.
The cruise control switches off automatically
when you depress the brake pedal or you
engage the electronic parking brake.
The cruise control also switches off
automatically when
R the vehicle speed falls below 20 mph
(30 km/h)
R the ESC is in operation
R the ESC is switched off with the ESC switch
Rthe ESC has switched off due to a
malfunction
R you shift the transmission into neutral
position N while driving
An acoustic warning will sound. Observe
additional messages in the multifunction
display that may appear.
Depressing the accelerator pedal does not
deactivate the cruise control. After a brief
acceleration (e.g. for passing), the cruise
control will resume the last set speed.
Changing the set speed GWarning!
Keep in mind that it may take a brief moment
until the vehicle has made the necessary
adjustments.
Increase or decrease the set vehicle speed to
a value that the prevailing road conditions and
legal speed limits permit. Otherwise, sudden
and unexpected acceleration or deceleration
of the vehicle could cause an accident and/
or serious injury to you and others.
You can increase or decrease the set speed
in 1 mph (Canada: 1 km/h) increments or in
5 mph (Canada: 10 km/h) increments.
When you use the cruise control lever to
decelerate, the brake system will brake the
vehicle automatically if the engine’s braking
power does not brake the vehicle sufficiently.
XIncreasing: Lift the cruise control lever in
direction of arrow : and hold it up until
the desired speed is reached.XDecreasing: Press the cruise control lever
in direction of arrow ; and hold it down
until the desired speed is reached.XRelease the cruise control lever.
The new speed is set and the vehicle will
accelerate or decelerate.
Adjustment in 1 mph (Canada: 1 km/h)
increments
i The set speed value is increased or
decreased in 1 mph (Canada: 1 km/h)
Driving systems291Controls in detailBA 197 USA, CA Edition A 2011; 1; 27, en-UShereepeVersion: 3.0.3.52010-03-24T15:31:10+01:00 - Seite 291Z
Page 296 of 436
Parktronic system
The Parktronic system is an electronic
parking aid with ultrasonic sensors designed
to assist the driver during parking maneuvers.
The Parktronic system indicates the relative
distance between the vehicle and an obstacle
visually and audibly.
The Parktronic system is activated
automatically when
Ryou switch on the ignition
and
Ryou release the electronic parking brake
or
Ryou start the engine
and
Rshift the transmission into drive position
D, reverse gear R, or neutral position N
The Parktronic system deactivates at speeds
above approximately 11 mph (18 km/h). At
lower speeds, the Parktronic system
activates again.
The Parktronic system also deactivates when
you shift the transmission into park position
P or engage the electronic parking brake and
turn off the engine.
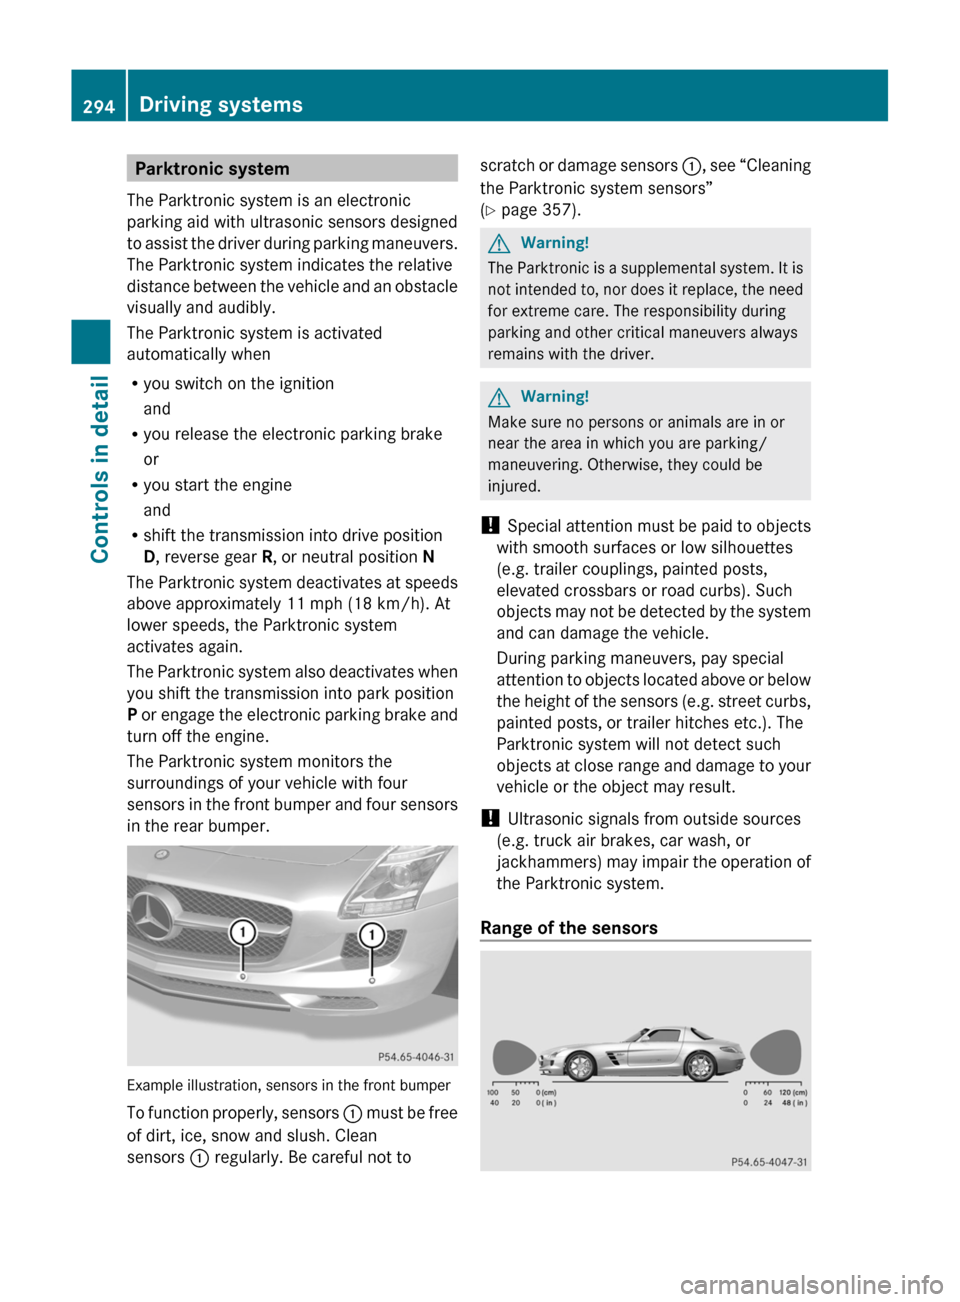
The Parktronic system monitors the
surroundings of your vehicle with four
sensors in the front bumper and four sensors
in the rear bumper.
Example illustration, sensors in the front bumper
To function properly, sensors : must be free
of dirt, ice, snow and slush. Clean
sensors : regularly. Be careful not to
scratch or damage sensors :, see “Cleaning
the Parktronic system sensors”
(Y page 357).
GWarning!
The Parktronic is a supplemental system. It is
not intended to, nor does it replace, the need
for extreme care. The responsibility during
parking and other critical maneuvers always
remains with the driver.
GWarning!
Make sure no persons or animals are in or
near the area in which you are parking/
maneuvering. Otherwise, they could be
injured.
! Special attention must be paid to objects
with smooth surfaces or low silhouettes
(e.g. trailer couplings, painted posts,
elevated crossbars or road curbs). Such
objects may not be detected by the system
and can damage the vehicle.
During parking maneuvers, pay special
attention to objects located above or below
the height of the sensors (e.g. street curbs,
painted posts, or trailer hitches etc.). The
Parktronic system will not detect such
objects at close range and damage to your
vehicle or the object may result.
! Ultrasonic signals from outside sources
(e.g. truck air brakes, car wash, or
jackhammers) may impair the operation of
the Parktronic system.
Range of the sensors
294Driving systemsControls in detail
BA 197 USA, CA Edition A 2011; 1; 27, en-UShereepeVersion: 3.0.3.52010-03-24T15:31:10+01:00 - Seite 294
Page 298 of 436
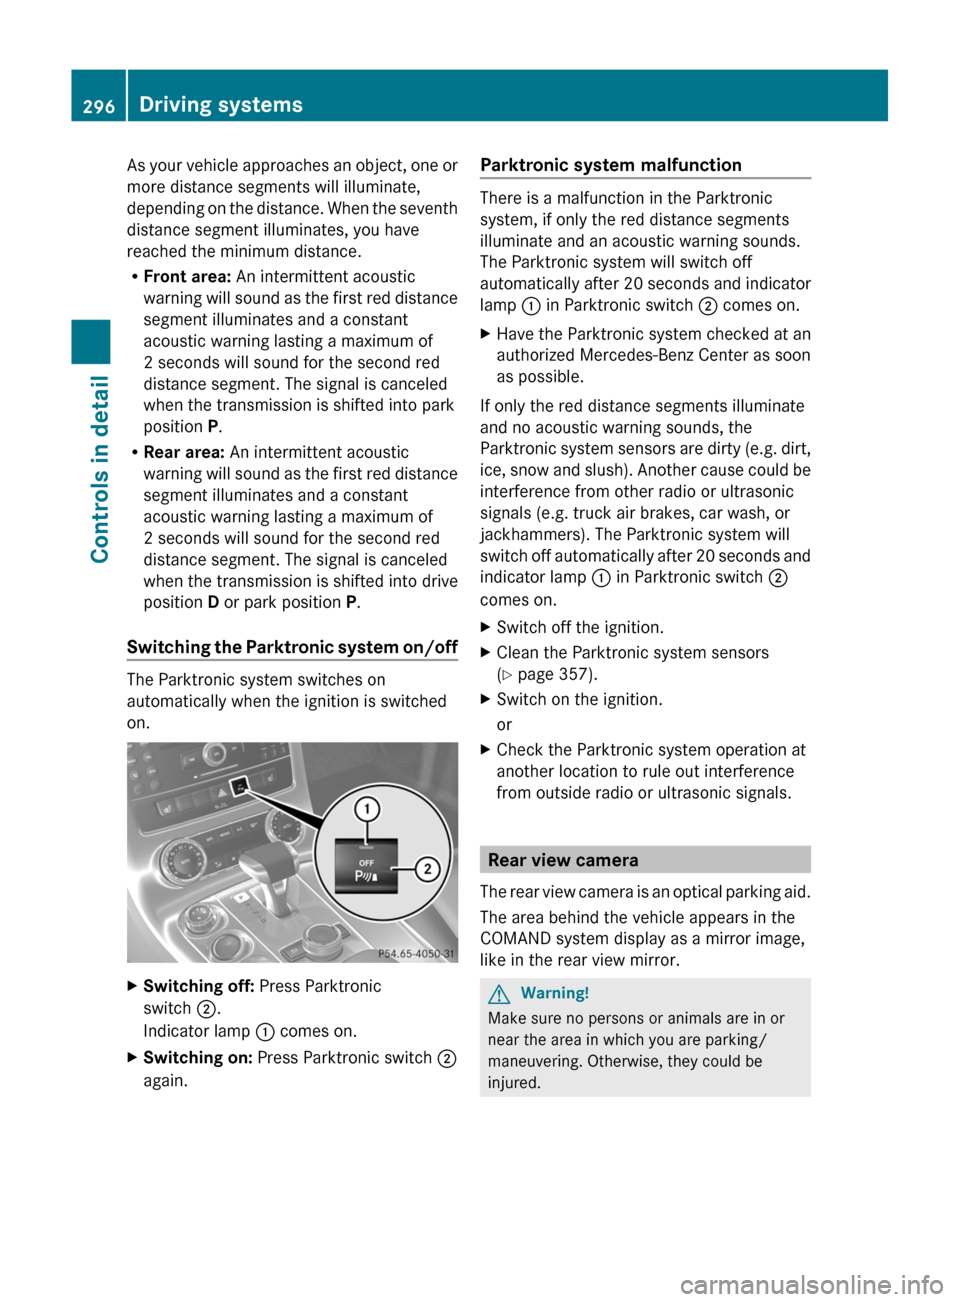
As your vehicle approaches an object, one or
more distance segments will illuminate,
depending on the distance. When the seventh
distance segment illuminates, you have
reached the minimum distance.
RFront area: An intermittent acoustic
warning will sound as the first red distance
segment illuminates and a constant
acoustic warning lasting a maximum of
2 seconds will sound for the second red
distance segment. The signal is canceled
when the transmission is shifted into park
position P.
RRear area: An intermittent acoustic
warning will sound as the first red distance
segment illuminates and a constant
acoustic warning lasting a maximum of
2 seconds will sound for the second red
distance segment. The signal is canceled
when the transmission is shifted into drive
position D or park position P.
Switching the Parktronic system on/off
The Parktronic system switches on
automatically when the ignition is switched
on.
XSwitching off: Press Parktronic
switch ;.
Indicator lamp : comes on.
XSwitching on: Press Parktronic switch ;
again.
Parktronic system malfunction
There is a malfunction in the Parktronic
system, if only the red distance segments
illuminate and an acoustic warning sounds.
The Parktronic system will switch off
automatically after 20 seconds and indicator
lamp : in Parktronic switch ; comes on.
XHave the Parktronic system checked at an
authorized Mercedes-Benz Center as soon
as possible.
If only the red distance segments illuminate
and no acoustic warning sounds, the
Parktronic system sensors are dirty (e.g. dirt,
ice, snow and slush). Another cause could be
interference from other radio or ultrasonic
signals (e.g. truck air brakes, car wash, or
jackhammers). The Parktronic system will
switch off automatically after 20 seconds and
indicator lamp : in Parktronic switch ;
comes on.
XSwitch off the ignition.XClean the Parktronic system sensors
(Y page 357).
XSwitch on the ignition.
or
XCheck the Parktronic system operation at
another location to rule out interference
from outside radio or ultrasonic signals.
Rear view camera
The rear view camera is an optical parking aid.
The area behind the vehicle appears in the
COMAND system display as a mirror image,
like in the rear view mirror.
GWarning!
Make sure no persons or animals are in or
near the area in which you are parking/
maneuvering. Otherwise, they could be
injured.
296Driving systemsControls in detail
BA 197 USA, CA Edition A 2011; 1; 27, en-UShereepeVersion: 3.0.3.52010-03-24T15:31:10+01:00 - Seite 296
Page 333 of 436
vehicle’s control system can occur. The tire
pressure displayed by the control system
apply to sea level. In high-altitude
locations, the reading on a tire pressure
gauge will be higher than the reading issued
by the vehicle’s control system. Do not
reduce the tire inflation pressure under
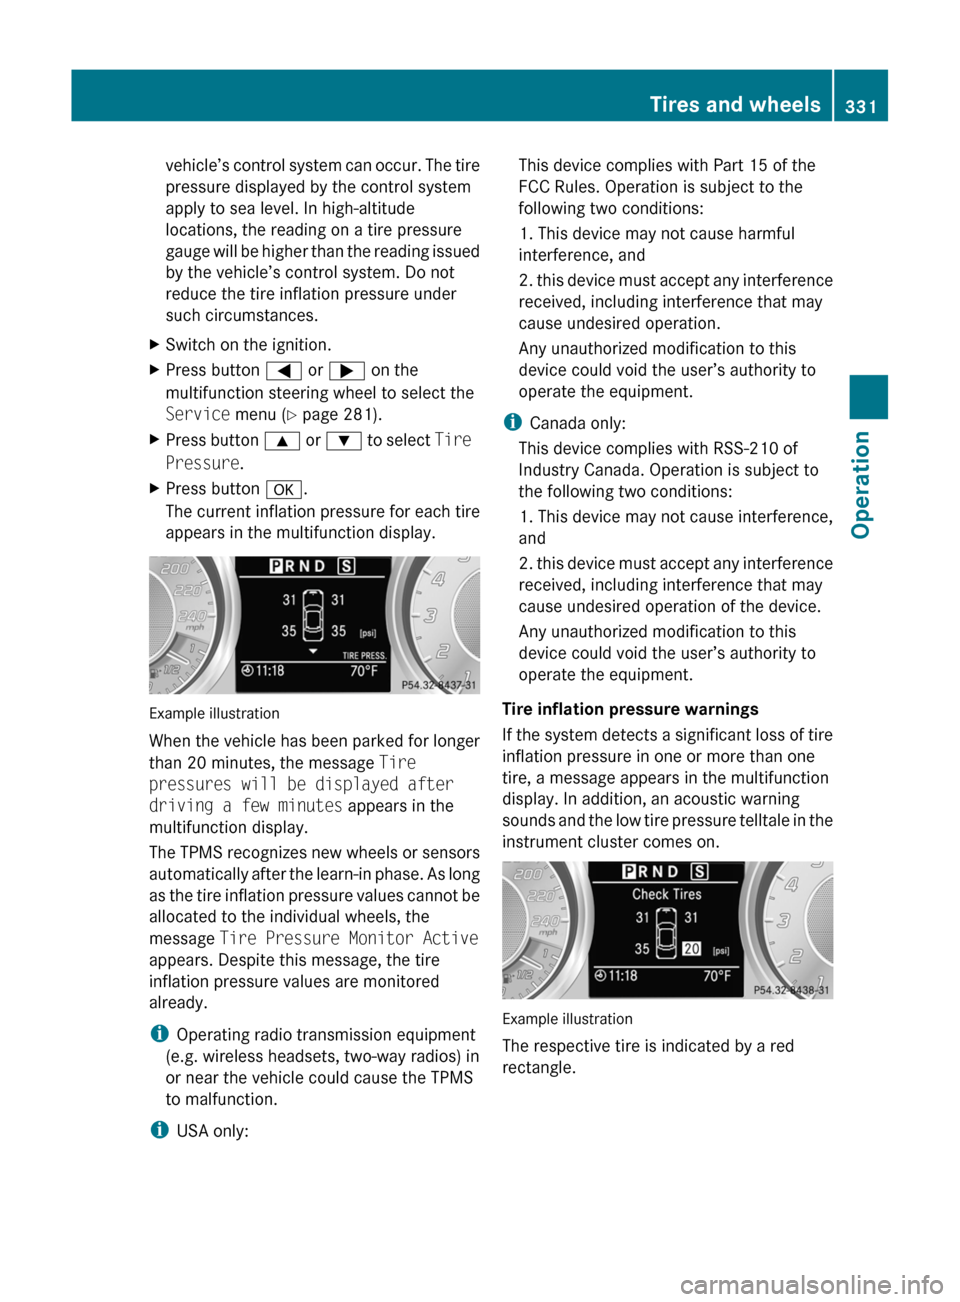
such circumstances.XSwitch on the ignition.XPress button = or ; on the
multifunction steering wheel to select the
Service menu (Y page 281).XPress button 9 or : to select Tire
Pressure .XPress button a.
The current inflation pressure for each tire
appears in the multifunction display.
Example illustration
When the vehicle has been parked for longer
than 20 minutes, the message Tire
pressures will be displayed after
driving a few minutes appears in the
multifunction display.
The TPMS recognizes new wheels or sensors
automatically after the learn-in phase. As long
as the tire inflation pressure values cannot be
allocated to the individual wheels, the
message Tire Pressure Monitor Active
appears. Despite this message, the tire
inflation pressure values are monitored
already.
i Operating radio transmission equipment
(e.g. wireless headsets, two-way radios) in
or near the vehicle could cause the TPMS
to malfunction.
i USA only:
This device complies with Part 15 of the
FCC Rules. Operation is subject to the
following two conditions:
1. This device may not cause harmful
interference, and
2. this device must accept any interference
received, including interference that may
cause undesired operation.
Any unauthorized modification to this
device could void the user’s authority to
operate the equipment.
i Canada only:
This device complies with RSS-210 of
Industry Canada. Operation is subject to
the following two conditions:
1. This device may not cause interference,
and
2. this device must accept any interference
received, including interference that may
cause undesired operation of the device.
Any unauthorized modification to this
device could void the user’s authority to
operate the equipment.
Tire inflation pressure warnings
If the system detects a significant loss of tire
inflation pressure in one or more than one
tire, a message appears in the multifunction
display. In addition, an acoustic warning
sounds and the low tire pressure telltale in the
instrument cluster comes on.
Example illustration
The respective tire is indicated by a red
rectangle.
Tires and wheels331OperationBA 197 USA, CA Edition A 2011; 1; 27, en-UShereepeVersion: 3.0.3.52010-03-24T15:31:10+01:00 - Seite 331Z
Page 359 of 436
Due to the width of the vehicle, fold in
exterior rear view mirrors prior to running
the vehicle through an automatic car wash
to prevent damage to the mirrors.XWhen taking the vehicle through an
automatic conveyor-type car wash:
Make sure the transmission remains in
neutral position N. Observe instructions,
see “Shifting into neutral position N”
( Y page 263).
When leaving the automatic car wash, make
sure the mirrors are folded out.
After running the vehicle through an
automatic car wash, wipe any wax off of the
windshield and the wiper blade inserts. This
will prevent smears and reduce wiping noise
which can be caused by residual wax on the
windshield.
Ornamental moldings
XFor regular cleaning and care of ornamental
moldings, use a damp cloth.
! Do not use chrome cleaner on ornamental
moldings. Although ornamental moldings
may have chrome appearance, they could
be made of anodized aluminum that will be
damaged when cleaned with chrome
cleaner. Instead, use a damp cloth to clean
those ornamental moldings.
For very dirty ornamental moldings of
which you are sure are chrome-plated, use
a chrome cleaner. If in doubt whether an
ornamental molding is chrome-plated,
contact an authorized Mercedes-Benz
Center.
Lamp lenses
XUse a mild vehicle wash detergent, such as
Mercedes-Benz approved Car Shampoo,
with plenty of water.
! Only use window cleaning solutions that
are suitable for plastic lamp lenses.
Window cleaning solutions which are not
suitable may damage the plastic lamp
lenses of the headlamps. Therefore, do not
use abrasives, solvents or cleaners that
contain solvents.
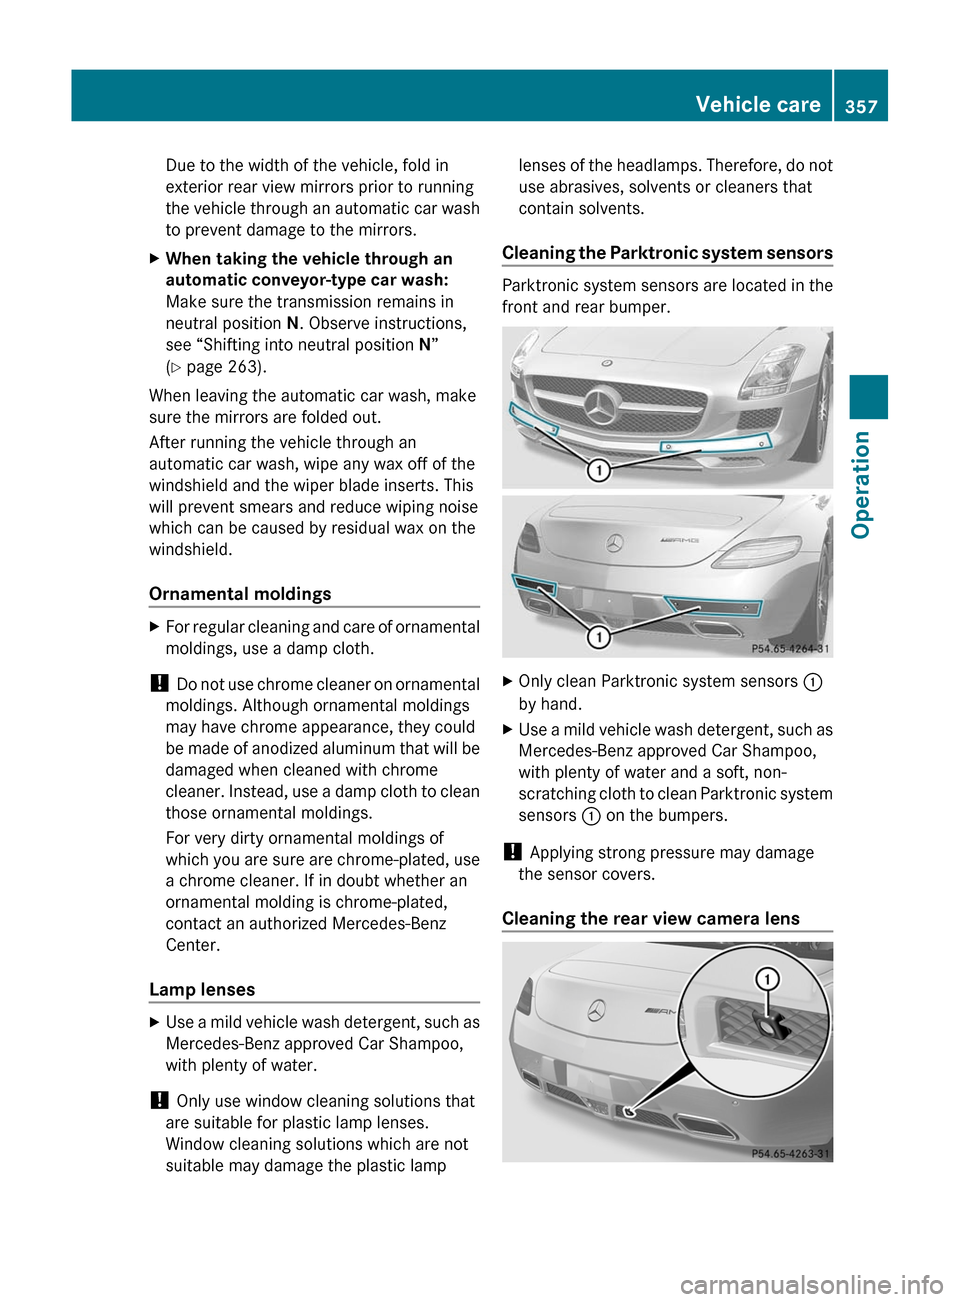
Cleaning the Parktronic system sensors
Parktronic system sensors are located in the
front and rear bumper.
XOnly clean Parktronic system sensors :
by hand.XUse a mild vehicle wash detergent, such as
Mercedes-Benz approved Car Shampoo,
with plenty of water and a soft, non-
scratching cloth to clean Parktronic system
sensors : on the bumpers.
!
Applying strong pressure may damage
the sensor covers.
Cleaning the rear view camera lens
Vehicle care357OperationBA 197 USA, CA Edition A 2011; 1; 27, en-UShereepeVersion: 3.0.3.52010-03-24T15:31:10+01:00 - Seite 357Z