2011 MERCEDES-BENZ SLS trunk release
[x] Cancel search: trunk releasePage 294 of 436

increments each time you lift or press the
cruise control lever up or down to the
resistance point.XIncreasing: Briefly lift the cruise control
lever up to the resistance point in direction
of arrow :.XDecreasing: Briefly press the cruise
control lever down to the resistance point
in direction of arrow ;.XRelease the cruise control lever.
The new speed is set and the vehicle will
accelerate or decelerate.
Adjustment in 5 mph (Canada: 10 km/h)
increments
i The set speed value is increased or
decreased in 5 mph (Canada: 10 km/h)
increments each time you lift or press the
cruise control lever up or down past the
resistance point.
XIncreasing: Briefly lift the cruise control
lever up past the resistance point in
direction of arrow :.XDecreasing: Briefly press the cruise
control lever down past the resistance
point in direction of arrow ;.XRelease the cruise control lever.
The new speed is set and the vehicle will
accelerate or decelerate. Keep in mind that
it may take a brief moment until the vehicle
has reached the set speed.
Setting stored speed (Resume function)
GWarning!
The set speed stored in memory should only
be set again if prevailing road conditions and
legal speed limits permit. Possible
acceleration or deceleration differences
arising from returning to the preset speed
could cause an accident and/or serious injury
to you and others.
XBriefly pull the cruise control lever in
direction of arrow ?.
If no speed is stored, the current speed is
set and stored.XRemove your foot from the accelerator
pedal.
The last stored speed is deleted from memory
when the engine is turned off.
RACE START
RACE START enables optimum acceleration
from a standing start with suitable high-grip
road surface conditions.
GWarning!
RACE START is only available when ESC
SPORT is activated. ESC SPORT only
stabilizes the vehicle to a certain extent if it is
swerving or the wheels are spinning.
RACE START may only be used on closed
roads. Always adapt your speed and driving
style to suit the current road and weather
conditions.
Conditions for activation
RACE START can be activated when
R the doors are closed
R the trunk is closed
R the hood is closed
R the engine is running and the transmission
and the engine have reached their
operating temperature. The engine has
reached its operating temperature when
the engine oil temperature indicator in the
multifunction display stops flashing.
R ESC SPORT is switched on ( Y page 62)
R the multifunction steering wheel is in the
straight-ahead position
R the vehicle is standing still and the brake
pedal is depressed (left foot)
R the transmission is in drive position D
292Driving systemsControls in detail
BA 197 USA, CA Edition A 2011; 1; 27, en-UShereepeVersion: 3.0.3.52010-03-24T15:31:10+01:00 - Seite 292
Page 306 of 436

XActivating: Adjust the air temperature, air
volume and air distribution.
XPress button ¸.
The indicator lamp in the button comes on.
The driver-side settings are used for the
passenger side.
XDeactivating: Press button ¸ again.
The indicator lamp in the button goes out.
Rear window defroster
GWarning!
Any accumulation of snow and ice should be
removed from the rear window before driving.
Visibility could otherwise be impaired,
endangering you and others.
The rear window defroster uses a large
amount of power. To keep the battery drain
to a minimum, switch off the defroster as
soon as the rear window is clear. The
defroster is switched off automatically after
some time of operation depending on the
outside temperature.
XSwitch on the ignition.XSwitching on: Press button ¤.
The indicator lamp in the button comes on.
XSwitching off: Press button ¤ again.
The rear window defroster switches off when
the battery voltage is too low. Too many
electrical consumers may be operating
simultaneously.
XSwitch off consumers that are currently not
needed if required.
Loading and storing
Parcel net
GWarning!
The parcel net is intended for storing light-
weight items only, such as road maps, mail,
etc.
Heavy objects, objects with sharp edges, or
fragile objects may not be transported in the
parcel net. In an accident, during hard
braking, or sudden maneuvers, they could be
thrown around inside the vehicle and cause
injury to vehicle occupants.
The parcel net cannot protect transported
goods in the event of an accident.
A parcel net is located in the passenger
footwell.
Storage compartments
GWarning!
To help avoid personal injury during a collision
or sudden maneuver, exercise care when
storing objects in the vehicle. Put luggage or
cargo in the trunk if possible.
Keep compartment lids closed. This will help
to prevent stored objects from being thrown
about and injuring vehicle occupants during
Rbraking
Rvehicle maneuvers
Ran accident
Glove box
Depending on vehicle equipment, an AUX
socket or a media interface is located in the
glove box. For information on Audio AUX
mode, see (Y page 197) and for media
interface, see (Y page 192).
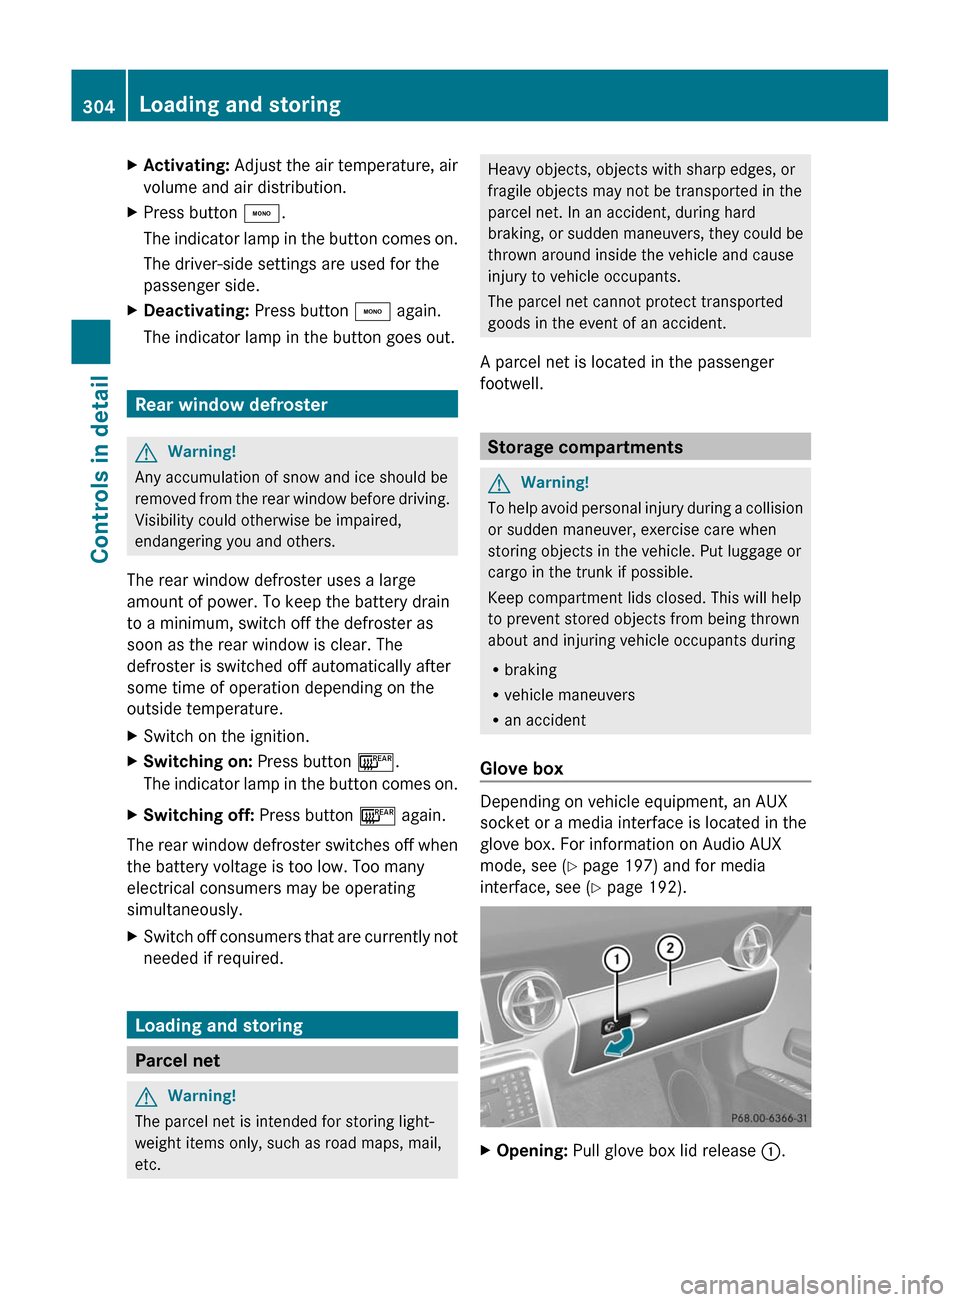
XOpening: Pull glove box lid release :.304Loading and storingControls in detail
BA 197 USA, CA Edition A 2011; 1; 27, en-UShereepeVersion: 3.0.3.52010-03-24T15:31:10+01:00 - Seite 304
Page 362 of 436

Leather upholstery
Please note that leather upholstery is a
natural product and is therefore subject to a
natural aging process. Leather upholstery
may also react to certain ambient influences
such as high humidity or high temperature by
showing wrinkles for example.
XWipe leather upholstery with a damp cloth
and dry thoroughly or clean with Mercedes-
Benz approved Leather Care.
! To avoid damage to leather upholstery:
RWipe with light pressure only.
RDo not clean with abrasive cleaning
agents such as scouring milk or powder.
RDo not soak the leather upholstery.
As leather is a natural product, it could
otherwise harden or become porous.
RExercise particular care when cleaning
perforated leather as its underside
should not become wet.
Chrome-plated exhaust tip
Regular cleaning and care of chrome-plated
exhaust tips will help to maintain their shine
and the classy appearance.
XUse Mercedes-Benz approved Chrome
Polishing Paste each time the vehicle has
been washed, especially during the winter.
! Do not use alkaline cleaners such as
wheel cleaners as they could cause
corrosion.
Trunk Wing
You can extend and retract the Trunk Wing
manually for cleaning.
GWarning!
Make sure that nobody can become trapped
when you retract the Trunk Wing manually. If
there is a risk of entrapment, release the
Trunk Wing switch to stop the retraction
process. The Trunk Wing will then extend
again.
Never leave children unattended in the
vehicle. They could inadvertently retract the
extended Trunk Wing. Somebody could
become trapped and be seriously injured.
! Do not enter an automatic car wash with
the Trunk Wing extended. Otherwise, the
Trunk Wing could be damaged.
Only extend the Trunk Wing in order to
clean it by hand. Retract it again after
cleaning.
XClose the trunk lid (Y page 240).XSwitch on the ignition.XTo extend: Press Trunk Wing switch :.
The Trunk Wing extends.
Trunk Wing switch : flashes for as long as
the Trunk Wing extends. It remains
illuminated in red when the Trunk Wing is
fully extended.
XTo retract: Press and hold Trunk Wing
switch : until the Trunk Wing has
retracted completely.
Trunk Wing switch : flashes for as long as
the Trunk Wing retracts. It goes out when
the Trunk Wing is fully retracted.
The message Rear Spoiler retracts
manually appears in the multifunction
display.
iWhen you release Trunk Wing switch :
during the retraction process, the Trunk
Wing extends again automatically.
360Vehicle careOperation
BA 197 USA, CA Edition A 2011; 1; 27, en-UShereepeVersion: 3.0.3.52010-03-24T15:31:10+01:00 - Seite 360
Page 400 of 436

Unlocking/locking the vehicle
If you cannot lock or unlock the vehicle
centrally with the SmartKey, use the
mechanical key.
The anti-theft alarm system will be triggered
when you
Runlock the driver’s door with the
mechanical key
and
Ropen the driver’s door
To cancel the alarm, see “Canceling the
alarm” (Y page 67).
XRemove the mechanical key from the
SmartKey (Y page 397).
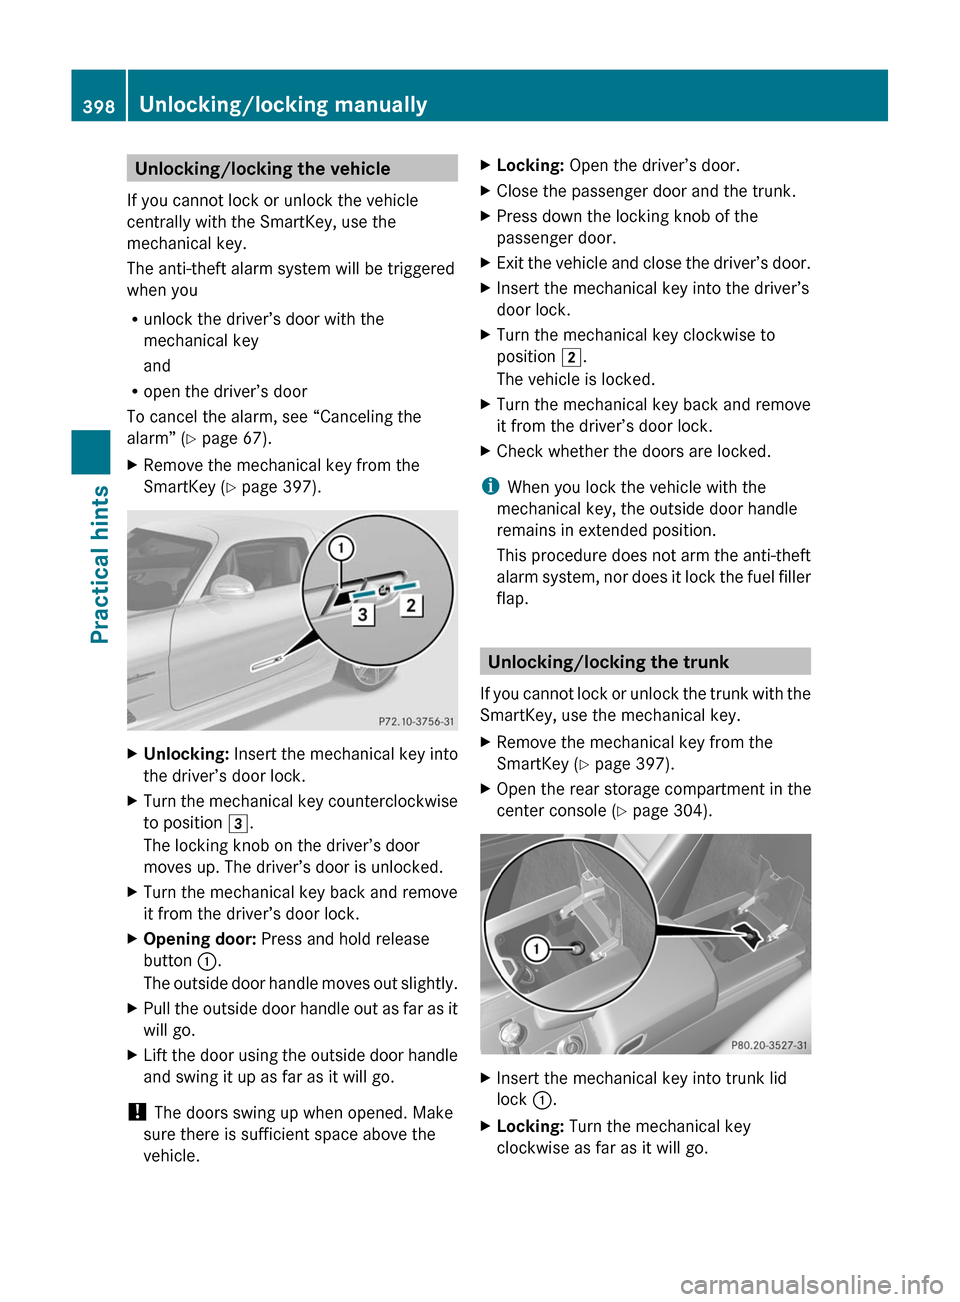
XUnlocking: Insert the mechanical key into
the driver’s door lock.
XTurn the mechanical key counterclockwise
to position 3.
The locking knob on the driver’s door
moves up. The driver’s door is unlocked.
XTurn the mechanical key back and remove
it from the driver’s door lock.
XOpening door: Press and hold release
button :.
The outside door handle moves out slightly.
XPull the outside door handle out as far as it
will go.
XLift the door using the outside door handle
and swing it up as far as it will go.
! The doors swing up when opened. Make
sure there is sufficient space above the
vehicle.
XLocking: Open the driver’s door.XClose the passenger door and the trunk.XPress down the locking knob of the
passenger door.
XExit the vehicle and close the driver’s door.XInsert the mechanical key into the driver’s
door lock.
XTurn the mechanical key clockwise to
position 2.
The vehicle is locked.
XTurn the mechanical key back and remove
it from the driver’s door lock.
XCheck whether the doors are locked.
iWhen you lock the vehicle with the
mechanical key, the outside door handle
remains in extended position.
This procedure does not arm the anti-theft
alarm system, nor does it lock the fuel filler
flap.
Unlocking/locking the trunk
If you cannot lock or unlock the trunk with the
SmartKey, use the mechanical key.
XRemove the mechanical key from the
SmartKey (Y page 397).
XOpen the rear storage compartment in the
center console (Y page 304).
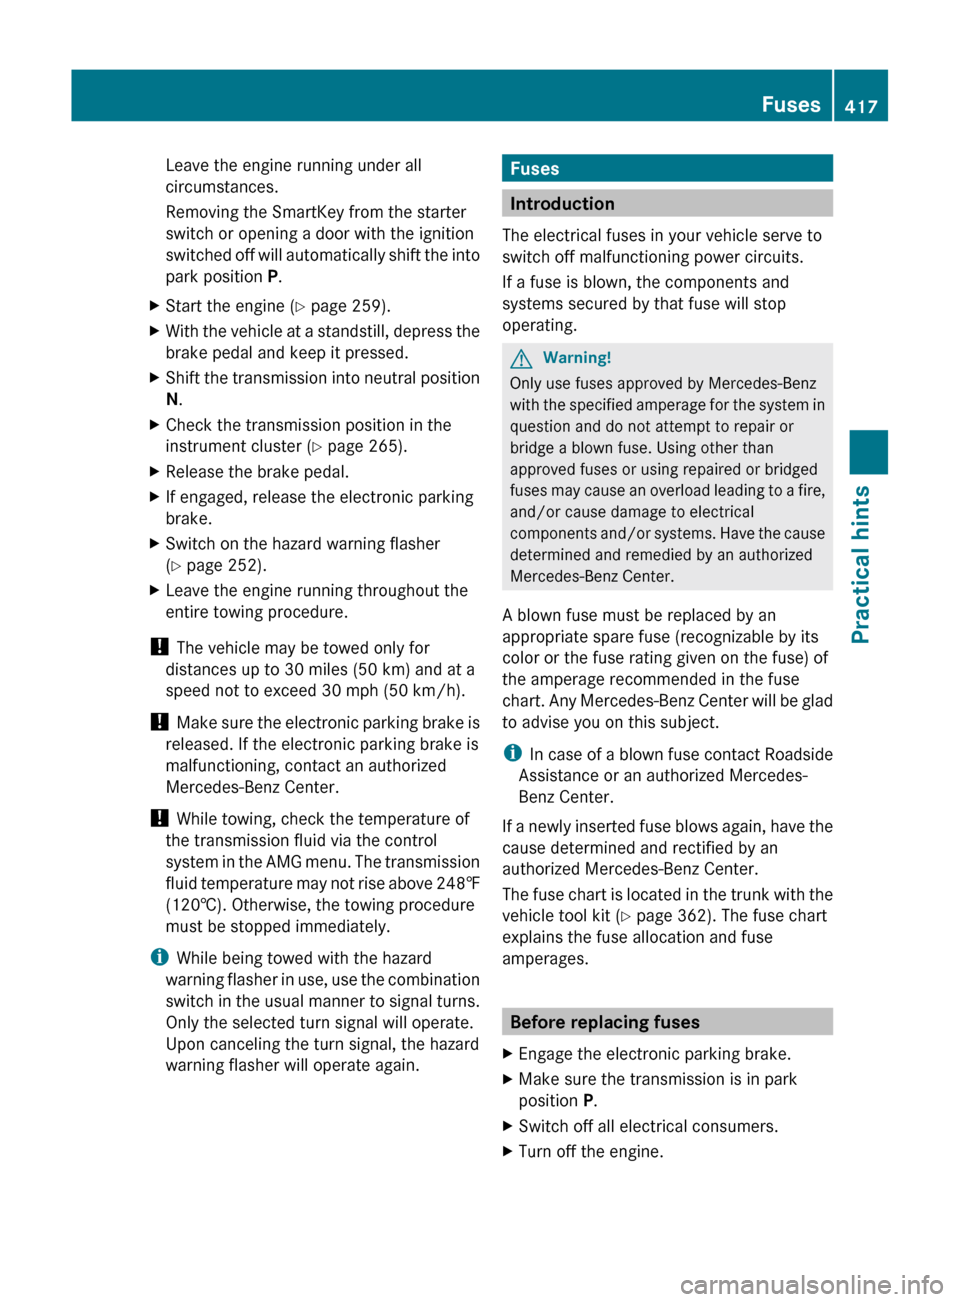
XInsert the mechanical key into trunk lid
lock :.
XLocking: Turn the mechanical key
clockwise as far as it will go.
398Unlocking/locking manuallyPractical hints
BA 197 USA, CA Edition A 2011; 1; 27, en-UShereepeVersion: 3.0.3.52010-03-24T15:31:10+01:00 - Seite 398
Page 419 of 436

Leave the engine running under all
circumstances.
Removing the SmartKey from the starter
switch or opening a door with the ignition
switched off will automatically shift the into
park position P.XStart the engine ( Y page 259).XWith the vehicle at a standstill, depress the
brake pedal and keep it pressed.XShift the transmission into neutral position
N .XCheck the transmission position in the
instrument cluster ( Y page 265).XRelease the brake pedal.XIf engaged, release the electronic parking
brake.XSwitch on the hazard warning flasher
( Y page 252).XLeave the engine running throughout the
entire towing procedure.
! The vehicle may be towed only for
distances up to 30 miles (50 km) and at a
speed not to exceed 30 mph (50 km/h).
! Make sure the electronic parking brake is
released. If the electronic parking brake is
malfunctioning, contact an authorized
Mercedes-Benz Center.
! While towing, check the temperature of
the transmission fluid via the control
system in the AMG menu. The transmission
fluid temperature may not rise above 248‡
(120†). Otherwise, the towing procedure
must be stopped immediately.
i While being towed with the hazard
warning flasher in use, use the combination
switch in the usual manner to signal turns.
Only the selected turn signal will operate.
Upon canceling the turn signal, the hazard
warning flasher will operate again.
Fuses
Introduction
The electrical fuses in your vehicle serve to
switch off malfunctioning power circuits.
If a fuse is blown, the components and
systems secured by that fuse will stop
operating.
GWarning!
Only use fuses approved by Mercedes-Benz
with the specified amperage for the system in
question and do not attempt to repair or
bridge a blown fuse. Using other than
approved fuses or using repaired or bridged
fuses may cause an overload leading to a fire,
and/or cause damage to electrical
components and/or systems. Have the cause
determined and remedied by an authorized
Mercedes-Benz Center.
A blown fuse must be replaced by an
appropriate spare fuse (recognizable by its
color or the fuse rating given on the fuse) of
the amperage recommended in the fuse
chart. Any Mercedes-Benz Center will be glad
to advise you on this subject.
i In case of a blown fuse contact Roadside
Assistance or an authorized Mercedes-
Benz Center.
If a newly inserted fuse blows again, have the
cause determined and rectified by an
authorized Mercedes-Benz Center.
The fuse chart is located in the trunk with the
vehicle tool kit ( Y page 362). The fuse chart
explains the fuse allocation and fuse
amperages.
Before replacing fuses
XEngage the electronic parking brake.XMake sure the transmission is in park
position P.XSwitch off all electrical consumers.XTurn off the engine.Fuses417Practical hintsBA 197 USA, CA Edition A 2011; 1; 27, en-UShereepeVersion: 3.0.3.52010-03-24T15:31:10+01:00 - Seite 417Z