2011 MERCEDES-BENZ SLS AMG key
[x] Cancel search: keyPage 382 of 436
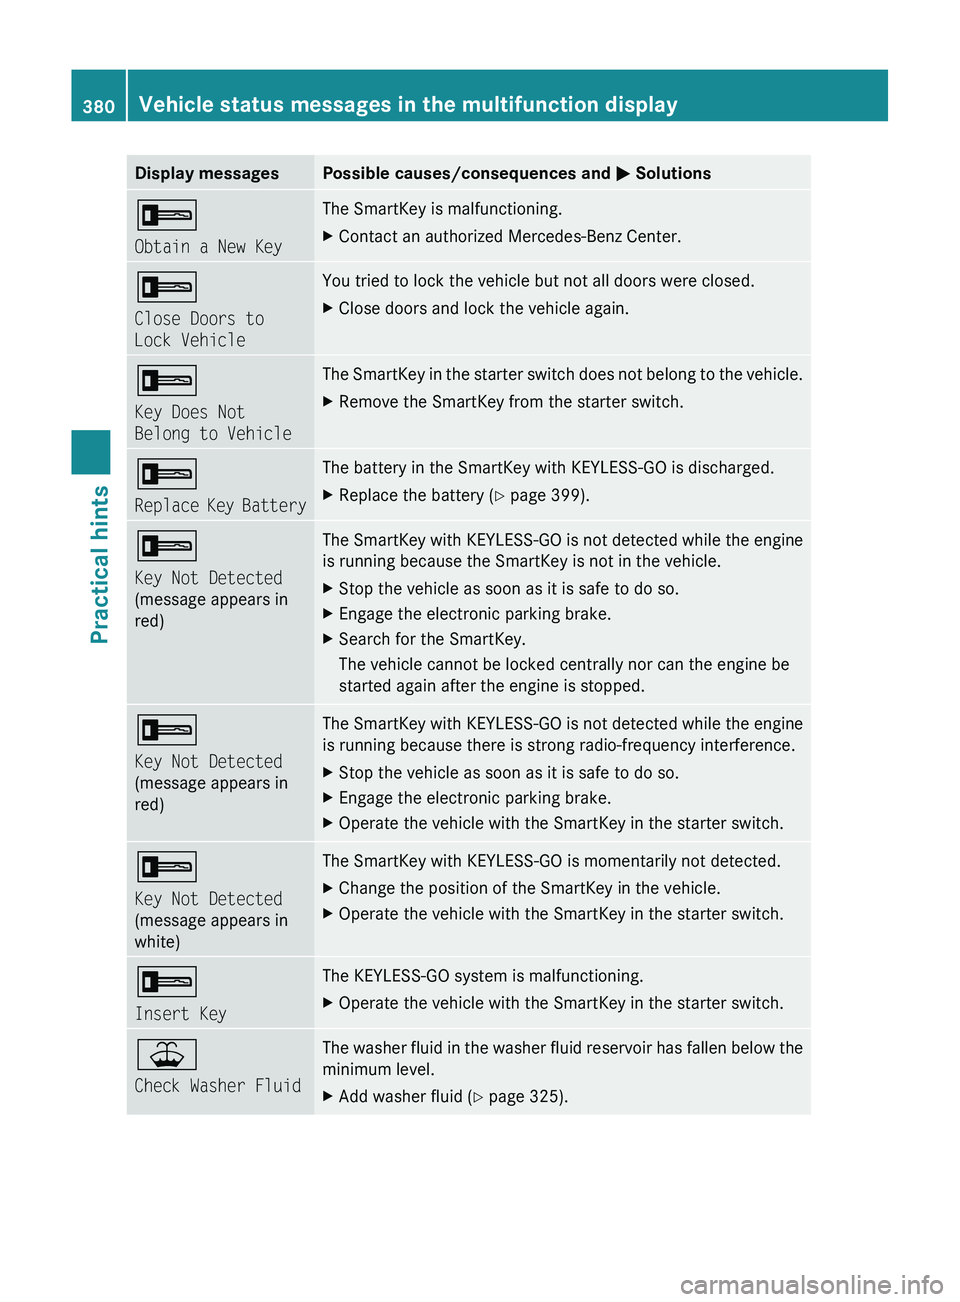
Display messagesPossible causes/consequences and 0050 Solutions0039
Obtain a New KeyThe SmartKey is malfunctioning.XContact an authorized Mercedes-Benz Center.0039
Close Doors to
Lock VehicleYou tried to lock the vehicle but not all doors were closed.XClose doors and lock the vehicle again.0039
Key Does Not
Belong to VehicleThe SmartKey in the starter switch does not belong to the vehicle.XRemove the SmartKey from the starter switch.0039
Replace Key BatteryThe battery in the SmartKey with KEYLESS-GO is discharged.XReplace the battery ( Y page 399).0039
Key Not Detected
(message appears in
red)The SmartKey with KEYLESS-GO is not detected while the engine
is running because the SmartKey is not in the vehicle.XStop the vehicle as soon as it is safe to do so.XEngage the electronic parking brake.XSearch for the SmartKey.
The vehicle cannot be locked centrally nor can the engine be
started again after the engine is stopped.0039
Key Not Detected
(message appears in
red)The SmartKey with KEYLESS-GO is not detected while the engine
is running because there is strong radio-frequency interference.XStop the vehicle as soon as it is safe to do so.XEngage the electronic parking brake.XOperate the vehicle with the SmartKey in the starter switch.0039
Key Not Detected
(message appears in
white)The SmartKey with KEYLESS-GO is momentarily not detected.XChange the position of the SmartKey in the vehicle.XOperate the vehicle with the SmartKey in the starter switch.0039
Insert KeyThe KEYLESS-GO system is malfunctioning.XOperate the vehicle with the SmartKey in the starter switch.00BE
Check Washer FluidThe washer fluid in the washer fluid reservoir has fallen below the
minimum level. XAdd washer fluid ( Y page 325).380Vehicle status messages in the multifunction displayPractical hints
BA 197 USA, CA Edition A 2011; 1; 27, en-UShereepeVersion: 3.0.3.52010-03-24T15:31:10+01:00 - Seite 380
Page 388 of 436
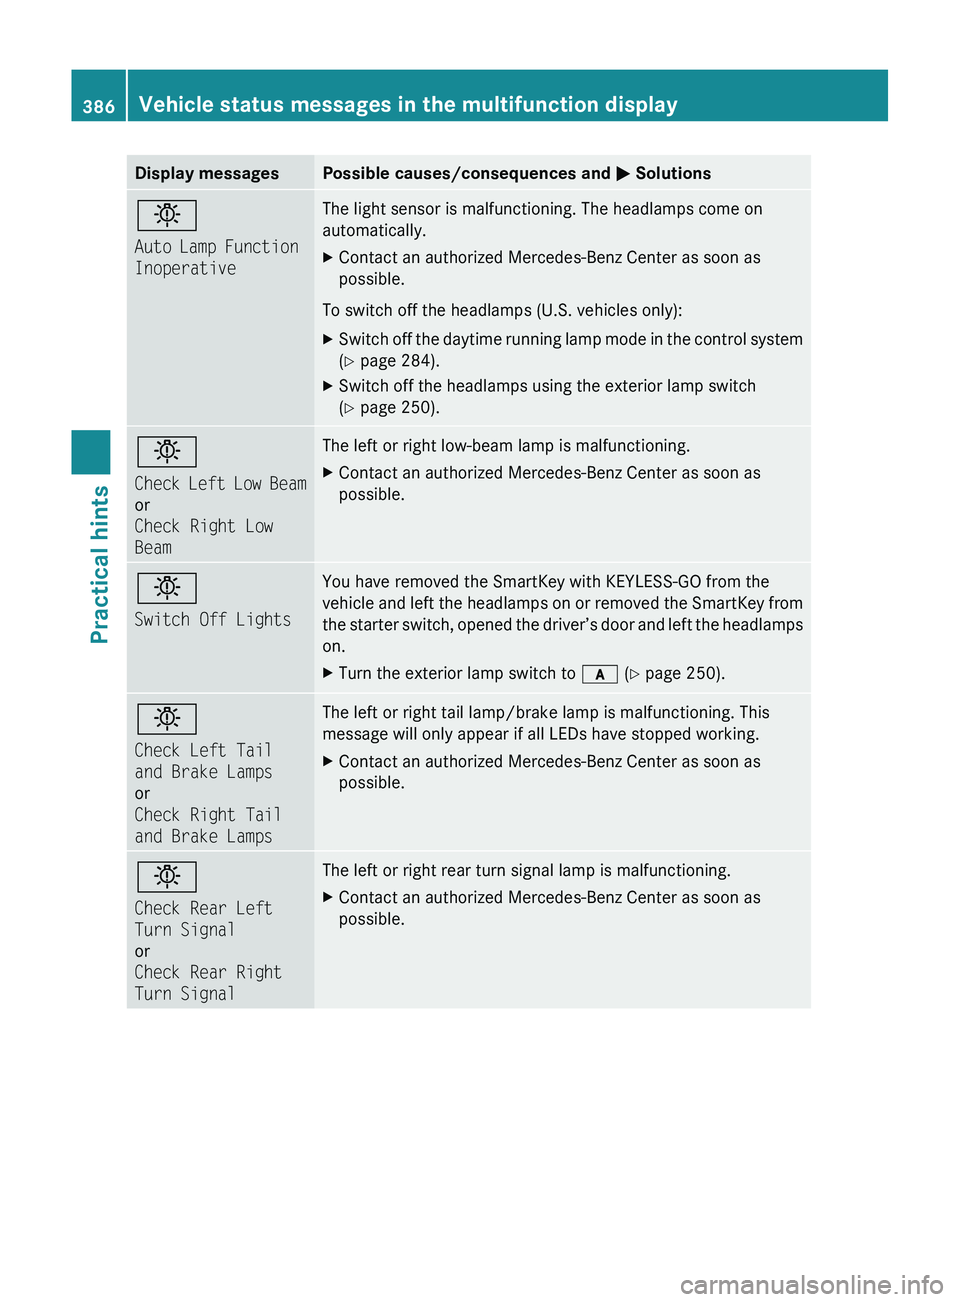
Display messagesPossible causes/consequences and 0050 Solutions0055
Auto Lamp Function
InoperativeThe light sensor is malfunctioning. The headlamps come on
automatically. XContact an authorized Mercedes-Benz Center as soon as
possible.
To switch off the headlamps (U.S. vehicles only):
XSwitch off the daytime running lamp mode in the control system
( Y page 284).XSwitch off the headlamps using the exterior lamp switch
( Y page 250).0055
Check Left Low Beam
or
Check Right Low
BeamThe left or right low-beam lamp is malfunctioning. XContact an authorized Mercedes-Benz Center as soon as
possible.0055
Switch Off LightsYou have removed the SmartKey with KEYLESS-GO from the
vehicle and left the headlamps on or removed the SmartKey from
the starter switch, opened the driver’s door and left the headlamps
on.XTurn the exterior lamp switch to 0066 (Y page 250).0055
Check Left Tail
and Brake Lamps
or
Check Right Tail
and Brake LampsThe left or right tail lamp/brake lamp is malfunctioning. This
message will only appear if all LEDs have stopped working.XContact an authorized Mercedes-Benz Center as soon as
possible.0055
Check Rear Left
Turn Signal
or
Check Rear Right
Turn SignalThe left or right rear turn signal lamp is malfunctioning.XContact an authorized Mercedes-Benz Center as soon as
possible.386Vehicle status messages in the multifunction displayPractical hints
BA 197 USA, CA Edition A 2011; 1; 27, en-UShereepeVersion: 3.0.3.52010-03-24T15:31:10+01:00 - Seite 386
Page 399 of 436

GWarning!
If the 007F 0080 indicator lamp illuminates and remains illuminated with the weight of a typical
adult or someone larger than a small individual on the passenger seat, do not have any passenger
use the passenger seat until the system has been repaired.
ProblemPossible causes/consequences and 0050 Solutions007F 0080
The passenger front air
bag off indicator lamp
does not illuminate
and/or does not
remain illuminated with
the weight of a typical
12-month-old child in a
standard child restraint
or less on the
passenger seat.The system is malfunctioning.XMake sure there is nothing between seat cushion and child seat
and check installation of the child seat.XMake sure no objects applying supplemental weight onto the
seat are present.XIf the passenger front air bag off indicator lamp remains out,
have the system checked as soon as possible at an authorized
Mercedes-Benz Center. Do not transport a child on the
passenger seat until the system has been repaired.XRead and observe messages in the multifunction display and
follow corrective steps ( Y page 364).GWarning!
If the 007F 0080 indicator lamp does not illuminate or remains out with the weight of a typical
12-month-old child in a standard child restraint or less on the passenger seat, do not transport
a child on the passenger seat until the system has been repaired.
Unlocking/locking manually
Mechanical key
If you cannot lock or unlock the vehicle with
the SmartKey, use the mechanical key.
The anti-theft alarm system will be triggered
when you
R unlock the driver’s door with the
mechanical key
and
R open the driver’s door
To cancel the alarm, see “Canceling the
alarm” ( Y page 67).
Removing the mechanical key XMove locking tab 0046 in the direction of the
arrow.XSlide mechanical key 0047 out of the housing.Unlocking/locking manually397Practical hintsBA 197 USA, CA Edition A 2011; 1; 27, en-UShereepeVersion: 3.0.3.52010-03-24T15:31:10+01:00 - Seite 397Z
Page 400 of 436
Unlocking/locking the vehicle
If you cannot lock or unlock the vehicle
centrally with the SmartKey, use the
mechanical key.
The anti-theft alarm system will be triggered
when you
Runlock the driver’s door with the
mechanical key
and
Ropen the driver’s door
To cancel the alarm, see “Canceling the
alarm” (Y page 67).
XRemove the mechanical key from the
SmartKey (Y page 397).
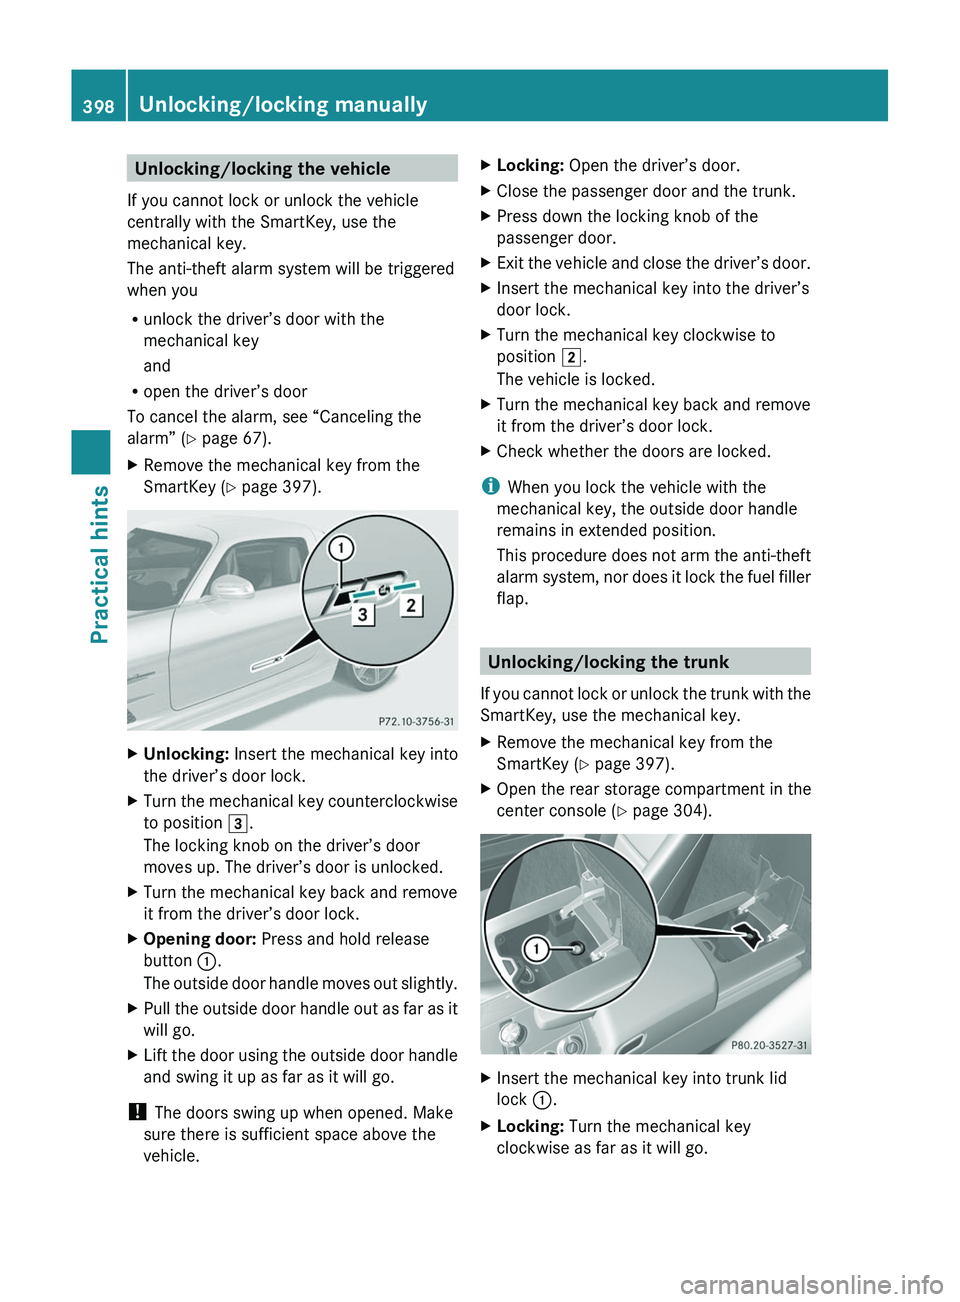
XUnlocking: Insert the mechanical key into
the driver’s door lock.
XTurn the mechanical key counterclockwise
to position \000L.
The locking knob on the driver’s door
moves up. The driver’s door is unlocked.
XTurn the mechanical key back and remove
it from the driver’s door lock.
XOpening door: Press and hold release
button \000F.
The outside door handle moves out slightly.
XPull the outside door handle out as far as it
will go.
XLift the door using the outside door handle
and swing it up as far as it will go.
! The doors swing up when opened. Make
sure there is sufficient space above the
vehicle.
XLocking: Open the driver’s door.XClose the passenger door and the trunk.XPress down the locking knob of the
passenger door.
XExit the vehicle and close the driver’s door.XInsert the mechanical key into the driver’s
door lock.
XTurn the mechanical key clockwise to
position \000K.
The vehicle is locked.
XTurn the mechanical key back and remove
it from the driver’s door lock.
XCheck whether the doors are locked.
iWhen you lock the vehicle with the
mechanical key, the outside door handle
remains in extended position.
This procedure does not arm the anti-theft
alarm system, nor does it lock the fuel filler
flap.
Unlocking/locking the trunk
If you cannot lock or unlock the trunk with the
SmartKey, use the mechanical key.
XRemove the mechanical key from the
SmartKey (Y page 397).
XOpen the rear storage compartment in the
center console (Y page 304).
XInsert the mechanical key into trunk lid
lock \000F.
XLocking: Turn the mechanical key
clockwise as far as it will go.
398Unlocking/locking manuallyPractical hints
BA 197 USA, CA Edition A 2011; 1; 27, en-UShereepeVersion: 3.0.3.52010-03-24T15:31:10+01:00 - Seite 398
Page 401 of 436
XRemove the SmartKey from the trunk lid
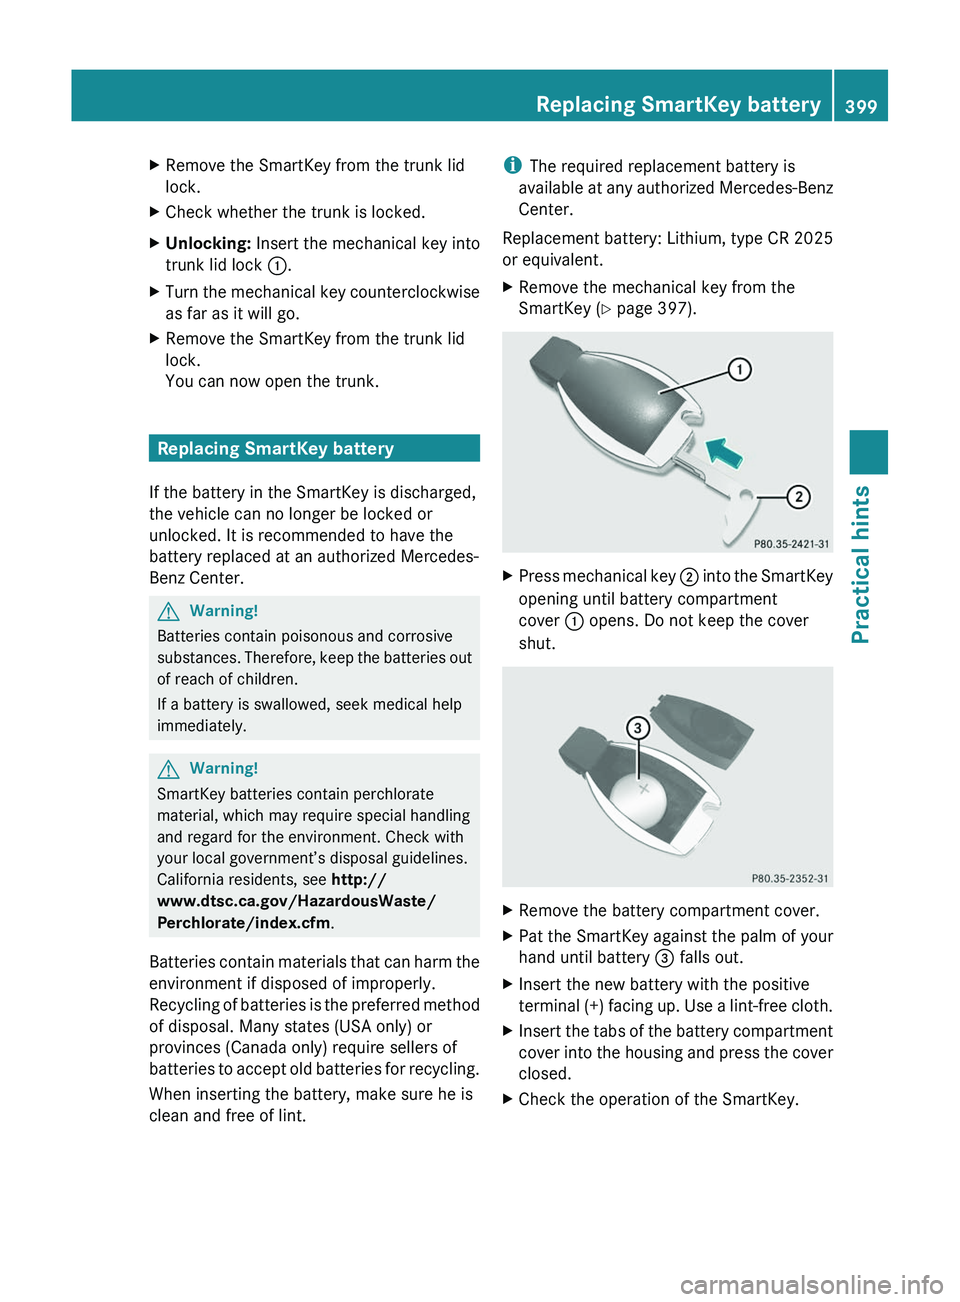
lock.XCheck whether the trunk is locked.XUnlocking: Insert the mechanical key into
trunk lid lock 0046.XTurn the mechanical key counterclockwise
as far as it will go.XRemove the SmartKey from the trunk lid
lock.
You can now open the trunk.
Replacing SmartKey battery
If the battery in the SmartKey is discharged,
the vehicle can no longer be locked or
unlocked. It is recommended to have the
battery replaced at an authorized Mercedes-
Benz Center.
GWarning!
Batteries contain poisonous and corrosive
substances. Therefore, keep the batteries out
of reach of children.
If a battery is swallowed, seek medical help
immediately.
GWarning!
SmartKey batteries contain perchlorate
material, which may require special handling
and regard for the environment. Check with
your local government’s disposal guidelines.
California residents, see http://
www.dtsc.ca.gov/HazardousWaste/
Perchlorate/index.cfm .
Batteries contain materials that can harm the
environment if disposed of improperly.
Recycling of batteries is the preferred method
of disposal. Many states (USA only) or
provinces (Canada only) require sellers of
batteries to accept old batteries for recycling.
When inserting the battery, make sure he is
clean and free of lint.
i The required replacement battery is
available at any authorized Mercedes-Benz
Center.
Replacement battery: Lithium, type CR 2025
or equivalent.XRemove the mechanical key from the
SmartKey ( Y page 397).XPress mechanical key 0047 into the SmartKey
opening until battery compartment
cover 0046 opens. Do not keep the cover
shut.XRemove the battery compartment cover.XPat the SmartKey against the palm of your
hand until battery 008A falls out.XInsert the new battery with the positive
terminal (+) facing up. Use a lint-free cloth.XInsert the tabs of the battery compartment
cover into the housing and press the cover
closed.XCheck the operation of the SmartKey.Replacing SmartKey battery399Practical hintsBA 197 USA, CA Edition A 2011; 1; 27, en-UShereepeVersion: 3.0.3.52010-03-24T15:31:10+01:00 - Seite 399Z
Page 402 of 436
Replacing bulbs
Safety notes
Safe vehicle operation depends on proper
exterior lighting and signaling to a large
degree.
Correct headlamp adjustment is extremely
important. Have headlamps checked and
readjusted at regular intervals and when a
bulb has been replaced. Contact an
authorized Mercedes-Benz Center for
headlamp adjustment.
GWarning!
Bulbs and bulb sockets can be very hot. Allow
the lamp to cool down before changing a bulb.
Keep bulbs out of reach of children.
Halogen lamps contain pressurized gas. A
bulb can explode if you
R touch or move it when hot
R drop the bulb
R scratch the bulb
Wear eye and hand protection.
Because of high voltage in Xenon lamps, it is
dangerous to replace the bulb or repair the
lamp and its components. We recommend
that you have such work done by a qualified
technician.
i Since replacing bulbs is a technically
highly demanding process, we recommend
to have them replaced at an authorized
Mercedes-Benz Center.
i If the headlamps are fogged up on the
inside as a result of high humidity, driving
the vehicle a distance with the lights on
should clear up the fogging.
Replacing bulbs for front lamps
You cannot replace the bulbs in the front
lamps yourself. Contact an authorized
Mercedes-Benz Center or a qualified
workshop.
Replacing bulbs for rear lamps
Except for the license plate lamp bulbs, you
cannot replace the bulbs in the rear lamps
yourself.
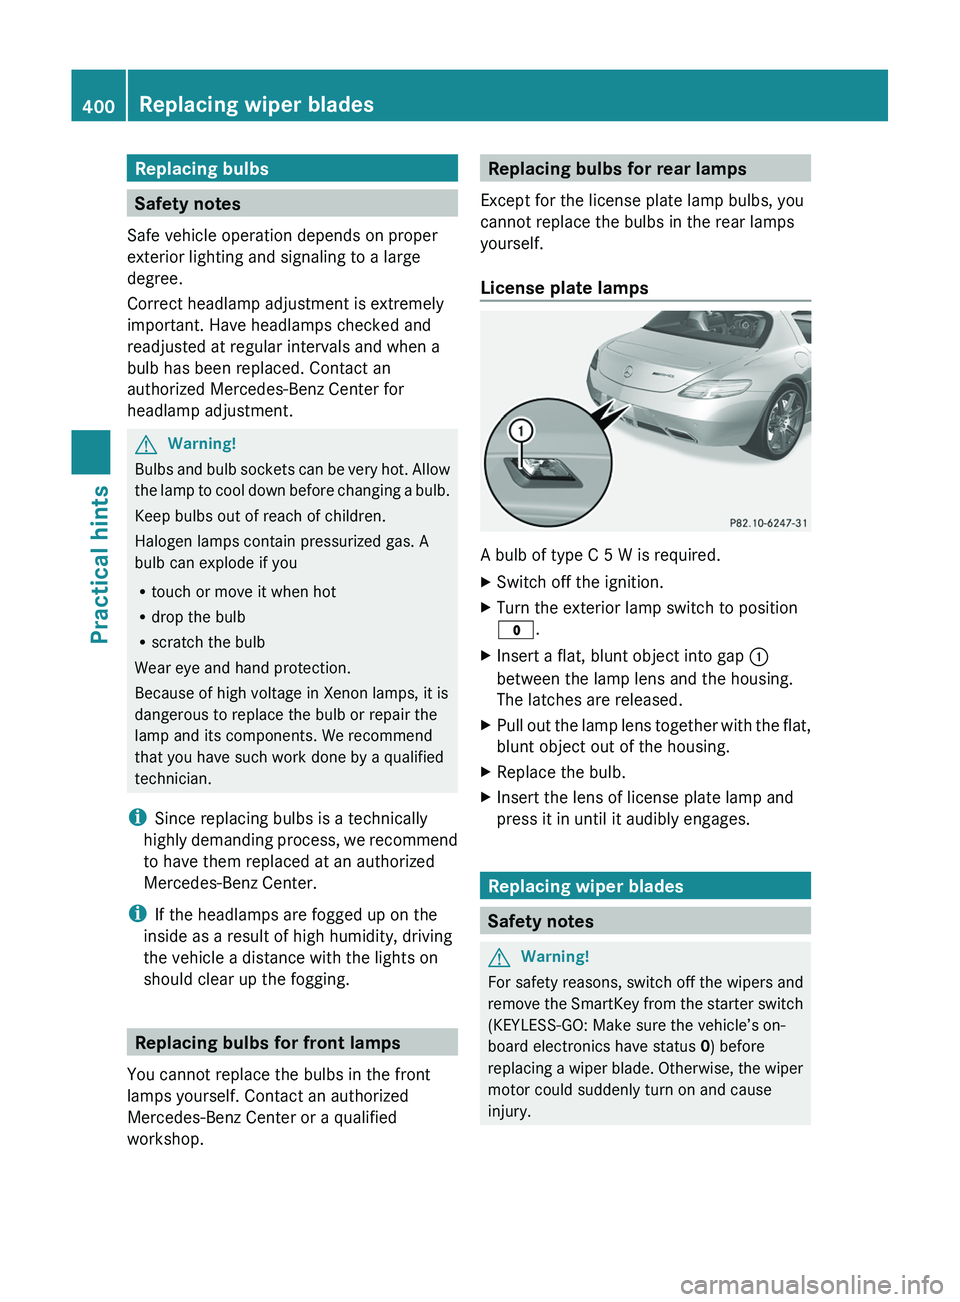
License plate lamps
A bulb of type C 5 W is required.
XSwitch off the ignition.XTurn the exterior lamp switch to position
0027 .XInsert a flat, blunt object into gap 0046
between the lamp lens and the housing.
The latches are released.XPull out the lamp lens together with the flat,
blunt object out of the housing.XReplace the bulb.XInsert the lens of license plate lamp and
press it in until it audibly engages.
Replacing wiper blades
Safety notes
GWarning!
For safety reasons, switch off the wipers and
remove the SmartKey from the starter switch
(KEYLESS-GO: Make sure the vehicle’s on-
board electronics have status 0) before
replacing a wiper blade. Otherwise, the wiper
motor could suddenly turn on and cause
injury.
400Replacing wiper bladesPractical hints
BA 197 USA, CA Edition A 2011; 1; 27, en-UShereepeVersion: 3.0.3.52010-03-24T15:31:10+01:00 - Seite 400
Page 404 of 436
Flat tire
Notes
Your vehicle is equipped with a TIREFIT kit
(Y page 362).
Preparing the vehicle
XWhenever possible, park the vehicle in a
safe distance from moving traffic on a hard,
flat surface.
XTurn on the hazard warning flasher.XTurn the steering wheel so that the front
wheels are in a straight-ahead position.
XEngage the electronic parking brake.XShift the transmission into park position P.XTurn off the engine.XKEYLESS-GO: Open the driver’s door (this
puts the starter switch in position 0, same
as with the SmartKey removed from the
starter switch). The driver’s door can then
be closed again. Open doors only when
conditions are safe to do so.
or
XRemove the SmartKey from the starter
switch.
XHave any passenger exit the vehicle at a
safe distance from the roadway. Open
doors only when conditions are safe to do
so.
Sealing tires with TIREFIT
Small tire punctures, particularly those in the
tread, can be sealed with TIREFIT.
TIREFIT can be used in ambient temperatures
down to -40‡ (-40†).
GWarning!
TIREFIT is a limited repair device. TIREFIT
cannot be used for cuts or punctures larger
than approximately 0.16 in (4 mm) and tire
damage caused by driving with extremely low
tire inflation pressure, or on a flat tire, or a
damaged wheel.
Do not drive the vehicle under such
circumstances.
Contact the nearest authorized Mercedes-
Benz Center for assistance or call Roadside
Assistance.
XForeign objects (e.g. screws or nails)
should not be removed from the tire.
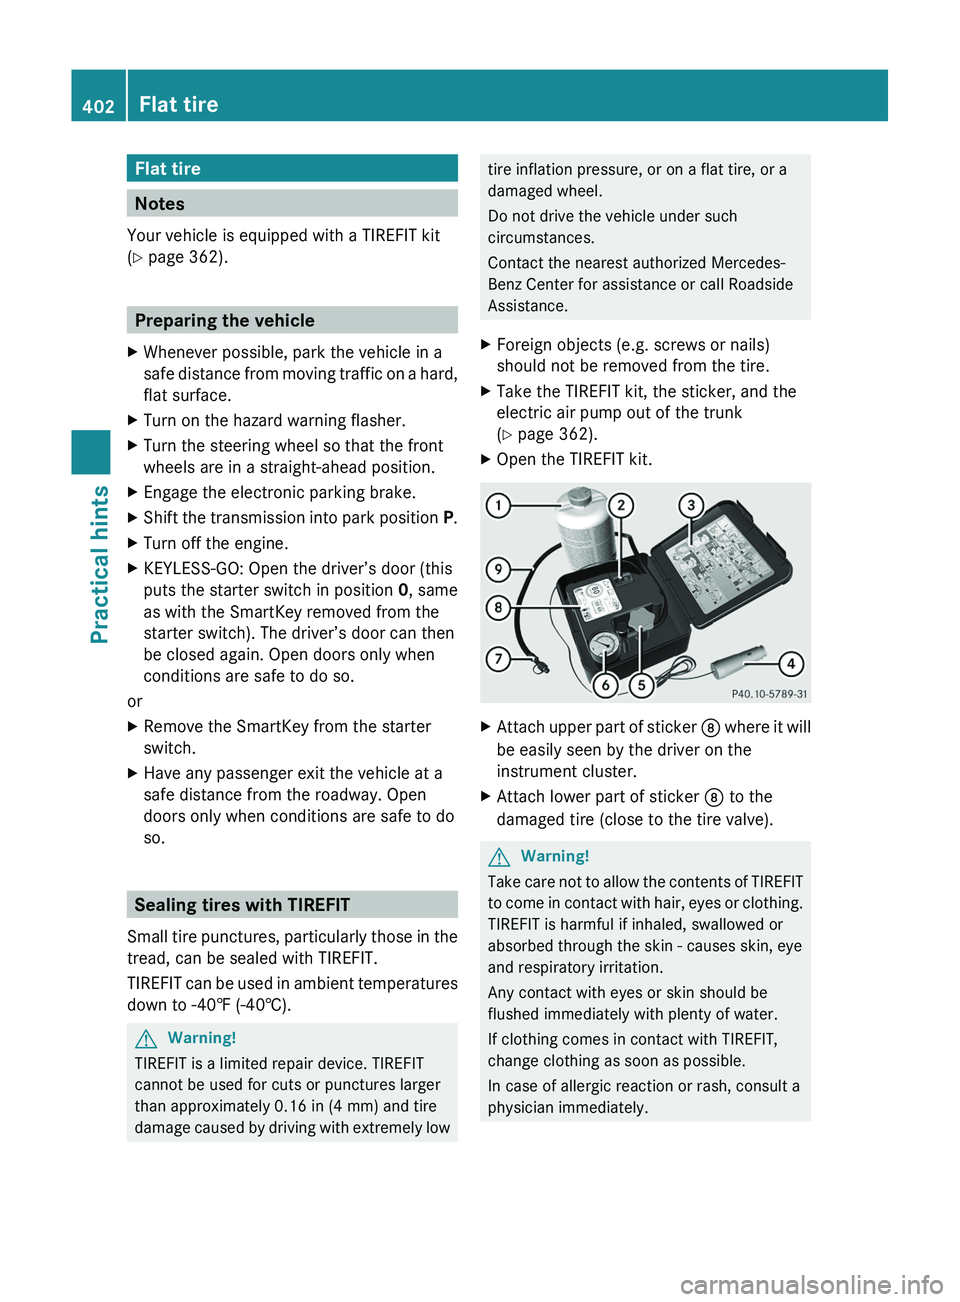
XTake the TIREFIT kit, the sticker, and the
electric air pump out of the trunk
(Y page 362).
XOpen the TIREFIT kit.XAttach upper part of sticker \000o where it will
be easily seen by the driver on the
instrument cluster.
XAttach lower part of sticker \000o to the
damaged tire (close to the tire valve).
GWarning!
Take care not to allow the contents of TIREFIT
to come in contact with hair, eyes or clothing.
TIREFIT is harmful if inhaled, swallowed or
absorbed through the skin - causes skin, eye
and respiratory irritation.
Any contact with eyes or skin should be
flushed immediately with plenty of water.
If clothing comes in contact with TIREFIT,
change clothing as soon as possible.
In case of allergic reaction or rash, consult a
physician immediately.
402Flat tirePractical hints
BA 197 USA, CA Edition A 2011; 1; 27, en-UShereepeVersion: 3.0.3.52010-03-24T15:31:10+01:00 - Seite 402
Page 407 of 436
GWarning!
Do not exceed a vehicle speed of 50 mph
( 80 km/h). A TIREFIT repair is not designed to
operate at higher speeds.
The sticker must be attached on the
instrument cluster where it will be easily seen
by the driver.
Vehicle handling characteristics of a TIREFIT
repaired tire may change. Adapt your driving
accordingly.
XAfter driving for approximately 5 miles
(3 km) or 10 minutes, stop the vehicle and
check the tire inflation pressure using the
electric air pump.
i The TIREFIT sealing may impair the
function of the sensors in the tire. Proper
operating sensors are necessary to check
the tire inflation pressure with the
Advanced Tire Pressure Monitoring
System. When the sensors are not
operating properly, the measured tire
inflation pressure may be inaccurate or the
tire inflation pressure may not be displayed
at all. Error messages may appear.
Therefore, check and adjust the tire
inflation pressure with pressure gauge 0087
on the electric air pump.
GWarning!
If tire inflation pressure has fallen below
130 kPA (1.3 bar, 20 psi) do not continue to
drive the vehicle.
Park your vehicle safely away from the
roadway and contact the nearest authorized
Mercedes-Benz Center or Roadside
Assistance.
Have the damaged tire replaced.
If the tire inflation pressure is at least 130 kPA
(1.3 bar, 20 psi), inflate or deflate the tire to
the correct tire inflation pressure (see Tire
and Loading Information placard on the
driver’s door B-pillar):XTo increase tire inflation pressure:
Switch on the electric air pump.XTo decrease tire inflation pressure:
Open vent screw 006E on air hose 0070.XDrive to the nearest qualified workshop,
e.g. an authorized Mercedes-Benz Center,
to have the damaged tire replaced.XContact an authorized Mercedes-Benz
Center as soon as possible to obtain a new
TIREFIT kit.XBring used TIREFIT materials to an
authorized Mercedes-Benz Center for
proper disposal.XReplace your TIREFIT container every
4 years. Replacement containers are
available at any authorized Mercedes-Benz
Center.
Wheel change
Preparing the vehicle
XPark the vehicle on a hard, flat surface.XTurn the steering wheel so that the front
wheels are in a straight-ahead position.XEngage the electronic parking brake.XShift the transmission into park position P.XTurn off the engine.XKEYLESS-GO: Open the driver’s door (this
puts the starter switch in position 0, same
as with the SmartKey removed from the
starter switch). The driver’s door can then
be closed again. Open doors only when
conditions are safe to do so.
or
XRemove the SmartKey from the starter
switch.XTake the following out of the vehicle:Wheel change405Practical hintsBA 197 USA, CA Edition A 2011; 1; 27, en-UShereepeVersion: 3.0.3.52010-03-24T15:31:10+01:00 - Seite 405Z