2011 MERCEDES-BENZ SLS AMG reset
[x] Cancel search: resetPage 95 of 436
SettingsDisplay OffDisplay
(Y page 93)
Time (Y page 93)
Text reader speed
(Y page 94)
Voice
Control(Y page
95)
Setting the language
(Y page 99)
Bluetooth®
(Y page 96)
Rear View Camera
(Y page 99)
Reset COMAND
(Y page 99)
iUse this function
to delete your
personal data,
e.g. before selling
your vehicle.
Display Settings
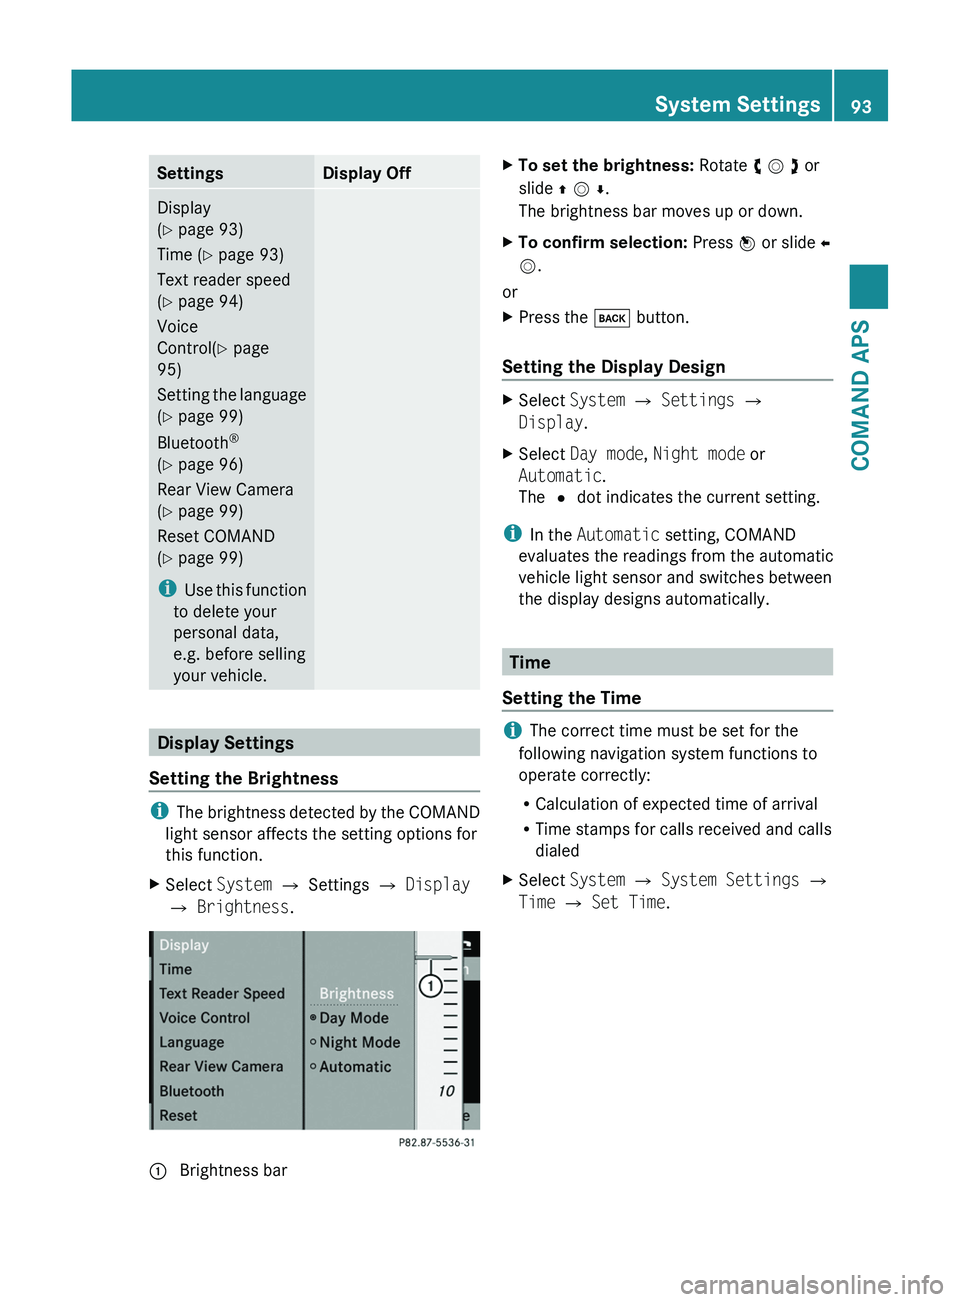
Setting the Brightness
iThe brightness detected by the COMAND
light sensor affects the setting options for
this function.
XSelect System £ Settings £ Display
£ Brightness.
1 Brightness barXTo set the brightness: Rotate y m z or
slide q m r.
The brightness bar moves up or down.
XTo confirm selection: Press n or slide o
m.
or
XPress the \000= button.
Setting the Display Design
XSelect System £ Settings £
Display.
XSelect Day mode, Night mode or
Automatic.
The R dot indicates the current setting.
iIn the Automatic setting, COMAND
evaluates the readings from the automatic
vehicle light sensor and switches between
the display designs automatically.
Time
Setting the Time
iThe correct time must be set for the
following navigation system functions to
operate correctly:
RCalculation of expected time of arrival
RTime stamps for calls received and calls
dialed
XSelect System £ System Settings £
Time £ Set Time.
System Settings93COMAND APSBA 197 USA, CA Edition A 2011; 1; 27, en-UShereepeVersion: 3.0.3.52010-03-24T15:31:10+01:00 - Seite 93Z
Page 101 of 436
Rear View Camera
COMAND shows the camera picture on the
display when
Rthe function is switched on in the System
Settings menu and
Rthe vehicle is shifted into reverse gear
As soon as you shift out of reverse gear, the
previous display is shown.
Switching On/Off the Display of the
Rear View Camera
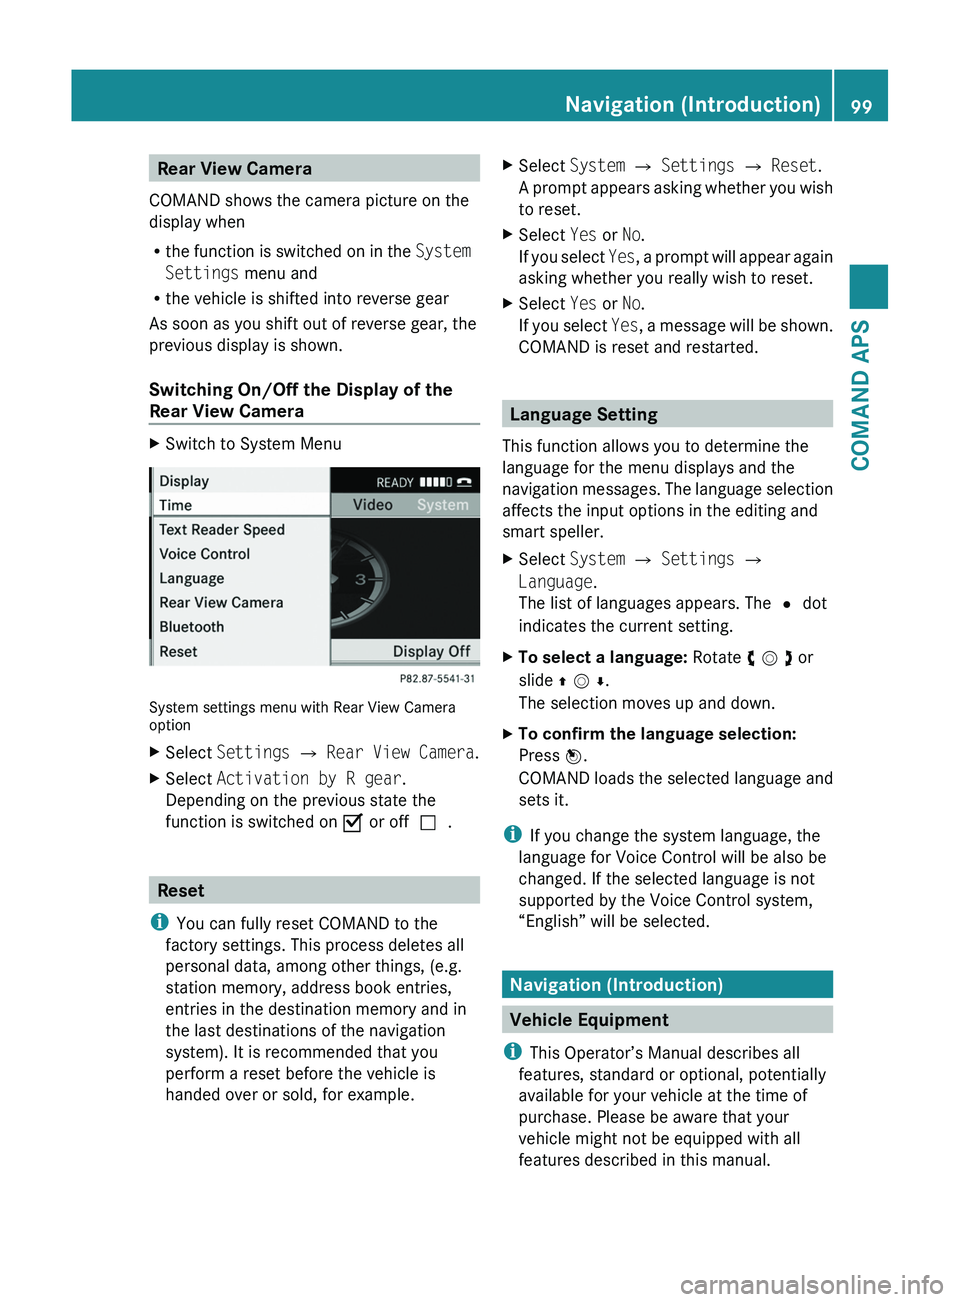
XSwitch to System Menu
System settings menu with Rear View Cameraoption
XSelect Settings £ Rear View Camera.XSelect Activation by R gear.
Depending on the previous state the
function is switched on Ç or offc.
Reset
iYou can fully reset COMAND to the
factory settings. This process deletes all
personal data, among other things, (e.g.
station memory, address book entries,
entries in the destination memory and in
the last destinations of the navigation
system). It is recommended that you
perform a reset before the vehicle is
handed over or sold, for example.
XSelect System £ Settings £ Reset.
A prompt appears asking whether you wish
to reset.
XSelect Yes or No.
If you select Yes, a prompt will appear again
asking whether you really wish to reset.
XSelect Yes or No.
If you select Yes, a message will be shown.
COMAND is reset and restarted.
Language Setting
This function allows you to determine the
language for the menu displays and the
navigation messages. The language selection
affects the input options in the editing and
smart speller.
XSelect System £ Settings £
Language.
The list of languages appears. The R dot
indicates the current setting.
XTo select a language: Rotate y m z or
slide q m r.
The selection moves up and down.
XTo confirm the language selection:
Press n.
COMAND loads the selected language and
sets it.
iIf you change the system language, the
language for Voice Control will be also be
changed. If the selected language is not
supported by the Voice Control system,
“English” will be selected.
Navigation (Introduction)
Vehicle Equipment
iThis Operator’s Manual describes all
features, standard or optional, potentially
available for your vehicle at the time of
purchase. Please be aware that your
vehicle might not be equipped with all
features described in this manual.
Navigation (Introduction)99COMAND APSBA 197 USA, CA Edition A 2011; 1; 27, en-UShereepeVersion: 3.0.3.52010-03-24T15:31:10+01:00 - Seite 99Z
Page 163 of 436
Only use the COMAND when road and traffic
conditions permit you to do so. Otherwise you
could be involved in an accident in which you
or others could be injured.
General Information
The entries of the address book can be used
for making phone calls and for setting
navigation destinations.
iYou should delete your personal data
before selling your vehicle, using the Reset
function (Y page 99).
Opening the Address Book
From Another Main Function
XSelect Phone £ Phone £ Address
Book.
iIf the address book was last open in the
telephone function, you only need to select
Phone.
Within the Phone Function
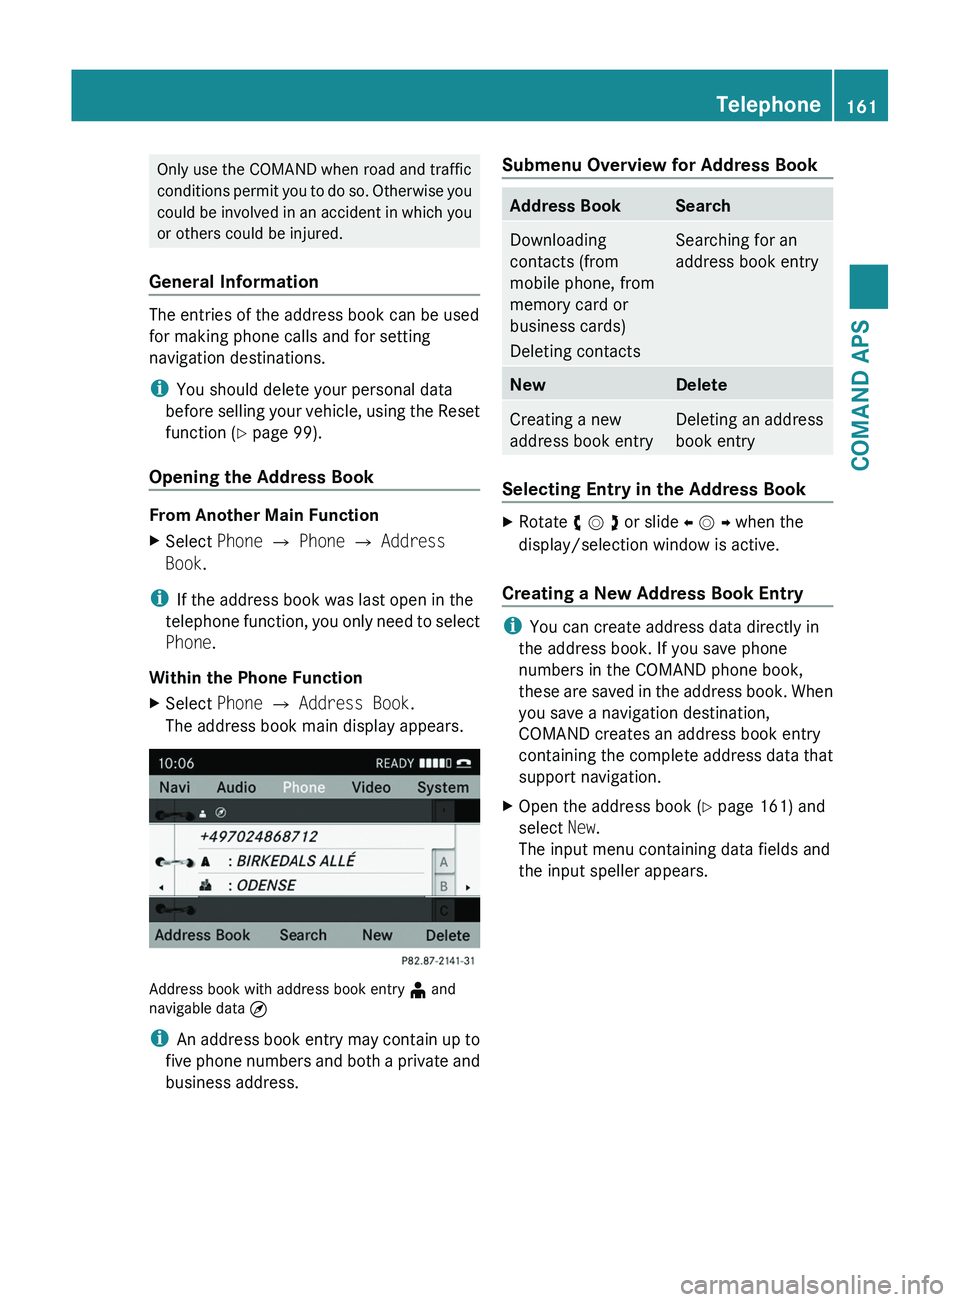
XSelect Phone £ Address Book.
The address book main display appears.
Address book with address book entry ¥ andnavigable data ¤
iAn address book entry may contain up to
five phone numbers and both a private and
business address.
Submenu Overview for Address BookAddress BookSearchDownloading
contacts (from
mobile phone, from
memory card or
business cards)
Deleting contacts
Searching for an
address book entry
NewDeleteCreating a new
address book entry
Deleting an address
book entry
Selecting Entry in the Address Book
XRotate y m z or slide o m p when the
display/selection window is active.
Creating a New Address Book Entry
iYou can create address data directly in
the address book. If you save phone
numbers in the COMAND phone book,
these are saved in the address book. When
you save a navigation destination,
COMAND creates an address book entry
containing the complete address data that
support navigation.
XOpen the address book (Y page 161) and
select New.
The input menu containing data fields and
the input speller appears.
Telephone161COMAND APSBA 197 USA, CA Edition A 2011; 1; 27, en-UShereepeVersion: 3.0.3.52010-03-24T15:31:10+01:00 - Seite 161Z
Page 172 of 436
Submenu OverviewRadio (FM
and AM
only)
Presets
(FM and
AM only)
Channel
(WB only)
InfoFMSoundEnter
Frequency
AutostoreList of
receivable
channels
Program
Information
FMTrebleÇ Show
Station
Information
List of
stored
stations
AMBassWBBalanceBang &
Olufsen
Sound
System
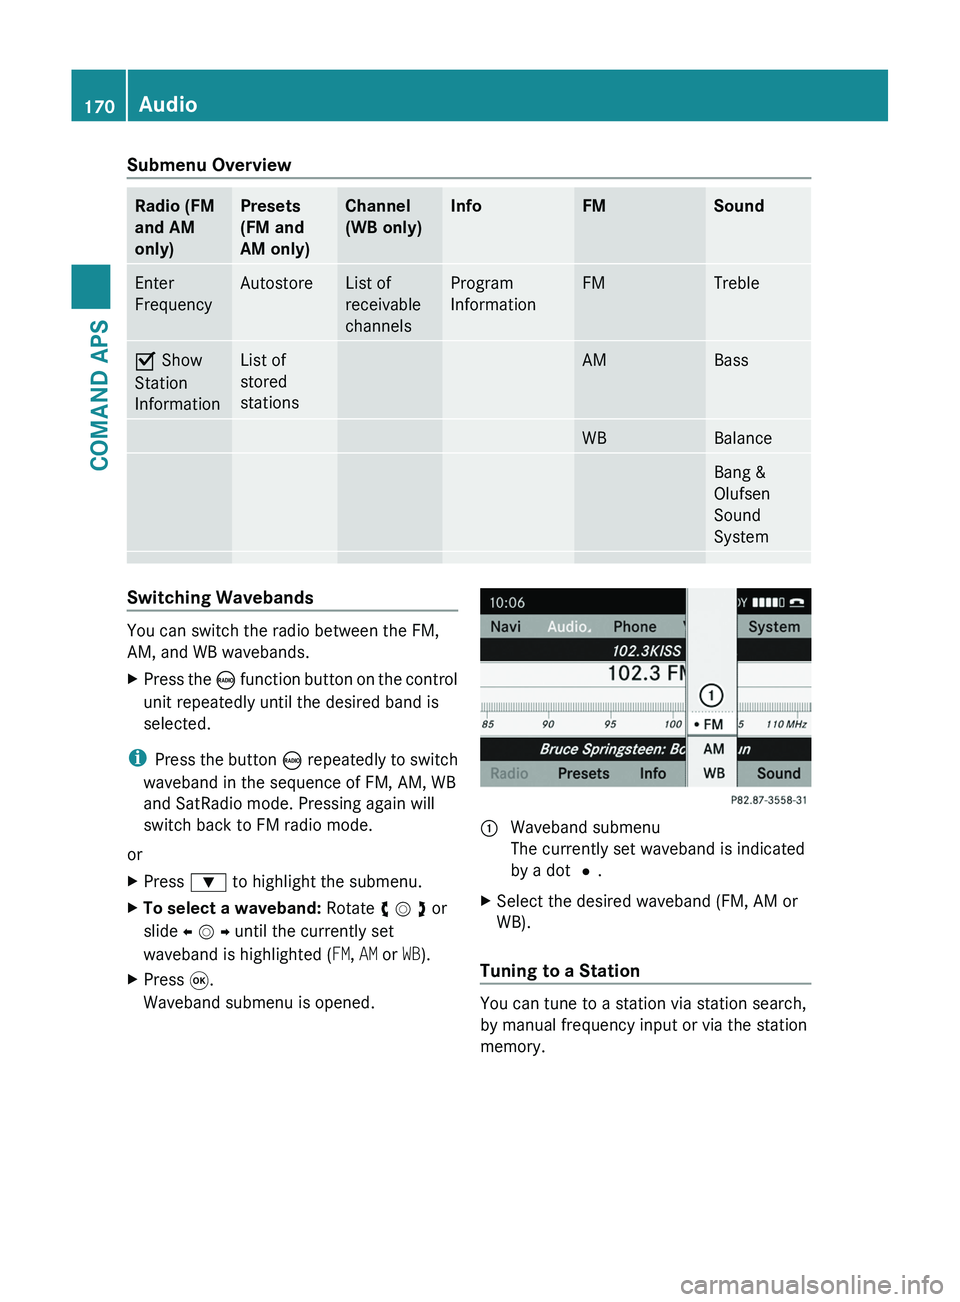
Switching Wavebands
You can switch the radio between the FM,
AM, and WB wavebands.
XPress the \000
Page 174 of 436
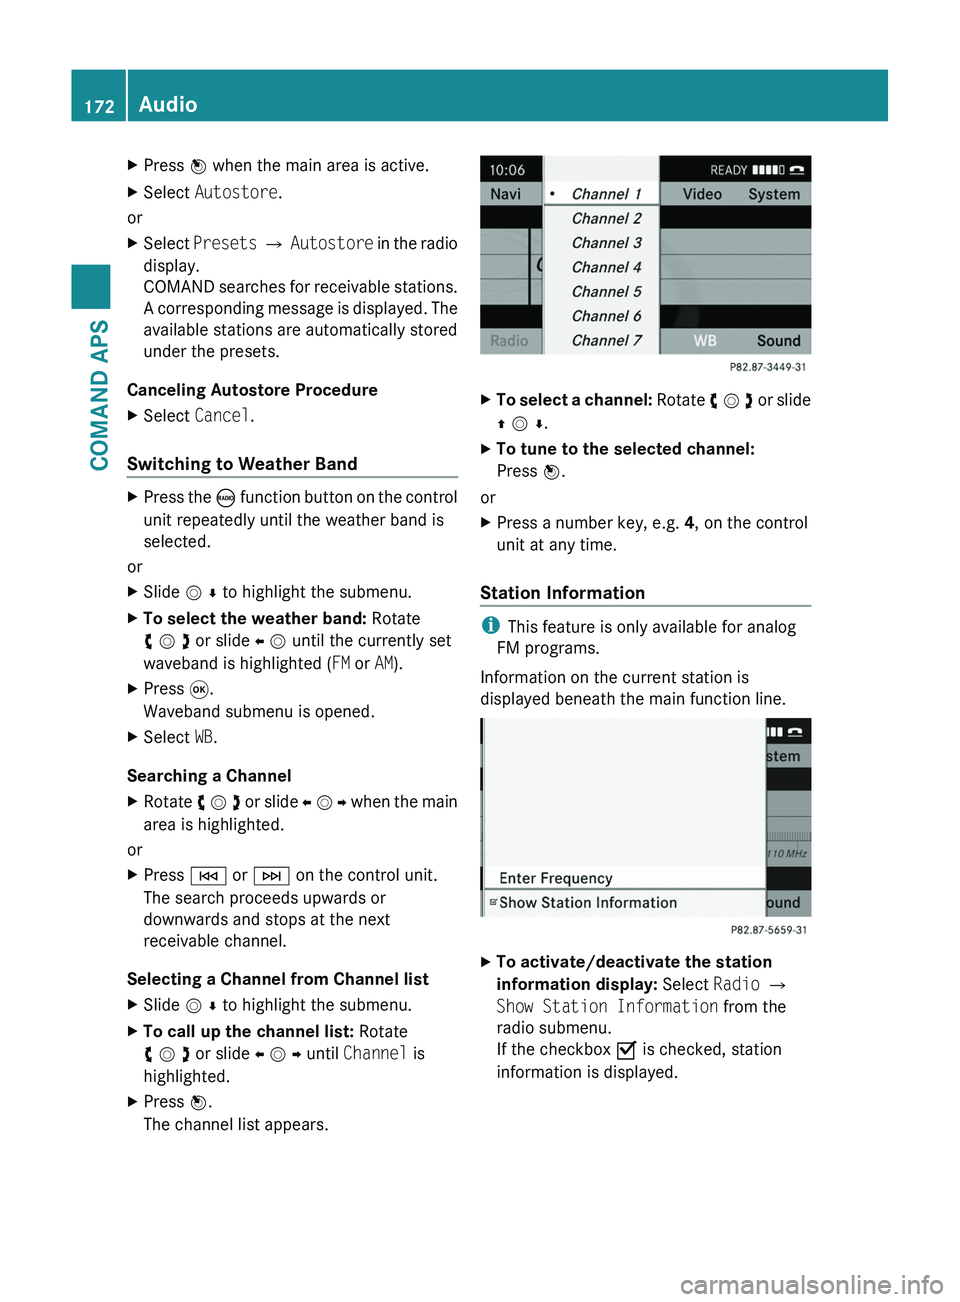
XPress n when the main area is active.XSelect Autostore.
or
XSelect Presets £ Autostore in the radio
display.
COMAND searches for receivable stations.
A corresponding message is displayed. The
available stations are automatically stored
under the presets.
Canceling Autostore Procedure
XSelect Cancel.
Switching to Weather Band
XPress the \000
Page 177 of 436
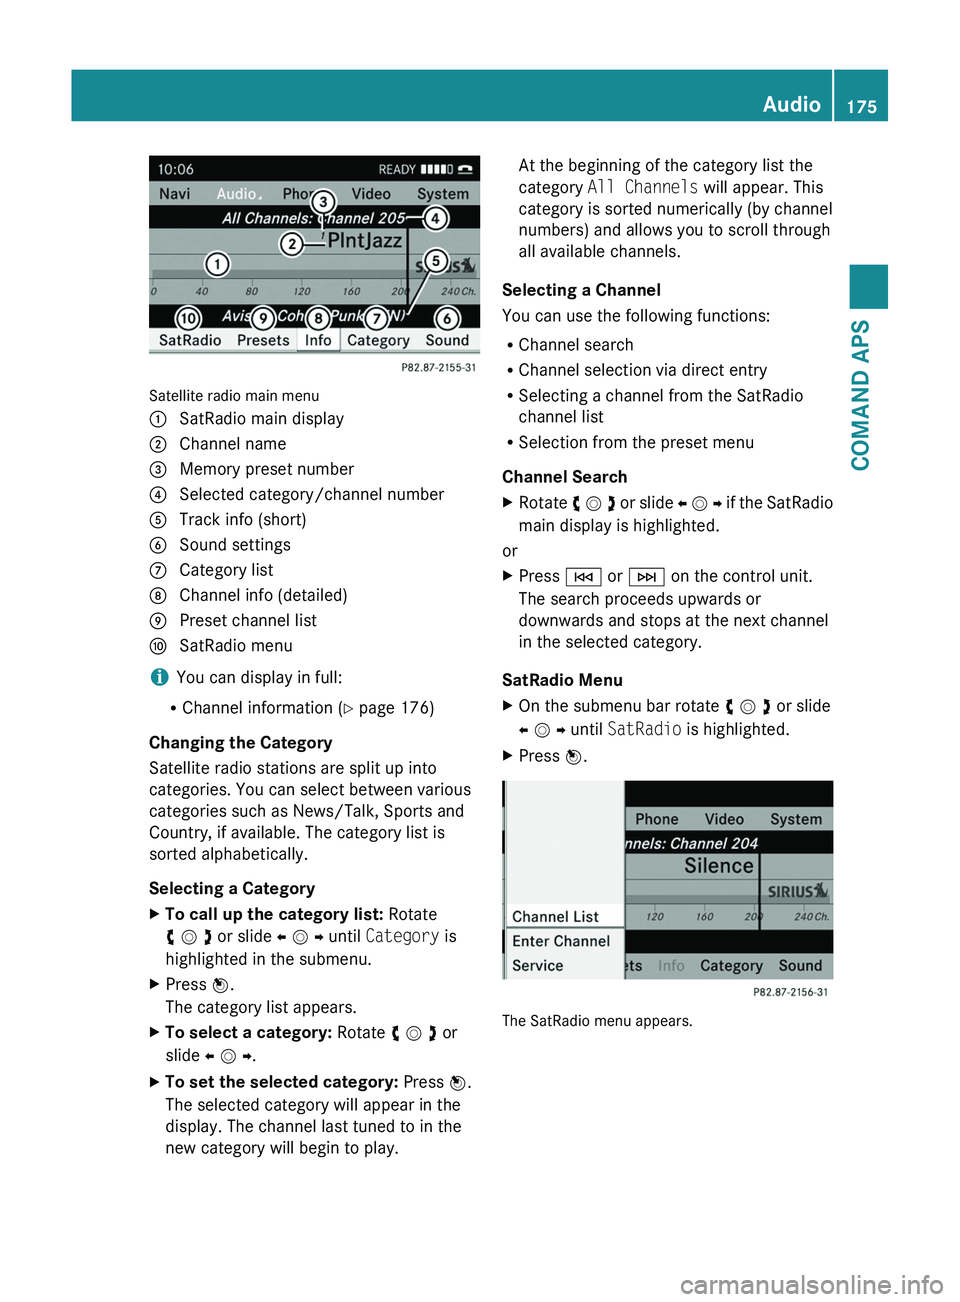
Satellite radio main menu
1 SatRadio main display2 Channel name3 Memory preset number4 Selected category/channel number5 Track info (short)6 Sound settings7 Category list8 Channel info (detailed)9 Preset channel lista SatRadio menu
iYou can display in full:
RChannel information (Y page 176)
Changing the Category
Satellite radio stations are split up into
categories. You can select between various
categories such as News/Talk, Sports and
Country, if available. The category list is
sorted alphabetically.
Selecting a Category
XTo call up the category list: Rotate
y m z or slide o m p until Category is
highlighted in the submenu.
XPress n.
The category list appears.
XTo select a category: Rotate y m z or
slide o m p.
XTo set the selected category: Press n.
The selected category will appear in the
display. The channel last tuned to in the
new category will begin to play.
At the beginning of the category list the
category All Channels will appear. This
category is sorted numerically (by channel
numbers) and allows you to scroll through
all available channels.
Selecting a Channel
You can use the following functions:
RChannel search
RChannel selection via direct entry
RSelecting a channel from the SatRadio
channel list
RSelection from the preset menu
Channel Search
XRotate y m z or slide o m p if the SatRadio
main display is highlighted.
or
XPress \000H or \000I on the control unit.
The search proceeds upwards or
downwards and stops at the next channel
in the selected category.
SatRadio Menu
XOn the submenu bar rotate y m z or slide
o m p until SatRadio is highlighted.
XPress n.
The SatRadio menu appears.
Audio175COMAND APSBA 197 USA, CA Edition A 2011; 1; 27, en-UShereepeVersion: 3.0.3.52010-03-24T15:31:10+01:00 - Seite 175Z
Page 241 of 436
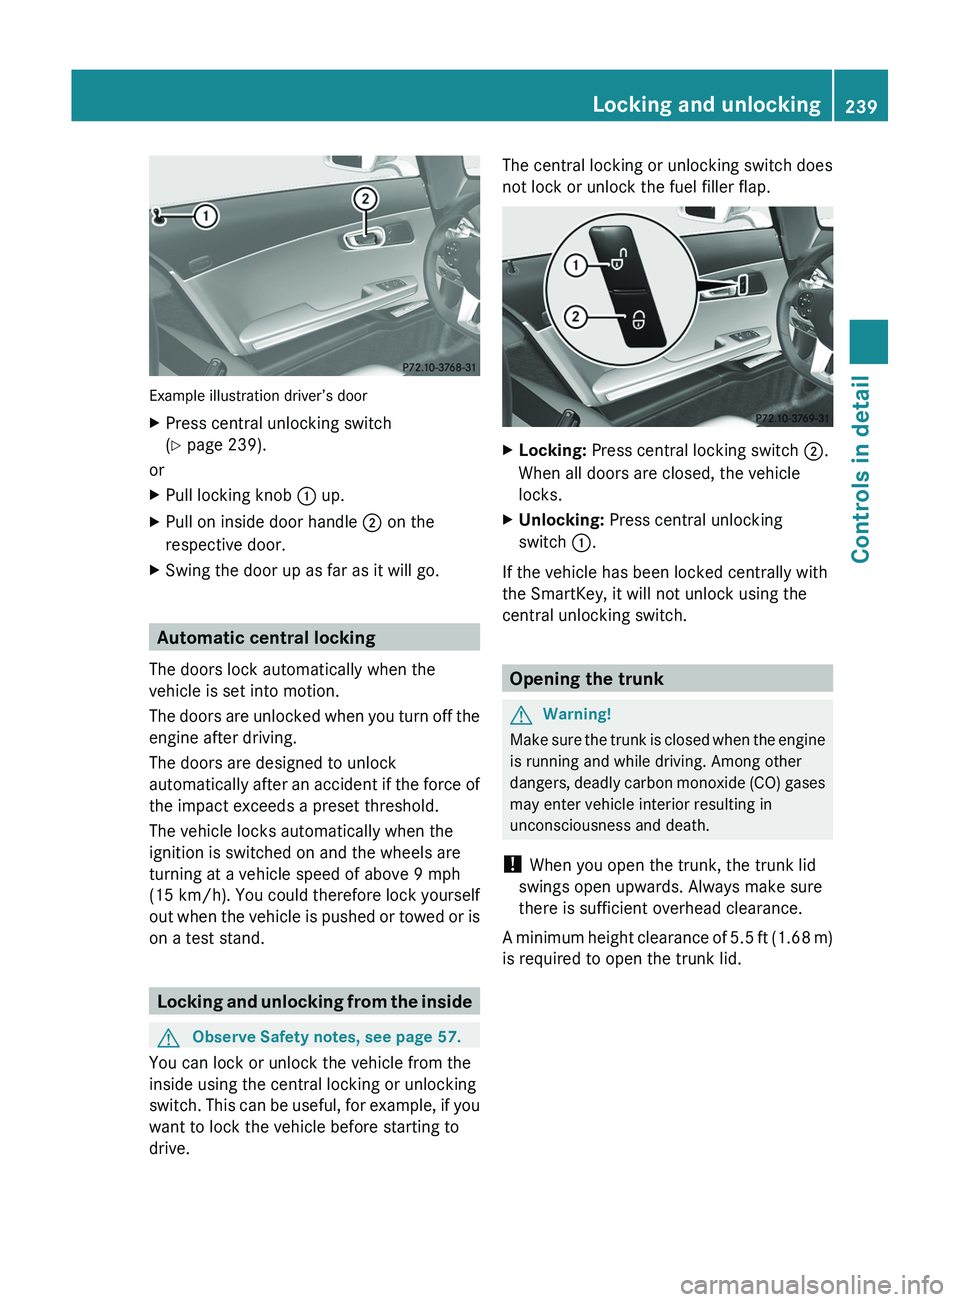
Example illustration driver’s door
XPress central unlocking switch
( Y page 239).
or
XPull locking knob 0046 up.XPull on inside door handle 0047 on the
respective door.XSwing the door up as far as it will go.
Automatic central locking
The doors lock automatically when the
vehicle is set into motion.
The doors are unlocked when you turn off the
engine after driving.
The doors are designed to unlock
automatically after an accident if the force of
the impact exceeds a preset threshold.
The vehicle locks automatically when the
ignition is switched on and the wheels are
turning at a vehicle speed of above 9 mph
(15 km/h) . You could therefore lock yourself
out when the vehicle is pushed or towed or is
on a test stand.
Locking and unlocking from the inside
GObserve Safety notes, see page 57.
You can lock or unlock the vehicle from the
inside using the central locking or unlocking
switch. This can be useful, for example, if you
want to lock the vehicle before starting to
drive.
The central locking or unlocking switch does
not lock or unlock the fuel filler flap.XLocking: Press central locking switch 0047.
When all doors are closed, the vehicle
locks.XUnlocking: Press central unlocking
switch 0046.
If the vehicle has been locked centrally with
the SmartKey, it will not unlock using the
central unlocking switch.
Opening the trunk
GWarning!
Make sure the trunk is closed when the engine
is running and while driving. Among other
dangers, deadly carbon monoxide (CO) gases
may enter vehicle interior resulting in
unconsciousness and death.
! When you open the trunk, the trunk lid
swings open upwards. Always make sure
there is sufficient overhead clearance.
A minimum height clearance of 5.5 ft (1.68 m)
is required to open the trunk lid.
Locking and unlocking239Controls in detailBA 197 USA, CA Edition A 2011; 1; 27, en-UShereepeVersion: 3.0.3.52010-03-24T15:31:10+01:00 - Seite 239Z
Page 253 of 436
Once the low-beam headlamps are on, the
high-beam headlamps are also available.
Daytime running lamp mode
In Canada, the daytime running lamp mode is
mandatory and therefore in a constant mode.
In the USA, the daytime running lamp mode
is activated by default.
XMake sure the daytime running lamp mode
is activated in the control system, see
“Switching daytime running lamp mode on
or off (USA only)” ( Y page 284).XTurn the exterior lamp switch to position
0066 .
When the engine is running and the
ambient light is bright, the daytime running
lamps come on.
In low ambient lighting conditions, the
following lamps will come on additionally:
R Low-beam headlamps
R Parking lamps 5
R green indicator lamp 0064 in the
instrument cluster
You can only switch on the high-beam
headlamps when the low-beam headlamps
are on.
The high-beam flasher is available at all times.
Canada only
When the engine is running, and you
R shift from a driving position to park
position P with the vehicle at a standstill,
the daytime running lamps or the low-beam
headlamps will go out with a delay of
3 minutes
R turn the exterior lamp switch to position
006C , the daytime running lamps and the
parking lamps 5
come on in bright ambient
lighting conditions.
R turn the exterior lamp switch to position
0064 , the manual headlamp mode has
priority over the daytime running lamp
mode
The corresponding exterior lamps come on
( Y page 250).
USA only
When the engine is running, and you turn the
exterior lamp switch to position 006C or
0064 , the manual headlamp mode has
priority over the daytime running lamp mode.
The corresponding exterior lamps come on
( Y page 250).
Locator lighting
The locator lighting is described in the
“Control system” section, see “Switching
locator lighting on or off” ( Y page 285).
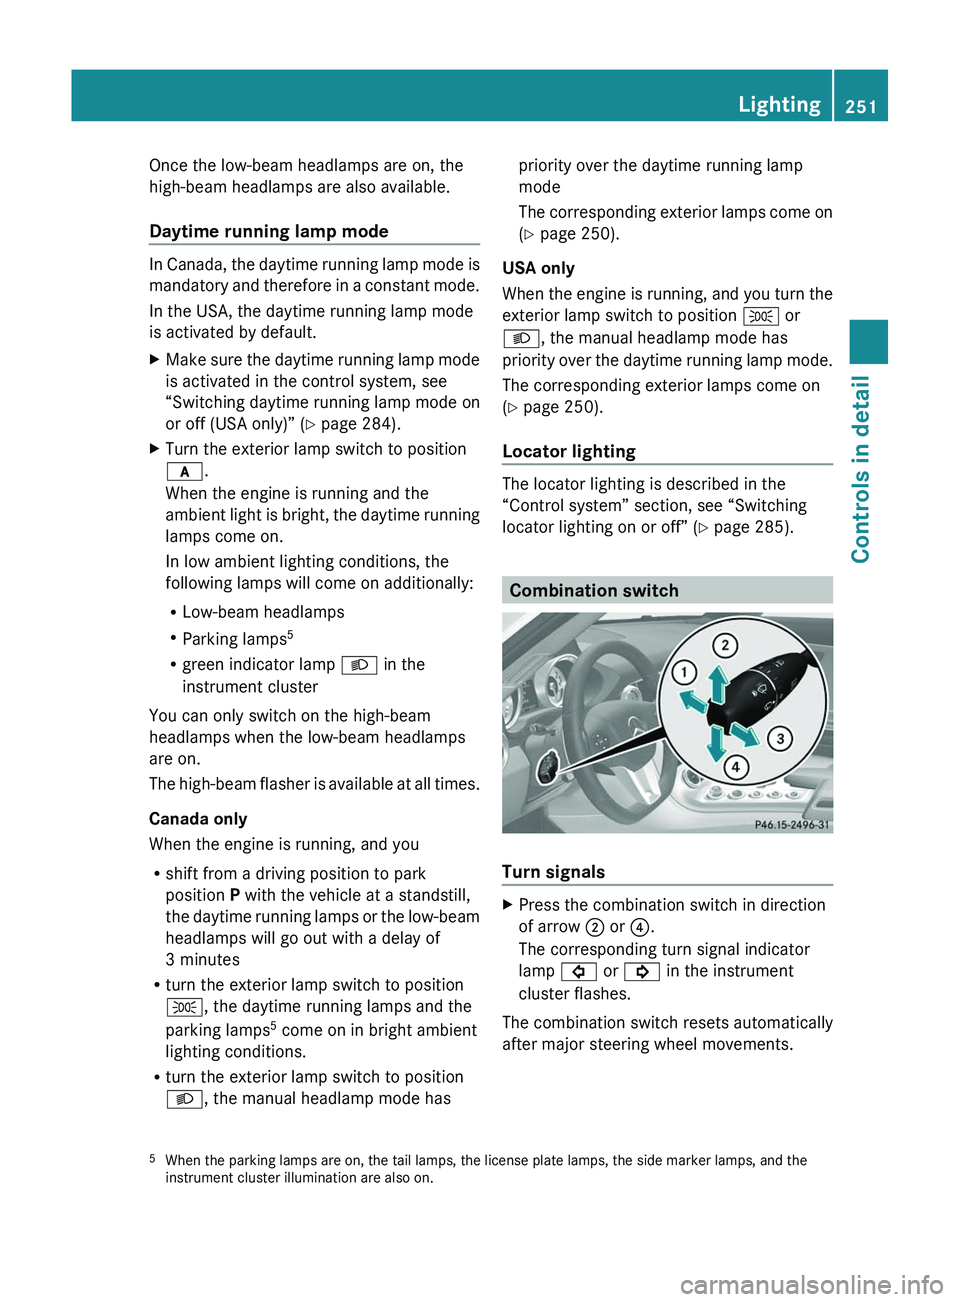
Combination switch
Turn signals
XPress the combination switch in direction
of arrow 0047 or 0088.
The corresponding turn signal indicator
lamp 0026 or 0024 in the instrument
cluster flashes.
The combination switch resets automatically
after major steering wheel movements.
5 When the parking lamps are on, the tail lamps, the license plate lamps, the side marker lamps, and the
instrument cluster illumination are also on.Lighting251Controls in detailBA 197 USA, CA Edition A 2011; 1; 27, en-UShereepeVersion: 3.0.3.52010-03-24T15:31:10+01:00 - Seite 251Z