2011 MERCEDES-BENZ SLS AMG warning
[x] Cancel search: warningPage 263 of 436
If the extent of the damage cannot be
determined:
XContact an authorized Mercedes-Benz
Center or call Roadside Assistance.
If no damage on major assemblies, fuel
system, and engine mount can be
determined:
XStart the engine in the usual manner.
Parking
GWarning!
Do not park in areas where the hot exhaust
system could come into contact with
combustible materials. Combustible
materials such as grass, hay or leaves could
be ignited and cause a vehicle fire.
Unintended vehicle movement could cause
serious personal injury or damage to the
vehicle or the vehicle drivetrain. To reduce
such risks, always do the following before
turning off the engine and leaving the vehicle:
RKeep right foot on the brake pedal.
REngage the electronic parking brake.
RShift the transmission into park position P.
RSlowly release the brake pedal.
RWhen parked on an incline, always turn the
front wheels towards the road curb.
RPress the KEYLESS-GO start/stop button,
or turn the SmartKey in the starter switch
to position 0 and remove the SmartKey
from the starter switch.
RTake the SmartKey with you and lock the
vehicle when leaving.
Electronic parking brake
GWarning!
When leaving the vehicle, always remove the
SmartKey from the starter switch, take it with
you, and lock the vehicle. Do not leave
children unattended in the vehicle, or with
access to an unlocked vehicle. Children could
release the electronic parking brake and/or
shift the transmission out of park position P,
either of which could result in an accident
and/or serious personal injury.
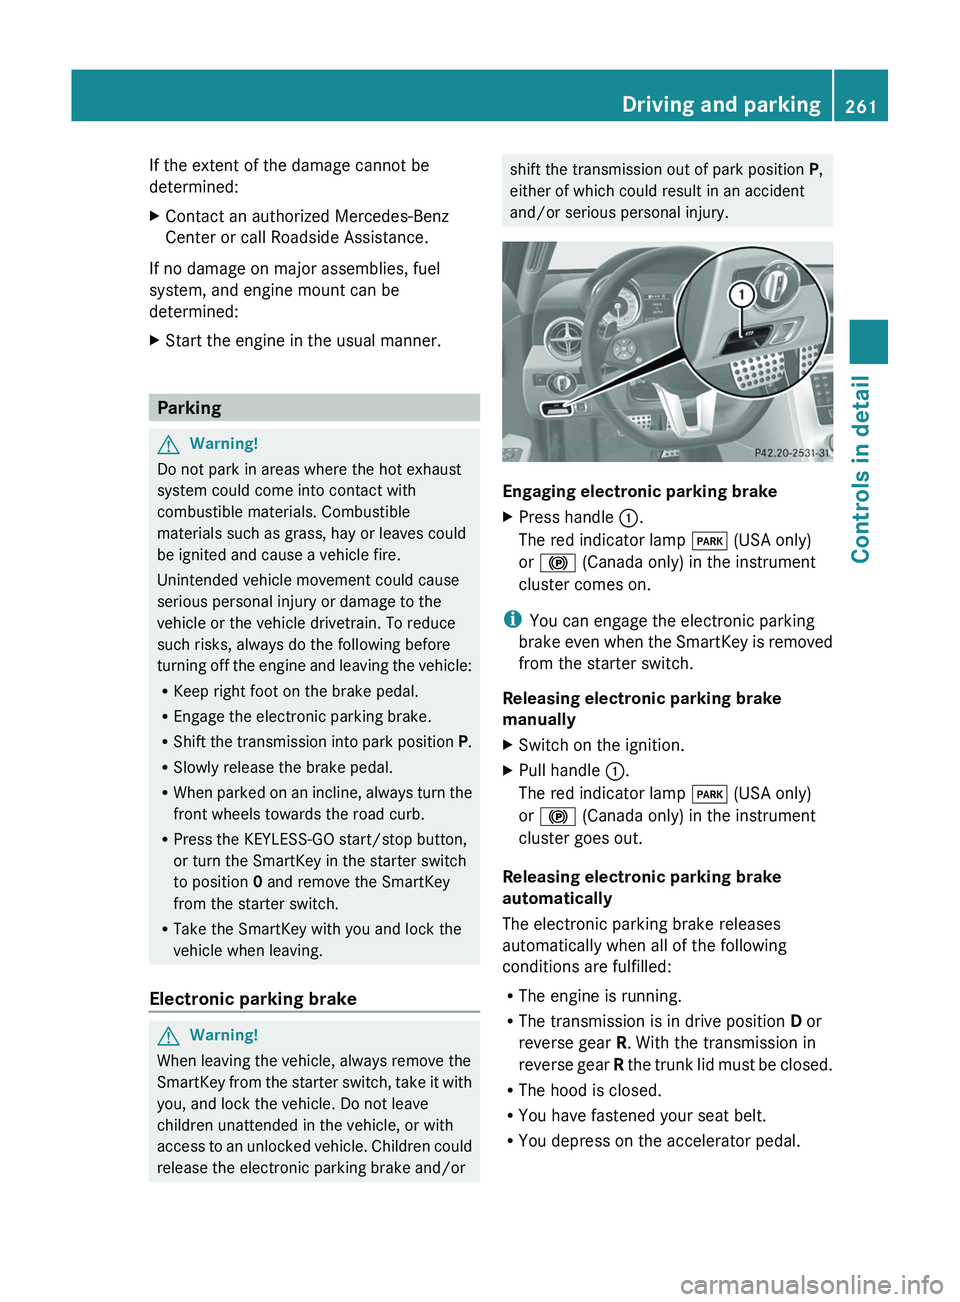
Engaging electronic parking brake
XPress handle \000F.
The red indicator lamp \000I (USA only)
or \000$ (Canada only) in the instrument
cluster comes on.
iYou can engage the electronic parking
brake even when the SmartKey is removed
from the starter switch.
Releasing electronic parking brake
manually
XSwitch on the ignition.XPull handle \000F.
The red indicator lamp \000I (USA only)
or \000$ (Canada only) in the instrument
cluster goes out.
Releasing electronic parking brake
automatically
The electronic parking brake releases
automatically when all of the following
conditions are fulfilled:
RThe engine is running.
RThe transmission is in drive position D or
reverse gear R. With the transmission in
reverse gear R the trunk lid must be closed.
RThe hood is closed.
RYou have fastened your seat belt.
RYou depress on the accelerator pedal.
Driving and parking261Controls in detailBA 197 USA, CA Edition A 2011; 1; 27, en-UShereepeVersion: 3.0.3.52010-03-24T15:31:10+01:00 - Seite 261Z
Page 264 of 436
iIf you have not fastened your seat belt,
the following conditions must be met in
order for the electronic parking brake to
release automatically:
R The driver’s door is closed and you shift
the transmission out of park position P.
or
R The driver’s door is closed and you drive
faster than 2 mph (3 km/h).
Emergency braking with electronic
parking brake
In an emergency situation, you can also brake
your vehicle by using the electronic parking
brake.XWhile driving, press handle 0046.
All four wheels of the vehicle will be braked
for as long as you press and hold the handle
for the electronic parking brake. The longer
you keep the handle pressed, the stronger
your vehicle will be braked.
During the braking procedure
R an acoustic warning sounds
R the message Release Parking Brake
appears in the multifunction display
R the red indicator lamp for the electronic
parking brake 0049 (USA only) or 0024
(Canada only) in the instrument cluster
flashes
Once the vehicle comes to a complete stop,
the electronic parking brake will engage
automatically.
Turning off the engine
GWarning!
Do not turn off the engine before the vehicle
has come to a complete stop. With the engine
not running, there is no power assistance for
the brake and steering systems. In this case,
it is important to keep in mind that a
considerably higher degree of effort is
necessary to brake and steer the vehicle.
XShift the transmission into park position P .With KEYLESS-GOXPress the KEYLESS-GO start/stop button.
With the driver’s door closed, the starter
switch is now in position 1. With the driver’s
door opened, the starter switch is set to
position 0, same as the SmartKey removed
from the starter switch ( Y page 242).
Read and observe messages that may appear
in the multifunction display ( Y page 367).
i The transmission will shift into neutral
position N automatically when you turn off
the engine with the transmission in reverse
gear R or drive position D.
The transmission will remain in neutral
position N for approximately 30 minutes
when you have shifted the transmission to
neutral position N before turning off the
engine.
The transmission will shift into park
position P automatically when you open a
door during this period.
i In an emergency you can turn off the
engine while driving by pressing and
holding the KEYLESS-GO start/stop button
for approximately 3 seconds.
With SmartKey
! Do not remove the SmartKey from the
starter switch while driving. When driving
at low speed, the transmission will
otherwise shift into park position P
automatically. The transmission could be
damaged as a result.
XTurn the SmartKey in the starter switch to
position 0.XRemove the SmartKey from the starter
switch.
Read and observe messages that may appear
in the multifunction display ( Y page 367).
i The transmission will shift into neutral
position N automatically when you turn off
the engine with the transmission in reverse
gear R or drive position D.
262Driving and parkingControls in detail
BA 197 USA, CA Edition A 2011; 1; 27, en-UShereepeVersion: 3.0.3.52010-03-24T15:31:10+01:00 - Seite 262
Page 265 of 436
The transmission will remain in neutral
position N for approximately 30 minutes
when you have shifted the transmission to
neutral position N before turning off the
engine.
The transmission remains in neutral
position N even when you open a door.
AMG SPEEDSHIFT DCT 7-SPEED
Transmission
Introduction
For information on driving with the AMG
SPEEDSHIFT DCT 7-SPEED Transmission, see
“Driving and parking” ( Y page 257).
GWarning!
Make sure absolutely no objects are
obstructing the pedals’ range of movement.
Keep the driver’s footwell clear of all
obstacles. If there are any floormats or
carpets in the footwell, make sure the pedals
still have sufficient clearance.
During sudden driving or braking maneuvers
the objects could get caught between or
under the pedals. You could then no longer
brake or accelerate. This could lead to
accidents and injury.
! Allow the engine to warm up under low
load use. Do not place full load on the
engine until the operating temperature has
been reached.
Avoid spinning of a drive wheel for an
extended period when driving off on
slippery road surfaces.
This may cause serious damage to the
engine and the drivetrain which is not
covered by the Mercedes-Benz Limited
Warranty.
i During the brief warm-up, transmission
upshifting is delayed. This allows the
catalytic converter to heat up more quickly
to operating temperature.
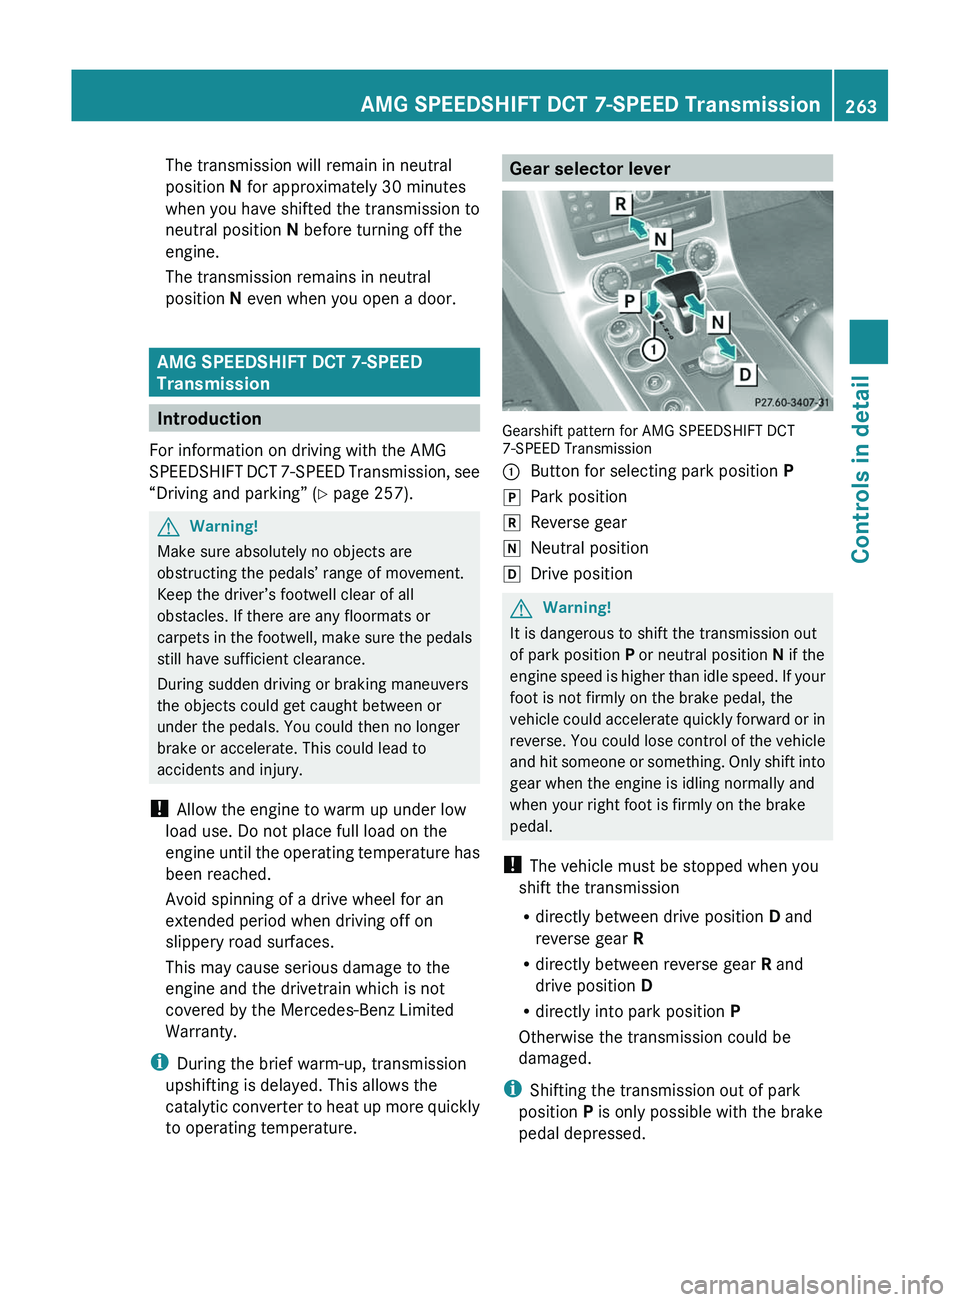
Gear selector lever
Gearshift pattern for AMG SPEEDSHIFT DCT
7-SPEED Transmission
0046Button for selecting park position P0060Park position0061Reverse gear005FNeutral position005EDrive positionGWarning!
It is dangerous to shift the transmission out
of park position P or neutral position N if the
engine speed is higher than idle speed. If your
foot is not firmly on the brake pedal, the
vehicle could accelerate quickly forward or in
reverse. You could lose control of the vehicle
and hit someone or something. Only shift into
gear when the engine is idling normally and
when your right foot is firmly on the brake
pedal.
! The vehicle must be stopped when you
shift the transmission
R directly between drive position D and
reverse gear R
R directly between reverse gear R and
drive position D
R directly into park position P
Otherwise the transmission could be
damaged.
i Shifting the transmission out of park
position P is only possible with the brake
pedal depressed.
AMG SPEEDSHIFT DCT 7-SPEED Transmission263Controls in detailBA 197 USA, CA Edition A 2011; 1; 27, en-UShereepeVersion: 3.0.3.52010-03-24T15:31:10+01:00 - Seite 263Z
Page 268 of 436
Effect0044Neutral position
No power is transmitted from the
engine to the drive axle. When the
brakes are released, the vehicle can
be moved freely (pushed or towed).
To avoid damage to the
transmission, never shift the
transmission into neutral position
N while driving.
Exception: If the ESC is switched off
or malfunctioning, shift the
transmission into neutral position
N if the vehicle is in danger of
skidding.
! Coasting the vehicle, or driving
for any other reason with the
transmission in neutral position
N can result in transmission
damage that is not covered by
the Mercedes-Benz Limited
Warranty.003ADrive position
The transmission shifts
automatically. All forward gears are
available.
Driving tips
Kickdown
Use the kickdown when you want maximum
acceleration.
XDepress the accelerator pedal past the
point of resistance.
Depending on the engine speed the
transmission shifts into a lower gear.
Working on the vehicle
GWarning!
When working on the vehicle, engage the
electronic parking brake and shift the
transmission into park position P. Otherwise
the vehicle could roll away which could result
in an accident and/or serious personal injury.
Gear ranges
With the transmission in drive position D and
driving in automatic program mode C, S , or
S+ , you can limit or extend the gear range,
see “One-touch gearshifting” ( Y page 267).
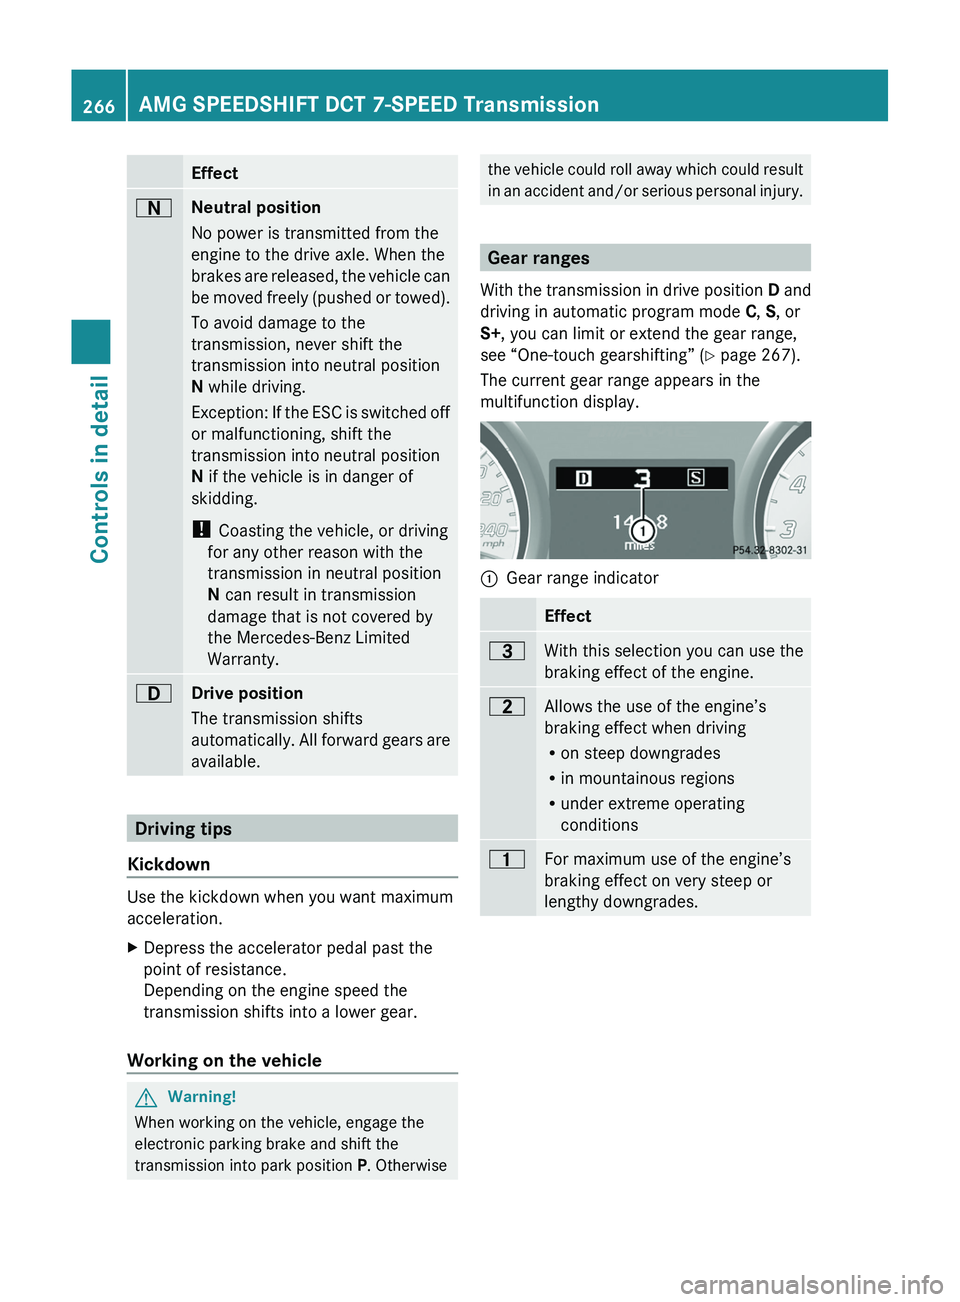
The current gear range appears in the
multifunction display.
0046Gear range indicatorEffect0040With this selection you can use the
braking effect of the engine.0038Allows the use of the engine’s
braking effect when driving
R on steep downgrades
R in mountainous regions
R under extreme operating
conditions0037For maximum use of the engine’s
braking effect on very steep or
lengthy downgrades.266AMG SPEEDSHIFT DCT 7-SPEED TransmissionControls in detail
BA 197 USA, CA Edition A 2011; 1; 27, en-UShereepeVersion: 3.0.3.52010-03-24T15:31:10+01:00 - Seite 266
Page 270 of 436
iYou cannot shift with the steering wheel
gearshift control when the transmission is
in park position P, neutral position N, or
reverse gear R.
Limiting gear range GWarning!
On slippery road surfaces, never downshift in
order to obtain braking action. This could
result in drive wheel slip and reduced vehicle
control. Your vehicle’s ABS will not prevent
this type of loss of control.
XBriefly pull left gearshift control 0046.
or
XMove the gear selector lever forward briefly
( Y page 263).
The transmission will shift into the next
lower gear as permitted by the shift
program. This action simultaneously limits
the gear range of the transmission.
i To avoid overrevving the engine when
downshifting, the transmission will not shift
into a lower gear if the engine’s maximum
speed would be exceeded.
Extending gear range
XBriefly pull right gearshift control 0047.
or
XMove the gear selector lever back briefly
( Y page 263).
The transmission will shift into the next
higher gear as permitted by the shift
program. This action simultaneously
extends the gear range of the transmission.
i If you press on the accelerator pedal
when the engine has reached the
revolution limit of the current gear range,
the transmission will upshift beyond any
gear range limit selected.
Canceling gear range limitXPull and hold right gearshift control 0047 until
the gear range indicator disappears from
the multifunction display.
or
XMove the gear selector lever back and hold
it there until the numeral for the current
gear disappears from the multifunction
display.
The transmission will shift from the current
gear range directly into drive position D.
Shifting into optimal gear range
XPull and hold left gearshift control 0046.
or
XMove the gear selector lever forward and
hold it there.
The transmission will select the gear range
suited for optimal acceleration and
deceleration automatically. This will involve
shifting down one or more gears.
Manual shift program
Manual program mode M differs with regard
to spontaneity, response time, and shifting
smoothness from automatic program modes
S or S+.
In manual program mode M, system-
controlled automatic gearshifting is switched
off. You need to change the gears by manually
upshifting or downshifting using the gear
selector lever or the steering wheel gearshift
control.
268AMG SPEEDSHIFT DCT 7-SPEED TransmissionControls in detail
BA 197 USA, CA Edition A 2011; 1; 27, en-UShereepeVersion: 3.0.3.52010-03-24T15:31:10+01:00 - Seite 268
Page 273 of 436
Instrument cluster
Introduction
For a full view illustration of the instrument
cluster, see “Instrument cluster”
( Y page 34).
GWarning!
No messages will be displayed if either the
instrument cluster or the multifunction
display is inoperative.
As a result, you will not be able to see
information about your driving conditions,
such as
R speed
R outside temperature
R warning/indicator lamps
R malfunction/warning messages
R failure of any systems
Driving characteristics may be impaired.
If you must continue to drive, do so with added
caution. Contact an authorized Mercedes-
Benz Center as soon as possible.
The language setting for the multifunction
display can be changed via COMAND system
( Y page 99).
Activating the instrument cluster
The instrument cluster is activated when you
R open the driver’s door
R switch on the ignition
R switch on the exterior lamps
Engine oil temperature gauge
The engine oil temperature gauge is located
in the instrument cluster. The engine oil
temperature may rise up to 140† under
normal driving conditions.
! The engine should not be operated with
the engine oil temperature above 140†.
Doing so may cause serious damage which
is not covered by the Mercedes-Benz
Limited Warranty.
The temperature of the transmission fluid and
coolant are displayed in the AMG menu
( Y page 287).
Tachometer
The red marking on the tachometer
( Y page 34) denotes excessive engine speed.
! Avoid driving at excessive engine speeds,
as it may result in serious engine damage
that is not covered by the Mercedes-Benz
Limited Warranty.
To help protect the engine, the fuel supply is
interrupted if the engine is operated within
the red marking.
Outside temperature indicator
The outside temperature indicator is
displayed in the multifunction display
( Y page 273).
GWarning!
The outside temperature indicator is not
designed to serve as an ice-warning device
and is therefore unsuitable for that purpose.
Indicated temperatures just above the
freezing point do not guarantee that the road
surface is free of ice. The road may still be icy,
especially in wooded areas or on bridges.
Fuel gauge
The fuel gauge is on the left-hand side of the
instrument cluster (Y page 34). Once the fuel
level has fallen below the reserve mark, the
yellow fuel tank reserve warning lamp 00B8
for the fuel reserve comes on.
Instrument cluster271Controls in detailBA 197 USA, CA Edition A 2011; 1; 27, en-UShereepeVersion: 3.0.3.52010-03-24T15:31:10+01:00 - Seite 271Z
Page 274 of 436
Control system
Introduction
The control system is activated as soon as the
starter switch is in position 2.
The control system enables you to call up
information about your vehicle and to change
vehicle settings.
For example, you can use the control system
to find out when your vehicle is next due for
maintenance service, to call up statistical
data on your vehicle, and much more.
GWarning!
A driver’s attention to the road and traffic
conditions must always be his/her primary
focus when driving.
For your safety and the safety of others,
selecting features through the multifunction
steering wheel should only be done by the
driver when traffic and road conditions permit
it to be done safely.
Bear in mind that at a speed of just 30 mph
(approximately 50 km/h), your vehicle is
covering a distance of 44 feet (approximately
14 m) every second.
The control system relays information to the
multifunction display.
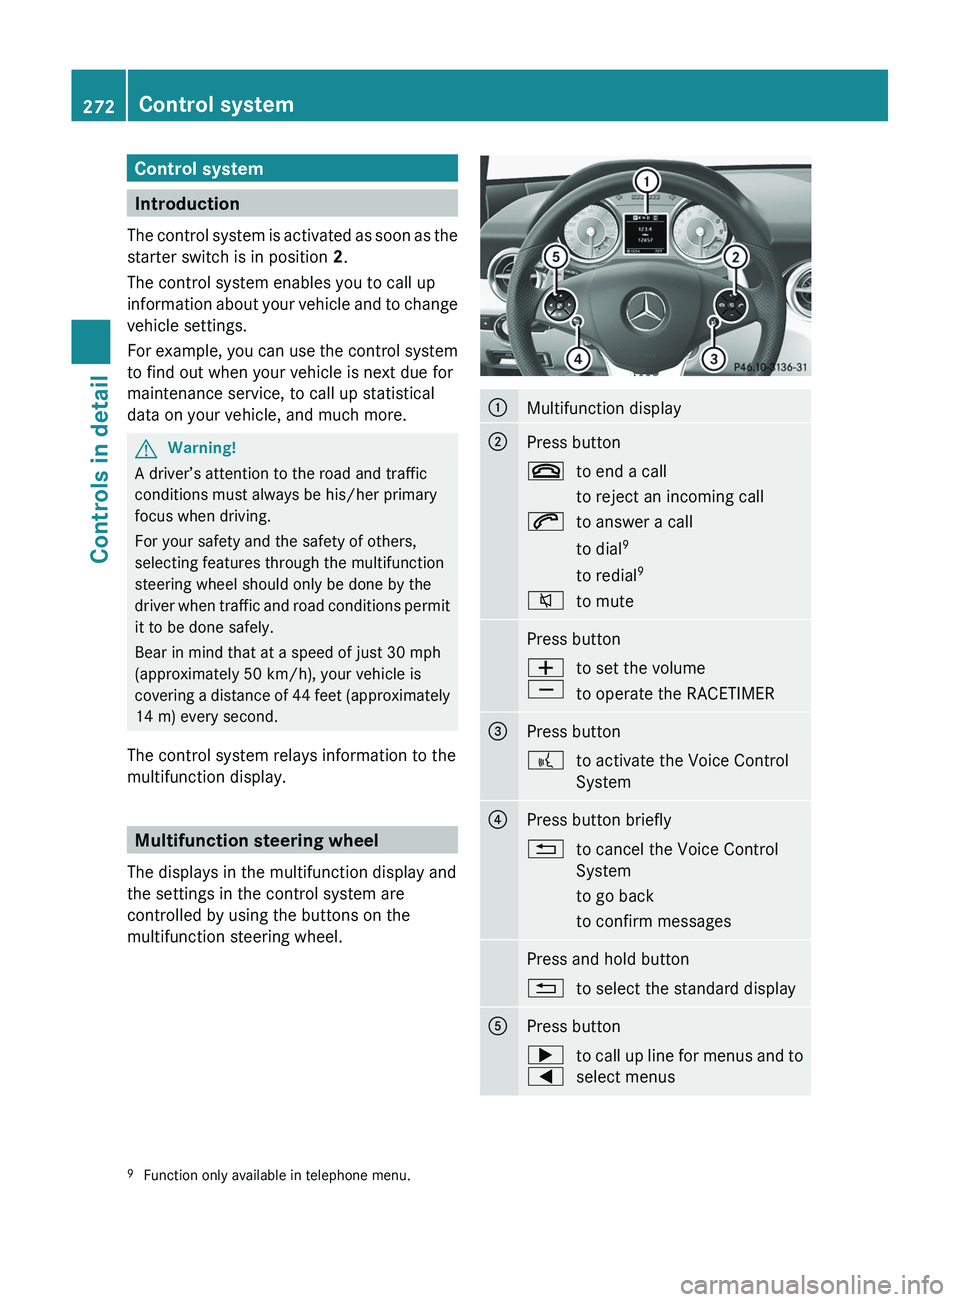
Multifunction steering wheel
The displays in the multifunction display and
the settings in the control system are
controlled by using the buttons on the
multifunction steering wheel.
0046Multifunction display0047Press button007Fto end a call
to reject an incoming call006Ato answer a call
to dial 9
to redial 9006Cto mutePress button005A
005Bto set the volume
to operate the RACETIMER008APress button0062to activate the Voice Control
System0088Press button briefly0041to cancel the Voice Control
System
to go back
to confirm messagesPress and hold button0041to select the standard display0086Press button003E
0040to call up line for menus and to
select menus9 Function only available in telephone menu.272Control systemControls in detail
BA 197 USA, CA Edition A 2011; 1; 27, en-UShereepeVersion: 3.0.3.52010-03-24T15:31:10+01:00 - Seite 272
Page 275 of 436
Press button briefly003C
003Dto select submenu or scroll
through lists
within Audio menu to select
previous or next track, scene or
stored station
within Tel menu to switch to
the phone book and select a
name or numberPress and hold button003C
003Dwithin Audio menu to select a
track or scene with quick
search or to select previous or
next station in station list or
wave band
within Tel menu to start the
quick search in the phone bookPress button0064to confirm selection or
messages
Depending on the selected menu, pressing
the buttons on the multifunction steering
wheel will alter what appears in the
multifunction display.
The information available in the multifunction
display is arranged in menus and
accompanying functions and submenus.
The individual functions are then found within
the relevant menu (radio or CD operations
under Audio, for example). These functions
serve to call up relevant information or to
customize the settings for your vehicle.
It is helpful to think of the menus, and the
functions within each menu, as being
arranged in a circular pattern.
In the Settings menu, instead of functions,
you will find a number of submenus for calling
up and changing settings. For instructions on
using these submenus, see “Settings menu”
( Y page 282).
The number of menus available in the system
depends on which optional equipment is
installed in your vehicle.
Using the control systemXTo select a menu: Press button 0040
or 003E .XTo select a submenu: Press button 003D
or 003C .XTo go to the next higher menu level:
Press button 0041.XTo select the standard display: Press
button 0041 repeatedly until the standard
display featuring the odometer and
speedometer appears.
or
XPress and hold button 0041 until the
standard display featuring the trip
odometer and the main odometer appears.XTo confirm selection: Press button 0064.XTo confirm display message: Press
button 0064 or 0041 .
The control system saves certain display
messages. Calling up display messages
( Y page 282).
For information about warning and
malfunction messages appearing in the
multifunction display ( Y page 364).
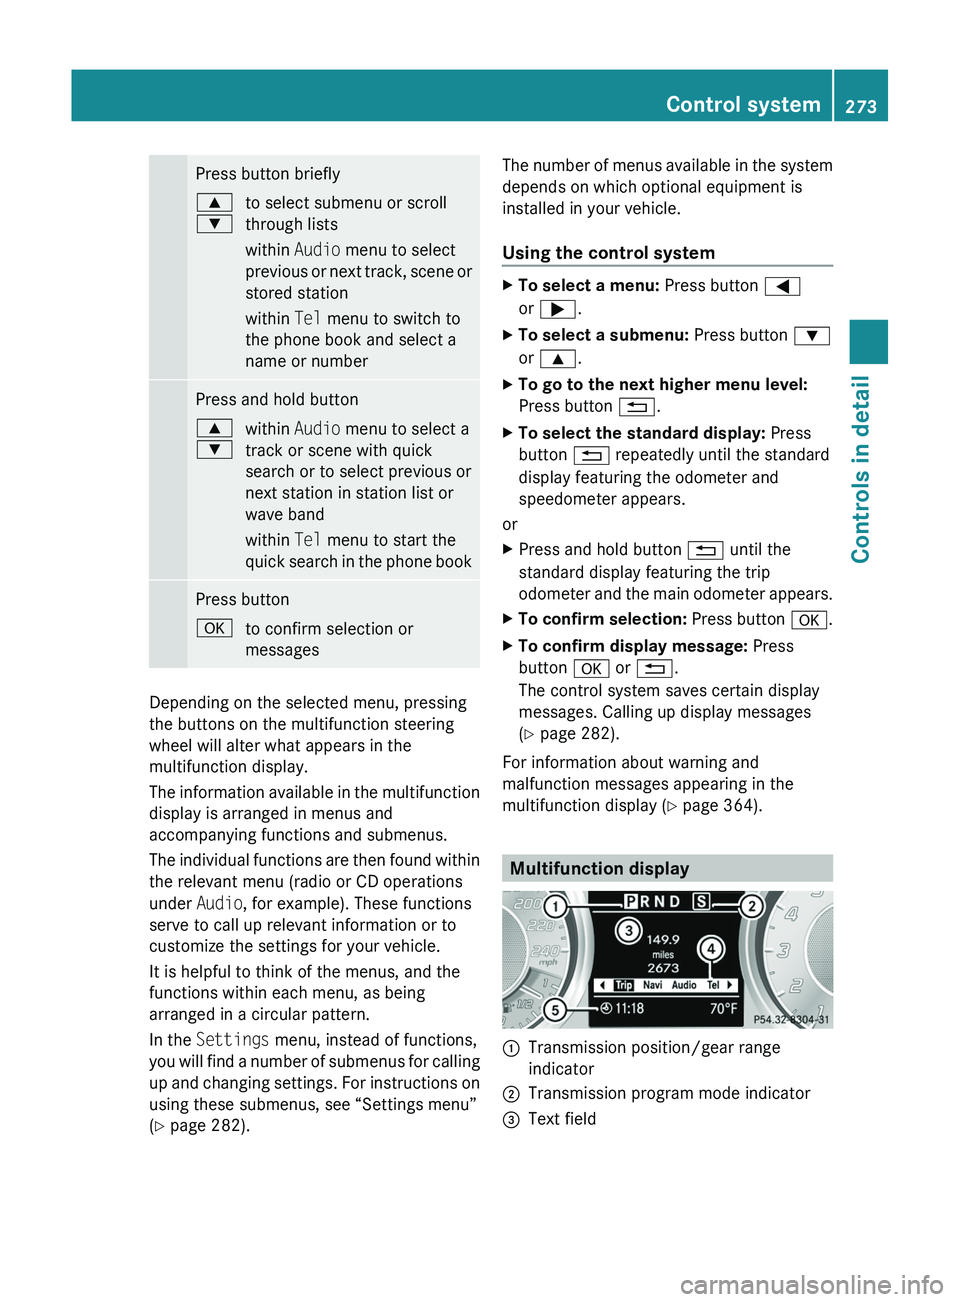
Multifunction display
0046Transmission position/gear range
indicator0047Transmission program mode indicator008AText fieldControl system273Controls in detailBA 197 USA, CA Edition A 2011; 1; 27, en-UShereepeVersion: 3.0.3.52010-03-24T15:31:10+01:00 - Seite 273Z