2011 MERCEDES-BENZ SLK55AMG ignition
[x] Cancel search: ignitionPage 80 of 312
If the windshield wipers fail to function at
all with the combination switch in position
I,
R
set the combination switch to the next
higher wiper speed
R have the windshield wipers checked at
the nearest authorized Mercedes-Benz
Center Power windows
Opening and closing
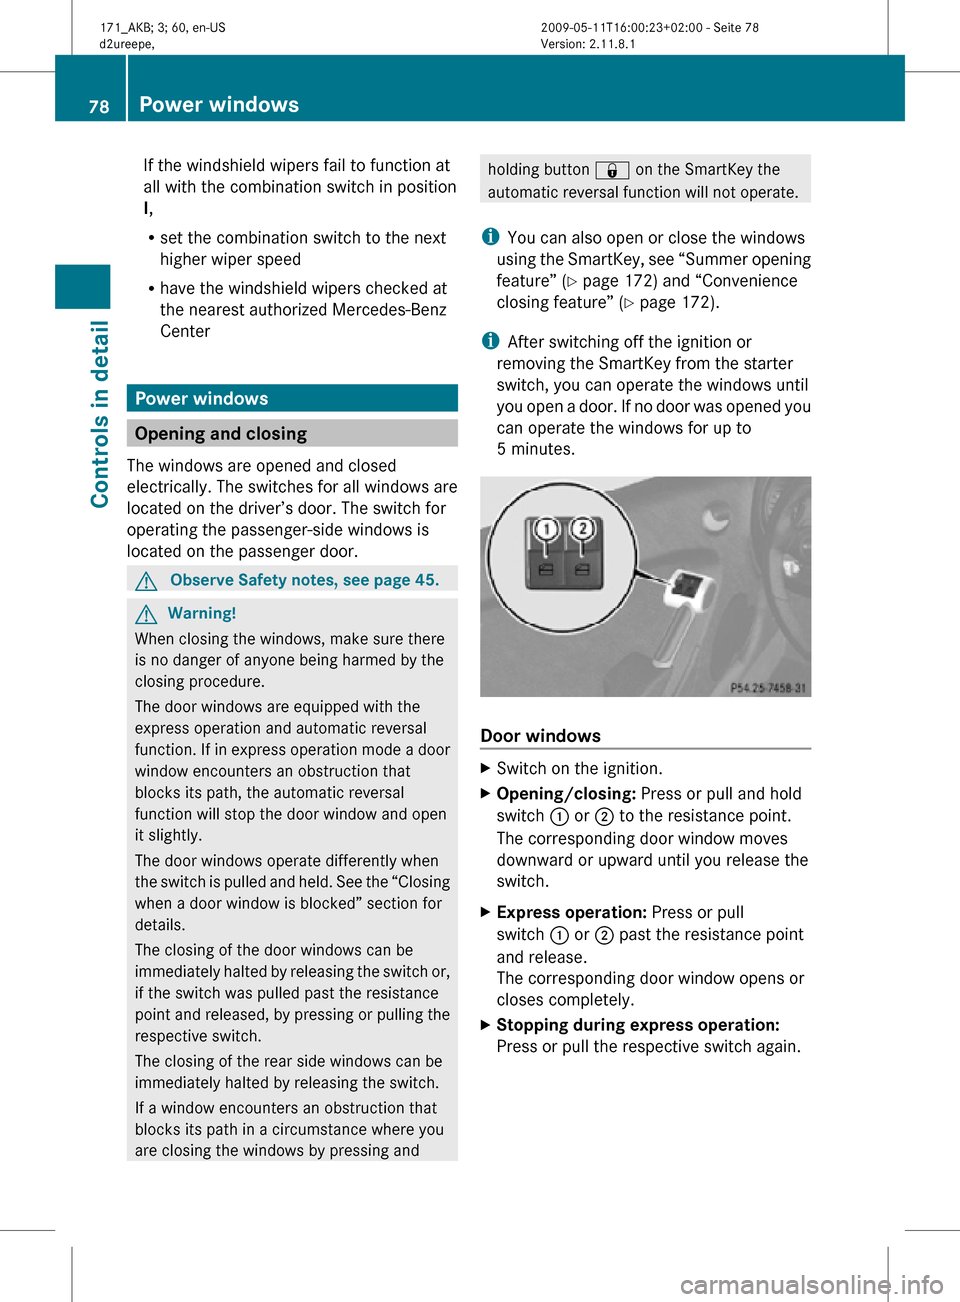
The windows are opened and closed
electrically. The switches for all windows are
located on the driver’s door. The switch for
operating the passenger-side windows is
located on the passenger door. G
Observe Safety notes, see page 45. G
Warning!
When closing the windows, make sure there
is no danger of anyone being harmed by the
closing procedure.
The door windows are equipped with the
express operation and automatic reversal
function. If in express operation mode a door
window encounters an obstruction that
blocks its path, the automatic reversal
function will stop the door window and open
it slightly.
The door windows operate differently when
the switch is pulled and held. See the “Closing
when a door window is blocked” section for
details.
The closing of the door windows can be
immediately halted by releasing the switch or,
if the switch was pulled past the resistance
point and released, by pressing or pulling the
respective switch.
The closing of the rear side windows can be
immediately halted by releasing the switch.
If a window encounters an obstruction that
blocks its path in a circumstance where you
are closing the windows by pressing and holding button & on the SmartKey the
automatic reversal function will not operate.
i You can also open or close the windows
using the SmartKey, see “Summer opening
feature” ( Y page 172) and “Convenience
closing feature” ( Y page 172).
i After switching off the ignition or
removing the SmartKey from the starter
switch, you can operate the windows until
you open a door. If no door was opened you
can operate the windows for up to
5 minutes. Door windows
X
Switch on the ignition.
X Opening/closing: Press or pull and hold
switch : or ; to the resistance point.
The corresponding door window moves
downward or upward until you release the
switch.
X Express operation: Press or pull
switch : or ; past the resistance point
and release.
The corresponding door window opens or
closes completely.
X Stopping during express operation:
Press or pull the respective switch again. 78
Power windowsControls in detail
171_AKB; 3; 60, en-US
d2ureepe,
Version: 2.11.8.1 2009-05-11T16:00:23+02:00 - Seite 78
Page 81 of 312
Closing when a door window is blocked
G
Warning!
Make sure that nobody can become trapped
and be seriously or even fatally injured when
closing a door window with greater force or
without automatic reversal function.
If the upward movement of a door window is
blocked during the closing procedure, the
door window will stop and open slightly.
X Immediately after the door window has
stopped because it was blocked, pull and
hold
the respective switch upward until the
door window is fully closed.
The door window closes with greater force.
If the door window is blocked again and opens
slightly:
X Immediately after the door window was
blocked, pull and hold the respective
switch
upward until the door window is fully
closed.
The door window closes without automatic
reversal function. G
Warning!
Pulling and holding the switch to close the
door window immediately after it had been
blocked
two times will cause the door window
to close without any reversal function for as
long as you hold the switch.
Opening and closing the rear side
windows when the hardtop is closed X
Opening: Open the door window.
X Press switch : or ; again.
The corresponding rear side window will
open completely.
X Closing: Close the door window.
X Pull and hold switch : or ;.
The
corresponding rear side window moves
upward until you release the switch. Synchronizing power windows
The windows must be synchronized after the
battery has been disconnected or if the
windows cannot be fully closed (express
operation).
Each window must be synchronized
separately.
X Close all doors.
X Switch on the ignition.
X Pull and hold switch : or ; (Y page 78)
until the respective window is closed.
The window opens again slightly.
X Pull and hold the respective switch once
more immediately until the window is
closed completely.
X Hold the respective switch for
approximately 1 second.
The window is synchronized. Driving and parking
Safety notes
G
Warning!
Make sure absolutely no objects are
obstructing the pedals’ range of movement.
Keep the driver’s footwell clear of all
obstacles. If there are any floormats or
carpets
in the footwell, make sure the pedals
still have sufficient clearance.
During sudden driving or braking maneuvers
the objects could get caught between or
under the pedals. You could then no longer
brake or accelerate. This could lead to
accidents and injury. G
Warning!
With the engine not running, there is no power
assistance for the brake and steering
systems. In this case, it is important to keep
in mind that a considerably higher degree of
effort is necessary to brake and steer the
vehicle. Adapt your driving accordingly. Driving and parking
79
Controls in detail
171_AKB; 3; 60, en-US
d2ureepe, Version: 2.11.8.1 2009-05-11T16:00:23+02:00 - Seite 79 Z
Page 84 of 312
!
Avoid driving at excessive engine speeds.
This may result in serious engine damage
that is not covered by the Mercedes-Benz
Limited Warranty.
Shift gear in a timely manner.
For more information on driving, see “Driving
instructions” ( Y page 221).
Automatic transmission G
Warning!
It is dangerous to shift the automatic
transmission
out of park position P or neutral
position N if the engine speed is higher than
idle speed. If your foot is not firmly on the
brake pedal, the vehicle could accelerate
quickly forward or in reverse. You could lose
control of the vehicle and hit someone or
something. Only shift into gear when the
engine is idling normally and when your right
foot is firmly on the brake pedal.
! Only shift the automatic transmission into
reverse gear R or park position P when the
vehicle is stopped. Otherwise the
automatic transmission could be damaged.
X Depress the brake pedal.
The gear selector lever lock is released.
X Shift the automatic transmission into drive
position D or reverse gear R.
i Shifting
the automatic transmission out of
park position P is only possible with the
brake pedal depressed.
Only depressing the brake pedal releases
the gear selector lever lock.
X Wait for the gear selection process to
complete before setting the vehicle in
motion.
X If engaged, release the parking brake.
X Release the brake pedal.
X Carefully depress the accelerator pedal.
After a cold start, the automatic transmission
shifts at a higher engine speed. This allows the catalytic converter to reach its operating
temperature earlier.
For
more information on driving, see “Driving
instructions” ( Y page 221). Problems while driving
The
engine runs erratically and misfires R
An ignition cable may be damaged.
R The engine electronics may not be
operating properly.
R Unburned gasoline may have entered the
catalytic converter and damaged it.
X Give very little gas.
X Have the problem checked at an authorized
Mercedes-Benz
Center as soon as possible.
The coolant temperature is above
248‡
(120†) The coolant is too hot and is no longer cooling
the engine.
X
Stop the vehicle in a safe location as soon
as possible.
X Turn off the engine immediately.
X Allow the engine and coolant to cool off.
X Check the coolant level and add coolant if
necessary ( Y page 196).
In case of accident If the vehicle is leaking fuel:
X
Do not start the engine under any
circumstances.
X Exit the vehicle at a safe distance from the
roadway.
X Notify local fire and/or police authorities.
If the extent of the damage cannot be
determined:
X Contact an authorized Mercedes-Benz
Center or call Roadside Assistance. 82
Driving and parking
Controls in detail
171_AKB; 3; 60, en-US
d2ureepe,
Version: 2.11.8.1 2009-05-11T16:00:23+02:00 - Seite 82
Page 85 of 312
If no damage on major assemblies, fuel
system, and engine mount can be
determined:
X
Start the engine in the usual manner. Parking
G
Warning!
Do not park this vehicle in areas where
combustible materials such as grass, hay or
leaves can come into contact with the hot
exhaust system. These materials could be
ignited and cause a vehicle fire.
Vehicle movement can cause serious
personal injury or damage to the vehicle or
the vehicle drivetrain. Therefore, always do
the following before turning off the engine and
leaving the vehicle:
R Keep right foot on the brake pedal.
R Engage the parking brake.
R Manual transmission: Shift the manual
transmission into 1st gear or reverse gear
R.
R Automatic transmission: Shift the
automatic transmission into park position
P.
R Slowly release the brake pedal.
R When parked on an incline, always turn the
front wheels towards the road curb.
R Turn the SmartKey in the starter switch to
position 0 and remove the SmartKey from
the starter switch.
R Take the SmartKey with you and lock the
vehicle when leaving. G
Warning!
Manual transmission:
Wait until the vehicle is stationary before
removing the SmartKey from the starter
switch. The vehicle cannot be steered when
the SmartKey is removed from the starter
switch. Parking brake G
Warning!
Engaging the parking brake while the vehicle
is in motion can cause the rear wheels to lock
up. You could lose control of the vehicle and
cause an accident. In addition, the vehicle’s
brake lights do not light up when the parking
brake is engaged. G
Warning!
When leaving the vehicle, always remove the
SmartKey from the starter switch, take it with
you, and lock the vehicle. Do not leave
children unattended in the vehicle, or with
access to an unlocked vehicle. Children could
release the parking brake and/or shift the
automatic transmission out of park position
P (manual transmission: shift into the neutral
position), either of which could result in an
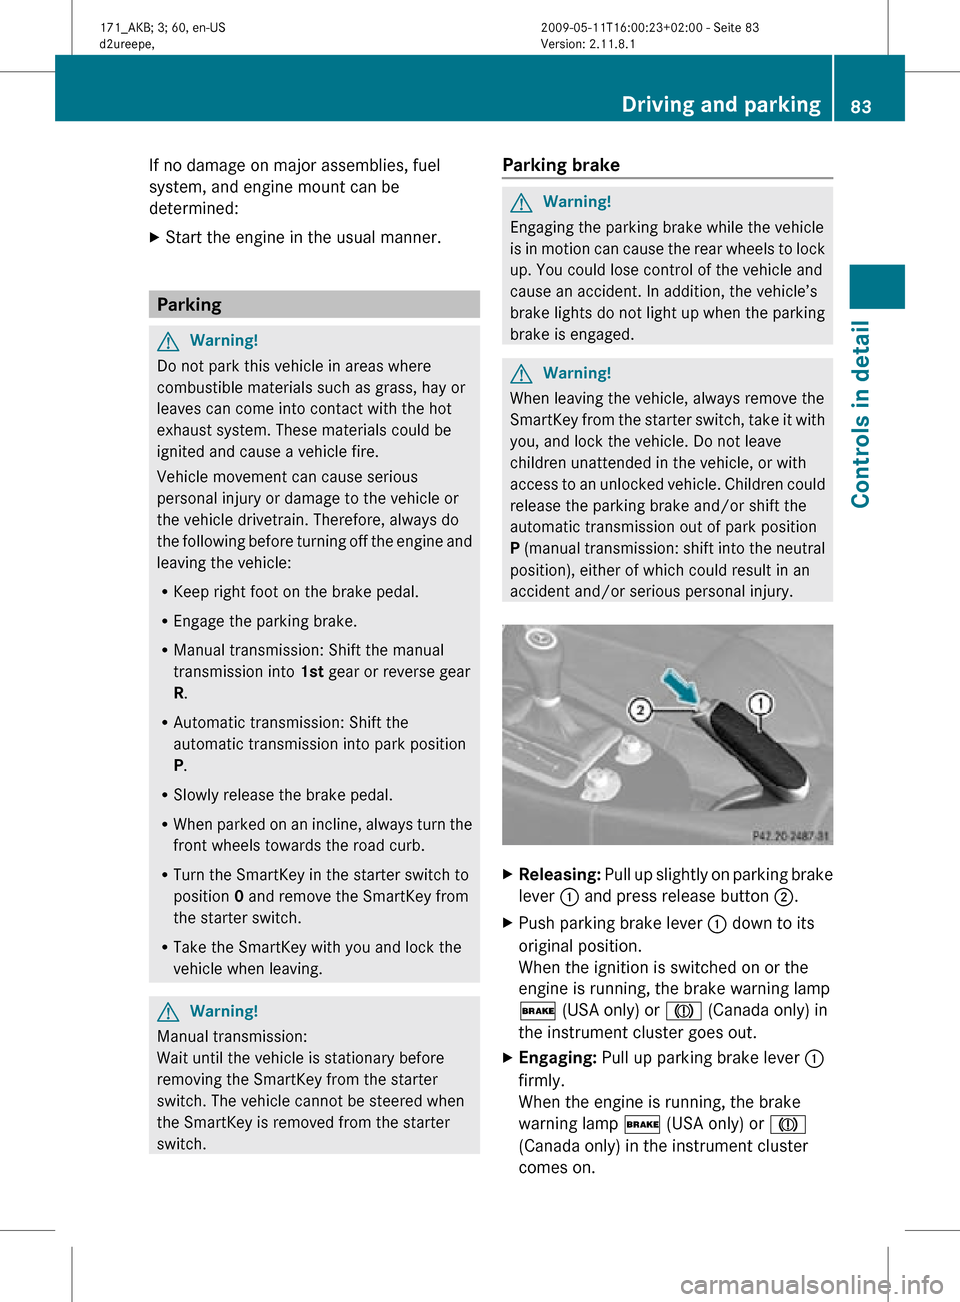
accident and/or serious personal injury. X
Releasing: Pull up slightly on parking brake
lever : and press release button ;.
X Push parking brake lever : down to its
original position.
When the ignition is switched on or the
engine is running, the brake warning lamp
$ (USA only) or J (Canada only) in
the instrument cluster goes out.
X Engaging: Pull up parking brake lever :
firmly.
When the engine is running, the brake
warning lamp $ (USA only) or J
(Canada only) in the instrument cluster
comes on. Driving and parking
83Controls in detail
171_AKB; 3; 60, en-US
d2ureepe, Version: 2.11.8.1 2009-05-11T16:00:23+02:00 - Seite 83 Z
Page 95 of 312
Activating the instrument cluster
The instrument cluster is activated when you
R open the driver’s door
R switch on the ignition
R press reset button .
R switch on the exterior lamps
i Opening the driver’s door or pressing the
reset button . without switching on the
ignition or the exterior lamps activates the
instrument cluster illumination only for
30 seconds. Adjusting the instrument cluster
illumination
X To brighten illumination: Press knob :
briefly.
X To dim illumination: Press knob ;
briefly.
The illumination brightness for the instrument
cluster changes each time you press
knob :
or ;. Several settings are possible.
i The instrument cluster illumination is
dimmed or brightened automatically to suit
ambient light conditions.
You can only adjust the brightness of the
instrument cluster illumination when it is
dark outside.
i With the exterior lighting switched on, the
brightness of the switches in the center
console will also be adjusted when using
knob : or ;. Resetting trip odometer
X Make sure you are viewing the standard
display
(Y page 96) in the multifunction
display.
X Press and hold reset button .
until the trip
odometer is reset. Tachometer
The red marking on the tachometer
(Y
page 26) denotes excessive engine speed.
! Avoid driving at excessive engine speeds,
as it may result in serious engine damage
that is not covered by the Mercedes-Benz
Limited Warranty.
To help protect the engine, the fuel supply is
interrupted if the engine is operated within
the red marking. Clock
In vehicles with the audio system, the clock
can be set via the control system
(Y page 105).
For setting the time with the COMAND
system, see separate COMAND system
operating instructions. Control system
Introduction
The
control system is activated as soon as the
starter switch is in position 1.
The control system enables you to call up
information about your vehicle and to change
vehicle settings.
For example, you can use the control system
to find out when your vehicle is next due for
maintenance service, to set the language for
messages in the instrument cluster display,
and much more. G
Warning!
A driver’s attention to the road and traffic
conditions must always be his/her primary
focus when driving.
For your safety and the safety of others,
selecting features through the multifunction
steering wheel should only be done by the
driver
when traffic and road conditions permit
it to be done safely. Control system
93
Controls in detail
171_AKB; 3; 60, en-US
d2ureepe, Version: 2.11.8.1 2009-05-11T16:00:23+02:00 - Seite 93 Z
Page 100 of 312
The main screen of the
AMG menu shows you
the gear currently engaged : as well as the
engine oil temperature ;.
The engine oil temperature flashes if the
engine oil temperature has not yet reached
80†. During this time, avoid driving at full
engine speed.
If the engine reaches the overspeed range in
the manual shift program, the menu will be
shown in red. In addition, you will see UP next
to gear indicator : as a reminder to upshift.
Use buttons & or * to select the
following functions in the AMG menu:
R Vehicle supply voltage ( Y page 98)
R RACETIMER (Y page 98)
R Overall analysis ( Y page 99)
R Lap analysis (Y page 99)
Vehicle supply voltage X
Press button V or U repeatedly until
the AMG menu appears in the
multifunction display.
X Press button & repeatedly until the
vehicle supply voltage appears in the
multifunction display. :
Gear indicator
; Vehicle supply voltage indicator RACETIMER G
Warning!
The RACETIMER feature is only for use on
roads and in conditions where high speed
driving is permitted. Racing on public roads is
prohibited under all circumstances. The driver
is and must always remain responsible for
following posted speed limits.
The RACETIMER allows you to time and save
driving stretches.
X Press button V or U repeatedly until
the AMG menu appears in the
multifunction display.
X Press button & repeatedly until the
RACETIMER appears in the multifunction
display. :
Gear indicator
; RACETIMER
= Lap number
You can start the RACETIMER when the
engine is running or the starter switch is in
position 2 (Y page 61).
While the RACETIMER is being displayed, you
cannot adjust the audio volume using buttons
W or X.
X Starting: Press button W.
X Displaying intermediate time: Press
button X while the timer is running.
The intermediate time is shown for
5 seconds.
X Stopping: Press button W.
When you stop the vehicle and turn the
SmartKey to position 1 (Y page 61), the
RACETIMER stops timing. Timing is resumed
when you switch the ignition back on or 98
Control systemControls in detail
171_AKB; 3; 60, en-US
d2ureepe,
Version: 2.11.8.1 2009-05-11T16:00:23+02:00 - Seite 98
Page 104 of 312
simply a reminder with respect to the
operation of certain systems. They do not
replace the owner’s and/or driver’s
responsibility to maintain the vehicle’s
operating safety. Have all required
maintenance and safety checks performed on
the vehicle. Bring the vehicle to an authorized
Mercedes-Benz Center to address the
malfunction and warning messages.
X Press button V or U repeatedly until
the Vehicle status message memory
menu appears in the multifunction display.
If conditions have occurred causing status
messages to be recorded, the number of
messages appears in the multifunction
display. :
Number of recorded status messages
X Press button & or *.
The stored messages will now be displayed
in the order in which they have occurred.
For malfunction and warning messages,
see “Vehicle status messages in the
multifunction display” ( Y page 236).
Should the vehicle’s system record any
conditions while driving, the number of
messages will reappear in the multifunction
display when the SmartKey in the starter
switch is turned to position 0 or removed
from the starter switch.
Except for high-priority messages, the vehicle
status message memory will be cleared when
you switch off the ignition. Settings menu
Introduction In the
Settings menu there are two
functions: The function To reset, push
reset button for 3 seconds, with which
you can reset all the settings to the original
factory settings and a collection of submenus
with which you can make individual settings
for your vehicle.
The following settings and submenus are
available in the Settings menu:
R Resetting to factory settings
(Y page 102)
R Submenus in the Settings menu
(Y page 103)
R Instrument cluster submenu
(Y page 103)
R Time/Date submenu ( Y page 105)
R Lighting submenu ( Y page 105)
R Vehicle submenu ( Y page 108)
R Convenience submenu ( Y page 108)
Resetting to factory settings You can reset the settings of all submenus to
the factory settings.
For safety reasons, the function
Headlamp
Mode in the Lighting submenu cannot be
reset while driving.
X Press button V or U repeatedly until
the Settings menu appears in the
multifunction display. 102
Control systemControls in detail
171_AKB; 3; 60, en-US
d2ureepe,
Version: 2.11.8.1 2009-05-11T16:00:23+02:00 - Seite 102
Page 119 of 312
the frequency range. Frequencies within
the current frequency range, but outside
the current frequency step width are
rounded to the next lower allowed
frequency.
X Enter 1045 with the keypad on the audio
control unit.
The audio system tunes in to the frequency
entered. Operation
In the following description, an operation step
is described as in the example below.
X $ Q Radio Q Enter Frequency
is the short for
X Press button $ on audio control unit
repeatedly until desired wave band has
been selected.
X Press button :.
X Press button = to select Radio.
X Press button 9.
The Radio menu is selected and a list of
submenus appears.
X Enter Frequency is selected. If it is not
selected, press button 9 to select
Enter Frequency.
X Press button 9.
The Enter Frequency submenu appears
in the audio display.
Switching audio system on or off X
Switching on: Press push button q.
or
X If the audio system was on as you switched
off the ignition, turn the SmartKey in the
starter switch to position 1.
The audio system will come back on with
the last selected function.
i If the audio system is switched on without
the SmartKey in the starter switch, it will
automatically switch off again after
approximately 30 minutes.
X Switching off: Press push button q.
or
X Turn the SmartKey in the starter switch to
position 0 and remove SmartKey from
starter switch.
i Should excessively high temperatures
occur while the audio system is being
operated, Temperature Too High -
Device switching off now. will appear
in the audio display, after which the audio
system will be switched off for a cooling-
down period.
i When you switch off the audio system,
you also switch off the currently playing
audio source. Also, telephone operation via
the audio control unit is not possible.
Adjusting volume Audio system
117Controls in detail
171_AKB; 3; 60, en-US
d2ureepe, Version: 2.11.8.1 2009-05-11T16:00:23+02:00 - Seite 117 Z