2011 MERCEDES-BENZ SLK55AMG heating
[x] Cancel search: heatingPage 70 of 312
X
Switch on the ignition.
X Switching on: Turn switch at the tip of the
stalk in direction of arrow :.
Indicator lamp ; comes on.
i The steering wheel heating may be
suspended temporarily. However, indicator
lamp ; remains on. The steering wheel
heating is suspended when the
temperature of the vehicle interior is above
86‡ (30†). It is also suspended when the
temperature of the steering wheel is above
95‡ (35†).
When these conditions do not apply
anymore, steering wheel heating
continues.
X Switching off: Turn switch at the tip of
stalk in direction of arrow =.
Indicator lamp ; goes out.
i Indicator lamp ; flashes or goes out in
case of power surge or undervoltage or if
the steering wheel heating malfunctions.
i The steering wheel heating switches off
automatically when you remove the
SmartKey from the starter switch.
For more information on the steering wheel,
see “Multifunction steering wheel”
(Y page 94). Mirrors
Notes
Adjust the interior and exterior rear view
mirrors before driving so that you have a good
view of the road and traffic conditions. Interior rear view mirror
X Adjust the interior rear view mirror
manually. Interior rear view mirror, antiglare
position
X
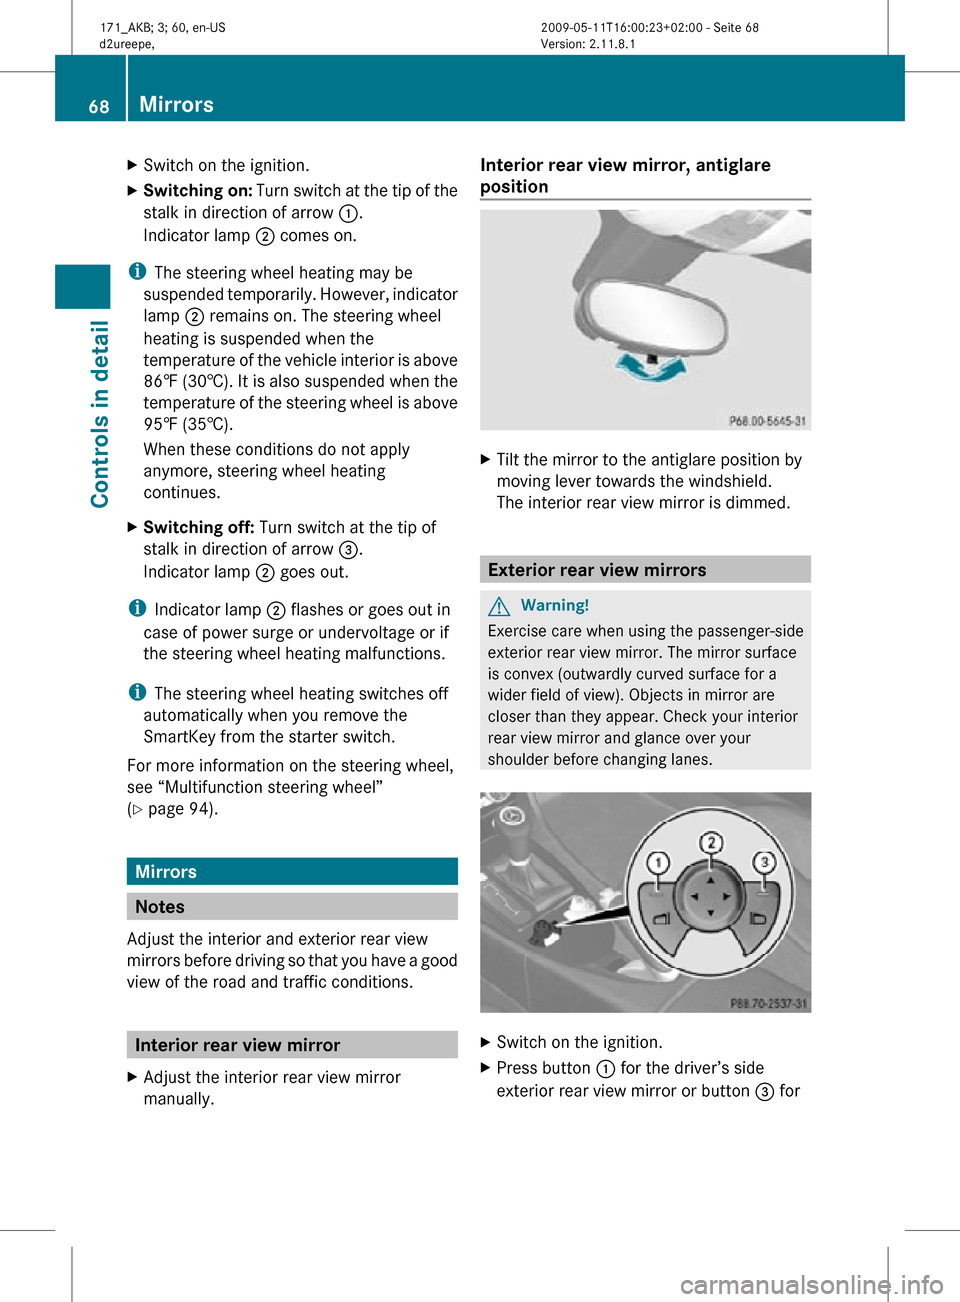
Tilt the mirror to the antiglare position by
moving lever towards the windshield.
The interior rear view mirror is dimmed. Exterior rear view mirrors
G
Warning!
Exercise care when using the passenger-side
exterior rear view mirror. The mirror surface
is convex (outwardly curved surface for a
wider field of view). Objects in mirror are
closer than they appear. Check your interior
rear view mirror and glance over your
shoulder before changing lanes. X
Switch on the ignition.
X Press button : for the driver’s side
exterior rear view mirror or button = for 68
MirrorsControls in detail
171_AKB; 3; 60, en-US
d2ureepe,
Version: 2.11.8.1 2009-05-11T16:00:23+02:00 - Seite 68
Page 164 of 312
Climate control system
Overview of climate control system functions
Your vehicle is equipped with either of the following climate control systems: Climate control
(Y page 162) Automatic climate control
(Y page 163)The climate control combines a heating and
ventilation system with a cooling system. The automatic climate control combines an
automatic heating and ventilation system
with a cooling system. You can adjust the
automatic climate control separately for the
driver’s and passenger side.
Control panels
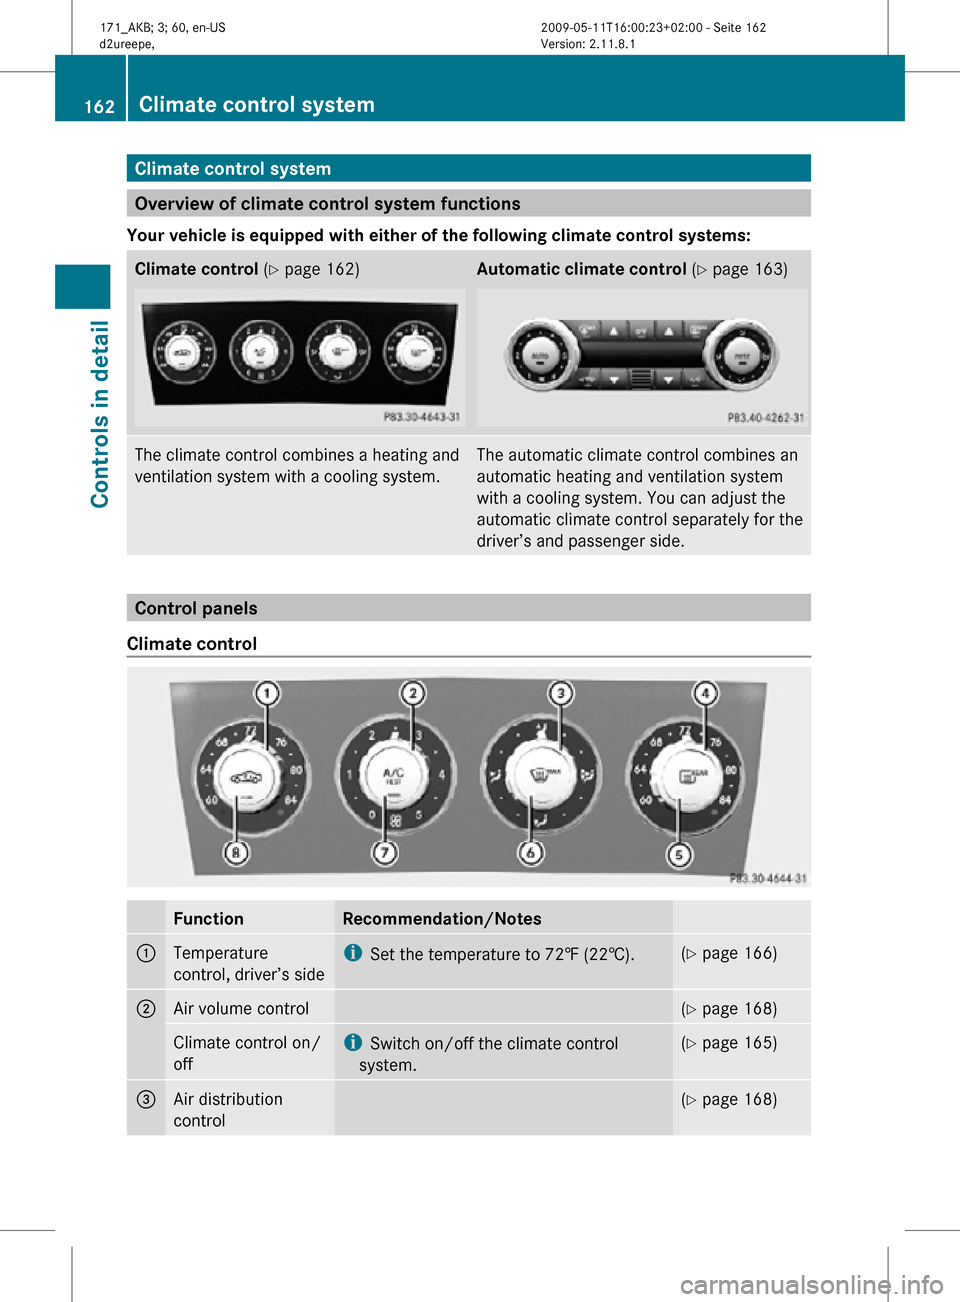
Climate control Function Recommendation/Notes
1
Temperature
control, driver’s side i
Set the temperature to 72‡ (22†). (Y page 166)
2
Air volume control (Y page 168)
Climate control on/
off i
Switch on/off the climate control
system. (Y page 165)
3
Air distribution
control (Y page 168)162
Climate control systemControls in detail
171_AKB; 3; 60, en-US
d2ureepe,
Version: 2.11.8.1 2009-05-11T16:00:23+02:00 - Seite 162
Page 167 of 312
The air conditioning will not engage (no
cooling) if the A/C
mode (Y page 165) is
deactivated. G
Warning!
Follow the recommended settings for heating
and cooling given on the following pages.
Otherwise the windows could fog up,
impairing visibility and endangering you and
others.
X Keep the air intake grille in front of the
windshield free of snow and debris.
When the retractable hardtop is closed, do
not obstruct air flow by placing objects on the
air flow-through exhaust slots below the rear
window.
i If the vehicle interior is hot, ventilate the
interior before driving off. The climate
control will then adjust the interior
temperature to the set value much faster. Deactivating the climate control
system
G
Warning!
When the climate control system is
deactivated, the outside air supply and
circulation are also deactivated. Only choose
this setting for a short time when the
retractable hardtop is closed. Otherwise the
windows
could fog up, impairing visibility and
endangering you and others.
Climate control X
Deactivating: Set air volume control ;
(Y page 162) to position 0.
X Reactivating:
Set air volume control ; to
any speed.
The previous settings are once again in
effect. Automatic climate control X
Deactivating: Press button ^.
The
indicator lamp in the button comes on.
X Reactivating: Press button ^.
The indicator lamp in the button goes out.
The previous settings are once again in
effect.
or
X Press button Ã.
The
indicator lamp in the button comes on.
Air volume and air distribution are adjusted
automatically. Air conditioning
The air conditioning is operational while the
engine
is running and cools the interior air to
the temperature set by the operator. In
addition, the air conditioning dehumidifies
the interior air and helps prevent window
fogging. G
Warning!
If you deactivate the air conditioning, the
vehicle will not be cooled when weather
conditions
are warm. The windows can fog up
more quickly. Window fogging may impair
visibility and endanger you and others.
i Condensated water may drip out from
underneath the vehicle. This is normal and
not an indication of a malfunction.
The air conditioning uses the refrigerant
R134a. This refrigerant is free of CFCs which
are harmful to the ozone layer.
Deactivating It is possible to deactivate the air
conditioning. The interior air will then no
longer be cooled or dehumidified.
X
Press button Á 10
/¿ 11
.
The indicator lamp in the button goes out.
10 Vehicles with climate control
11 Vehicles with automatic climate control Climate control system
165
Controls in detail
171_AKB; 3; 60, en-US
d2ureepe, Version: 2.11.8.1 2009-05-11T16:00:23+02:00 - Seite 165 Z
Page 169 of 312
i
For draft-free ventilation, move the
adjustable center and side air vents to the
middle position.
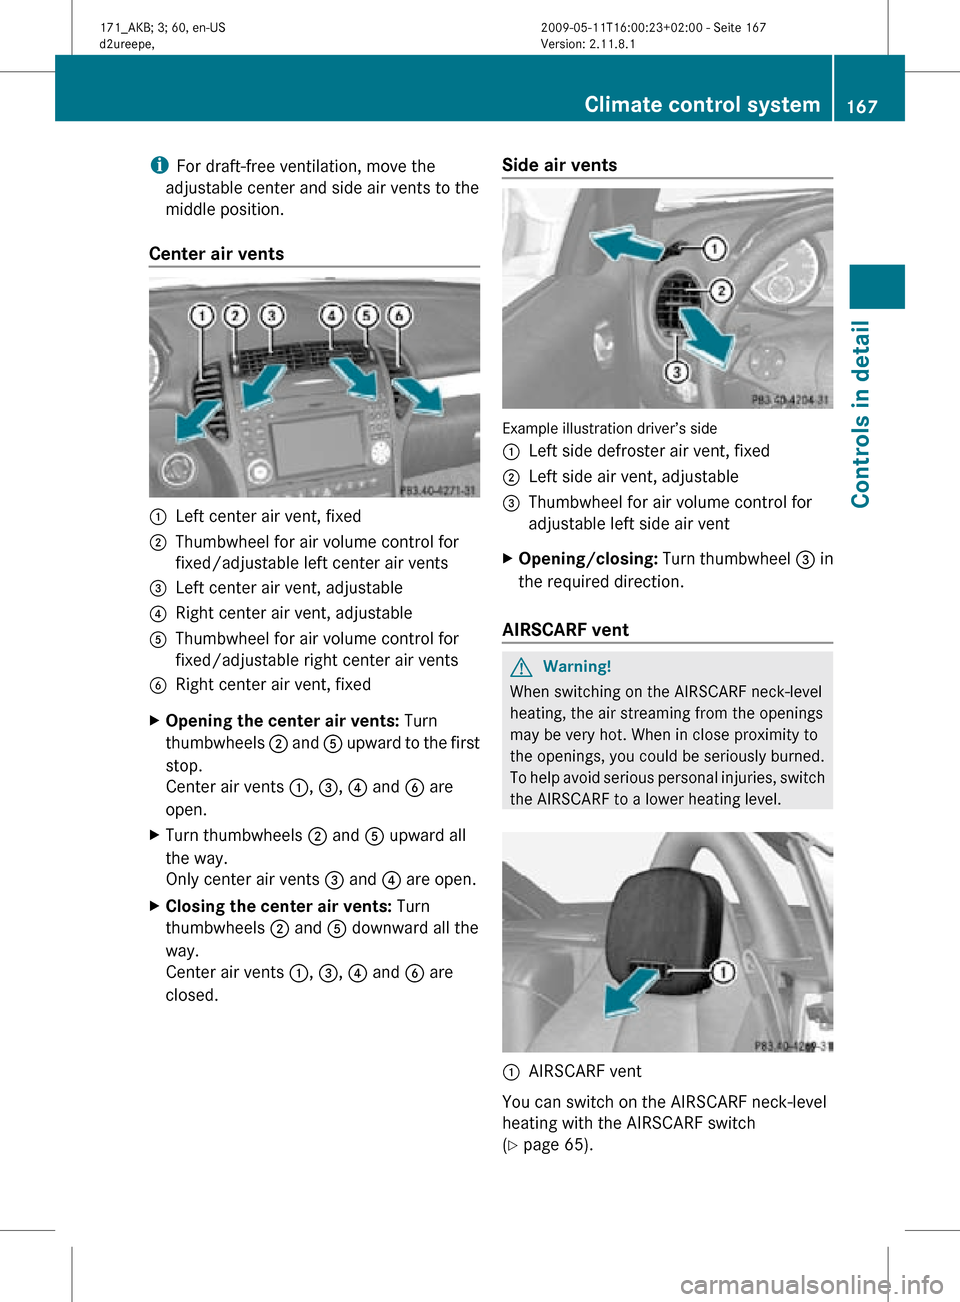
Center air vents :
Left center air vent, fixed
; Thumbwheel for air volume control for
fixed/adjustable left center air vents
= Left center air vent, adjustable
? Right center air vent, adjustable
A Thumbwheel for air volume control for
fixed/adjustable right center air vents
B Right center air vent, fixed
X Opening the center air vents: Turn
thumbwheels ; and A upward to the first
stop.
Center air vents :, =, ? and B are
open.
X Turn thumbwheels ; and A upward all
the way.
Only center air vents = and ? are open.
X Closing the center air vents: Turn
thumbwheels ; and A downward all the
way.
Center air vents :, =, ? and B are
closed. Side air vents Example illustration driver’s side
:
Left side defroster air vent, fixed
; Left side air vent, adjustable
= Thumbwheel for air volume control for
adjustable left side air vent
X Opening/closing: Turn thumbwheel = in
the required direction.
AIRSCARF vent G
Warning!
When switching on the AIRSCARF neck-level
heating, the air streaming from the openings
may be very hot. When in close proximity to
the openings, you could be seriously burned.
To help avoid serious personal injuries, switch
the AIRSCARF to a lower heating level. :
AIRSCARF vent
You can switch on the AIRSCARF neck-level
heating with the AIRSCARF switch
(Y page 65). Climate control system
167Controls in detail
171_AKB; 3; 60, en-US
d2ureepe, Version: 2.11.8.1 2009-05-11T16:00:23+02:00 - Seite 167 Z
Page 170 of 312
Adjusting air distribution
The symbols on the control represent the
following functions: Symbol Function
M
Directs air to the windshield and
through the side defroster air
vents
Q
Directs air into the entire
vehicle interior
O
Directs air to the footwells and
through the side air vents
P
Directs air through the center
and side air vents
Climate control
The air distribution can be adjusted manually.
X
Turn air distribution control =
(Y page 162) to the desired symbol.
The
air distribution is adjusted according to
the chosen setting.
You can also turn the control to a position
between two symbols.
Automatic climate control X
Turn air distribution control D
(Y page 163) to the desired symbol.
The
air distribution is adjusted according to
the chosen setting.
You can also turn the control to a position
between two symbols. Adjusting air volume
Climate control X
Decreasing/increasing: Turn air volume
control ; (Y page 162) clockwise or
counterclockwise. Automatic climate control X
Decreasing/increasing: Turn air volume
control : (Y page 163) clockwise or
counterclockwise. Front defroster
You can use this setting to defrost the
windshield, for example if it is iced up.
You can also defog the windshield and the
door windows.
i Keep this setting selected only until the
windshield or the door windows are clear
again.
X Activating: Press button ¬.
The
indicator lamp in the button comes on.
The climate control switches to the
following functions automatically:
R most efficient blower speed and heating
power, depending on outside
temperature
R air flows onto the windshield and the
door windows (side air vents must be
open)
R the air conditioning compressor
switches on at outside temperatures
above approximately 41‡ (5†) for air-
drying
R the air recirculation mode is switched off
X Deactivating: Press button ¬ again.
The indicator lamp in the button goes out.
The previous settings are once again in
effect.
i The cooling remains switched on. 168
Climate control systemControls in detail
171_AKB; 3; 60, en-US
d2ureepe,
Version: 2.11.8.1 2009-05-11T16:00:23+02:00 - Seite 168
Page 171 of 312
Windshield fogged on the outside
X
Switch the windshield wipers on
(Y page 76).
X Press button à 12
.
The indicator lamp in the button comes on.
Air distribution and air volume are adjusted
automatically.
or
X Turn air distribution control to P or
O. Maximum cooling MAX COOL
MAX COOL is only available in U.S. vehicles
with automatic climate control.
MAX COOL is only operational when the
engine is running.
If the air distribution controls as well as the
air volume control are set to à and there
is a high demand for cooling, MAX COOL is
activated. MAX COOL appears in display H
(Y page 163).
This provides the fastest possible cooling of
the
vehicle interior (when retractable hardtop
is closed). Air recirculation mode
Switch to air recirculation mode to prevent
unpleasant odors from entering the vehicle
from the outside (e. g. before driving through
a tunnel). This setting cuts off the intake of
outside air and recirculates the air in the
passenger compartment. G
Warning!
Fogged windows impair visibility,
endangering you and others. If the windows
begin to fog on the inside, switching off the
air recirculation mode immediately should
clear interior window fogging. If interior
window fogging persists, make sure the air conditioning is activated, or press button
¬.
X Activating: Press button g.
The
indicator lamp in the button comes on.
i The air recirculation mode is activated
automatically at high outside
temperatures.
The
indicator lamp in button g is not lit
when the air recirculation mode is switched
on automatically.
A quantity of outside air is added after
approximately 30 minutes.
X Deactivating: Press button g again.
The indicator lamp in the button goes out.
i The manually selected air recirculation
mode is deactivated automatically:
R after 5 minutes if the outside
temperature is below approximately
41‡ (5†)
R after 5 minutes if the air conditioning is
turned off
R after 30 minutes if the outside
temperature is above approximately
41‡ (5†) Residual heat and ventilation
With the engine turned off, it is possible to
continue to heat or ventilate the interior for
up to 30 minutes. This feature makes use of
the residual heat produced by the engine.
i If
you switch on the residual heat function
when outside temperatures are high, only
the ventilation will be switched on.
i How long the system will provide heating
depends on the coolant temperature and
the selected temperature. The blower will
run at speed setting 1 regardless of the air
volume control setting.
12 Vehicles with automatic climate control Climate control system
169
Controls in detail
171_AKB; 3; 60, en-US
d2ureepe, Version: 2.11.8.1 2009-05-11T16:00:23+02:00 - Seite 169 Z
Page 179 of 312
X
Lift up vanity mirror cover B.
Vanity mirror lamp : comes on. Ashtray
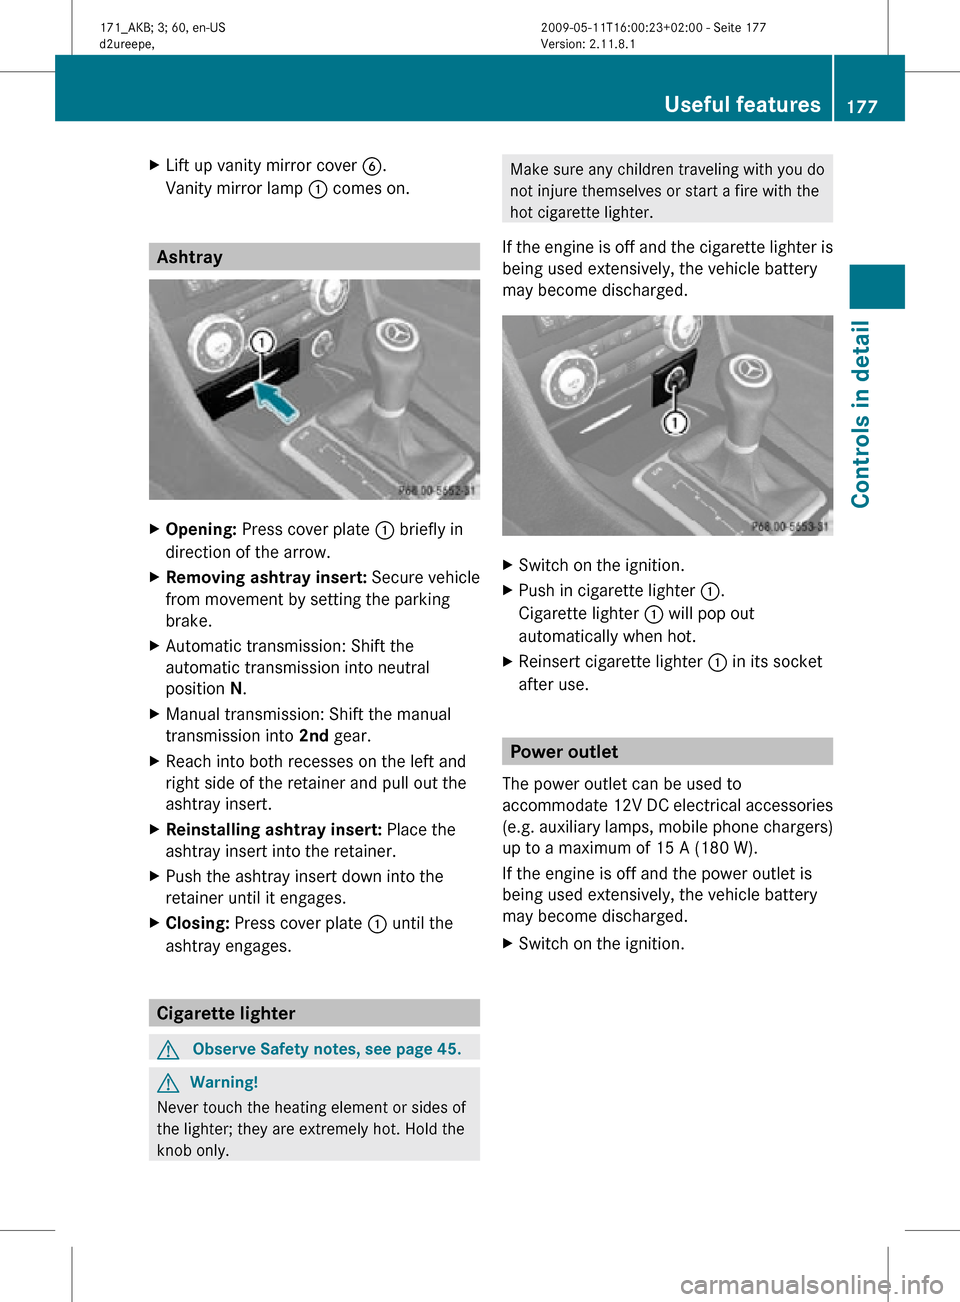
X
Opening: Press cover plate : briefly in
direction of the arrow.
X Removing ashtray insert: Secure vehicle
from movement by setting the parking
brake.
X Automatic transmission: Shift the
automatic transmission into neutral
position N.
X Manual transmission: Shift the manual
transmission into 2nd gear.
X Reach into both recesses on the left and
right side of the retainer and pull out the
ashtray insert.
X Reinstalling ashtray insert: Place the
ashtray insert into the retainer.
X Push the ashtray insert down into the
retainer until it engages.
X Closing: Press cover plate : until the
ashtray engages. Cigarette lighter
G
Observe Safety notes, see page 45. G
Warning!
Never touch the heating element or sides of
the lighter; they are extremely hot. Hold the
knob only. Make sure any children traveling with you do
not injure themselves or start a fire with the
hot cigarette lighter.
If the engine is off and the cigarette lighter is
being used extensively, the vehicle battery
may become discharged. X
Switch on the ignition.
X Push in cigarette lighter :.
Cigarette lighter : will pop out
automatically when hot.
X Reinsert cigarette lighter : in its socket
after use. Power outlet
The power outlet can be used to
accommodate 12V DC electrical accessories
(e.g. auxiliary lamps, mobile phone chargers)
up to a maximum of 15 A (180 W).
If the engine is off and the power outlet is
being used extensively, the vehicle battery
may become discharged.
X Switch on the ignition. Useful features
177Controls in detail
171_AKB; 3; 60, en-US
d2ureepe, Version: 2.11.8.1 2009-05-11T16:00:23+02:00 - Seite 177 Z
Page 224 of 312
Power assistance
G
Warning!
There is no power assistance for the steering
and the brake when the engine is not running.
Steering and braking requires significantly
more effort and you could lose control of the
vehicle and cause an accident as a result.
Do not turn off the engine while the vehicle is
in motion. Brakes
Downhill grades !
When driving down long and steep
grades, relieve the load on the brakes by
shifting into a lower gear to use the
engine’s
braking power. This helps prevent
overheating of the brakes and reduces
wear.
When using the engine’s braking power, a
drive wheel may not spin for an extended
period of time, e.g. on slippery road
surfaces. This may cause serious damage
to the drivetrain which is not covered by the
Mercedes-Benz Limited Warranty.
Continuous or hard braking G
Warning!
Resting your foot on the brake pedal will
cause excessive and premature wear of the
brake pads.
It can also result in the brakes overheating,
thereby significantly reducing their
effectiveness. It may not be possible to stop
the vehicle in sufficient time to avoid an
accident.
After hard braking, it is advisable to drive on
for
some time, rather than immediately park,
so that the air stream will cool down the
brakes faster. Wet roads G
Warning!
After driving in heavy rain for some time
without
applying the brakes or through water
deep enough to wet brake components, the
first braking action may be somewhat
reduced and increased pedal pressure may be
necessary to obtain expected brake effect.
Maintain a safe distance from vehicles in
front.
To help prevent brake disk corrosion after
driving on wet or salt-covered roads, it is
advisable to brake the vehicle with
considerable force prior to parking. The heat
generated serves to dry the brakes.
Salt-covered roads G
Warning!
A layer of salt on the brake discs and the brake
linings may cause a delay in the braking
effect, resulting in a significantly increased
braking distance, which could lead to an
accident.
To avoid this danger, you should:
R occasionally brake carefully when you are
driving on salt-covered roads, so that any
layer of salt that may have built up on the
brake discs and the brake linings is
removed without putting other road users
at risk
R maintain a greater distance to the vehicle
ahead and drive with particular care
R carefully apply the brakes at the end of a
trip and immediately after commencing a
new
trip, so that salt residues are removed
from the brake disc
Brake service !
The brake fluid level in the reservoir may
be
too low if the brake warning lamp in the
instrument cluster comes on and an
acoustic warning sounds although the 222
Driving instructions
Operation
171_AKB; 3; 60, en-US
d2ureepe,
Version: 2.11.8.1 2009-05-11T16:00:23+02:00 - Seite 222