2011 MERCEDES-BENZ SLK500 remote start
[x] Cancel search: remote startPage 9 of 312

Direction of rotation (tires)
..............209
Displays
Digital speedometer ........................97
Maintenance service indicator .......225
Messages in the multifunction
display
........................................... 236
Multifunction display .......................95
Outside temperature ...............97, 104
Symbol messages .......................... 243
Text messages ............................... 237
Trip computer ................................ 109
Vehicle status message memory ...101
Vehicle system settings ................. 102
Door control panel .............................. 30
Doors
Locking/unlocking (SmartKey) ........ 56
Messages in the multifunction
display ........................................... 245
Opening from inside ......................... 58
Remote door unlock (Tele Aid) ....... 182
Unlocking (Mechanical key) ........... 264
DOT (Department of
Transportation) .................................. 217
Drinking and driving .........................221
Driving
Abroad ........................................... 224
Hydroplaning ................................. 224
Instructions ............................. 80, 221
In winter ........................................ 220
Problems ......................................... 82
Safety systems ................................ 47
Systems ......................................... 159
Through standing water .................224
Driving and parking
Safety notes ..................................... 79
Driving off .................................... 81, 224
Driving safety systems ....................... 47
ABS .................................................. 48
BAS .................................................. 49
ESP ®
................................................ 49
ETS .................................................. 50
Driving systems
Cruise control ................................ 159
Driving tips, automatic
transmission ........................................ 87 E
Easy-entry/exit feature .............. 67, 108
Electrical system
Improper work on or
modifications ................................... 20
Power outlet .................................. 177
Electrical system (Technical data)
see Vehicle specification
Electronic Stability Program
see ESP ®
Emergency, in case of
First aid kit ..................................... 234
Flat tire .......................................... 273
Hazard warning flasher ....................74
Roadside Assistance ................ 19, 180
Towing the vehicle .........................285
Emergency calls
Tele Aid .......................................... 179
Telephone ...................................... 152
Emergency operations
Remote door unlock (Tele Aid) ....... 182
Retractable hardtop .......................266
Trunk lid, emergency release ...........60
Emergency Tensioning Device
see ETD
Emission control ............................... 225
Information label ............................ 293
System warranties ........................... 18
Engine
Break-in recommendations ............190
Cleaning ......................................... 228
Compartment ................................ 192
Malfunction indicator
lamp ........................................ 26, 262
Messages in the multifunction
display ........................................... 247
Number .......................................... 293
Starting ............................................ 80
Turning off ....................................... 84
Engine (Technical data)
see Vehicle specification
Engine coolant
see Coolant
Engine oil
Adding ........................................... 195
Additives ........................................ 303
Checking level ............................... 193 Index
7 171_AKB; 3; 60, en-US
d2ureepe,
Version: 2.11.8.1 2009-05-11T16:00:23+02:00 - Seite 7
Page 12 of 312

Unlocking/locking manually ..........
264
Valet locking .................................... 61
Key, SmartKey
Battery check lamp .......................... 57
Checking batteries ........................... 57
Factory setting
................................. 57
Global locking (SmartKey) ................ 57
Global unlocking
(SmartKey) ....................................... 57
Locking/unlocking ........................... 56
Loss of ............................................. 58
Messages in the multifunction
display ........................................... 246
Remote control ................................ 56
Replacing ......................................... 58
Replacing batteries ........................ 266
Restoring to factory setting ............. 57
Selective setting .............................. 57
Starter switch positions ................... 61
Kickdown ............................................. 87
Kickdown (manual shift program) ..... 92
Kilopascal (air pressure unit) ...........218
Knee bags ............................................ 36L
Labels
Certification ................................... 292
Emission control information
......... 293
Tire and Loading Information
placard ........................................... 205
Tire inflation pressure ....................200
Lamps, exterior
Exterior lamp switch ........................ 71
Front .............................................. 269
Messages in the multifunction
display ........................................... 252
Switching on/off .............................. 71
Lamps, indicator and warning
ABS .......................................... 26, 257
Brakes ..................................... 27, 257
Engine malfunction .................. 26, 262
ESP ®
........................................ 26, 260
Fog lamps ........................................ 73
Fuel tank reserve ..................... 26, 261
High-beam headlamps ...............26, 74
Instrument cluster ...................26, 256 Low tire pressure/TPMS
malfunction telltale ..................
26, 262
Passenger front air bag
off ...................................... 29, 37, 263
Seat belt telltale ................26, 42, 259
SRS ....................................
26, 32, 260
Turn signals ..................................... 26
Language, selecting ..........................104
License plate lamps
Messages in the multifunction
display ........................................... 253
Replacing bulbs ............................. 269
Light alloy wheels, cleaning .............230
Lighter see Cigarette lighter
Lighting ................................................ 70
Daytime running lamp mode ............72
Exterior ............................................ 71
Interior ............................................. 75
Limp-home mode ................................. 92
Load index (tires) ......................213, 218
Locator lighting ................................. 106
Locking the vehicle
Manually ........................................ 265
SmartKey ......................................... 56
Loss of
Key .................................................. 58
Service and Warranty Information
booklet .......................................... 292
Low-beam headlamps ......................... 71
Exterior lamp switch ........................ 71
Switching on .................................... 71
Lubricants .......................................... 300
Luggage cover ................................... 173
Lumbar support ................................... 64 M
Maintenance ........................................ 19
Maintenance System Service indicator display
................226
Service indicator message ............. 225
Service term exceeded ..................226
Manual headlamp mode (Low-
beam headlamps) ................................ 71
Manual shift program .........................90
Manual transmission .......................... 84
Gearshift lever ................................. 8410
Index 171_AKB; 3; 60, en-US
d2ureepe,
Version: 2.11.8.1 2009-05-11T16:00:23+02:00 - Seite 10
Page 16 of 312

SmartKey
see Key, SmartKey
Snow chains ...................................... 220
Snow tires see Winter tires
Spare wheel ....................................... 297
Mounting ....................................... 277
Storage location ............................ 235
Speed settings
Cruise control ................................ 160
Resume function ............................ 161
SRS (Supplemental Restraint System)
Indicator lamp ................... 26, 32, 260
Messages in the multifunction
display ........................................... 245
Standing water, driving through ......224
Starter switch positions SmartKey ......................................... 61
Starting difficulties (engine) ..............80
Starting the engine ............................. 80
Steering column see Multifunction steering wheel,
Adjustment
Steering wheel
see Multifunction steering wheel
Steering wheel gearshift control .......89
Stolen Vehicle Recovery Services ...183
Storage compartments .....................174
Storing tires ....................................... 210
Sun visors .......................................... 176T
Tachometer .......................................... 93
Overspeed range ............................. 93
Tail lamps
Cleaning lenses
............................. 229
Messages in the multifunction
display ........................................... 254
Tar stains ........................................... 228
Technical data Air conditioning refrigerant ............ 303
Brake fluid ..................................... 303
Capacities fuels, coolants,
lubricants etc. ................................ 300
Coolant .......................................... 304
Engine oil additives ........................303
Engine oils ..................................... 302Fuel requirements .......................... 303
Gasoline additives
.......................... 304
Identification labels .......................292
Premium unleaded gasoline ...........303
Rims and tires ................................ 297
Spare wheel ................................... 300
Vehicle specification SLK 300 .......294
Vehicle specification SLK 350 .......295
Vehicle specification SLK 55 AMG . 296
Washer and headlamp cleaning
system ................................... 302, 306
Technical data (dimensions)
see Vehicle specification
Technical data (electrical system)
see Vehicle specification
Technical data (engine)
see Vehicle specification
Technical data (weights)
see Vehicle specification
Tele Aid ............................................... 178
Emergency calls ............................. 179
Information button .........................181
Initiating an emergency call
manually ........................................ 180
Messages in the multifunction
display ........................................... 245
Remote door unlock ...................... 182
Roadside Assistance button .......... 180
Search & Send ............................... 182
SOS button .................................... 180
Stolen Vehicle Recovery Services .. 183
System self-test ............................. 178
Telephone .................................... 27, 146
Answering/ending a call ................ 110
Call lists ......................................... 156
Emergency calls “911” .................. 152
Hands-free microphone ...................30
Making calls ................................... 156
Menu ............................................. 110
Operation ....................................... 110
Phone book ........................... 111, 153
Redialing ........................................ 111
Temperature
Interior temperature ......................166
Outside .................................... 97, 104
Tightening torque
Wheels ........................................... 281
Time setting ....................................... 10514
Index 171_AKB; 3; 60, en-US
d2ureepe,
Version: 2.11.8.1 2009-05-11T16:00:23+02:00 - Seite 14
Page 142 of 312
Notes
i
The media interface allows for connection
of the following media with the audio
system:
R iPod ®
R USB storage media
R Audio devices with analog output (AUX),
e.g. MP3 or tape players.
i Do not leave external devices in the
vehicle under extremely high or low
temperatures. Read and observe the
operating instructions of the respective
device. Damage to external devices due to
excessive temperature is not covered by
the Mercedes-Benz Limited Warranty.
Do not operate iPods ®
or USB storage media
with a remote control such as Bluetooth ®
in
addition to the media interface control.
Otherwise malfunctions may occur.
Always use the latest firmware for the iPod ®
or USB storage media.
Only use genuine software for uploading to
your iPod ®
or MP3 player as otherwise certain
functions may not be available or the system
may not recognize the device.
Connecting a completely discharged iPod ®
or
USB storage medium can increase the
initialization time.
Only use genuine Mercedes-Benz
connectors.
i Suitable connector cables are located in
the vehicle or can be purchased at any
authorized Mercedes-Benz Center.
Depending on the device, loading large audio
files may take several minutes.
When the power consumption of the external
device is too high or the media interface is not
functioning properly, malfunction messages
will be displayed.
i For information on compatible
multimedia devices and iPod ®
versions R
visit www.mbusa-mobile.com
R call the Mercedes-Benz Customer
Assistance Center at
1-800-FOR-MERCedes
(1-800-367-6372)
(in the USA)
R call Customer Service at
1-800-387-0100 (in Canada)
Special characteristics of USB storage
media
R If the storage medium contains other data
than audio data, the time required for
initialization increases. Initialization may
then take several minutes. Therefore, audio
data should be stored on a separate
partition.
R Up to 8 folder levels containing up to
1 000 tracks per folder are supported.
R Do not use USB extension cables or
connectors as they may impair
functionality.
R The playlists on the device are searched for
in the background. They are provided in a
separate category once they are available.
R The media interface does not support files
that are protected by DRM (Digital Rights
Management).
Supported USB storage media
The following USB storage media are
supported:
R USB Flash Drives
R USB hard disks, 1", 1.8", and 2.5" drives
with a starting/continuous current rating
of maximum 800 mA (otherwise a separate
power supply will be necessary)
R MP3 players
-basic MP3 player are treated as USB
storage media
- for selected MP3 players additional
functions are supported
The media interface supports USB storage
media of USB Device SubClass 6. Information 140
Audio system
Controls in detail
171_AKB; 3; 60, en-US
d2ureepe,
Version: 2.11.8.1 2009-05-11T16:00:23+02:00 - Seite 140
Page 184 of 312
i
If the indicator lamp in Information
button : is flashing continuously and
there was no voice connection to the
Customer Assistance Center established,
then the Tele Aid system could not initiate
an Information call (e.g. the relevant
cellular phone network is not available).
The message Call Failed appears in the
multifunction display.
X Terminating calls: Press button ~ on
the multifunction steering wheel.
or
X Press the respective button for ending a
telephone call on the audio system or the
COMAND system.
Call priority If other service calls such as a Roadside
Assistance
call or Information call are active,
an emergency call is still possible. In this
case, the emergency call will take priority and
override all other active calls.
The indicator lamp in the respective button
flashes until the call is concluded. Automatic
initiated emergency calls can only be
terminated by a Customer Assistance Center
representative. All other calls can be
terminated by pressing button ~ on the
multifunction steering wheel or the
respective button for ending a telephone call
on the audio system or the COMAND system.
i When a Tele Aid call has been initiated,
the audio system or the COMAND system
is muted. The mobile phone is no longer
connected to the COMAND system. If you
must use this phone, we recommend that
you use it only with the vehicle at a
standstill in a safe location.
Destination Download to the COMAND
system i
The
components and operating principles
of the COMAND system can be found in the separate COMAND system operating
instructions.
Destination
Download allows you access to a
database of over 10 million points of interest
(POIs) that can be downloaded to your
vehicle’s navigation system. If you know the
destination, the address can be downloaded,
or can be provided with points of interests
near your location.
Route guidance
You will be prompted to confirm that route
guidance to the entered address is to be
started.
X Select Yes using button = or ; on
the COMAND system.
X Press button 9 on the COMAND system
to confirm.
The system calculates the route and
subsequently
starts the route guidance to the
defined address.
i If you select No, you can save the address
to your address book.
i The Destination Download feature is
available if the relevant mobile phone
network is available and data connection is
possible.
Search & Send “Search & Send” is a navigation destination
address entry service. For more information
on “Search & Send”, refer to separate
COMAND system operating instructions.
Remote door unlock
In case you have locked your vehicle
unintentionally
(e.g. SmartKey inside vehicle),
and the reserve SmartKey is not available:
X Contact the Customer Assistance Center
at 1-800-FOR-MERCedes 182
Useful features
Controls in detail
171_AKB; 3; 60, en-US
d2ureepe,
Version: 2.11.8.1 2009-05-11T16:00:23+02:00 - Seite 182
Page 186 of 312
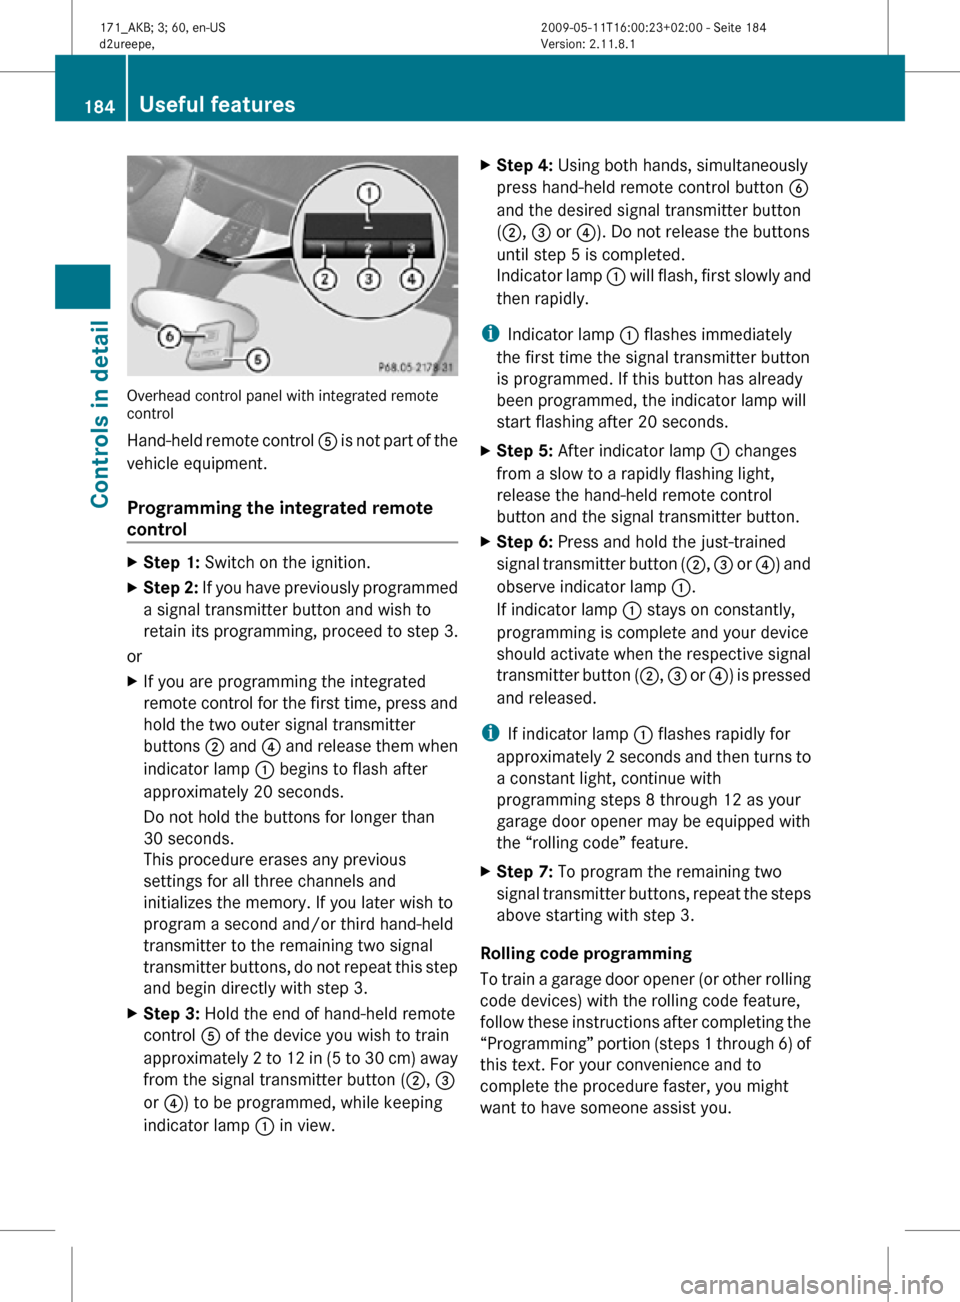
Overhead control panel with integrated remote
control
Hand-held remote control
A is not part of the
vehicle equipment.
Programming the integrated remote
control X
Step 1: Switch on the ignition.
X Step 2: If you have previously programmed
a signal transmitter button and wish to
retain its programming, proceed to step 3.
or
X If you are programming the integrated
remote control for the first time, press and
hold the two outer signal transmitter
buttons ; and ? and release them when
indicator lamp : begins to flash after
approximately 20 seconds.
Do not hold the buttons for longer than
30 seconds.
This procedure erases any previous
settings for all three channels and
initializes the memory. If you later wish to
program a second and/or third hand-held
transmitter to the remaining two signal
transmitter buttons, do not repeat this step
and begin directly with step 3.
X Step 3: Hold the end of hand-held remote
control A of the device you wish to train
approximately 2 to 12 in (5 to 30 cm) away
from the signal transmitter button ( ;, =
or ?) to be programmed, while keeping
indicator lamp : in view. X
Step 4: Using both hands, simultaneously
press hand-held remote control button B
and the desired signal transmitter button
(;, = or ?). Do not release the buttons
until step 5 is completed.
Indicator lamp : will flash, first slowly and
then rapidly.
i Indicator lamp : flashes immediately
the first time the signal transmitter button
is programmed. If this button has already
been programmed, the indicator lamp will
start flashing after 20 seconds.
X Step 5: After indicator lamp : changes
from a slow to a rapidly flashing light,
release the hand-held remote control
button and the signal transmitter button.
X Step 6: Press and hold the just-trained
signal transmitter button (;, = or ?) and
observe indicator lamp :.
If indicator lamp : stays on constantly,
programming is complete and your device
should activate when the respective signal
transmitter button ( ;, = or ?) is pressed
and released.
i If indicator lamp : flashes rapidly for
approximately 2 seconds and then turns to
a constant light, continue with
programming steps 8 through 12 as your
garage door opener may be equipped with
the “rolling code” feature.
X Step 7: To program the remaining two
signal transmitter buttons, repeat the steps
above starting with step 3.
Rolling code programming
To train a garage door opener (or other rolling
code devices) with the rolling code feature,
follow these instructions after completing the
“Programming” portion (steps 1 through 6) of
this text. For your convenience and to
complete the procedure faster, you might
want to have someone assist you. 184
Useful featuresControls in detail
171_AKB; 3; 60, en-US
d2ureepe,
Version: 2.11.8.1 2009-05-11T16:00:23+02:00 - Seite 184
Page 187 of 312
X
Step 8: Locate the “training” button on the
garage door opener motor head unit.
i Exact
location and color of the button may
vary by garage door opener brand.
Depending on manufacturer, the “training”
button may also be referred to as “learn” or
“smart” button. If there is difficulty locating
the transmitting button, refer to the garage
door opener Operator’s Manual.
X Step 9: Press the “training” button on the
garage door opener motor head unit.
The “training light” is activated.
You have 30 seconds to initiate the
following two steps.
X Step 10: Return to the vehicle and firmly
press, hold for 2 seconds and release the
programmed
signal transmitter button (;,
= or ?).
X Step 11: Press, hold for 2 seconds and
release same signal transmitter button a
second time to complete the training
process.
i Some garage door openers (or other
rolling
code equipped devices) may require
you to press, hold for 2 seconds and
release the same signal transmitter button
a third time to complete the training
process.
X Step 12: Confirm the garage door
operation by pressing the programmed
signal transmitter button ( ;, = or ?).
X Step 13: To program the remaining two
signal
transmitter buttons, repeat the steps
above starting with step 3.
Gate operator/Canadian programming
Canadian radio-frequency laws require
transmitter signals to “time-out” (or quit)
after several seconds of transmission which
may not be long enough for the integrated
signal
transmitter to pick up the signal during
programming. Similar to this Canadian law,
some U.S. gate operators are designed to
“time-out” in the same manner. If you live in Canada or if you are having
difficulties programming a gate operator
(regardless of where you live) by using the
programming
procedures, replace step 4 with
the following:
X Step 4: Press and hold the signal
transmitter button ( ;, = or ?). Do not
release this button until it has been
successfully trained.
X While still holding down the signal
transmitter button ( ;, = or ?), “cycle”
your hand-held remote control button B
as follows: Press and hold button B for
2 seconds, then release it for 2 seconds,
and again press and hold it for 2 seconds.
Repeat this sequence on the hand-held
remote control until the frequency signal
has been learned.
Upon successful training, indicator
lamp : will flash slowly and then rapidly
after several seconds.
X Proceed with programming step 5 and
step 6 to complete.
i Upon completion of programming the
integrated remote control, make sure you
retain the hand-held remote control that
came with the garage door opener, gate
operator or other device. You may need it
for use in other vehicles, for future
programming of an integrated remote
control, or simply for continued use as a
hand-held remote control to operate the
respective device in other situations.
Reprogramming a single signal
transmitter button To program a device using a signal
transmitter button previously trained, follow
these steps: Useful features
185
Controls in detail
171_AKB; 3; 60, en-US
d2ureepe, Version: 2.11.8.1 2009-05-11T16:00:23+02:00 - Seite 185 Z
Page 188 of 312
X
Switch on the ignition.
X Press and hold the desired signal
transmitter button ( ;, = or ?). Do not
release the button.
Indicator lamp : will begin to flash after
20 seconds.
X Without releasing the signal transmitter
button,
proceed with programming starting
with step 3.
Operation of integrated remote control X
Switch on the ignition.
X Select and press the appropriate
integrated signal transmitter button ( ;,
=
or ?) to activate the remote controlled
device.
The integrated remote control transmitter
continues to send the signal as long as the
button is pressed – up to 20 seconds.
Erasing the integrated remote control
memory i
If
you sell your vehicle, erase the codes of
all three channels.
X Switch on the ignition.
X Simultaneously press and hold outer signal
transmitter buttons ; and ?, for
approximately 20 seconds, until indicator
lamp : flashes rapidly. Do not hold for
longer than 30 seconds.
The
codes of all three channels are erased.
Programming tips If you are having difficulty programming the
integrated remote control, here are some
helpful tips:
R
Check the frequency of hand-held remote
control A
(typically located on the reverse
side of the remote). The integrated remote control is compatible with radio-frequency
devices operating between 280-390 MHz
.
R Put a new battery in hand-held remote
control A. This will increase the likelihood
of the hand-held remote control sending a
stronger and more accurate signal to the
integrated remote control.
R While performing step 3, hold hand-held
remote control A at different lengths and
angles from the signal transmitter button
(;, = or ?) you are programming.
Attempt varying angles at the distance of 2
to 12 inches (5 to 30 cm) away or the same
angle at varying distances.
R If another hand-held remote control is
available for the same device, try the
programming steps again using that other
hand-held remote control. Make sure new
batteries are in the hand-held remote
control before beginning the procedure.
R Straighten the antenna wire from the
garage door opener assembly. This may
help improve transmitting and/or receiving
signals.
i Certain types of garage door openers are
incompatible with the integrated remote
control. If you should experience further
difficulties with programming the
integrated remote control, contact an
authorized Mercedes-Benz Center, or call
the Mercedes-Benz Customer Assistance
Center (USA only) at
1-800-FOR-MERCedes, or the HomeLink ®
Hotline (USA only) at 1-800-355-3515, or
the Customer Service (Canada only) at
1-800-387-0100. 186
Useful features
Controls in detail
171_AKB; 3; 60, en-US
d2ureepe,
Version: 2.11.8.1 2009-05-11T16:00:23+02:00 - Seite 186