2011 MERCEDES-BENZ SLK500 spare wheel
[x] Cancel search: spare wheelPage 283 of 312

X
Turn the SmartKey in the starter switch to
position 1.
X Press I on electric air pump switch ;.
The electric air pump switches on and
inflates the collapsible tire.
X Inflate the collapsible tire to the
recommended tire inflation pressure as
specified for your vehicle ( Y page 300).
This should take approximately 5 minutes. G
Warning!
The air hose and the union nut can become
hot during inflation. Exercise proper caution
to avoid burning yourself when using the
equipment.
! Do not operate the electric air pump
longer than 6 minutes without interruption.
Otherwise it may overheat.
You may operate the air pump again after
it has cooled off.
! Compare the recommended tire inflation
pressure for your vehicle with the tire
inflation pressure on the yellow label
located on the spare wheel rim.
If the tire inflation pressure on the yellow
label on the spare wheel rim differs from
the values given in this Operator’s Manual,
inflate the tire to the recommended tire
inflation pressure given on the yellow label
on the spare wheel rim.
X Press 0 on electric air pump switch ;.
X Turn the SmartKey in the starter switch to
position 0.
X Version 1 only: If the tire inflation pressure
is above the recommended tire inflation
pressure as specified for your vehicle
(Y page 300), decrease tire pressure using
the vent screw on air hose ?.
X Version 2 only: If the tire inflation pressure
is above the recommended tire inflation
pressure as specified for your vehicle
(Y page 300), decrease tire pressure using
deflate button B. G
Observe Safety notes, see page 201.
X Detach the electric air pump.
X Reinstall collapsible tire valve cap.
X Version 1 only: Store electrical plug =
and air hose ? behind flap :.
X Version 2 only: Store electrical plug =
and the air hose back into the pump
housing bottom.
X Place the electric air pump back in its
designated storage space.
X Lower the vehicle.
Lowering the vehicle G
Warning!
Inflate collapsible tire only after the wheel is
properly attached.
Inflate the collapsible tire using the electric
air pump before lowering the vehicle.
X Lower the vehicle by turning the crank
counterclockwise until the vehicle is
resting fully on its own weight.
X Remove the jack. X
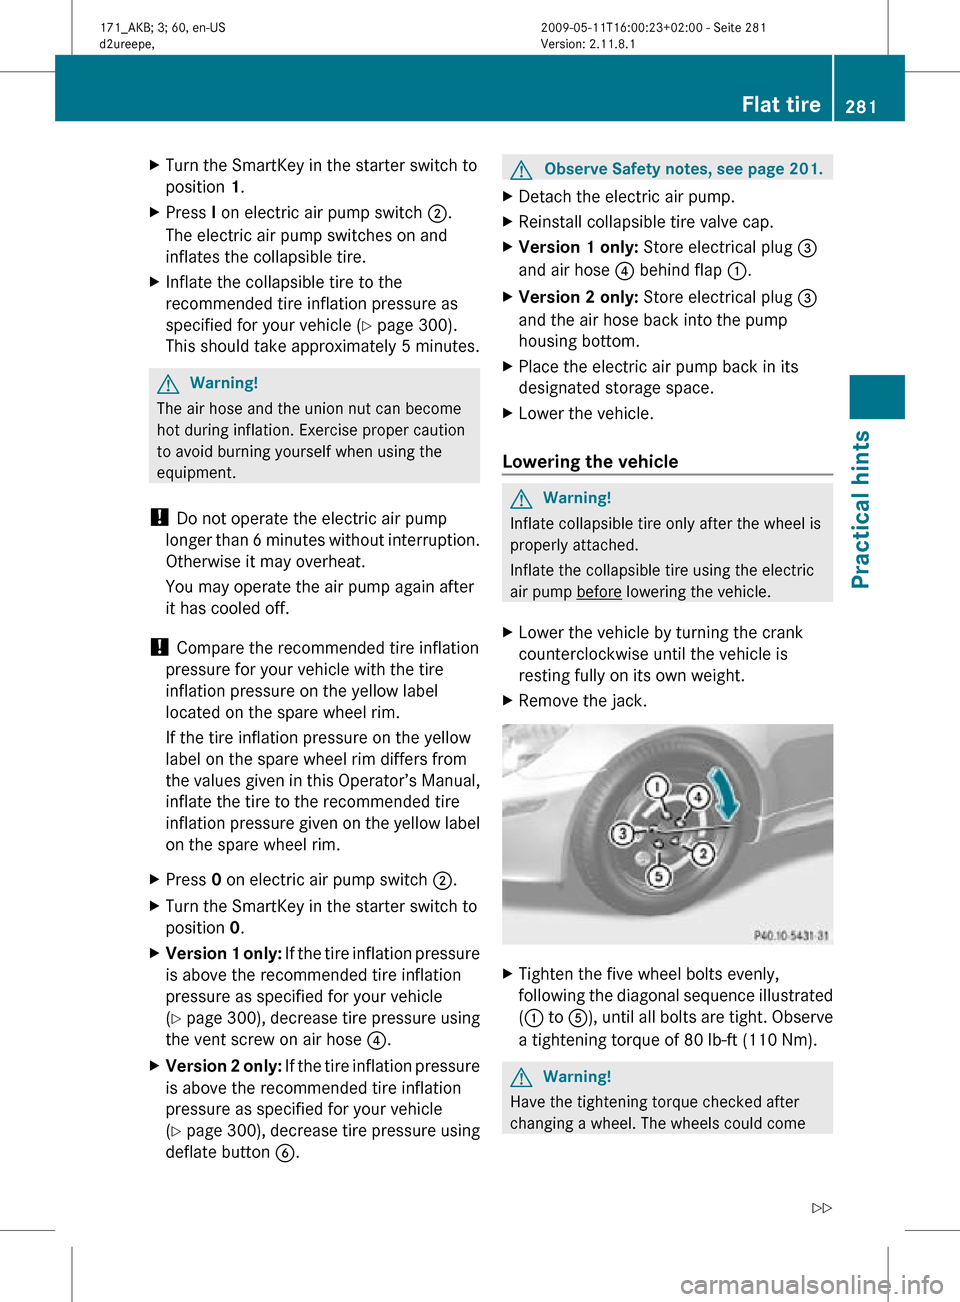
Tighten the five wheel bolts evenly,
following the diagonal sequence illustrated
(: to A), until all bolts are tight. Observe
a tightening torque of 80 lb-ft (110 Nm). G
Warning!
Have the tightening torque checked after
changing a wheel. The wheels could come Flat tire
281Practical hints
171_AKB; 3; 60, en-US
d2ureepe, Version: 2.11.8.1 2009-05-11T16:00:23+02:00 - Seite 281 Z
Page 284 of 312

loose if they are not tightened to a torque of
80 lb-ft (110 Nm).
X Fully collapse the jack, with handle folded
in (storage position), see ( Y page 235).
X Store the jack and the other vehicle tools
in the designated storage space.
X If so equipped, wrap the damaged wheel in
the protective wrap provided with the
vehicle tool kit and put the wheel in the
trunk.
The retractable hardtop must be closed.
For information on storing the spare wheel
after it has been replaced by a regular road
wheel, see ( Y page 235). Battery
Safety notes
A battery should always be sufficiently
charged in order to achieve its rated service
life. Refer to Maintenance Booklet for battery
maintenance intervals.
If you use your vehicle mostly for short-
distance trips, you will need to have the
battery charge checked more frequently.
When replacing a battery, always use a
battery approved by Mercedes-Benz.
If you do not intend to operate your vehicle
for an extended period of time, contact an
authorized Mercedes-Benz Center about
steps you need to observe. G
Warning!
Observe all safety instructions and
precautions when handling automotive
batteries.Risk of explosion.
Fire, open flames and
smoking are prohibited
when handling batteries.
Avoid creating sparks.
Battery acid is caustic. Do
not allow it to come into
contact with skin, eyes or
clothing.
Wear suitable protective
clothing, especially gloves,
apron and faceguard.
Wear eye protection.
Rinse any acid spills
immediately with clear
water. Contact a physician
if necessary.
Keep children away.
Follow the instructions in
this Operator’s Manual.
A battery contains materials that can harm
the environment if disposed of improperly. A
large 12 V storage battery contains lead.
Recycling of the battery is the preferred
method of disposal. Many states (USA only)
or provinces (Canada only) require sellers of
batteries to accept the old battery for
recycling.
G Warning!
Failure to follow these instructions can result
in severe injury or death.
Never lean over batteries while connecting.
You might get injured.
Battery fluid contains sulfuric acid. Do not
allow this fluid to come in contact with eyes,
skin or clothing. In case it does, immediately
flush affected area with water and seek
medical help if necessary.
A battery will also produce hydrogen gas,
which is flammable and explosive. Keep
flames or sparks away from battery, avoid
improper connection of jumper cables,
smoking etc.
282 Battery
Practical hints
171_AKB; 3; 60, en-US
d2ureepe,
Version: 2.11.8.1 2009-05-11T16:00:23+02:00 - Seite 282
Page 290 of 312

Towing with all wheels on the ground
G
Warning!
If circumstances require towing the vehicle
with all wheels on the ground, always tow with
a tow bar if:
R the engine will not run
R there is a malfunction in the brake system
R there is a malfunction in the power supply
or in the vehicle’s electrical system
This is necessary to adequately control the
towed vehicle.
Prior to towing the vehicle with all wheels on
the ground, make sure the SmartKey is in
starter switch position 2.
If the SmartKey is left in the starter switch
position 0 for an extended period of time, it
can no longer be turned in the switch. In this
case, the steering is locked. To unlock,
remove SmartKey from starter switch and
reinsert. G
Warning!
With the engine not running, there is no power
assistance for the brake and steering
systems. In this case, it is important to keep
in mind that a considerably higher degree of
effort is necessary to brake and steer the
vehicle. Adapt your driving accordingly.
X Make sure the ignition is switched on.
X With the vehicle at a standstill, depress the
brake pedal and keep it pressed.
X Vehicles with manual transmission: Shift
the manual transmission into the neutral
position (no gear selected).
or
X Vehicles with automatic transmission: Shift
the automatic transmission into neutral
position N.
X Release the brake pedal.
X If engaged, release the parking brake.
X Switch on the hazard warning flasher
(Y page 74). !
The vehicle may be towed only for
distances up to 30 miles (50 km) and at a
speed not to exceed 30 mph (50 km/h).
i While being towed with the hazard
warning
flasher in use, use the combination
switch in the usual manner to signal turns.
Only the selected turn signal will operate.
Upon canceling the turn signal, the hazard
warning flasher will operate again. Fuses
Introduction
The electrical fuses in your vehicle serve to
switch off malfunctioning power circuits.
If a fuse is blown, the components and
systems secured by that fuse will stop
operating. G
Warning!
Only use fuses approved by Mercedes-Benz
with
the specified amperage for the system in
question and do not attempt to repair or
bridge a blown fuse. Using other than
approved fuses or using repaired or bridged
fuses may cause an overload leading to a fire,
and/or cause damage to electrical
components and/or systems. Have the cause
determined and remedied by an authorized
Mercedes-Benz Center.
A blown fuse must be replaced by an
appropriate spare fuse (recognizable by its
color or the fuse rating given on the fuse) of
the amperage recommended in the fuse
chart. Any Mercedes-Benz Center will be glad
to advise you on this subject.
i In case of a blown fuse contact Roadside
Assistance or an authorized Mercedes-
Benz Center.
If a newly inserted fuse blows again, have the
cause determined and rectified by an
authorized Mercedes-Benz Center.
The fuse chart is located in the fuse box in the
passenger compartment. The fuse chart 288
Fuses
Practical hints
171_AKB; 3; 60, en-US
d2ureepe,
Version: 2.11.8.1 2009-05-11T16:00:23+02:00 - Seite 288
Page 302 of 312

Spare wheel
! Compare the recommended tire inflation pressure for your vehicle with the tire inflation
pressure on the yellow label located on the spare wheel rim.
If
the tire inflation pressure on the yellow label on the spare wheel rim differs from the values
given in this Operator’s Manual, inflate the tire to the recommended tire inflation pressure
given on the yellow label on the spare wheel rim.
i Please note that the tire inflation pressure of the spare wheel differs from the tire inflation
pressure of the road tires.
i The SLK 55 AMG with Performance Package does not have a spare wheel. The SLK 55 AMG
with Performance Package is equipped with TIREFIT ( Y page 273). All models
(except SLK 55 AMG with Performance Package)
Rim
4.5 B x 17 H2
Wheel offset
0.47 in (12 mm)
Collapsible tire
33 145/70-17 92P
Recommended tire inflation
pressure
51 psi (3.5 bar)
Fuels, coolants, lubricants, etc.
Capacities
Vehicle components and their respective
lubricants must match. Therefore only use
products tested and approved by Mercedes-
Benz.
For information on tested and approved
products, contact an authorized Mercedes-
Benz Center or visit www.mbusa.com (USA
only). G
Warning!
Comply with all valid regulations with respect
to handling, storing, and disposing of service fluids. Otherwise you could endanger persons
or the environment.
Keep service fluids out of the reach of
children.
For health reasons, you should prevent
service
fluids from coming into direct contact
with your skin or clothing.
If a service fluid is swallowed, contact a
physician immediately.
33 Must not be used with snow chains. 300
Fuels, coolants, lubricants, etc.
Technical data
171_AKB; 3; 60, en-US
d2ureepe,
Version: 2.11.8.1 2009-05-11T16:00:23+02:00 - Seite 300