2011 MERCEDES-BENZ SLK300 seats
[x] Cancel search: seatsPage 64 of 312
driving, refer to “Lamps in instrument cluster”
(Y page 256).
If the SmartKey is left in starter switch
position 0 for an extended period of time, it
can
no longer be turned in the starter switch.
In this case, the steering is locked. To unlock,
remove SmartKey from the starter switch and
reinsert.
The steering is locked when the SmartKey is
removed from the starter switch.
X Always remove the SmartKey from the
starter switch when the engine is not in
operation.
This
will help to prevent accelerated vehicle
battery discharge or a completely
discharged vehicle battery.
If the SmartKey cannot be turned in the
starter
switch, the vehicle battery may not be
sufficiently charged.
X Check the vehicle battery and charge it if
necessary ( Y page 283).
or
X Get a jump start (Y page 283). Seats
Safety notes
G
Warning!
In order to avoid possible loss of vehicle
control
the following must be done before the
vehicle is put into motion:
R seat adjustment
R head restraint adjustment
R steering wheel adjustment
R rear view mirror adjustment
R fastening of seat belts G
Warning!
Do not adjust the driver’s seat while driving.
Adjusting the seat while driving could cause
the driver to lose control of the vehicle. Never ride in a moving vehicle with the seat
backrest
in an excessively reclined position as
this can be dangerous. You could slide under
the seat belt in a collision. If you slide under
it, the seat belt would apply force at the
abdomen or neck. That could cause serious
or fatal injuries. The seat backrest and seat
belts provide the best restraint when the
wearer is in a position that is as upright as
possible and seat belts are properly
positioned on the body. G
Warning!
Your seat must be adjusted so that you can
correctly fasten your seat belt.
Observe the following points:
R Adjust
the seat backrest until your arms are
slightly angled when holding the steering
wheel.
R Adjust the seat to a comfortable seating
position that still allows you to reach the
accelerator/brake pedal safely. The
position should be as far back as possible
with the driver still able to operate the
controls properly.
R Adjust the head restraint so that it is as
close to the head as possible. The center of
the head restraint must support the back of
the head at eye level.
R Never place hands under the seat or near
any moving parts while a seat is being
adjusted.
Failure to do so could result in an accident
and/or serious personal injury. G
Warning!
Children 12 years old and under must be
seated and properly secured in an
appropriately sized infant restraint, toddler
restraint, or booster seat recommended for
the
size and weight of the child. For additional
information, see section “Children in the
vehicle”.
A child’s risk of serious or fatal injuries is
significantly increased if the child restraints 62
Seats
Controls in detail
171_AKB; 3; 60, en-US
d2ureepe,
Version: 2.11.8.1 2009-05-11T16:00:23+02:00 - Seite 62
Page 65 of 312
are not properly secured in the vehicle and/
or the child is not properly secured in the child
restraint.
G
Warning!
For your protection, drive only with properly
positioned head restraints.
Adjust the head restraint so that it is as close
to the head as possible and the center of the
head restraint supports the back of the head
at eye level. This will reduce the potential for
injury to the head and neck in the event of an
accident or similar situation.
Do not drive the vehicle without the seat head
restraints. Head restraints are intended to
help reduce injuries during an accident. Seat adjustment
The seats can be adjusted either manually or
electrically, depending on the vehicle’s
equipment.
! When moving the seats, make sure there
are no items in the footwell or behind the
seats. Otherwise, you could damage the
seats and/or the items.
Manual seat adjustment X
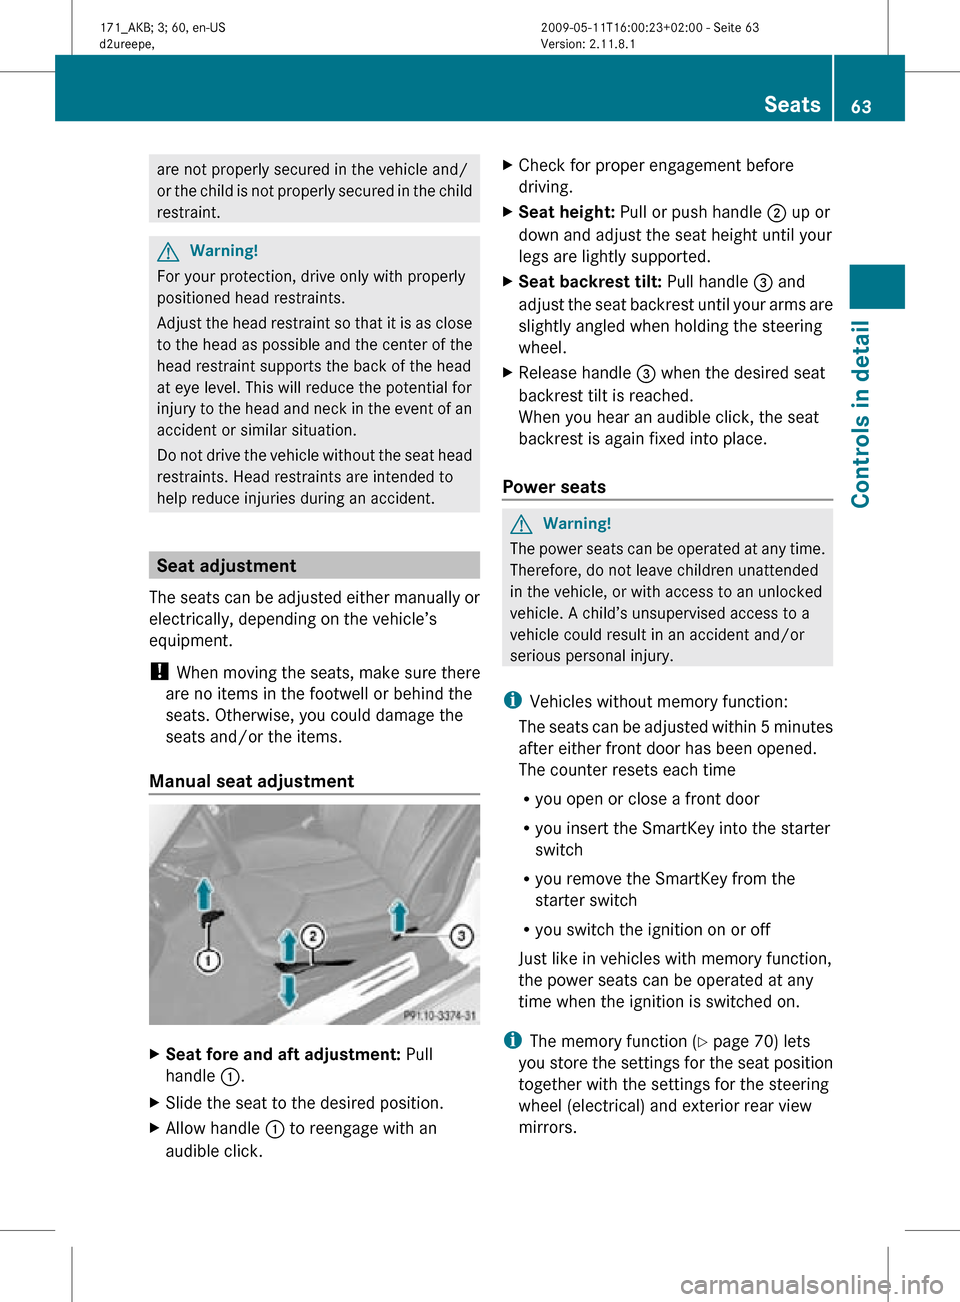
Seat fore and aft adjustment: Pull
handle :.
X Slide the seat to the desired position.
X Allow handle : to reengage with an
audible click. X
Check for proper engagement before
driving.
X Seat height: Pull or push handle ; up or
down and adjust the seat height until your
legs are lightly supported.
X Seat backrest tilt: Pull handle = and
adjust the seat backrest until your arms are
slightly angled when holding the steering
wheel.
X Release handle = when the desired seat
backrest tilt is reached.
When you hear an audible click, the seat
backrest is again fixed into place.
Power seats G
Warning!
The power seats can be operated at any time.
Therefore, do not leave children unattended
in the vehicle, or with access to an unlocked
vehicle. A child’s unsupervised access to a
vehicle could result in an accident and/or
serious personal injury.
i Vehicles without memory function:
The seats can be adjusted within 5 minutes
after either front door has been opened.
The counter resets each time
R you open or close a front door
R you insert the SmartKey into the starter
switch
R you remove the SmartKey from the
starter switch
R you switch the ignition on or off
Just like in vehicles with memory function,
the power seats can be operated at any
time when the ignition is switched on.
i The memory function (Y page 70) lets
you store the settings for the seat position
together with the settings for the steering
wheel (electrical) and exterior rear view
mirrors. Seats
63Controls in detail
171_AKB; 3; 60, en-US
d2ureepe, Version: 2.11.8.1 2009-05-11T16:00:23+02:00 - Seite 63 Z
Page 66 of 312
X
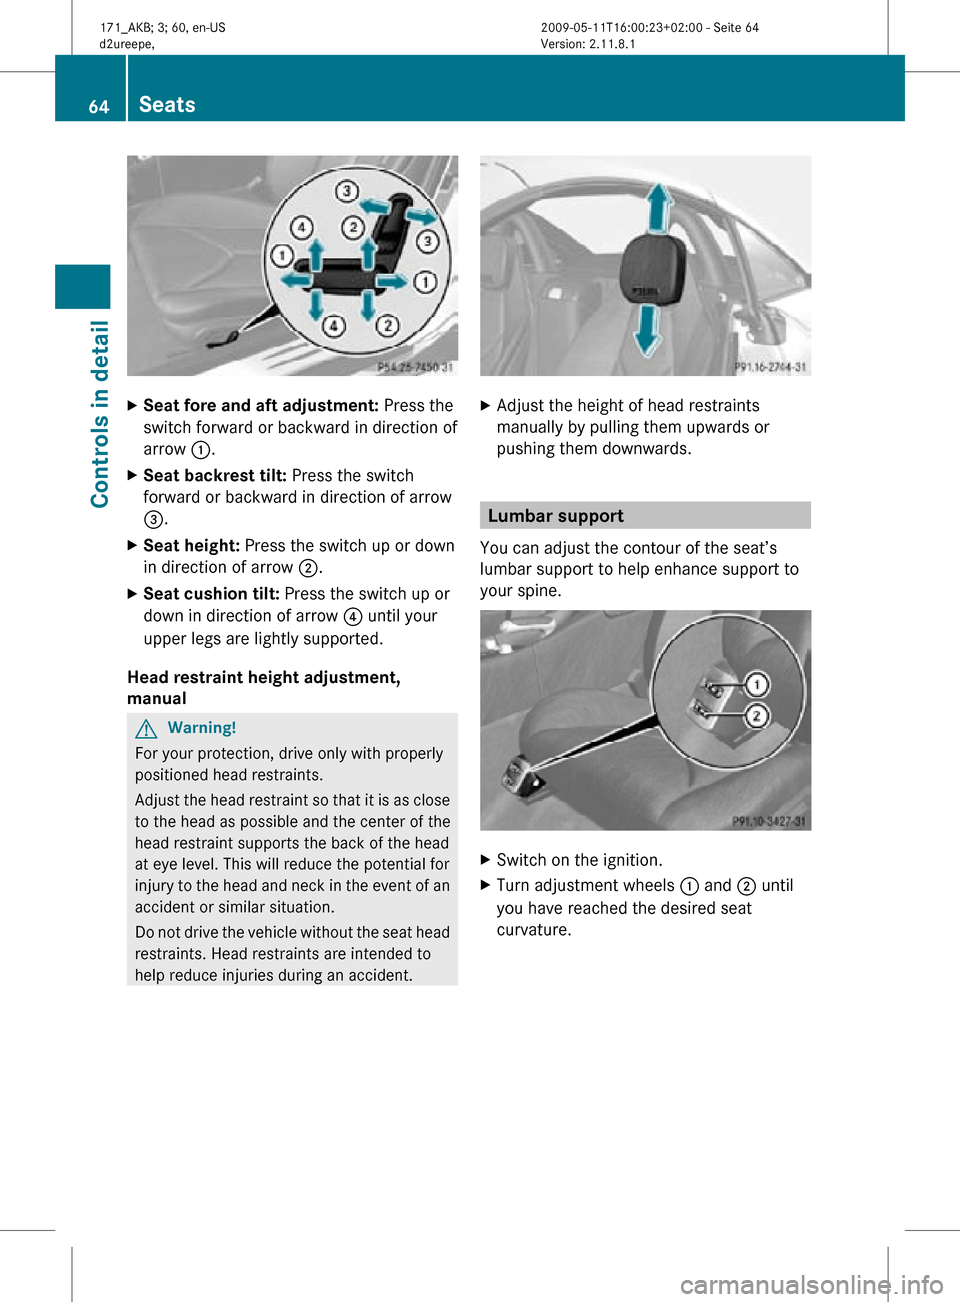
Seat fore and aft adjustment: Press the
switch forward or backward in direction of
arrow :.
X Seat backrest tilt: Press the switch
forward or backward in direction of arrow
=.
X Seat height: Press the switch up or down
in direction of arrow ;.
X Seat cushion tilt: Press the switch up or
down in direction of arrow ? until your
upper legs are lightly supported.
Head restraint height adjustment,
manual G
Warning!
For your protection, drive only with properly
positioned head restraints.
Adjust the head restraint so that it is as close
to the head as possible and the center of the
head restraint supports the back of the head
at eye level. This will reduce the potential for
injury to the head and neck in the event of an
accident or similar situation.
Do not drive the vehicle without the seat head
restraints. Head restraints are intended to
help reduce injuries during an accident. X
Adjust the height of head restraints
manually by pulling them upwards or
pushing them downwards. Lumbar support
You can adjust the contour of the seat’s
lumbar support to help enhance support to
your spine. X
Switch on the ignition.
X Turn adjustment wheels : and ; until
you have reached the desired seat
curvature. 64
SeatsControls in detail
171_AKB; 3; 60, en-US
d2ureepe,
Version: 2.11.8.1 2009-05-11T16:00:23+02:00 - Seite 64
Page 67 of 312
Seat heating
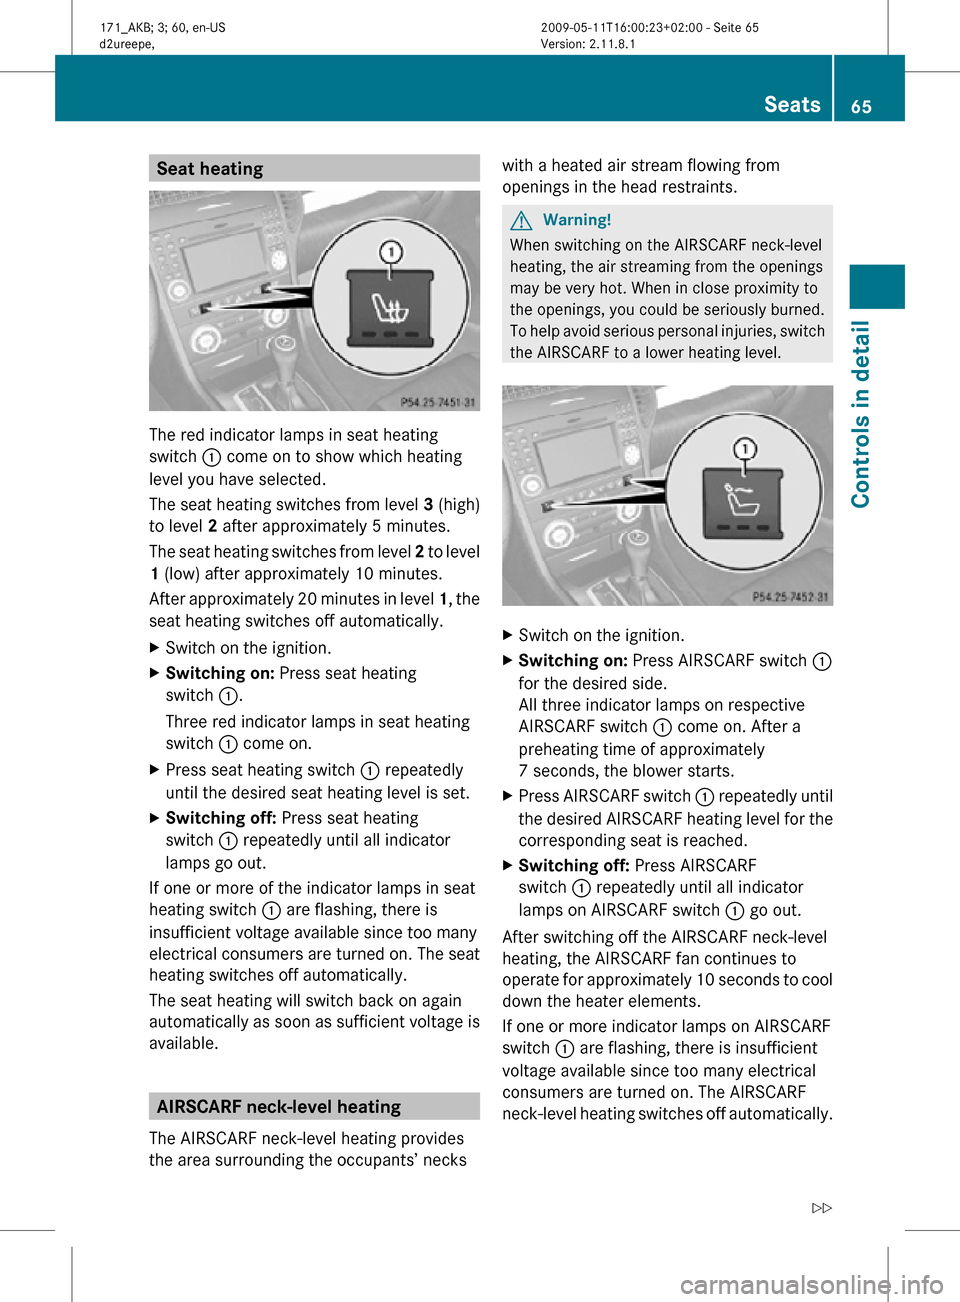
The red indicator lamps in seat heating
switch : come on to show which heating
level you have selected.
The seat heating switches from level
3 (high)
to level 2 after approximately 5 minutes.
The seat heating switches from level 2 to level
1 (low) after approximately 10 minutes.
After approximately 20 minutes in level 1, the
seat heating switches off automatically.
X Switch on the ignition.
X Switching on: Press seat heating
switch :.
Three red indicator lamps in seat heating
switch : come on.
X Press seat heating switch : repeatedly
until the desired seat heating level is set.
X Switching off: Press seat heating
switch : repeatedly until all indicator
lamps go out.
If one or more of the indicator lamps in seat
heating switch : are flashing, there is
insufficient voltage available since too many
electrical consumers are turned on. The seat
heating switches off automatically.
The seat heating will switch back on again
automatically as soon as sufficient voltage is
available. AIRSCARF neck-level heating
The AIRSCARF neck-level heating provides
the area surrounding the occupants’ necks with a heated air stream flowing from
openings in the head restraints. G
Warning!
When switching on the AIRSCARF neck-level
heating, the air streaming from the openings
may be very hot. When in close proximity to
the openings, you could be seriously burned.
To help avoid serious personal injuries, switch
the AIRSCARF to a lower heating level. X
Switch on the ignition.
X Switching on: Press AIRSCARF switch :
for the desired side.
All three indicator lamps on respective
AIRSCARF switch : come on. After a
preheating time of approximately
7 seconds, the blower starts.
X Press AIRSCARF switch : repeatedly until
the desired AIRSCARF heating level for the
corresponding seat is reached.
X Switching off: Press AIRSCARF
switch : repeatedly until all indicator
lamps on AIRSCARF switch : go out.
After switching off the AIRSCARF neck-level
heating, the AIRSCARF fan continues to
operate for approximately 10 seconds to cool
down the heater elements.
If one or more indicator lamps on AIRSCARF
switch : are flashing, there is insufficient
voltage available since too many electrical
consumers are turned on. The AIRSCARF
neck-level heating switches off automatically. Seats
65Controls in detail
171_AKB; 3; 60, en-US
d2ureepe, Version: 2.11.8.1 2009-05-11T16:00:23+02:00 - Seite 65 Z
Page 72 of 312
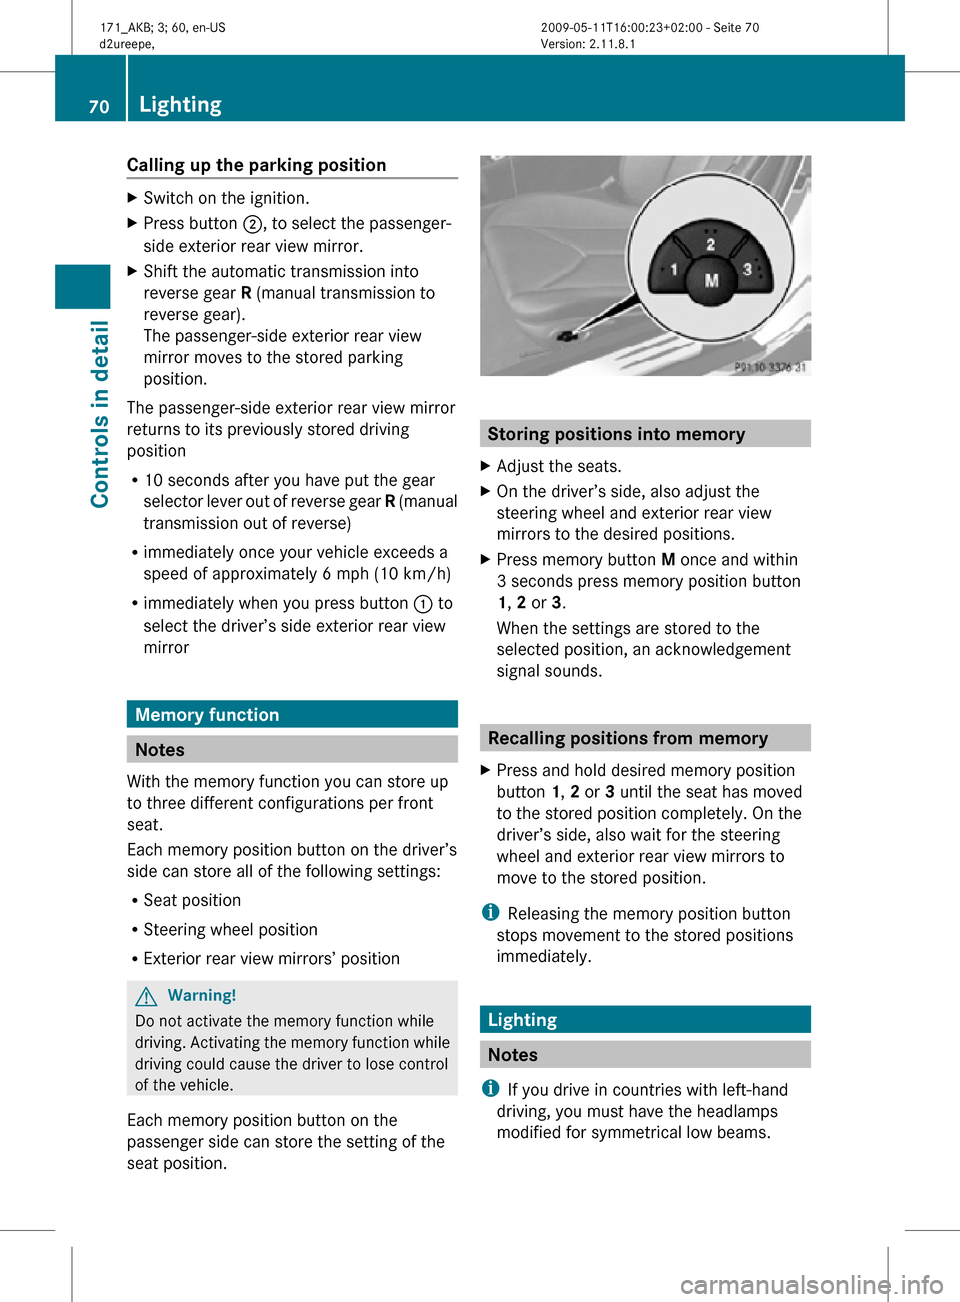
Calling up the parking position
X
Switch on the ignition.
X Press button ;, to select the passenger-
side exterior rear view mirror.
X Shift the automatic transmission into
reverse gear R (manual transmission to
reverse gear).
The passenger-side exterior rear view
mirror moves to the stored parking
position.
The passenger-side exterior rear view mirror
returns to its previously stored driving
position
R 10 seconds after you have put the gear
selector lever out of reverse gear R (manual
transmission out of reverse)
R immediately once your vehicle exceeds a
speed of approximately 6 mph (10 km/h)
R immediately when you press button : to
select the driver’s side exterior rear view
mirror Memory function
Notes
With the memory function you can store up
to three different configurations per front
seat.
Each memory position button on the driver’s
side can store all of the following settings:
R Seat position
R Steering wheel position
R Exterior rear view mirrors’ position G
Warning!
Do not activate the memory function while
driving. Activating the memory function while
driving could cause the driver to lose control
of the vehicle.
Each memory position button on the
passenger side can store the setting of the
seat position. Storing positions into memory
X Adjust the seats.
X On the driver’s side, also adjust the
steering wheel and exterior rear view
mirrors to the desired positions.
X Press memory button M once and within
3 seconds press memory position button
1, 2 or 3.
When the settings are stored to the
selected position, an acknowledgement
signal sounds. Recalling positions from memory
X Press and hold desired memory position
button 1, 2 or 3 until the seat has moved
to the stored position completely. On the
driver’s side, also wait for the steering
wheel and exterior rear view mirrors to
move to the stored position.
i Releasing the memory position button
stops movement to the stored positions
immediately. Lighting
Notes
i If you drive in countries with left-hand
driving, you must have the headlamps
modified for symmetrical low beams. 70
LightingControls in detail
171_AKB; 3; 60, en-US
d2ureepe,
Version: 2.11.8.1 2009-05-11T16:00:23+02:00 - Seite 70
Page 121 of 312
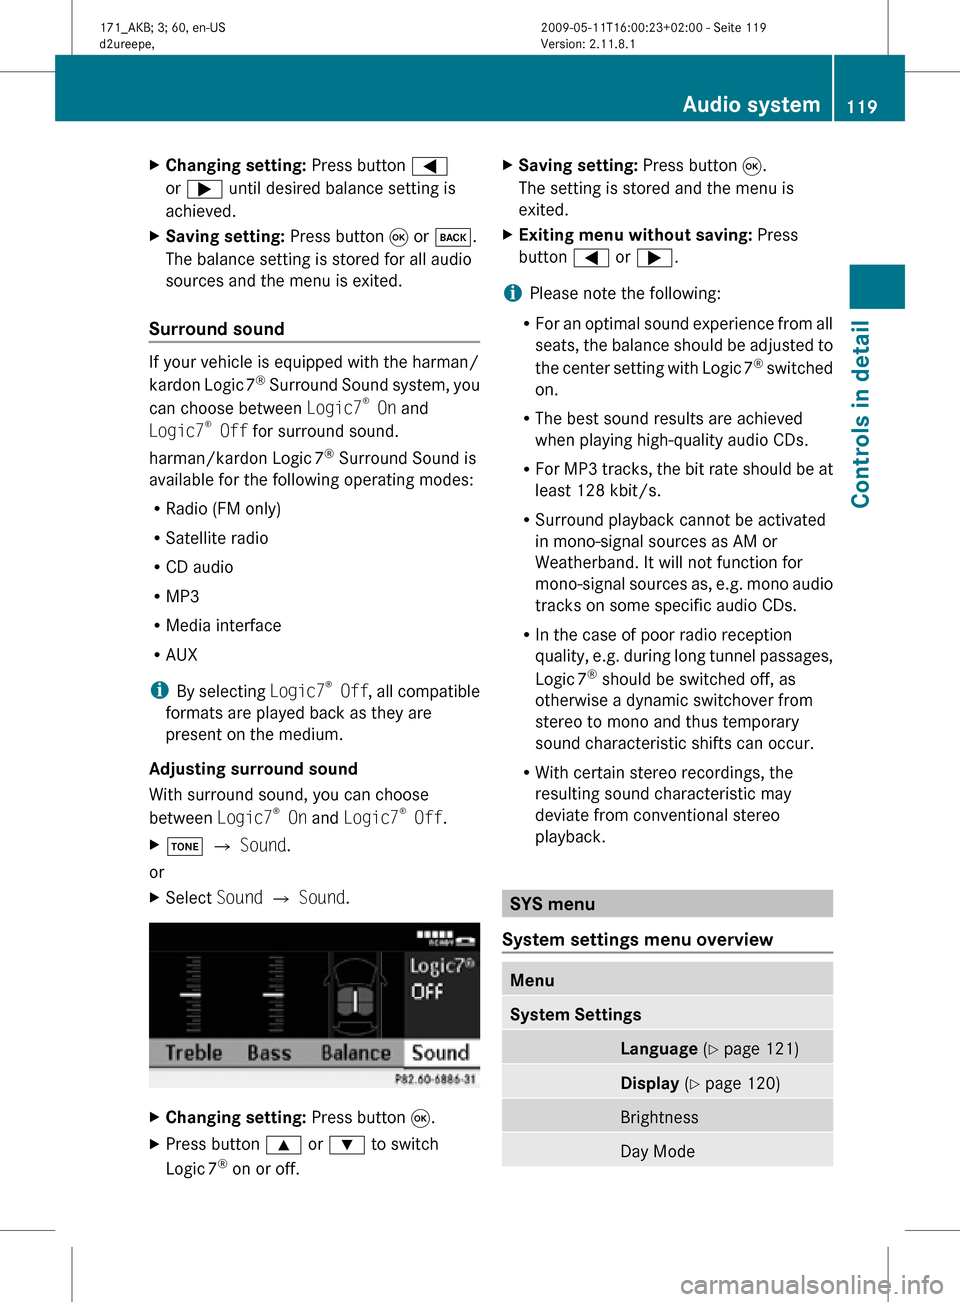
X
Changing setting: Press button =
or ; until desired balance setting is
achieved.
X Saving setting: Press button 9 or k.
The balance setting is stored for all audio
sources and the menu is exited.
Surround sound If your vehicle is equipped with the harman/
kardon Logic
7®
Surround Sound system, you
can choose between Logic7 ®
On and
Logic7 ®
Off for surround sound.
harman/kardon Logic 7®
Surround Sound is
available for the following operating modes:
R Radio (FM only)
R Satellite radio
R CD audio
R MP3
R Media interface
R AUX
i By selecting Logic7®
Off , all compatible
formats are played back as they are
present on the medium.
Adjusting surround sound
With surround sound, you can choose
between Logic7 ®
On and Logic7 ®
Off.
X J Q Sound.
or
X Select Sound Q Sound. X
Changing setting: Press button 9.
X Press button 9 or : to switch
Logic 7 ®
on or off. X
Saving setting: Press button 9.
The setting is stored and the menu is
exited.
X Exiting menu without saving: Press
button = or ;.
i Please note the following:
R For an optimal sound experience from all
seats, the balance should be adjusted to
the center setting with Logic 7 ®
switched
on.
R The best sound results are achieved
when playing high-quality audio CDs.
R For MP3 tracks, the bit rate should be at
least 128 kbit/s.
R Surround playback cannot be activated
in mono-signal sources as AM or
Weatherband. It will not function for
mono-signal sources as, e.g. mono audio
tracks on some specific audio CDs.
R In the case of poor radio reception
quality, e.g. during long tunnel passages,
Logic 7 ®
should be switched off, as
otherwise a dynamic switchover from
stereo to mono and thus temporary
sound characteristic shifts can occur.
R With certain stereo recordings, the
resulting sound characteristic may
deviate from conventional stereo
playback. SYS menu
System settings menu overview Menu
System Settings
Language
(Y page 121) Display
(Y page 120) Brightness
Day Mode Audio system
119Controls in detail
171_AKB; 3; 60, en-US
d2ureepe, Version: 2.11.8.1 2009-05-11T16:00:23+02:00 - Seite 119 Z
Page 219 of 312
Tire type code
Tire type code
? may, at the option of the
manufacturer, be used as a descriptive code
for identifying significant characteristics of
the tire.
Date of manufacture The date of manufacture
A identifies the
week and year of manufacture.
The first two figures identify the week,
starting with “01” to represent the first full
week of the calendar year. The second two
figures represent the year.
For example, “3208” represents the 32nd
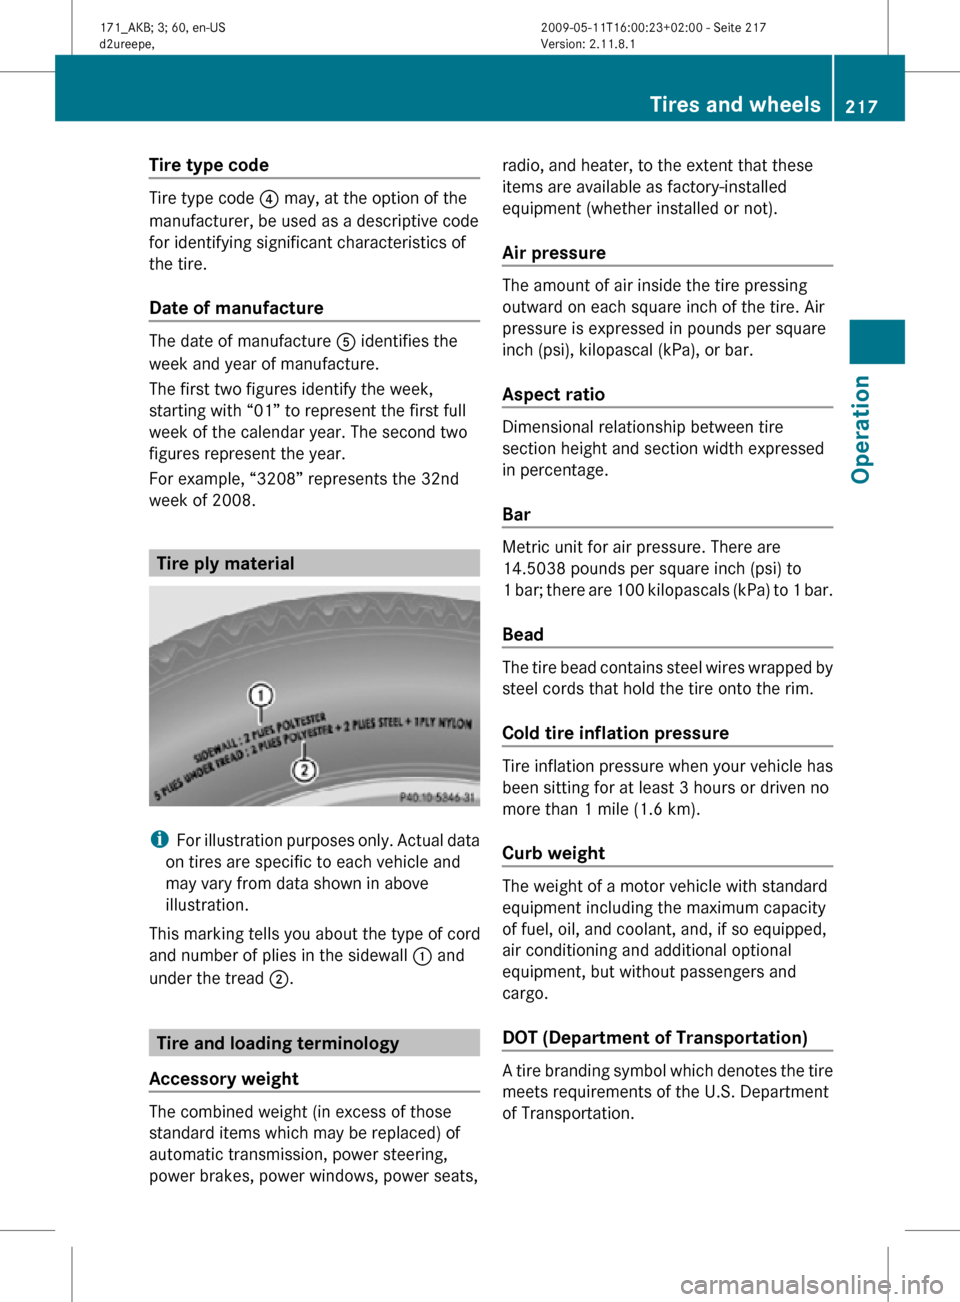
week of 2008. Tire ply material
i
For illustration purposes only. Actual data
on tires are specific to each vehicle and
may vary from data shown in above
illustration.
This marking tells you about the type of cord
and number of plies in the sidewall : and
under the tread ;. Tire and loading terminology
Accessory weight The combined weight (in excess of those
standard items which may be replaced) of
automatic transmission, power steering,
power brakes, power windows, power seats, radio, and heater, to the extent that these
items are available as factory-installed
equipment (whether installed or not).
Air pressure The amount of air inside the tire pressing
outward on each square inch of the tire. Air
pressure is expressed in pounds per square
inch (psi), kilopascal (kPa), or bar.
Aspect ratio
Dimensional relationship between tire
section height and section width expressed
in percentage.
Bar
Metric unit for air pressure. There are
14.5038 pounds per square inch (psi) to
1 bar; there are 100 kilopascals (kPa) to 1 bar.
Bead
The tire bead contains steel wires wrapped by
steel cords that hold the tire onto the rim.
Cold tire inflation pressure
Tire inflation pressure when your vehicle has
been sitting for at least 3 hours or driven no
more than 1 mile (1.6 km).
Curb weight
The weight of a motor vehicle with standard
equipment including the maximum capacity
of fuel, oil, and coolant, and, if so equipped,
air conditioning and additional optional
equipment, but without passengers and
cargo.
DOT (Department of Transportation)
A tire branding symbol which denotes the tire
meets requirements of the U.S. Department
of Transportation. Tires and wheels
217Operation
171_AKB; 3; 60, en-US
d2ureepe, Version: 2.11.8.1 2009-05-11T16:00:23+02:00 - Seite 217 Z
Page 233 of 312
G
Warning!
Do not use cleaners or cockpit care sprays
containing solvents to clean the cockpit or the
steering wheel. Cleaners containing solvents
will make the surface porous and vehicle
occupants could suffer serious injuries from
plastic parts coming loose in the event of air
bag deployment.
! Do not use oil, wax or scouring agents.
Otherwise you may scratch or damage the
surface.
Hard plastic trim items
X Use Mercedes-Benz approved Interior Care
on
a soft, lint-free cloth and apply with light
pressure.
Audio or COMAND display !
You must switch off the audio or
COMAND display and allow it to cool prior
to cleaning.
! Do
not use any liquids or cleaning agents.
These can damage or even destroy the
audio or COMAND display screen.
X Use a standard microfiber cloth and apply
with light pressure.
Steering wheel and gearshift/gear
selector lever X
Wipe with a damp cloth and dry thoroughly
or clean with Mercedes-Benz approved
Leather Care.
Carpets X
Use Mercedes-Benz approved Carpet and
Fabric Care for cleaning the carpets.
Headliner X
Use a soft bristle brush or a dry-shampoo
cleaner in case of excessive dirt. Seat belts X
Only use clear, lukewarm water and soap.
! The seat belts must not be treated with
chemical cleaning agents. Do not dry the
seat belts at temperatures above
176‡
(80†) or in direct sunlight. G
Warning!
Do not bleach or dye seat belts as this may
severely weaken them. In a crash they may
not be able to provide adequate protection.
Upholstery Using aftermarket seat covers or wearing
clothing that have the tendency to give off
coloring (e.g. when wet, etc.) may cause the
upholstery to become permanently
discolored. By lining the seats with a proper
intermediate
cover, contact-discoloration will
be prevented. G
Warning!
Only use seat covers which have been tested
and approved by Mercedes-Benz for your
vehicle model. Using other seat covers may
interfere with or prevent the deployment of
the head-thorax air bags. Contact an
authorized Mercedes-Benz Center for
availability.
Leather upholstery
Please note that leather upholstery is a
natural product and is therefore subject to a
natural aging process. Leather upholstery
may also react to certain ambient influences
such
as high humidity or high temperature by
showing wrinkles for example.
X Wipe leather upholstery with a damp cloth
and
dry thoroughly or clean with Mercedes-
Benz approved Leather Care.
! To avoid damage to leather upholstery:
R Wipe with light pressure only.
R Do not clean with abrasive cleaning
agents
such as scouring milk or powder. Vehicle care
231
Operation
171_AKB; 3; 60, en-US
d2ureepe, Version: 2.11.8.1 2009-05-11T16:00:23+02:00 - Seite 231 Z