2011 MERCEDES-BENZ SLK300 power steering
[x] Cancel search: power steeringPage 219 of 312
Tire type code
Tire type code
? may, at the option of the
manufacturer, be used as a descriptive code
for identifying significant characteristics of
the tire.
Date of manufacture The date of manufacture
A identifies the
week and year of manufacture.
The first two figures identify the week,
starting with “01” to represent the first full
week of the calendar year. The second two
figures represent the year.
For example, “3208” represents the 32nd
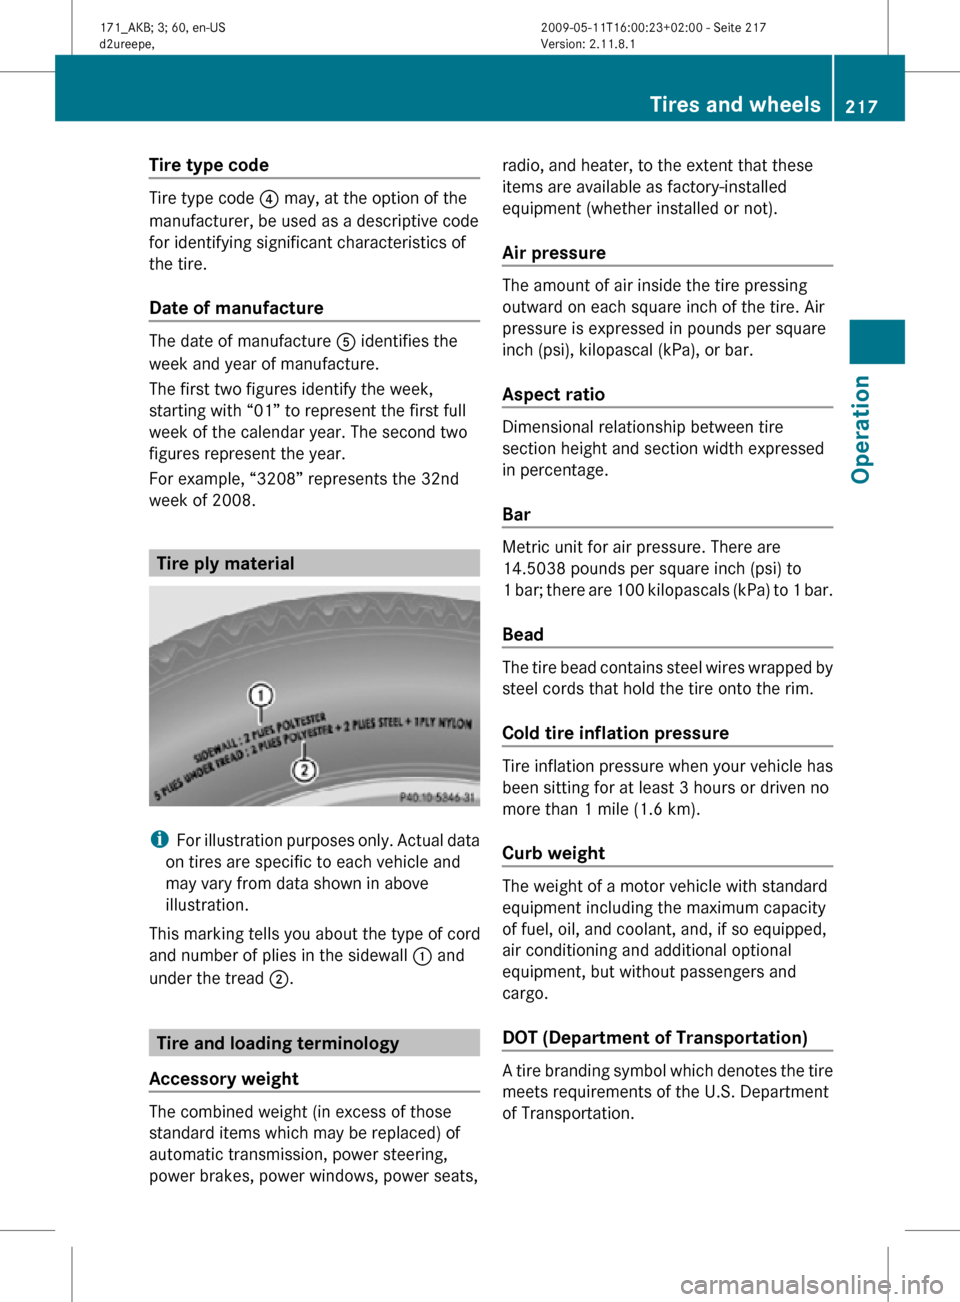
week of 2008. Tire ply material
i
For illustration purposes only. Actual data
on tires are specific to each vehicle and
may vary from data shown in above
illustration.
This marking tells you about the type of cord
and number of plies in the sidewall : and
under the tread ;. Tire and loading terminology
Accessory weight The combined weight (in excess of those
standard items which may be replaced) of
automatic transmission, power steering,
power brakes, power windows, power seats, radio, and heater, to the extent that these
items are available as factory-installed
equipment (whether installed or not).
Air pressure The amount of air inside the tire pressing
outward on each square inch of the tire. Air
pressure is expressed in pounds per square
inch (psi), kilopascal (kPa), or bar.
Aspect ratio
Dimensional relationship between tire
section height and section width expressed
in percentage.
Bar
Metric unit for air pressure. There are
14.5038 pounds per square inch (psi) to
1 bar; there are 100 kilopascals (kPa) to 1 bar.
Bead
The tire bead contains steel wires wrapped by
steel cords that hold the tire onto the rim.
Cold tire inflation pressure
Tire inflation pressure when your vehicle has
been sitting for at least 3 hours or driven no
more than 1 mile (1.6 km).
Curb weight
The weight of a motor vehicle with standard
equipment including the maximum capacity
of fuel, oil, and coolant, and, if so equipped,
air conditioning and additional optional
equipment, but without passengers and
cargo.
DOT (Department of Transportation)
A tire branding symbol which denotes the tire
meets requirements of the U.S. Department
of Transportation. Tires and wheels
217Operation
171_AKB; 3; 60, en-US
d2ureepe, Version: 2.11.8.1 2009-05-11T16:00:23+02:00 - Seite 217 Z
Page 224 of 312
Power assistance
G
Warning!
There is no power assistance for the steering
and the brake when the engine is not running.
Steering and braking requires significantly
more effort and you could lose control of the
vehicle and cause an accident as a result.
Do not turn off the engine while the vehicle is
in motion. Brakes
Downhill grades !
When driving down long and steep
grades, relieve the load on the brakes by
shifting into a lower gear to use the
engine’s
braking power. This helps prevent
overheating of the brakes and reduces
wear.
When using the engine’s braking power, a
drive wheel may not spin for an extended
period of time, e.g. on slippery road
surfaces. This may cause serious damage
to the drivetrain which is not covered by the
Mercedes-Benz Limited Warranty.
Continuous or hard braking G
Warning!
Resting your foot on the brake pedal will
cause excessive and premature wear of the
brake pads.
It can also result in the brakes overheating,
thereby significantly reducing their
effectiveness. It may not be possible to stop
the vehicle in sufficient time to avoid an
accident.
After hard braking, it is advisable to drive on
for
some time, rather than immediately park,
so that the air stream will cool down the
brakes faster. Wet roads G
Warning!
After driving in heavy rain for some time
without
applying the brakes or through water
deep enough to wet brake components, the
first braking action may be somewhat
reduced and increased pedal pressure may be
necessary to obtain expected brake effect.
Maintain a safe distance from vehicles in
front.
To help prevent brake disk corrosion after
driving on wet or salt-covered roads, it is
advisable to brake the vehicle with
considerable force prior to parking. The heat
generated serves to dry the brakes.
Salt-covered roads G
Warning!
A layer of salt on the brake discs and the brake
linings may cause a delay in the braking
effect, resulting in a significantly increased
braking distance, which could lead to an
accident.
To avoid this danger, you should:
R occasionally brake carefully when you are
driving on salt-covered roads, so that any
layer of salt that may have built up on the
brake discs and the brake linings is
removed without putting other road users
at risk
R maintain a greater distance to the vehicle
ahead and drive with particular care
R carefully apply the brakes at the end of a
trip and immediately after commencing a
new
trip, so that salt residues are removed
from the brake disc
Brake service !
The brake fluid level in the reservoir may
be
too low if the brake warning lamp in the
instrument cluster comes on and an
acoustic warning sounds although the 222
Driving instructions
Operation
171_AKB; 3; 60, en-US
d2ureepe,
Version: 2.11.8.1 2009-05-11T16:00:23+02:00 - Seite 222
Page 240 of 312
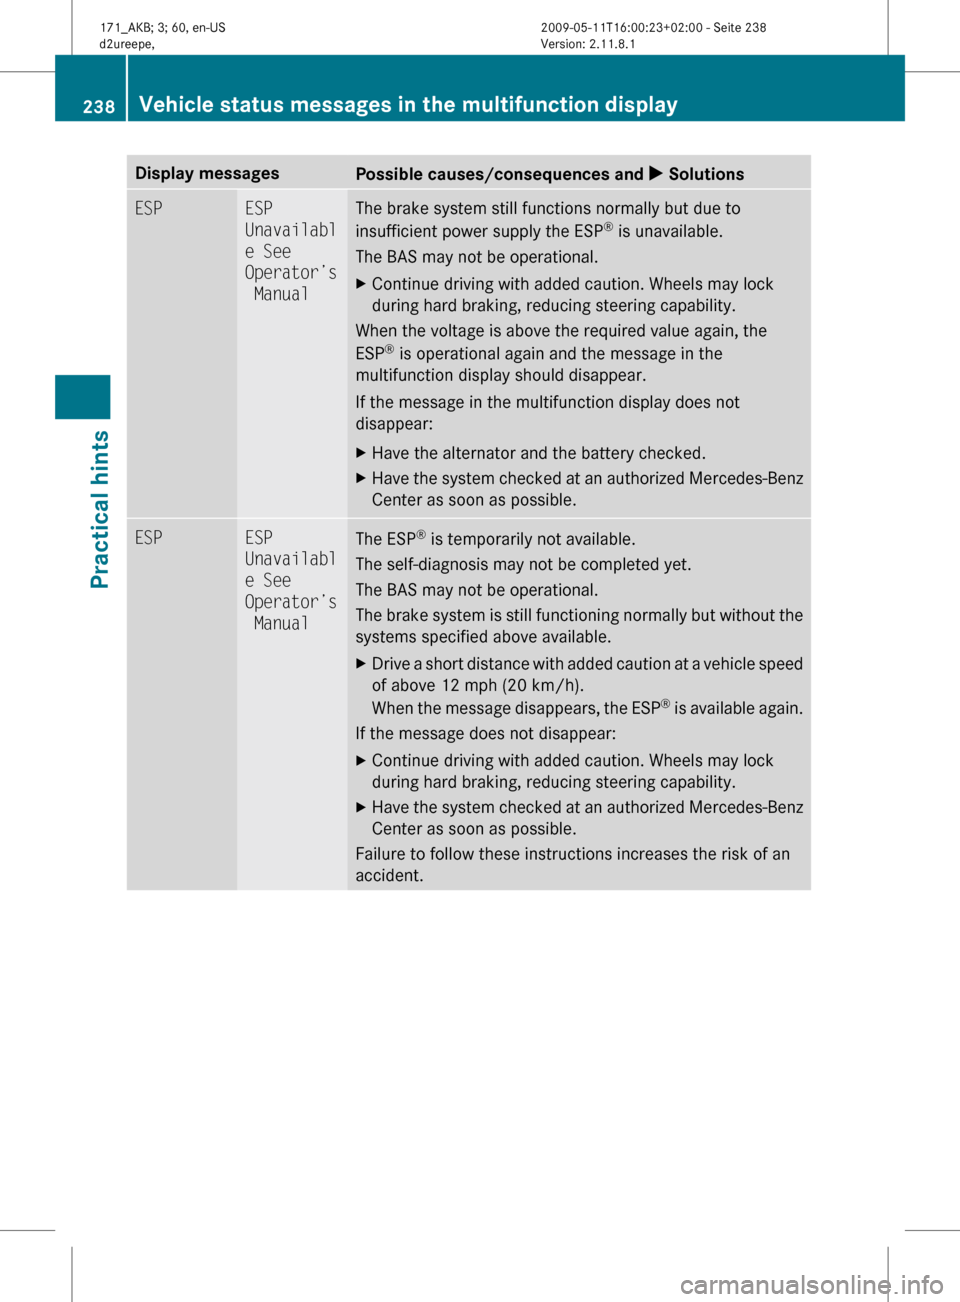
Display messages
Possible causes/consequences and
X SolutionsESP ESP
Unavailabl
e See
Operator’s
Manual The brake system still functions normally but due to
insufficient power supply the ESP
®
is unavailable.
The BAS may not be operational.
X Continue driving with added caution. Wheels may lock
during hard braking, reducing steering capability.
When the voltage is above the required value again, the
ESP ®
is operational again and the message in the
multifunction display should disappear.
If the message in the multifunction display does not
disappear:
X Have the alternator and the battery checked.
X Have the system checked at an authorized Mercedes-Benz
Center as soon as possible. ESP ESP
Unavailabl
e See
Operator’s
Manual
The ESP
®
is temporarily not available.
The self-diagnosis may not be completed yet.
The BAS may not be operational.
The
brake system is still functioning normally but without the
systems specified above available.
X Drive a short distance with added caution at a vehicle speed
of above 12 mph (20 km/h).
When
the message disappears, the ESP ®
is available again.
If the message does not disappear:
X Continue driving with added caution. Wheels may lock
during hard braking, reducing steering capability.
X Have the system checked at an authorized Mercedes-Benz
Center as soon as possible.
Failure to follow these instructions increases the risk of an
accident. 238
Vehicle status messages in the multifunction display
Practical hints
171_AKB; 3; 60, en-US
d2ureepe,
Version: 2.11.8.1 2009-05-11T16:00:23+02:00 - Seite 238
Page 259 of 312
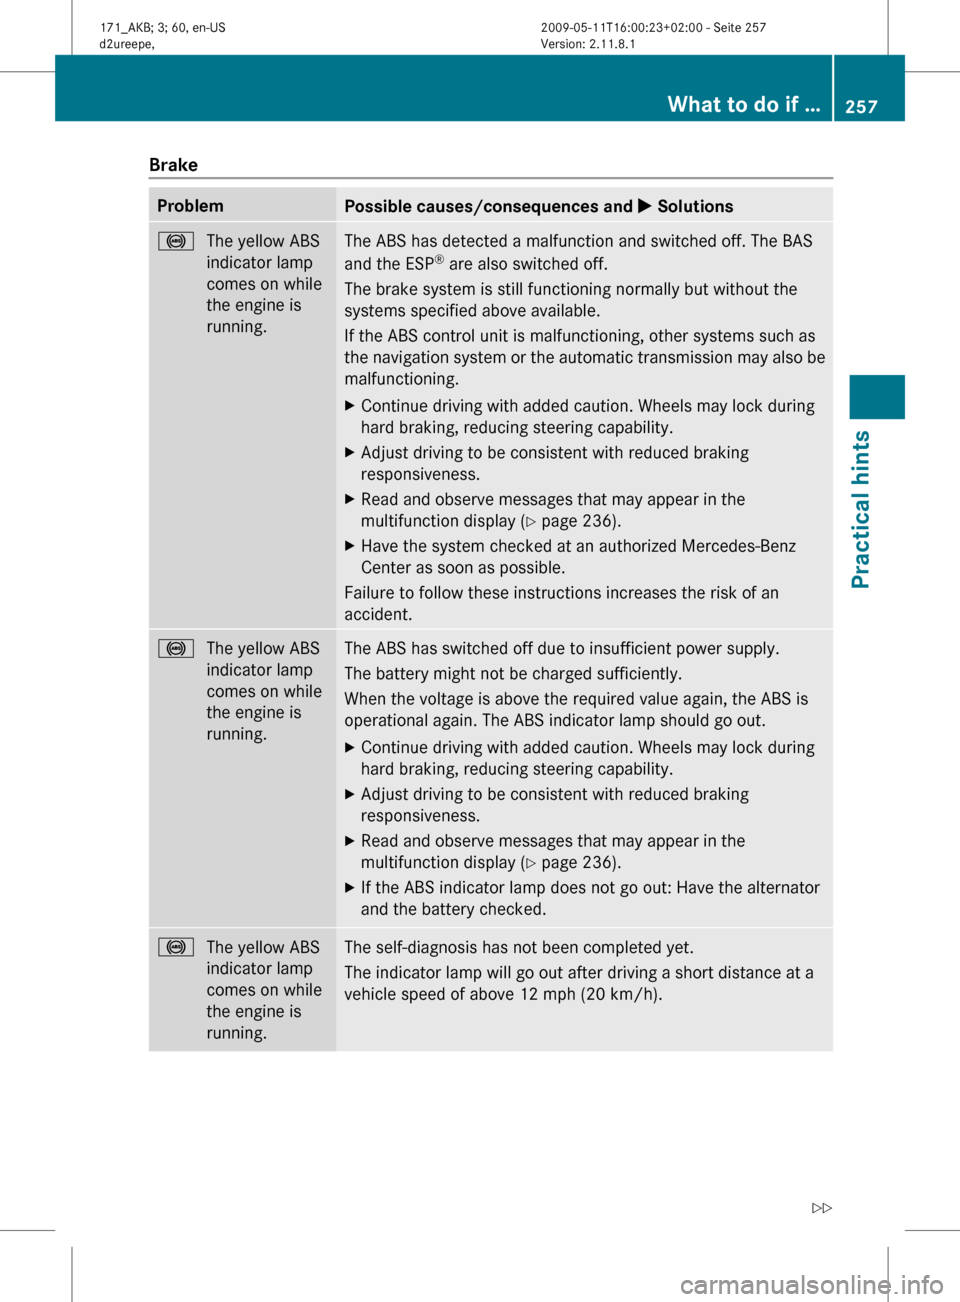
Brake
Problem
Possible causes/consequences and
X Solutions!
The yellow ABS
indicator lamp
comes on while
the engine is
running. The ABS has detected a malfunction and switched off. The BAS
and the ESP
®
are also switched off.
The brake system is still functioning normally but without the
systems specified above available.
If the ABS control unit is malfunctioning, other systems such as
the
navigation system or the automatic transmission may also be
malfunctioning.
X Continue driving with added caution. Wheels may lock during
hard braking, reducing steering capability.
X Adjust driving to be consistent with reduced braking
responsiveness.
X Read and observe messages that may appear in the
multifunction display
(Y page 236).
X Have the system checked at an authorized Mercedes-Benz
Center as soon as possible.
Failure to follow these instructions increases the risk of an
accident. !
The yellow ABS
indicator lamp
comes on while
the engine is
running. The ABS has switched off due to insufficient power supply.
The battery might not be charged sufficiently.
When the voltage is above the required value again, the ABS is
operational again. The ABS indicator lamp should go out.
X
Continue driving with added caution. Wheels may lock during
hard braking, reducing steering capability.
X Adjust driving to be consistent with reduced braking
responsiveness.
X Read and observe messages that may appear in the
multifunction display
(Y page 236).
X If the ABS indicator lamp does not go out: Have the alternator
and the battery checked. !
The yellow ABS
indicator lamp
comes on while
the engine is
running. The self-diagnosis has not been completed yet.
The indicator lamp will go out after driving a short distance at a
vehicle speed of above 12 mph
(20 km/h). What to do if …
257
Practical hints
171_AKB; 3; 60, en-US
d2ureepe, Version: 2.11.8.1 2009-05-11T16:00:23+02:00 - Seite 257 Z
Page 288 of 312

X
Switch off the tow-away alarm before
towing the vehicle with all wheels on the
ground or one axle raised ( Y page 52).
! Before towing the vehicle observe the
following instructions:
R Vehicles with automatic transmission:
Do not tow-start the vehicle. You could
otherwise seriously damage the
automatic transmission which is not
covered by the Mercedes-Benz Limited
Warranty.
R Do not tow with sling-type equipment.
Towing with sling-type equipment over
bumpy roads will damage radiator and
supports.
R Towing of the vehicle should only be
done using the properly installed towing
eye bolt. Never attach a tow cable, tow
rope or tow rod to the vehicle chassis,
frame or suspension parts. G
Warning!
With the engine not running, there is no power
assistance for the brake and steering
systems. In this case, it is important to keep
in mind that a considerably higher degree of
effort is necessary to brake and steer the
vehicle. Adapt your driving accordingly.
! Avoid pulling the vehicle abruptly or
diagonally, since it could result in damage
to the chassis alignment.
! Do not use the towing eye bolt for
recovery, as this could damage the vehicle.
If in doubt, recover the vehicle with a crane.
i If the battery is disconnected or
discharged
R the SmartKey will not turn in the starter
switch
R Vehicles with automatic transmission:
the automatic transmission will remain in
park position P For more information see “Battery”
(Y page 282) or “Jump starting”
(Y page 283).
Vehicles with automatic transmission: For
information on manually unlocking the gear
selector lever, see (
Y page 266). Installing towing eye bolt
Depending on whether you are towing a
vehicle or you are being towed, the towing eye
bolt can be screwed into threaded holes
which are located behind covers on each
bumper.
The towing eye bolt is supplied with the
vehicle tool kit, located in the compartment
underneath the trunk floor (Y page 234).
X Take the vehicle tool kit out of the trunk.
Removing cover in front bumper X
Press mark on cover : as indicated by the
arrow.
X Lift cover : off to reveal the threaded hole
for the towing eye bolt.
Removing cover in rear bumper G
Warning!
In order to avoid possible serious burns or
injury, use extreme caution when removing
the rear cover, because the rear exhaust pipe
is extremely hot. 286
Towing the vehiclePractical hints
171_AKB; 3; 60, en-US
d2ureepe,
Version: 2.11.8.1 2009-05-11T16:00:23+02:00 - Seite 286
Page 290 of 312
Towing with all wheels on the ground
G
Warning!
If circumstances require towing the vehicle
with all wheels on the ground, always tow with
a tow bar if:
R the engine will not run
R there is a malfunction in the brake system
R there is a malfunction in the power supply
or in the vehicle’s electrical system
This is necessary to adequately control the
towed vehicle.
Prior to towing the vehicle with all wheels on
the ground, make sure the SmartKey is in
starter switch position 2.
If the SmartKey is left in the starter switch
position 0 for an extended period of time, it
can no longer be turned in the switch. In this
case, the steering is locked. To unlock,
remove SmartKey from starter switch and
reinsert. G
Warning!
With the engine not running, there is no power
assistance for the brake and steering
systems. In this case, it is important to keep
in mind that a considerably higher degree of
effort is necessary to brake and steer the
vehicle. Adapt your driving accordingly.
X Make sure the ignition is switched on.
X With the vehicle at a standstill, depress the
brake pedal and keep it pressed.
X Vehicles with manual transmission: Shift
the manual transmission into the neutral
position (no gear selected).
or
X Vehicles with automatic transmission: Shift
the automatic transmission into neutral
position N.
X Release the brake pedal.
X If engaged, release the parking brake.
X Switch on the hazard warning flasher
(Y page 74). !
The vehicle may be towed only for
distances up to 30 miles (50 km) and at a
speed not to exceed 30 mph (50 km/h).
i While being towed with the hazard
warning
flasher in use, use the combination
switch in the usual manner to signal turns.
Only the selected turn signal will operate.
Upon canceling the turn signal, the hazard
warning flasher will operate again. Fuses
Introduction
The electrical fuses in your vehicle serve to
switch off malfunctioning power circuits.
If a fuse is blown, the components and
systems secured by that fuse will stop
operating. G
Warning!
Only use fuses approved by Mercedes-Benz
with
the specified amperage for the system in
question and do not attempt to repair or
bridge a blown fuse. Using other than
approved fuses or using repaired or bridged
fuses may cause an overload leading to a fire,
and/or cause damage to electrical
components and/or systems. Have the cause
determined and remedied by an authorized
Mercedes-Benz Center.
A blown fuse must be replaced by an
appropriate spare fuse (recognizable by its
color or the fuse rating given on the fuse) of
the amperage recommended in the fuse
chart. Any Mercedes-Benz Center will be glad
to advise you on this subject.
i In case of a blown fuse contact Roadside
Assistance or an authorized Mercedes-
Benz Center.
If a newly inserted fuse blows again, have the
cause determined and rectified by an
authorized Mercedes-Benz Center.
The fuse chart is located in the fuse box in the
passenger compartment. The fuse chart 288
Fuses
Practical hints
171_AKB; 3; 60, en-US
d2ureepe,
Version: 2.11.8.1 2009-05-11T16:00:23+02:00 - Seite 288
Page 303 of 312

Model Capacity Fuels, coolants,
lubricants, etc.
Engine with oil
filter
All models 8.5 US qt (8.0 l) Approved engine
oils
Manual
transmission
SLK 300
SLK 350 1.6 US qt (1.5 l) MB Manual
Transmission Fluid
Automatic
transmission
SLK 300
SLK 350 9.8 US qt (9.3 l) MB Automatic
Transmission Fluid
SLK 55 AMG 9.2 US qt (8.7 l)
Rear axle
SLK 300 1.1 US qt (1.0 l) MB Hypoid Gear Oil
(SAE 85W-90)
SLK 350 1.2 US qt (1.1 l)
SLK 55 AMG 1.3 US qt (1.2 l) Fuchs Titan
EG 5010 D
Power steering
All models aprrox. 1.1 US qt (1.0 l) MB Power Steering
Fluid (Chevron
Texaco PSF 9109)
Brake system
All models 0.53 US qt (0.5 l) MB Brake Fluid
(DOT 4+)
Cooling system
SLK 300
SLK 350 approx. 10.4 US qt (9.8 l) MB 325.0
Anticorrosion/
Antifreeze
SLK 55 AMG approx. 11.7 US qt (11.1 l)
Fuel tank
All models 18.5 US gal (70.0 l) Premium unleaded
gasoline (Minimum
Posted Octane 91
[Avg. of
96 RON/86 MON])
Fuel tank
reserve
SLK 300
SLK 350 approx. 2.4 US gal (9.0 l)
SLK 55 AMG approx. 2.6 US gal (10.0 l)
Air
conditioning
system
All models — R134a refrigerant
and special
PAG lubricant oil
(never R 12)Fuels, coolants, lubricants, etc.
301Technical data
171_AKB; 3; 60, en-US
d2ureepe, Version: 2.11.8.1 2009-05-11T16:00:23+02:00 - Seite 301 Z