2011 MERCEDES-BENZ SLK300 AUX
[x] Cancel search: AUXPage 142 of 312
Notes
i
The media interface allows for connection
of the following media with the audio
system:
R iPod ®
R USB storage media
R Audio devices with analog output (AUX),
e.g. MP3 or tape players.
i Do not leave external devices in the
vehicle under extremely high or low
temperatures. Read and observe the
operating instructions of the respective
device. Damage to external devices due to
excessive temperature is not covered by
the Mercedes-Benz Limited Warranty.
Do not operate iPods ®
or USB storage media
with a remote control such as Bluetooth ®
in
addition to the media interface control.
Otherwise malfunctions may occur.
Always use the latest firmware for the iPod ®
or USB storage media.
Only use genuine software for uploading to
your iPod ®
or MP3 player as otherwise certain
functions may not be available or the system
may not recognize the device.
Connecting a completely discharged iPod ®
or
USB storage medium can increase the
initialization time.
Only use genuine Mercedes-Benz
connectors.
i Suitable connector cables are located in
the vehicle or can be purchased at any
authorized Mercedes-Benz Center.
Depending on the device, loading large audio
files may take several minutes.
When the power consumption of the external
device is too high or the media interface is not
functioning properly, malfunction messages
will be displayed.
i For information on compatible
multimedia devices and iPod ®
versions R
visit www.mbusa-mobile.com
R call the Mercedes-Benz Customer
Assistance Center at
1-800-FOR-MERCedes
(1-800-367-6372)
(in the USA)
R call Customer Service at
1-800-387-0100 (in Canada)
Special characteristics of USB storage
media
R If the storage medium contains other data
than audio data, the time required for
initialization increases. Initialization may
then take several minutes. Therefore, audio
data should be stored on a separate
partition.
R Up to 8 folder levels containing up to
1 000 tracks per folder are supported.
R Do not use USB extension cables or
connectors as they may impair
functionality.
R The playlists on the device are searched for
in the background. They are provided in a
separate category once they are available.
R The media interface does not support files
that are protected by DRM (Digital Rights
Management).
Supported USB storage media
The following USB storage media are
supported:
R USB Flash Drives
R USB hard disks, 1", 1.8", and 2.5" drives
with a starting/continuous current rating
of maximum 800 mA (otherwise a separate
power supply will be necessary)
R MP3 players
-basic MP3 player are treated as USB
storage media
- for selected MP3 players additional
functions are supported
The media interface supports USB storage
media of USB Device SubClass 6. Information 140
Audio system
Controls in detail
171_AKB; 3; 60, en-US
d2ureepe,
Version: 2.11.8.1 2009-05-11T16:00:23+02:00 - Seite 140
Page 143 of 312
on USB Device SubClasses of storage
medium are available from the manufacturer
of the device.
Supported file formats on USB storage
media
The following file formats are supported:
R
mp3: CBR, VBR (up to 320 kbit/s)
R wma: CBR, VBR (up to 320 kbit/s)
R m4a: low complexity (LC) codec
R playlists: m3u, pls
ID3 Tags (version 1.x, 2.3, 2.4) and WMA tags
in ASCII and UTF16 coding are supported to
display meta data during playback.
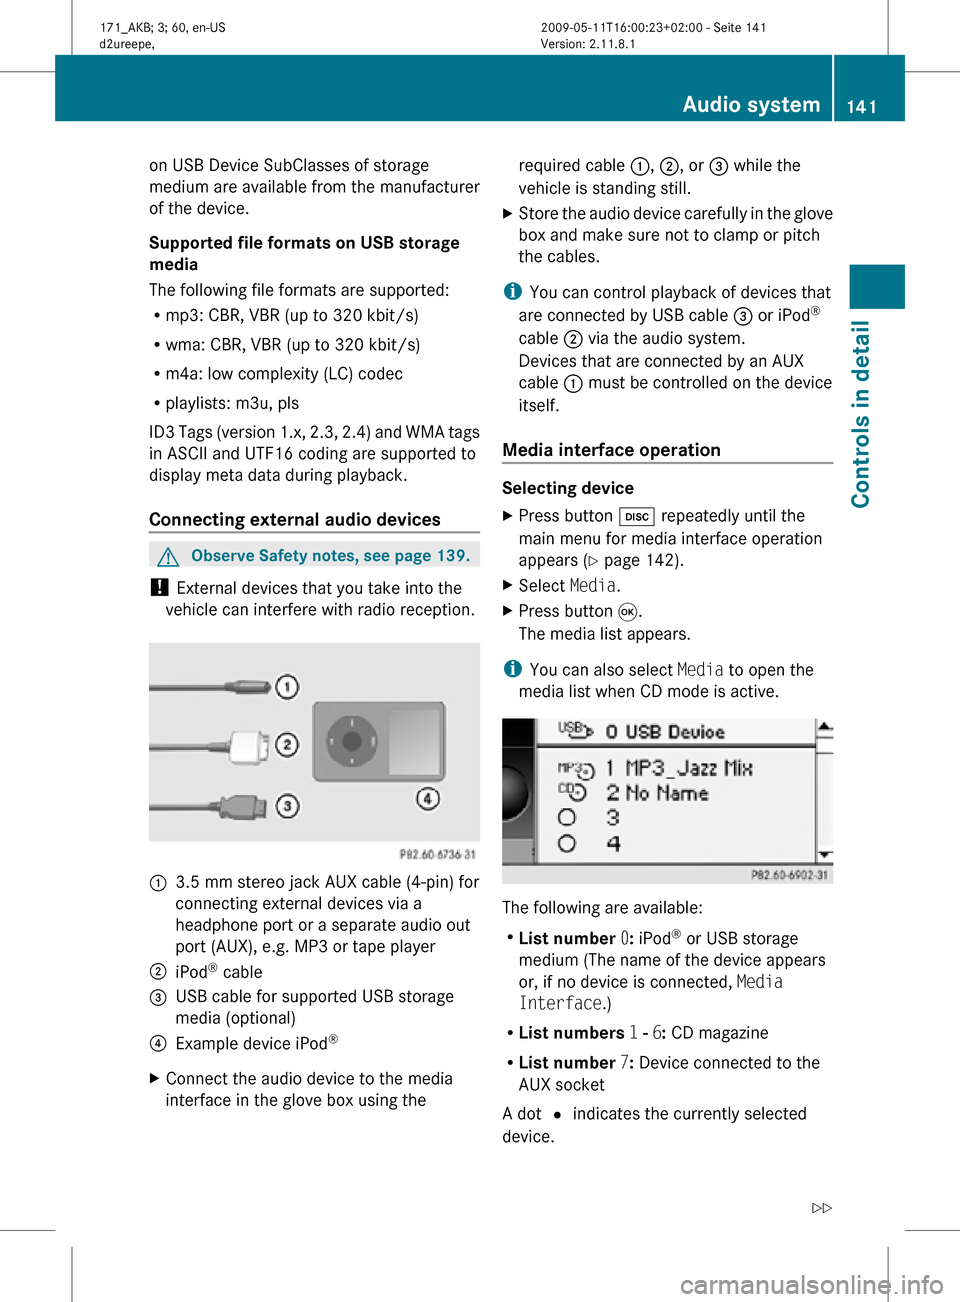
Connecting external audio devices G
Observe Safety notes, see page 139.
! External devices that you take into the
vehicle can interfere with radio reception. :
3.5 mm stereo jack AUX cable (4-pin) for
connecting external devices via a
headphone port or a separate audio out
port (AUX), e.g. MP3 or tape player
; iPod ®
cable
= USB cable for supported USB storage
media (optional)
? Example device iPod ®
X Connect the audio device to the media
interface in the glove box using the required cable
:, ;, or = while the
vehicle is standing still.
X Store the audio device carefully in the glove
box and make sure not to clamp or pitch
the cables.
i You can control playback of devices that
are connected by USB cable = or iPod ®
cable ; via the audio system.
Devices that are connected by an AUX
cable : must be controlled on the device
itself.
Media interface operation Selecting device
X
Press button h repeatedly until the
main menu for media interface operation
appears ( Y page 142).
X Select Media.
X Press button 9.
The media list appears.
i You can also select Media to open the
media list when CD mode is active. The following are available:
R
List number 0: iPod ®
or USB storage
medium (The name of the device appears
or, if no device is connected, Media
Interface.)
R List numbers 1 - 6: CD magazine
R List number 7: Device connected to the
AUX socket
A dot # indicates the currently selected
device. Audio system
141Controls in detail
171_AKB; 3; 60, en-US
d2ureepe, Version: 2.11.8.1 2009-05-11T16:00:23+02:00 - Seite 141 Z
Page 144 of 312
X
Select the desired device by pressing
button : and/or 9.
X Press button 9 to confirm.
The main menu for media interface operation
appears. The selected device starts to
playback.
i You can also select external devices
directly: Press button x when CD mode
is active.
When you have connected a new device, the
audio system initializes it. The respective
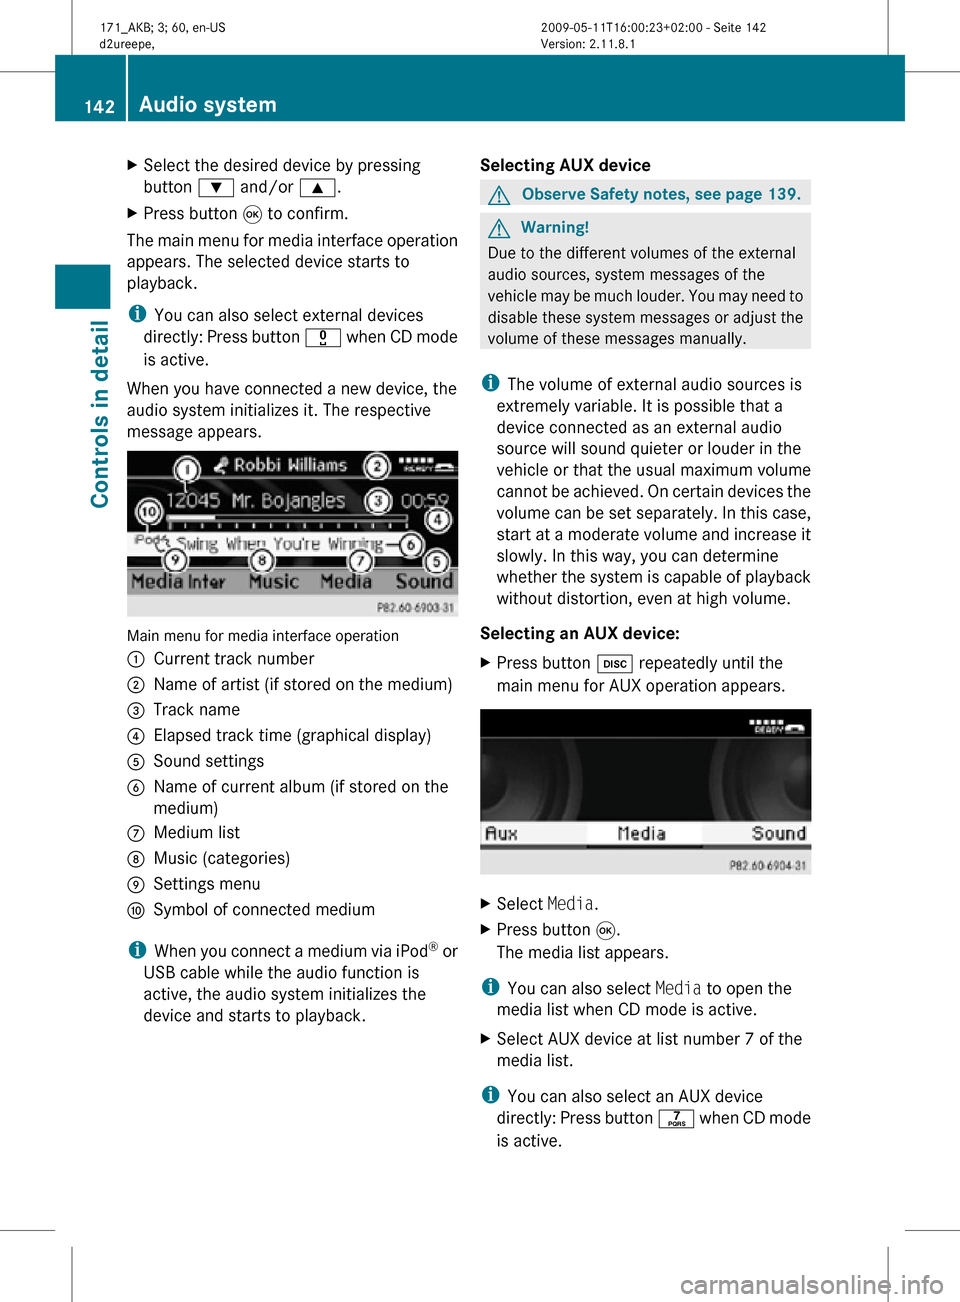
message appears. Main menu for media interface operation
:
Current track number
; Name of artist (if stored on the medium)
= Track name
? Elapsed track time (graphical display)
A Sound settings
B Name of current album (if stored on the
medium)
C Medium list
D Music (categories)
E Settings menu
F Symbol of connected medium
i When you connect a medium via iPod ®
or
USB cable while the audio function is
active, the audio system initializes the
device and starts to playback. Selecting AUX device G
Observe Safety notes, see page 139. G
Warning!
Due to the different volumes of the external
audio sources, system messages of the
vehicle may be much louder. You may need to
disable these system messages or adjust the
volume of these messages manually.
i The volume of external audio sources is
extremely variable. It is possible that a
device connected as an external audio
source will sound quieter or louder in the
vehicle or that the usual maximum volume
cannot be achieved. On certain devices the
volume can be set separately. In this case,
start at a moderate volume and increase it
slowly. In this way, you can determine
whether the system is capable of playback
without distortion, even at high volume.
Selecting an AUX device:
X Press button h repeatedly until the
main menu for AUX operation appears. X
Select Media.
X Press button 9.
The media list appears.
i You can also select Media to open the
media list when CD mode is active.
X Select AUX device at list number 7 of the
media list.
i You can also select an AUX device
directly: Press button q when CD mode
is active. 142
Audio systemControls in detail
171_AKB; 3; 60, en-US
d2ureepe,
Version: 2.11.8.1 2009-05-11T16:00:23+02:00 - Seite 142
Page 145 of 312

Deselecting an AUX device:
X
Press h to switch back to CD mode.
Selecting audio files i
The audio system lists the stored data on
an iPod ®
, MP3 player, or USB storage
medium according to their own respective
file structure.
Selecting via track skipping
X Skipping backwards or forwards to a
track: Press button = or ;.
or
X Briefly press button E
or F on audio
control unit.
i Skipping forwards through the tracks
skips
to the next track. Skipping backwards
through the tracks skips to the beginning
of the current track if the track has been
playing for more than 8 seconds. If the
track has been playing for less than
8 seconds, it skips to the start of the
previous track. When you have chosen a
playback option other than Normal Track
Sequence, the track sequence is random.
Selecting via keypad
X Initiating input: Press button l.
A numerical input field appears. The
number of available digits depends on the
number of stored tracks.
X Entering track number: Press a keypad
button, e.g. q.
The digit appears in first place of the entry
line.
i The audio system will reject invalid
entries and does not display them.
X Enter additional digits as required.
X Completing input: Press button 9.
or
X Press and hold keypad button for last digit
of desired track number.
The track is played. Fast forward/rewind
X
Main area is selected: Press and hold
button = or ; until desired place is
reached.
or
X Press and hold button E or F on
audio control unit.
i With an iPod ®
the function “fast rewind”
is only available within the current track.
Selecting categories and folders iPod
®
and selected MP3 players
iPods ®
and selected MP3 players let you
select tracks via categories and folders.
The following categories may be available:
R Current Track List
R Playlists
R Artists
R Albums
R Tracks
R Podcasts
R Genres
R Composers
R Audiobooks
i Some categories contain the entry All.
When
you select this entry, the category is
played completely.
USB storage media
With USB storage media you can select
folders and, if available, playlists. When
playing playlists, the audio system can display
the respective album name and artist, e.g.
meta data, if such information has been read
into the system.
Playlists are displayed using a particular
symbol. When you open a playlist, the
contained tracks are opened and playback
begins. The available playback option is now
Random Categories instead of Random
Folder. Audio system
143
Controls in detail
171_AKB; 3; 60, en-US
d2ureepe, Version: 2.11.8.1 2009-05-11T16:00:23+02:00 - Seite 143 Z
Page 147 of 312
has been read-in completely, the first list
entry with the entered initial letter is
highlighted.
i If no match is found, the last entry that
matches a previous initial letter is
highlighted.
The quality of the search results depends
on the version and the language of the
software, e.g. iTunes™ used to store data
on the iPod ®
or MP3 player.
USB storage media
i This function is only available for
alphabetically ordered files. It is not
available for playlists.
X Press the respective keypad button once or
multiple times to enter the initial letter of
the desired artist name.
The available initial letters are displayed.
If the file system contains folders only, the
system searches for folders and the
message Please Wait... appears. Once
the search is concluded, the first list entry
with the entered initial letter is highlighted.
If this is not the case, the system searches
for tracks. The message Please Wait...
appears. Once the search is concluded, the
first list entry with the entered initial letter
is highlighted.
Select active partition USB storage media may contain up to
4 partitions (primary or logical; formatted to
FAT16 or FAT32).
X
Selecting partition: h Q Media
Inter QSelect Active Partition.
Playback options The following options are available:
R
Normal Track Sequence
Tracks are played in standard order (e.g.
numerical or alphabetical order).
R Random Tracks Tracks are played in random order.
R Random Categories or Random Folder
(when folder was selected on USB storage
medium)
Tracks of the current category or of the
current folder are played in random order. Audio AUX mode
i This section applies to vehicles without
media interface only.
An external audio source can be connected
to the AUX socket of the audio system. Please
contact an authorized Mercedes-Benz Center
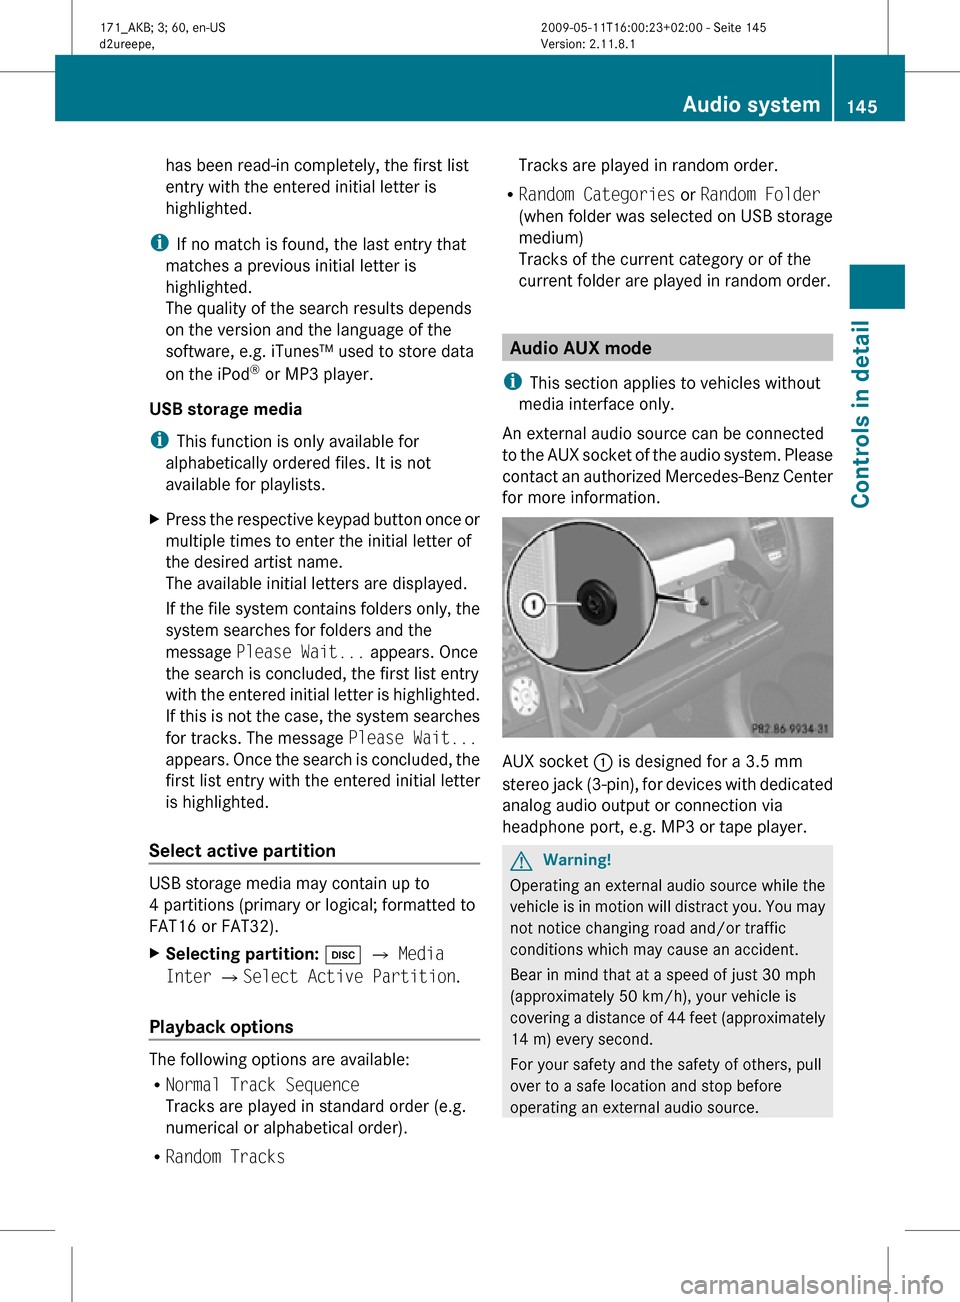
for more information. AUX socket
: is designed for a 3.5 mm
stereo jack (3-pin), for devices with dedicated
analog audio output or connection via
headphone port, e.g. MP3 or tape player. G
Warning!
Operating an external audio source while the
vehicle is in motion will distract you. You may
not notice changing road and/or traffic
conditions which may cause an accident.
Bear in mind that at a speed of just 30 mph
(approximately 50 km/h), your vehicle is
covering a distance of 44 feet (approximately
14 m) every second.
For your safety and the safety of others, pull
over to a safe location and stop before
operating an external audio source. Audio system
145Controls in detail
171_AKB; 3; 60, en-US
d2ureepe, Version: 2.11.8.1 2009-05-11T16:00:23+02:00 - Seite 145 Z
Page 148 of 312
Calling up AUX mode
G
Warning!
Due to the different volumes of the external
audio sources, system messages of the
vehicle may be much louder. You may need to
disable these system messages or adjust the
volume of these messages manually.
X Selecting audio AUX mode:
Press button h repeatedly until the
main menu for AUX operation appears.
or
X In CD mode: Select CD/MP3 Q Aux.
The audio AUX menu appears. The medium in
the external audio source is heard, provided
it is connected and switched to playback.
i Please refer to the relevant operating
guide for operation of the external audio
source.
The following settings can be made in the
audio AUX mode:
R Volume ( Y page 117)
R Balance control ( Y page 118)
R Bass and treble control (Y page 118)
R Surround sound ( Y page 119)
i The volume of external audio sources is
extremely variable. It is possible that a
device connected as an external audio
source will sound quieter or louder in the
vehicle or that the usual maximum volume
cannot be achieved. On certain devices the
volume can be set separately. In this case,
start at a moderate volume and increase it
slowly. In this way, you can determine
whether the system is capable of playback
without distortion, even at high volume.
Volume adjustment for the audio device
You can increase the volume for the AUX
socket in case the internal volume of the
connected audio device is too low. Use the
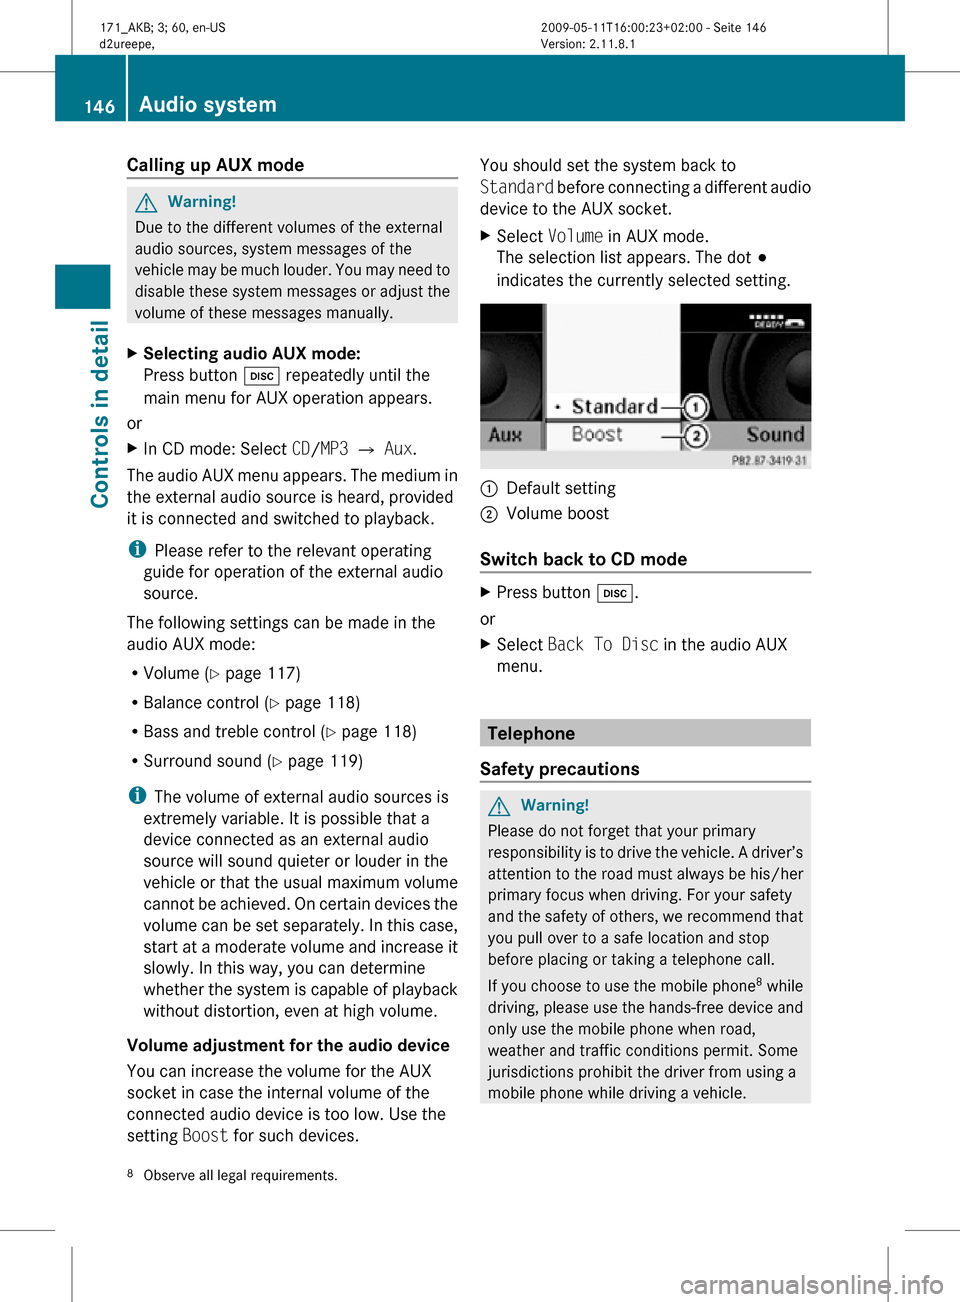
setting Boost for such devices. You should set the system back to
Standard before connecting a different audio
device to the AUX socket.
X
Select Volume in AUX mode.
The selection list appears. The dot #
indicates the currently selected setting. :
Default setting
; Volume boost
Switch back to CD mode X
Press button h.
or
X Select Back To Disc in the audio AUX
menu. Telephone
Safety precautions G
Warning!
Please do not forget that your primary
responsibility is to drive the vehicle. A driver’s
attention to the road must always be his/her
primary focus when driving. For your safety
and the safety of others, we recommend that
you pull over to a safe location and stop
before placing or taking a telephone call.
If you choose to use the mobile phone 8
while
driving, please use the hands-free device and
only use the mobile phone when road,
weather and traffic conditions permit. Some
jurisdictions prohibit the driver from using a
mobile phone while driving a vehicle.
8 Observe all legal requirements. 146
Audio systemControls in detail
171_AKB; 3; 60, en-US
d2ureepe,
Version: 2.11.8.1 2009-05-11T16:00:23+02:00 - Seite 146
Page 179 of 312
X
Lift up vanity mirror cover B.
Vanity mirror lamp : comes on. Ashtray
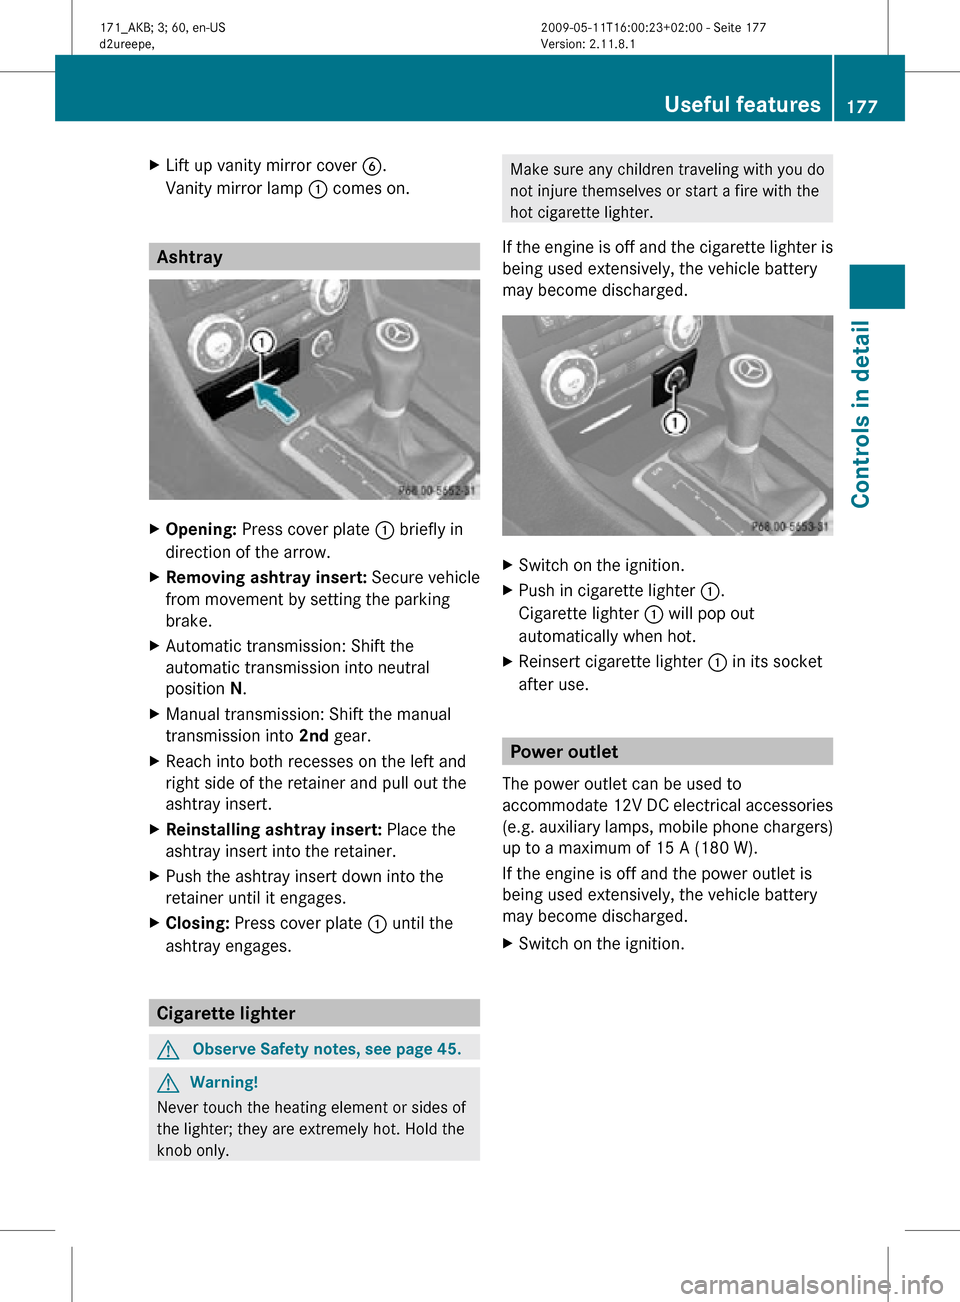
X
Opening: Press cover plate : briefly in
direction of the arrow.
X Removing ashtray insert: Secure vehicle
from movement by setting the parking
brake.
X Automatic transmission: Shift the
automatic transmission into neutral
position N.
X Manual transmission: Shift the manual
transmission into 2nd gear.
X Reach into both recesses on the left and
right side of the retainer and pull out the
ashtray insert.
X Reinstalling ashtray insert: Place the
ashtray insert into the retainer.
X Push the ashtray insert down into the
retainer until it engages.
X Closing: Press cover plate : until the
ashtray engages. Cigarette lighter
G
Observe Safety notes, see page 45. G
Warning!
Never touch the heating element or sides of
the lighter; they are extremely hot. Hold the
knob only. Make sure any children traveling with you do
not injure themselves or start a fire with the
hot cigarette lighter.
If the engine is off and the cigarette lighter is
being used extensively, the vehicle battery
may become discharged. X
Switch on the ignition.
X Push in cigarette lighter :.
Cigarette lighter : will pop out
automatically when hot.
X Reinsert cigarette lighter : in its socket
after use. Power outlet
The power outlet can be used to
accommodate 12V DC electrical accessories
(e.g. auxiliary lamps, mobile phone chargers)
up to a maximum of 15 A (180 W).
If the engine is off and the power outlet is
being used extensively, the vehicle battery
may become discharged.
X Switch on the ignition. Useful features
177Controls in detail
171_AKB; 3; 60, en-US
d2ureepe, Version: 2.11.8.1 2009-05-11T16:00:23+02:00 - Seite 177 Z
Page 255 of 312
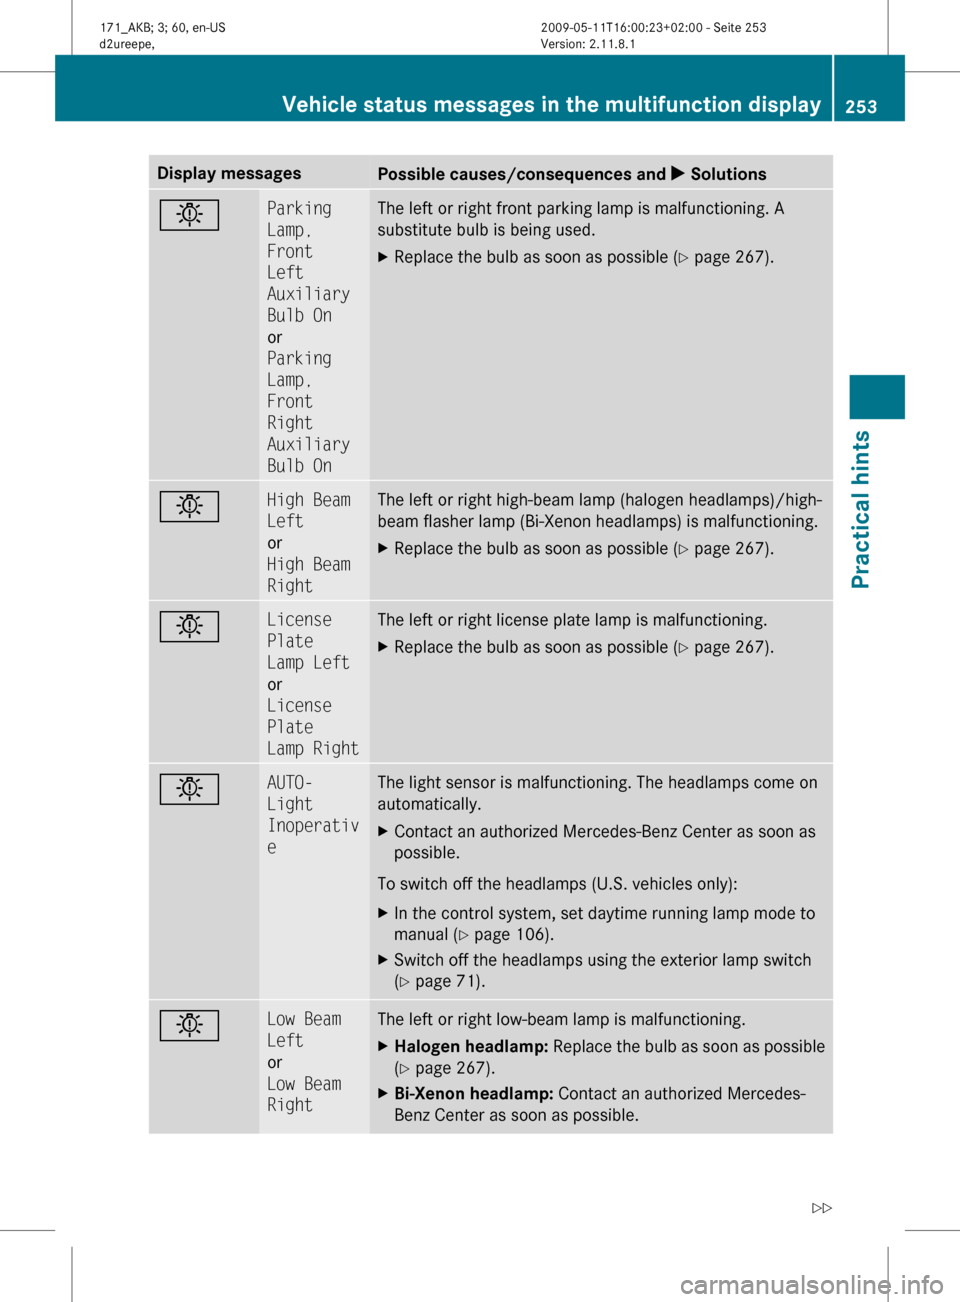
Display messages
Possible causes/consequences and
X Solutionsb Parking
Lamp,
Front
Left
Auxiliary
Bulb On
or
Parking
Lamp,
Front
Right
Auxiliary
Bulb On The left or right front parking lamp is malfunctioning. A
substitute bulb is being used.
X
Replace the bulb as soon as possible (Y page 267). b High Beam
Left
or
High Beam
Right The left or right high-beam lamp (halogen headlamps)/high-
beam flasher lamp (Bi-Xenon headlamps) is malfunctioning.
X
Replace the bulb as soon as possible (Y page 267). b License
Plate
Lamp Left
or
License
Plate
Lamp Right The left or right license plate lamp is malfunctioning.
X
Replace the bulb as soon as possible (Y page 267). b AUTO-
Light
Inoperativ
e The light sensor is malfunctioning. The headlamps come on
automatically.
X
Contact an authorized Mercedes-Benz Center as soon as
possible.
To switch off the headlamps (U.S. vehicles only):
X In the control system, set daytime running lamp mode to
manual
(Y page 106).
X Switch off the headlamps using the exterior lamp switch
(Y page 71). b Low Beam
Left
or
Low Beam
Right The left or right low-beam lamp is malfunctioning.
X
Halogen headlamp:
Replace the bulb as soon as possible
(Y page 267).
X Bi-Xenon headlamp: Contact an authorized Mercedes-
Benz Center as soon as possible. Vehicle status messages in the multifunction display
253
Practical hints
171_AKB; 3; 60, en-US
d2ureepe,Version: 2.11.8.1 2009-05-11T16:00:23+02:00 - Seite 253 Z